By Zachary Brown
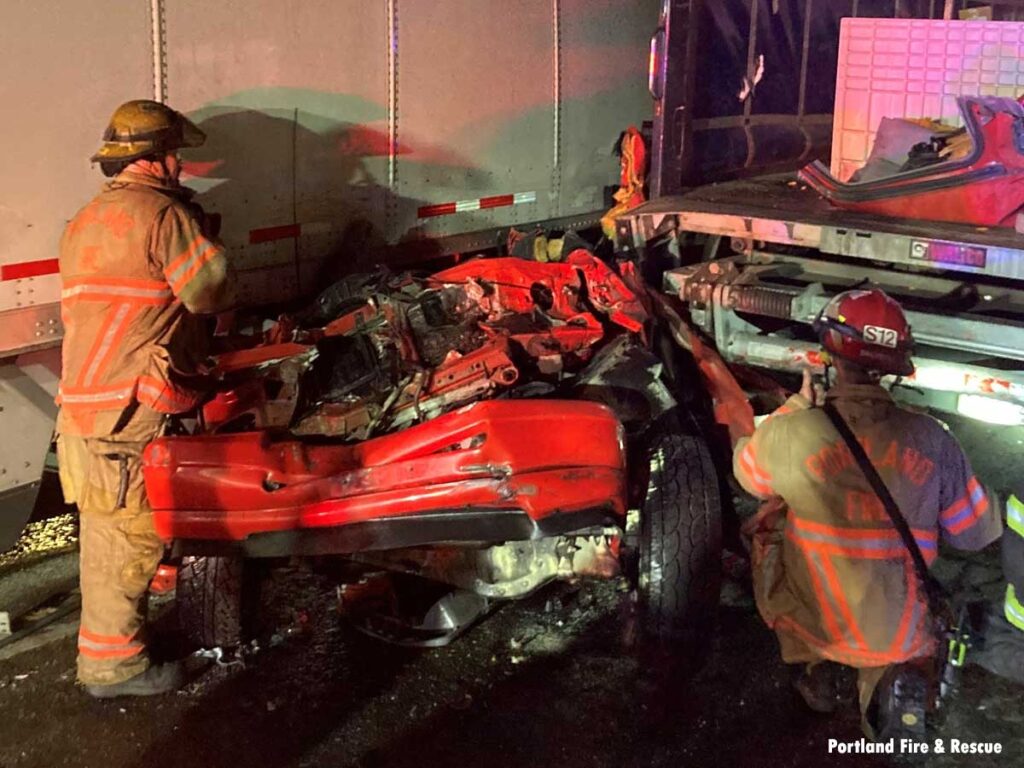
In every fire district across the United States are roadways that carry potential for vehicle accidents. Although the majority of these accidents will involve only passenger vehicles, it’s almost certain that at some point during firefighters’ careers they will respond to an accident involving heavy vehicles such as 18-wheelers, cement trucks, or school buses. These vehicles will often rest on smaller passenger vehicles, which greatly enhances the technical knowledge needed to free the pinned victim. Underrides, overrides, or stacked vehicles take an already chaotic and stressful scene and turn up the volume significantly. Responders must have the basic knowledge of how to gain space to either remove the victim while the vehicle is still under the load or remove the bottom vehicle from the stack to allow for extrication. This will require a certain set of steps that needs to be completed to not only create enough space but also stop the top and often heavier vehicle from crushing the bottom vehicle.
- Basic, Advanced, or Heavy Vehicle Extrication?
- Heavy Vehicle Extrication: Cab Components
- Heavy-Truck Extrication: Truck Types and Hazard Identification
- Big Truck Extrication: A Different Animal
When first responders first arrive on a scene of this type, the priority is to ensure that the scene is safe. Responders should ensure that traffic is stopped or redirected and there are no hazardous materials or contaminants to contend with, or if there are they are assessed and mitigated. The officer should complete a 360 walkaround of the accident scene to ensure that he or she sees every aspect of the incident. The officer should then meet with the driver of the heavy vehicle, and, if possible, ask how much his trailer or his vehicle weighs and what he is carrying. Once he gets a general picture of the weights involved, he can determine if the stabilization and lifting equipment that is available will be sufficient for the scene. If not, it is a good idea to request either a tow truck rotator or a mutual aid response with sufficient equipment. If it is determined that the equipment carried by the responding agency is sufficient, then stabilization can start.
Basic stabilization should always be considered first to ensure that the load of the vehicle(s) do not shift. For example, if the road is sloped then the tires should chocked, air brakes set, et cetera. Once general stabilization has occurred, then it is essential that responders stop the crush.
Stopping the crush simply means that you are putting something in place to stop the top and heavier vehicle from continuing to crush down the bottom vehicle. Like an empty tin can under a brick, as time passes that can will continue to compress until it can’t compress any more. Although you can use either a crib stack(s) or struts to stop the crush, it should be noted that struts are the quicker, more efficient option. The weight of the load should indicate the angle that you set your struts to. While 45-60° is the standard angle of strut placement for light vehicles and loads, with heavier loads a shallower angle such as 70-90° needs to be considered due to the downward pressure from your load; this creates what’s known as horizontal load multiplier, a weight that is pushing the bottom of the strut and the base plates away from the load. So, for example, one manufacturer states that a strut at a 45° angle has a horizontal strut load multiplier of 1, whereas a strut at a 75° angle has a horizontal strut load multiplier of .28. Thus, if the load weighs 15,000 pounds, a strut at 45° will have 15,000 pounds (the horizontal load multiplier) pushing against the base plate in a horizontal manner away from the load. Alternately, if the strut is at 75°, the horizontal load multiplier would be only 4,200 pounds. The reason this becomes so important is due to the ratchet straps or chains that are used to keep that strut from kicking out under pressure. The same manufacturer’s ratchet straps have a breaking strength of 3,300 pounds, which isn’t much if you consider you’re lifting a loaded down tractor trailer or cement truck. Incident command must consider the load and consider using rescue grade chain in place of ratchet straps to keep stabilizing struts or lifting struts from kicking out.
- Extrication: Stabilization Crib Notes
- Calling for Heavy Wreckers
- Working With the Tow and Recovery Industry for Success
- Challenging Auto Extrication
Once you’ve stopped the crush, it’s time to move on to compressing the suspension of the vehicles. With the bottom vehicle compressing the struts, you can create several inches of space between the top of that vehicle and the bottom of the top vehicle. However, it should be noted that if you are planning on winching out the bottom vehicle after you have made your lift, the tires of the vehicle will bound up and no longer able to roll with the rachet straps constricting the tires and keeping them from rolling. This makes that option more difficult, and therefore you might elect to withhold that step, however you should control the suspension of each tire of the top vehicle that is involved prior to lifting. This will be completed by going from tire to tire over the trailer or frame of the vehicle on each axle with a heavy-duty ratchet strap or chain and chain binder. Tighten this down until all the slack of the suspension is compressed. By doing this, when you go to lift the vehicle, the axles won’t drop down to the full extension of the suspension. It should be noted that if the underride is not complete—that is, if the bottom vehicle is not all the way under the rear wheels—this step could be skipped as it is time consuming and, in that scenario, unnecessary.
Once the vehicle is stabilized, the crush is stopped, and the suspension components are compressed, it’s time to put into place the lifting device. What you choose to lift with should be carefully considered based on the weight of the vehicle, its center of gravity, and what is available to you. Not every department will have the luxury of top-of-the-line technology for these operations, so here are some other options. There are a variety lifting struts on the market that can be used, but it is crucial that responders know their lifting capacity and the weight of load that they are trying to lift. An old-school, high-pressure airbag is a time-tested option that can be utilized to make your lift, but you must know how to calculate what you can lift because the tonnage that’s stamped on the bag can be misleading. Flat high-pressure airbags work off surface contact, thus they will only lift that tonnage that’s stamped on the bag if the entire airbag has surface contact with the load. Then it will only lift that tonnage one inch. There is a way to determine what the bag will lift, but you need the measurements of the load surface area that is coming into contact with your airbag. To calculate the lift ability you will need the length of the object you’re lifting (on the bag, don’t calculate any that goes over the edge of the bag) in inches times the width of the of the object in inches, times the operating pressure of the airbag you’re using. If the load is under or equal to the calculated number, you will be able to lift it. If you come up with a number that is under the weight of the load, you may need to increase the surface area. You can do this by using a metal aerial outrigger pad or by putting several 4x4s side by side in between the airbag and the load to create a flat wooden pad that increases the surface area.
Once you’ve chosen your means of lifting and have it in place, it’s time to lift. You should have a firefighter on each of the struts or crib stacks that are stopping the crush to ensure that they capture the progress to keep up with the lift. Like the old saying goes, lift an inchm crib an inch. Vehicle stabilization kits are another option that make things much easier for the rescuers. Such kits employ air at a constant pressure, pneumatically pushing up the top of the strut to chase the lift instead of physically having to lift it before you manually twist collars to capture your progress. It also increases safety being that rescuers can now stand back to some degree and only need to turn the collars to capture the progress. You should also have a person or people who are running the means of lift, as well as a team leader who is standing where he or she can see everyone and controls the lift by giving easy to hear and clear commands. After the lift is complete, the stabilizing struts should be locked out to ensure that if the lifting bag or struts fail the load doesn’t come down. Then it’s come time to begin the actual extrication.
How you decide to extricate will be up to the means available to you, your training, and your capabilities. Having either tow trucks on scene or a portable fire service winch to winch the car from underneath the top vehicle gives firefighters the ability to work freely and without overhead obstructions or hazards. If you don’t have that capability, however, you may have to extricate the patient from the vehicle while still under the load.
Know your equipment and its capabilities. Even if you don’t have the top of the line or most advanced equipment, your firefighters can learn how to work around what you do have to make the rescue.
ZACHARY BROWN is a captain and 13-year veteran of the DeKalb County (GA) Fire Rescue Department. A 16-year veteran of the fire service, he is a paramedic and has been involved in his department’s technical rescue and dive teams, as well as the Georgia Search and Rescue (GSAR) team.

