BY GEORGE GUINAN 5TH
Expect the unexpected. There’s something new every day. Never assume anything, and remember that no two jobs are ever the same. These are just a few sayings firefighters live by; they serve to keep our minds challenged, alert, and always on guard. Vacant property security systems (VPSS) are just another of these new and unexpected things with which we must deal in the course of what we are called to do. VPSS installations are still fairly new, but they are rapidly increasing, and incidents involving these systems are on the rise. Comprised of fortified window and door coverings, these systems have added to the challenge of forcible entry operations for firefighters everywhere. Encountering them on arrival at fire or emergencies is a cause for concern and is not to be taken lightly. By reviewing the basic information on the systems’ use, makeup, and methods of installation presented here, you will see how the presence of these systems can affect firefighting operations. The photos depict what we have seen so far and some of the methods for compromising and defeating these systems when the need arises.
- Operational Considerations in Abandoned Building Fires
- Tom Brennan: OPERATING ‘AT’ VACANT BUILDINGS
- Abandoned Building Policy: Five Years Later
VPSS are used to secure properties and protect them from vandalism. They may also provide a measure of safety and protection for construction workers operating within the buildings. The systems are leased or rented and are usually installed on newly constructed or renovated buildings during the later stages of construction. Typically, the systems will remain in place while the building is in the marketing and sale stages, right up to the time that occupancy takes place.
After their beginnings in the United Kingdom, VPSS found their way to the United States. Their use has grown rapidly and can now be seen from the East Coast to the West Coast. There are other systems and variations of fortified window and door coverings; VPSS constitute only one category. Installations can be seen in urban and suburban locations and on commercial as well as residential structures. They are in use on one-story and multistory structures and on buildings of any size. Recently, they have been seen installed on vacant, abandoned, and foreclosed structures. Installers have indicated that they will install these systems only on structures that are unoccupied. Though installations can be locally regulated and their use limited to such structures, applications have now been seen on vacant occupancies within occupied structures. Do not assume that there is no life hazard simply because VPSS are present. Perform complete searches for life as soon as it is safe to do so.
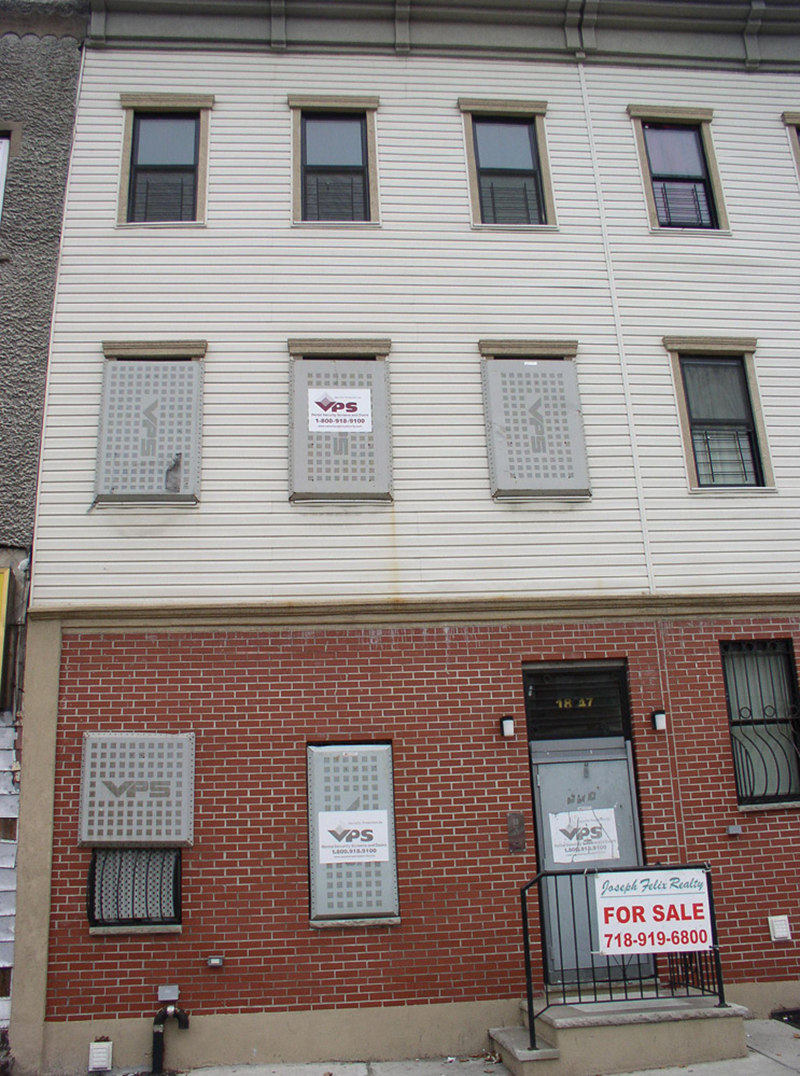
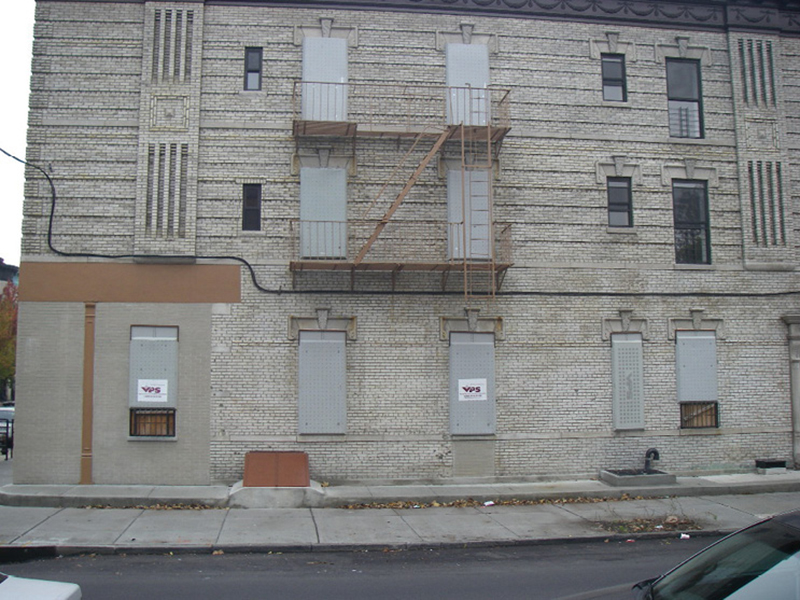
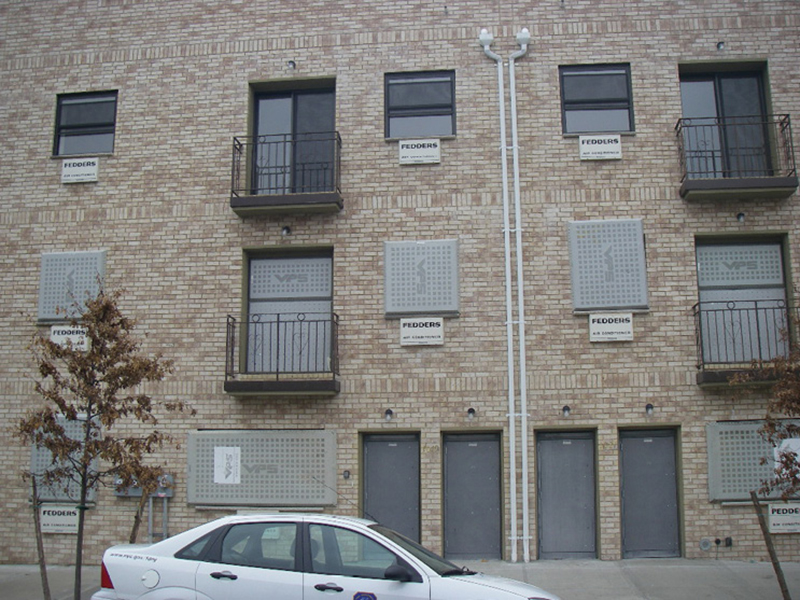
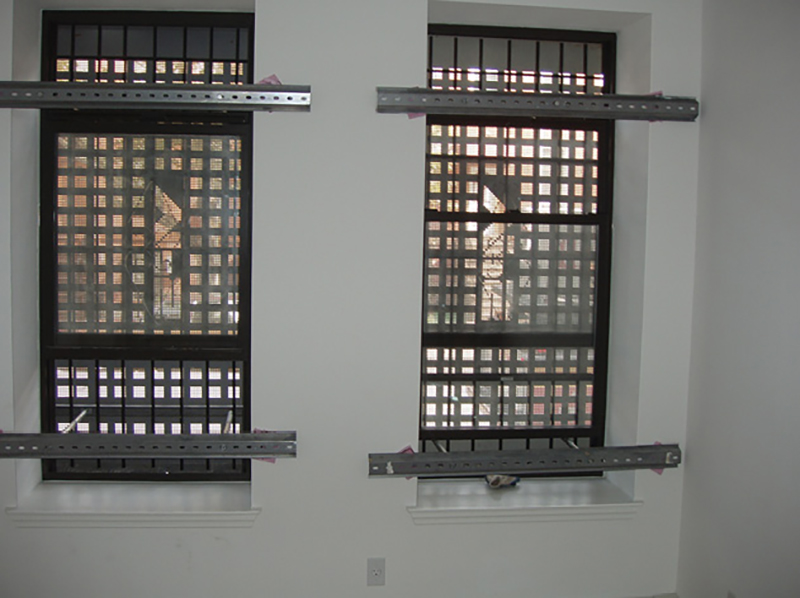
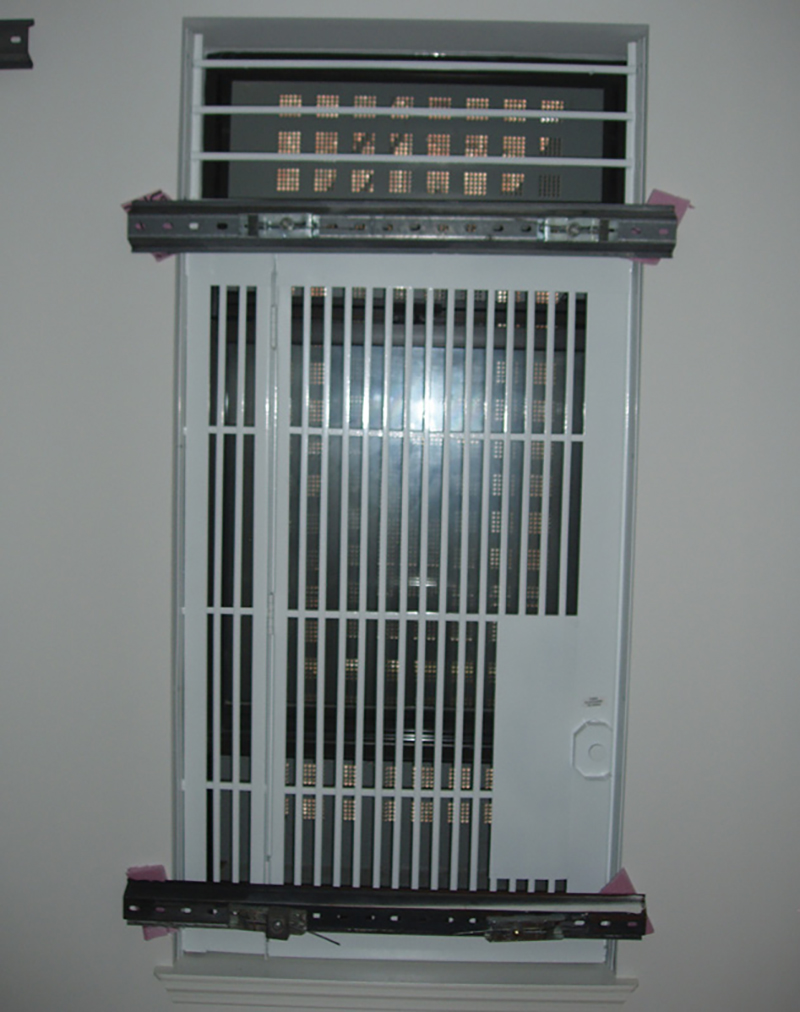
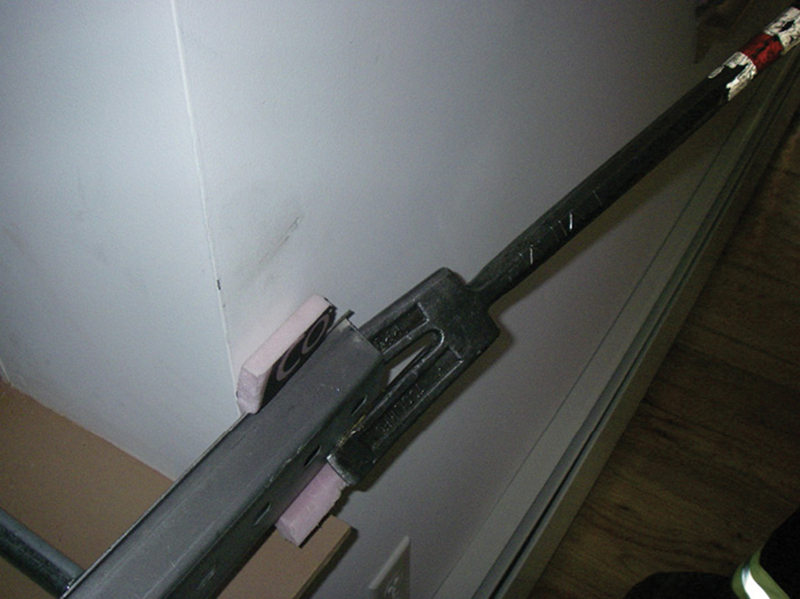
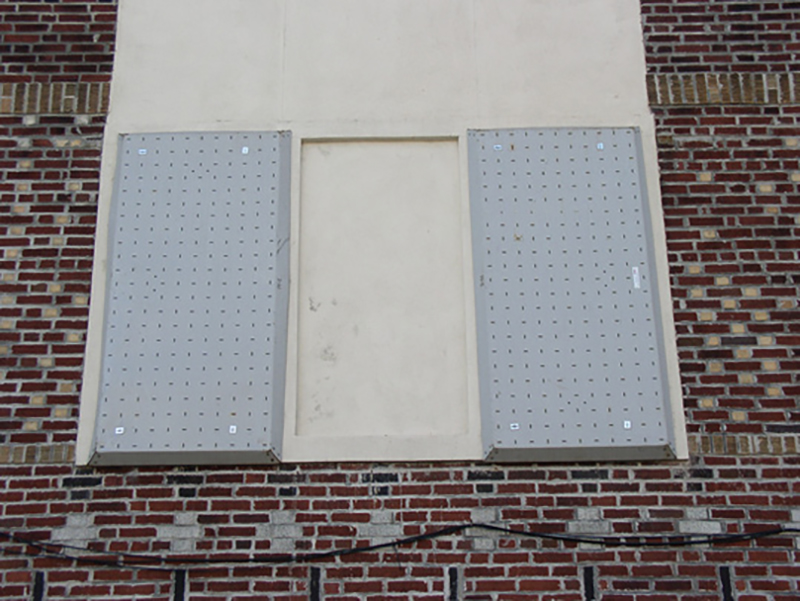
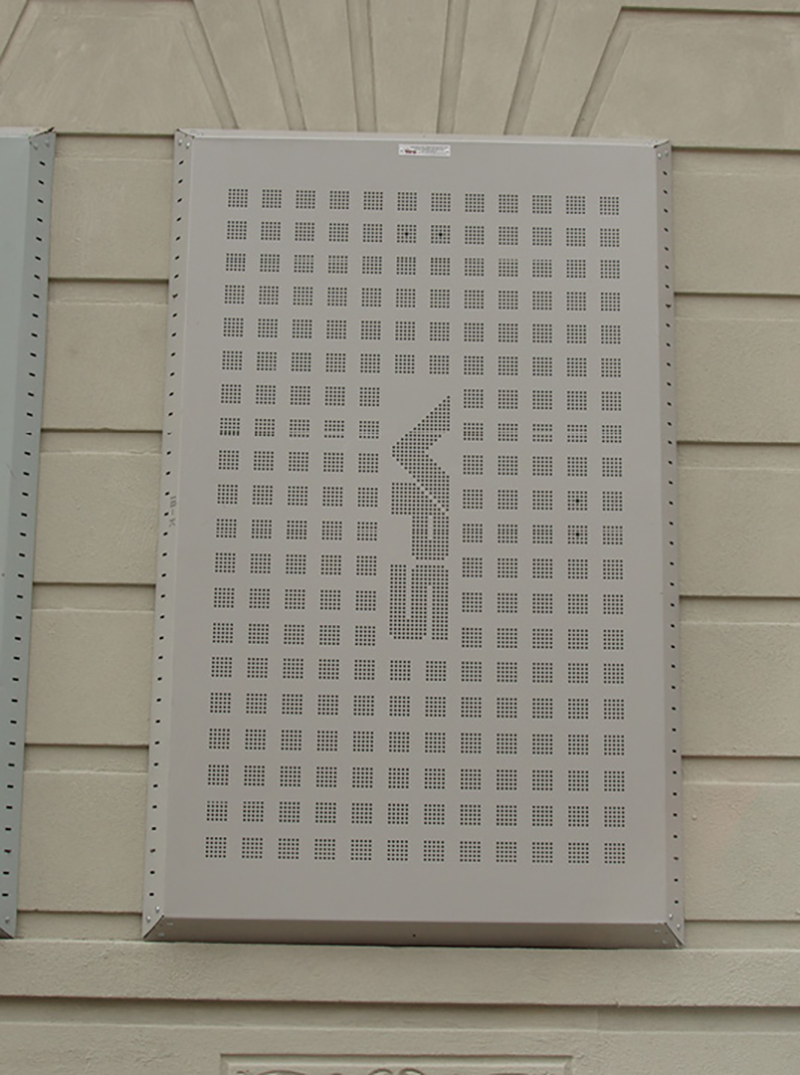
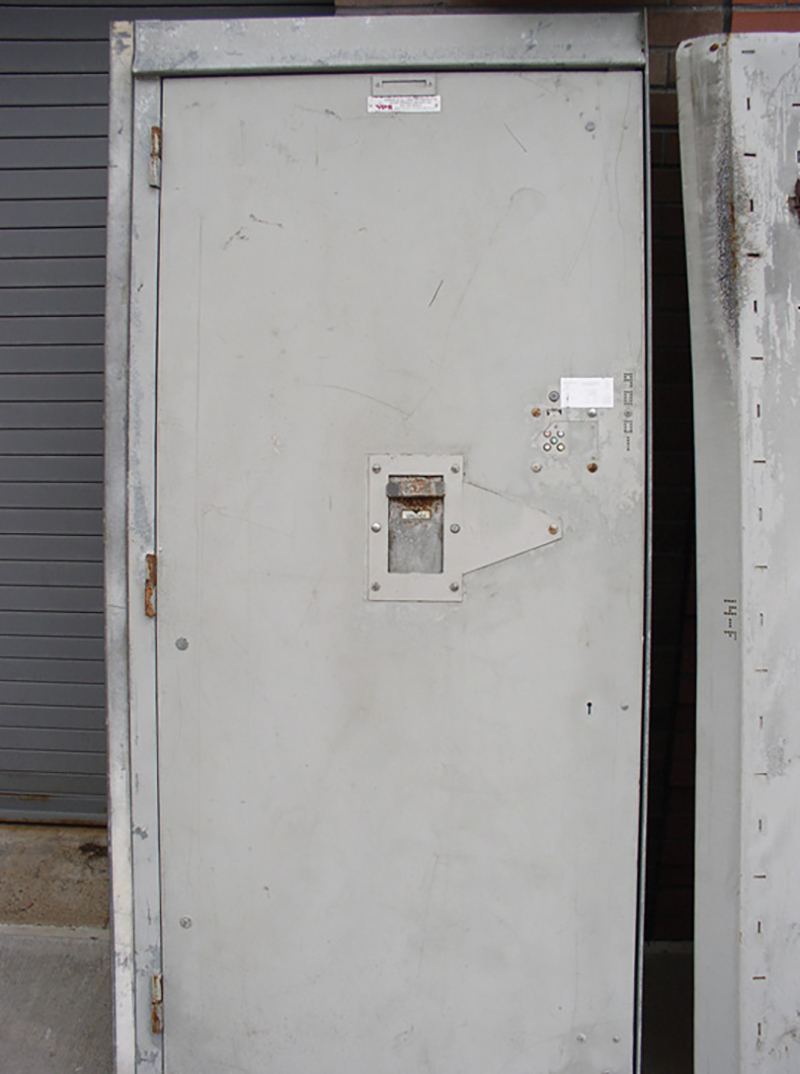
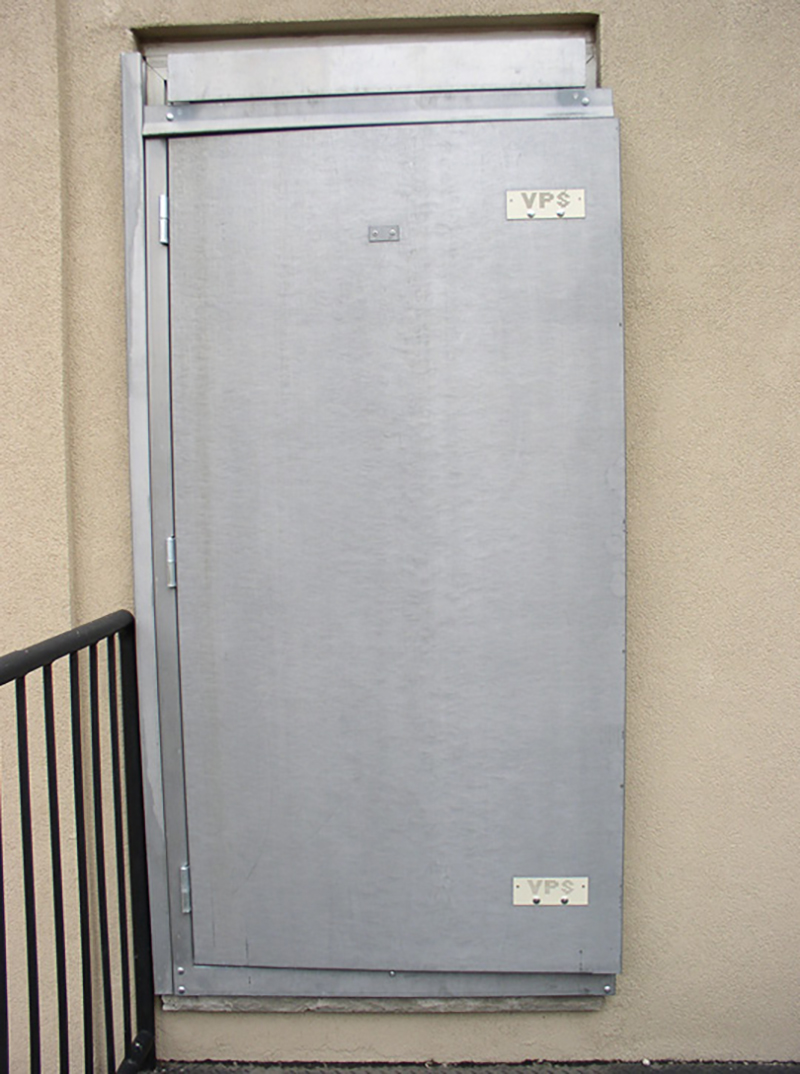
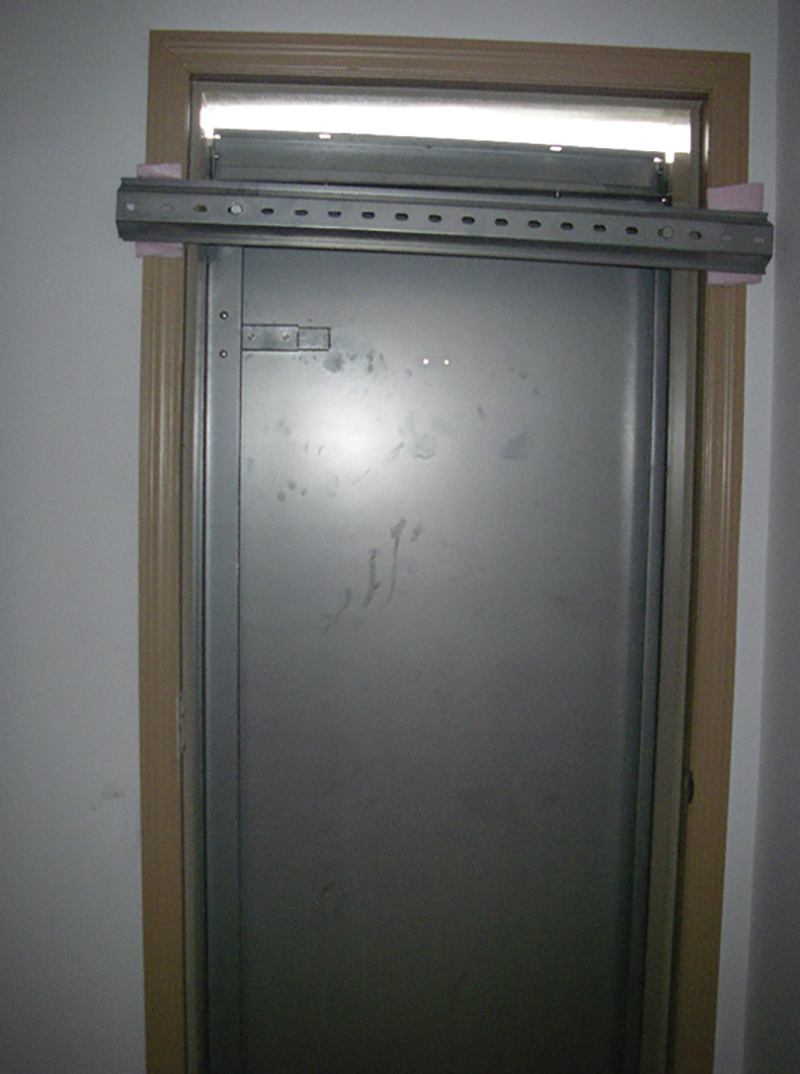
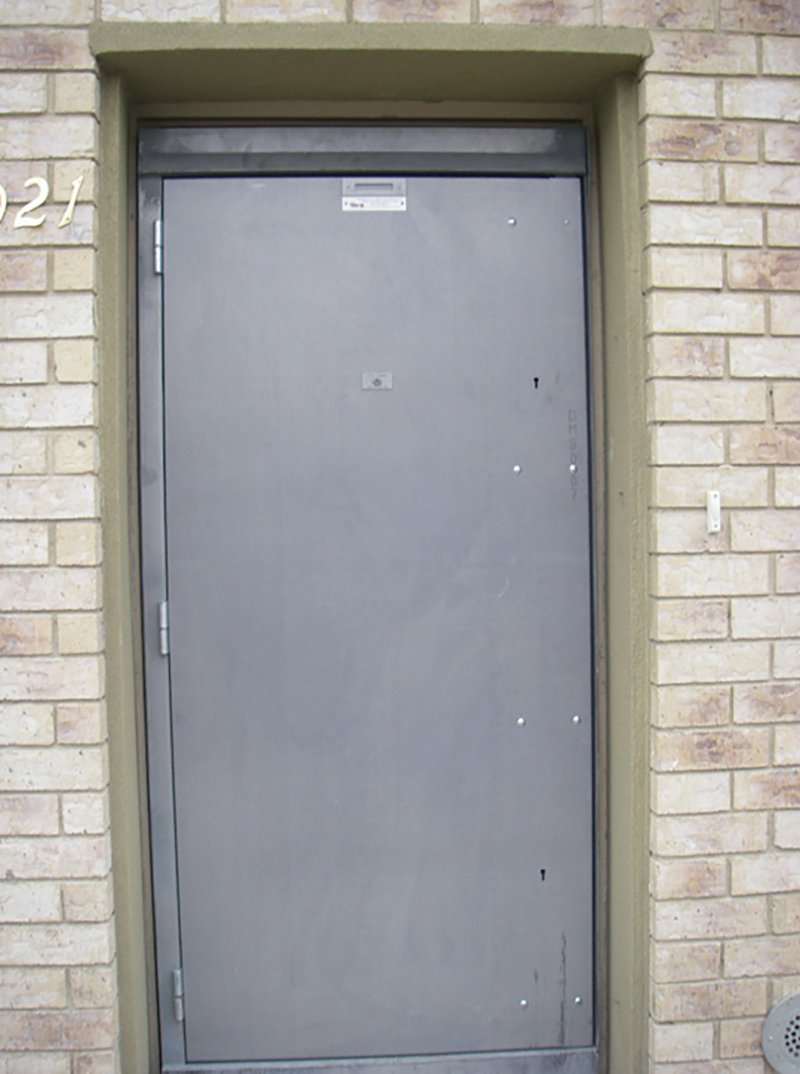
The system’s fortified window and door coverings are constructed of lightweight steel; average-sized coverings weigh between 30 to 40 pounds each. These coverings are designed to enclose windows, doors, and other access openings. When installed over openings, they are usually placed into position with finished window and door units already in place. When applied, these coverings completely enclose the entire opening, covering over window frames and doorjambs so that they cannot be seen from the exterior. The window coverings have vent holes that allow air and light to pass. Other systems and variations of fortified window and door coverings are similar in makeup and installation. In more urban locations, installations may have window bars or safety gates in place. They have been seen on basement and roof access points, including steel basement doors, small basement windows, overhead skylights, scuttles, and bulkheads. Typically, only the openings that allow for direct or easy access into the building are covered—i.e., first-floor openings, openings exposed to fire escapes, balconies, and roofs accessible from adjoining buildings. For cost effectiveness, remote and inaccessible openings are usually left uncovered (photos 1-3).
 |
| (1) Photos by author. |
 |
| (2) |
 |
| (3) |
When encountering VPSS at scenes involving fire—and as soon as it is determined that entry will be made—incident commanders (ICs) should request additional personnel and the necessary apparatus to facilitate a more rapid removal of multiple coverings. Operations involving the removal of coverings above the first floor will necessitate the use of tower ladders or aerial platforms. Another option would be portable or aerial ladders, but they will not afford you the best of operating conditions. Using them will place firefighters in compromising positions and will not allow them to adequately control coverings after they are removed. VPSS coverings are not overly heavy, but they can be cumbersome when they are compromised and removed. If they are not controlled, they will present a serious hazard when falling to the ground. ICs should coordinate the removal of window coverings and ensure that the ground below has been cleared before attacking the coverings. Ladder apparatus that provide a stable operating platform are the safest and most reliable options for complete removal.
WINDOW COVERINGS
Except for a variation in size, the only difference between window coverings is the method used to install them. Removing VPSS window coverings from the exterior of the building is not difficult. These coverings appear formidable, but once members familiarize themselves with the system, the installation, and the way it works, the system is easy to defeat. In cases where systems are installed with window bars or safety gates already in place, remove the coverings as soon as possible. This will allow members to identify the window bars or safety gates and to be able to address that problem as well.
Completely removing the VPSS from the interior is more challenging, especially if it is installed with window bars or safety gates already in place. Members who commit themselves to interior firefighting operations prior to removing VPSS coverings could be faced with a serious life hazard. Operating to remove coverings in high heat and reduced visibility caused by smoke would be tough enough, but if conditions deteriorate rapidly and members need to immediately evacuate, encountering one of these coverings would be a definite problem. If egress through the original point of entry is compromised, the VPSS could possibly eliminate a secondary means of escape or at the very least seriously delay the escape.
Removing Window Coverings from the Interior
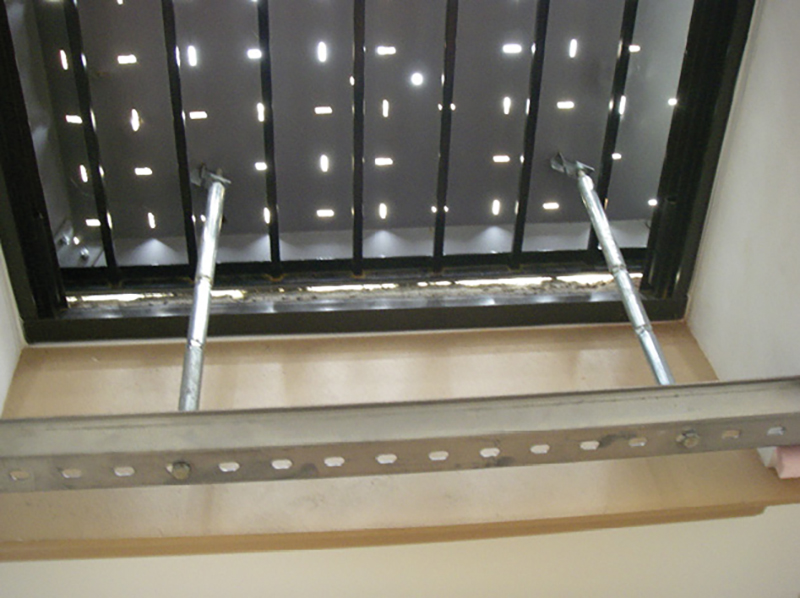
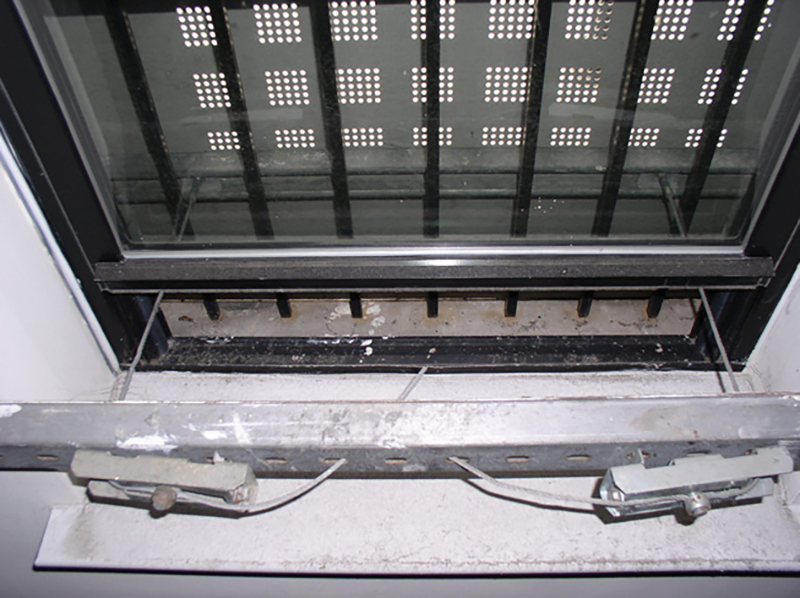
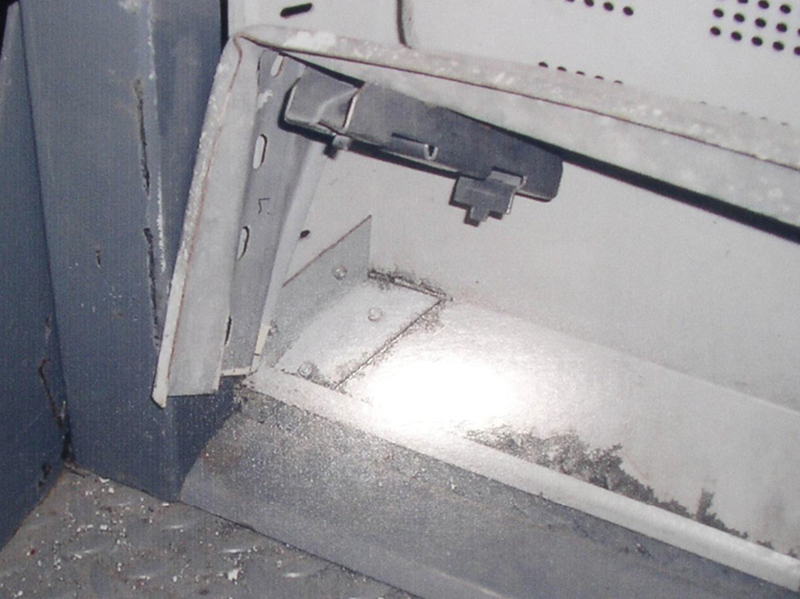
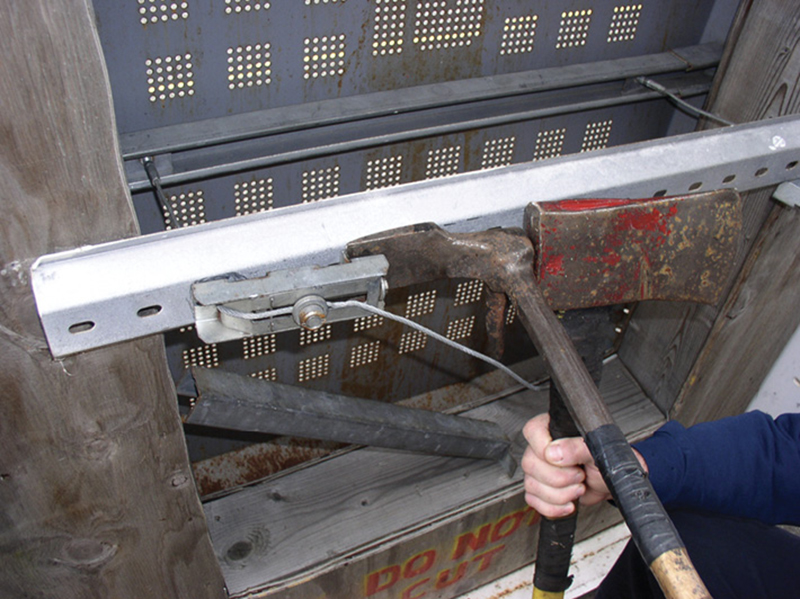
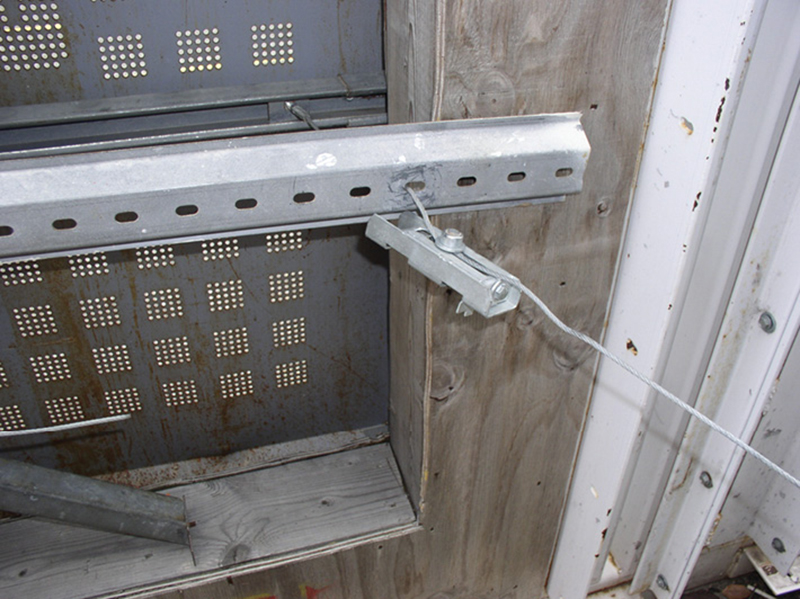
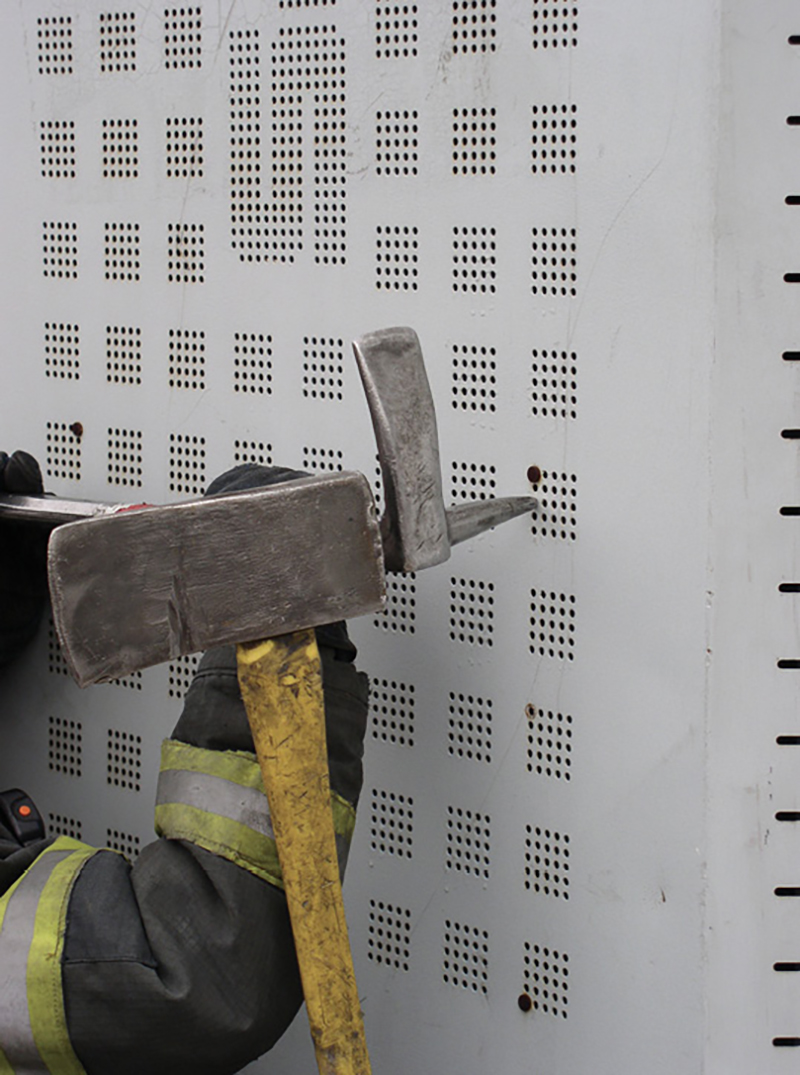
All VPSS window coverings are secured in position with either threaded rods or, more likely, cables attached on the interior side to a U-shaped steel cross-brace that spans across the window opening. Two rods or cables are attached to each cross-brace, and there are usually two braces per covering. If rods are used, they are attached directly to the cross-brace. Cables, on the other hand, are threaded through the cross-brace to a tightening device on the opposite side. The tightening device is then attached to the brace on the interior side. To remove the covering from the interior side, the cables, rods, or cross-brace must be compromised. The following are some of the possibilities for doing this:
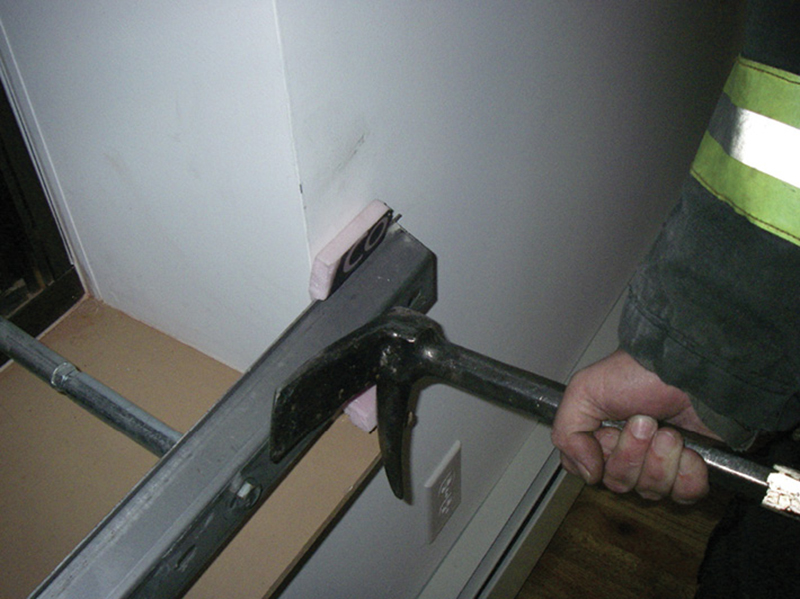
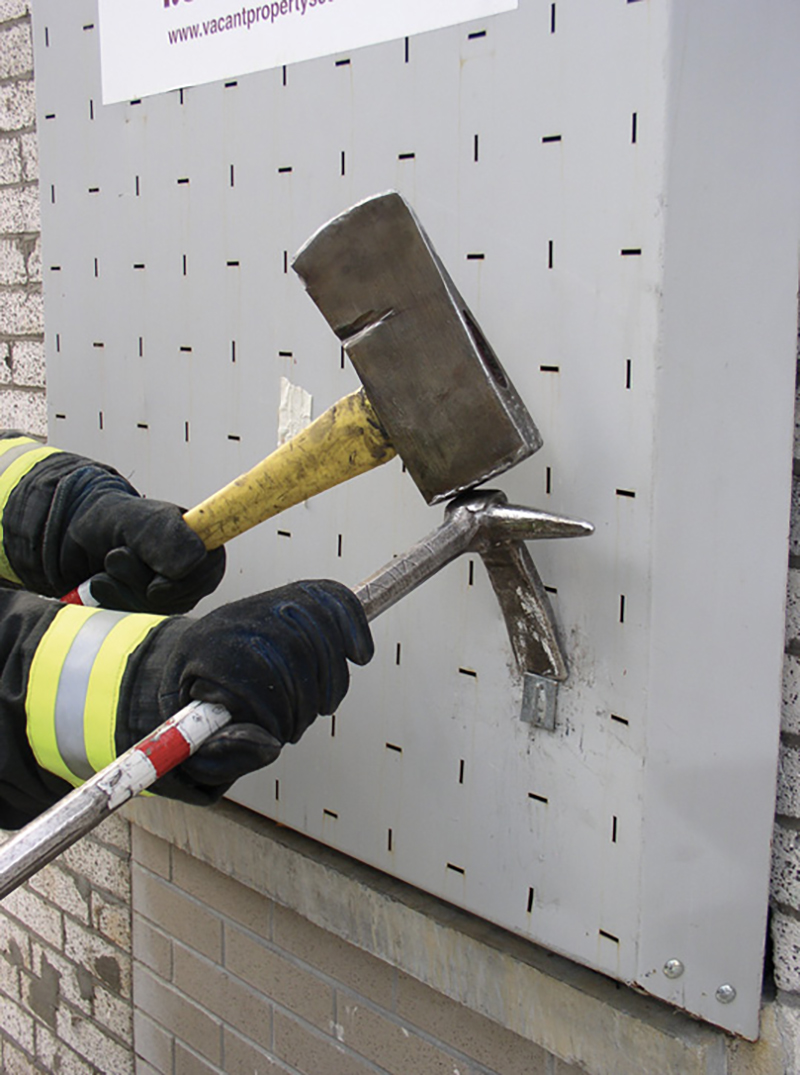
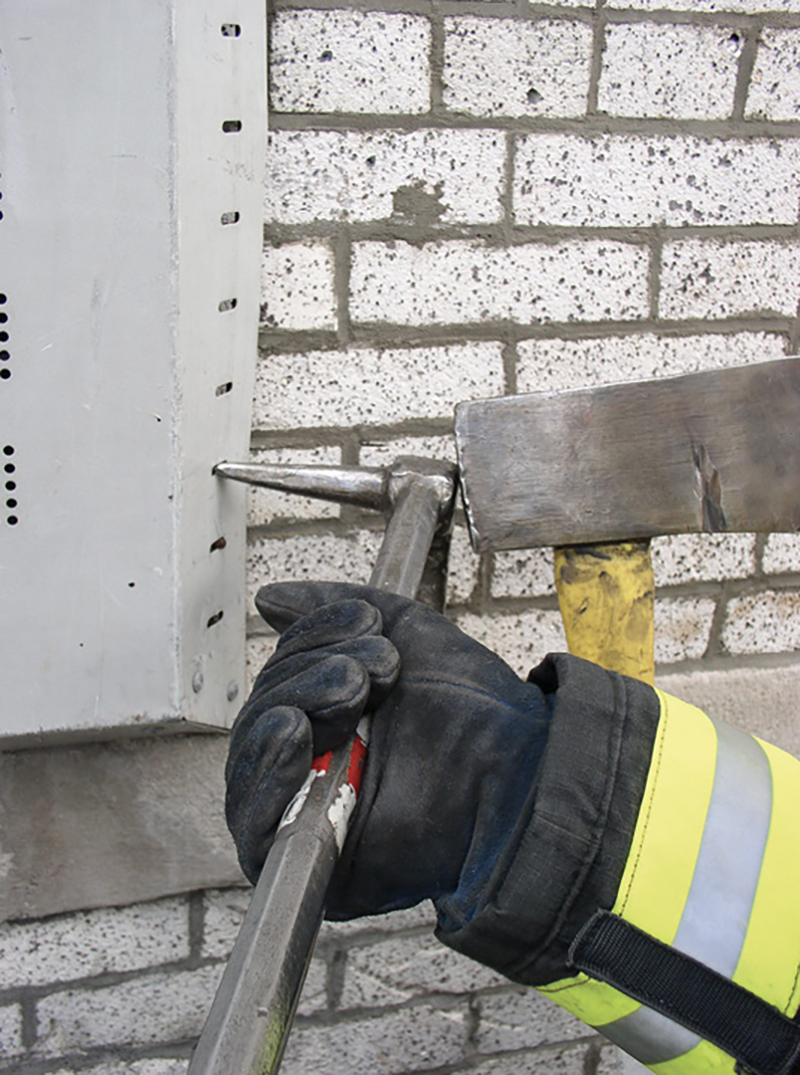
1 Using a flathead ax or the back side of a halligan, strike the cross-brace near one of the cable or rod attachment points. This will crease the brace, allowing it to bend more easily. After the cross-brace is creased, use the fork end of the halligan to pry the brace away from the wall and inward toward the center of the window opening. Since there are usually two cross-braces, repeat this for the second brace. When the second brace is pried away, you will see that the system has been compromised and the covering will be free. If the ground below is cleared and it is safe to do so, you can lower the covering to the ground. Otherwise, control the covering, and bring it in through the opening to the interior (photos 4-7).
 |
| (4) |
 |
| (5) |
 |
| (6) |
 |
| (7) |
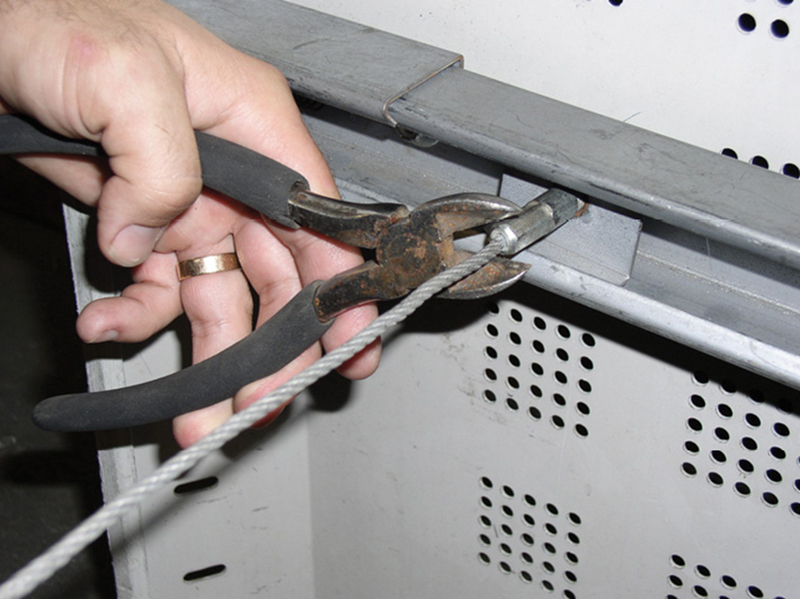
2 If the covering is secured in place with cables, use the adz end of the halligan to pry the cable-tightening device away from the brace. This will loosen the cables enough to allow the brace to be turned sideways and into the window opening. As in method 1 above, repeat this for the second cross-brace; the system will then be compromised, and the covering will be free. If the ground below is cleared and it is safe to do so, you can lower the covering to the ground. Otherwise, control the covering, and bring it in through the opening to the interior (photos 8-10).
 |
| (8) |
 |
| (9) |
 |
| (10) |
3 If window coverings are installed with window bars or safety gates already in place, neither of the above two methods will completely remove the system. If you simply compromise the brace, the cables or rods would still be attached to the cross-brace, and the brace will not pass through the window bars or gates. If this is the case, you must compromise the cables or rods and separate them from the cross-brace (photos 11-12).
 |
| (11) |
 |
| (12) |
If the covering is secured with rods, you must shear the hex heads or the rod itself using an ax and a halligan. If the covering is secured with cables, cut the cable. You can do this by using a pair of diagonal cutters or heavy-duty wire cutters (photo 13). Cut the cable as close to the attachment point as possible. Shearing the rods or cutting the cables will separate them from the brace, thus compromising the system, and the covering will be free. Remember that there are two rod or cable attachment points on each brace. If the brace fits through the window bars or safety gates, compromising one attachment point on each brace may be enough to accomplish complete removal. Otherwise, you will need to shear both rods or cut both cables on each brace. Note: If the covering is installed with window bars or safety gates already in place, compromising the system in this manner will not allow you to adequately control the covering once it is separated from the cross-brace. You must be certain that the ground below is safe.
 |
| (13) |
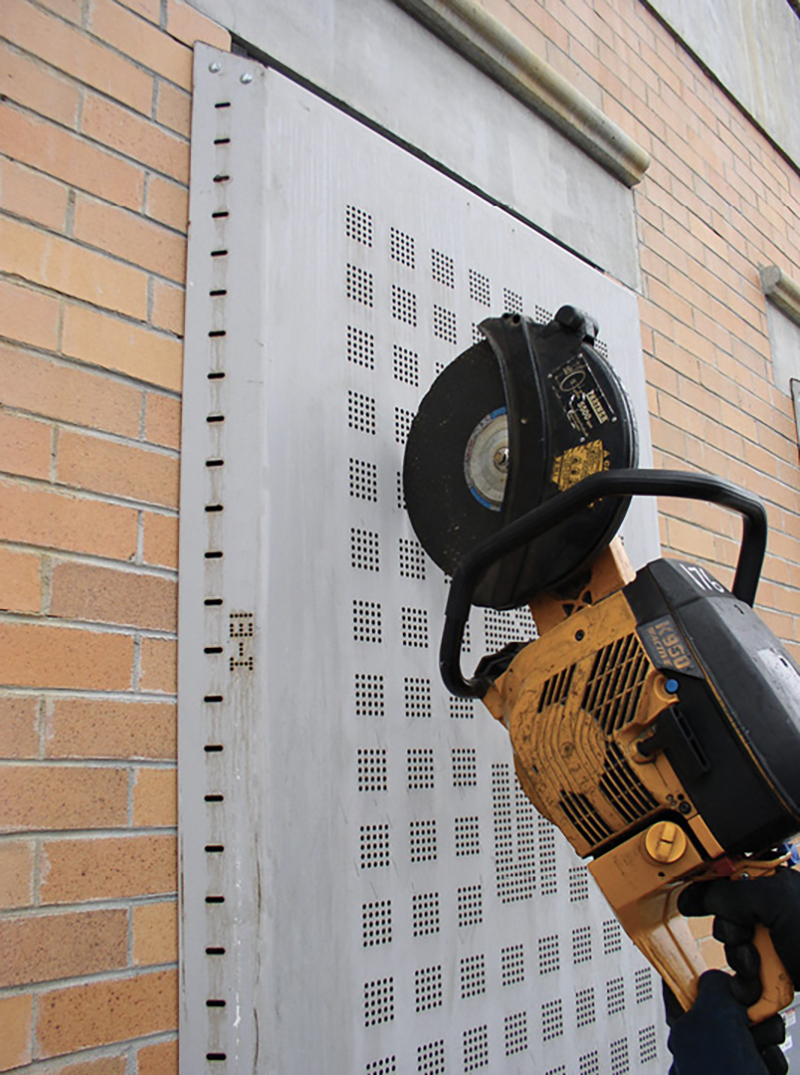
Removing Fortified Window Coverings from the Exterior
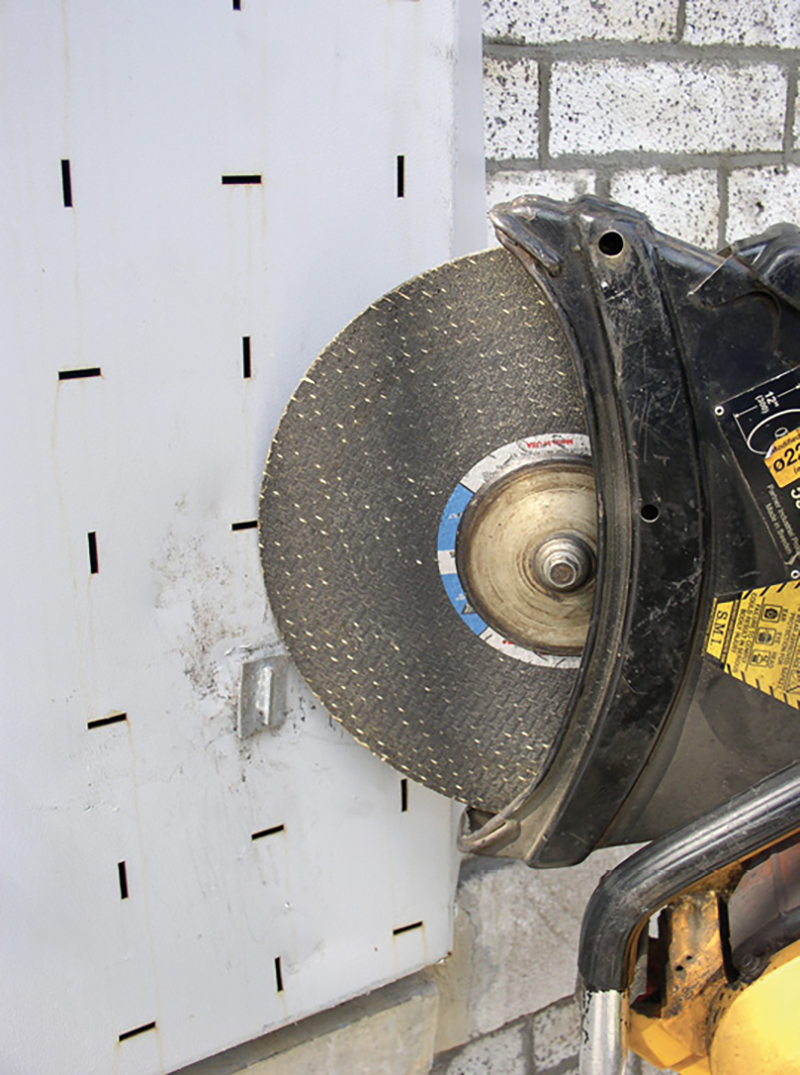
Looking at a vacant property system from the outside, you will notice that the window coverings are secured in one of three ways, each being immediately recognizable. The first method of installation is easily recognized by the plates on the face of the window covering. Each plate has a tab, which passes through the face of the covering. The plate is then attached to the rods or cables on the interior. There are usually four plates on each covering. To remove a covering installed in this manner, sever the visible outside plate from its attachment to the inside, threaded rod or cable. Following are two possibilities for doing this:
1 Using a power saw equipped with an aluminum oxide metal cutting blade and angling the blade from the side, make a cut through the outside plate. This will sever the rod or cable from the plate. Cut the remaining plates in the same manner. When finished, the system will be compromised, and the covering will be free. When operating from the bucket of a tower ladder or an aerial platform, one member can hold pressure on the window covering while another member makes the cuts. This will hold the covering in place until cutting is completed and make the process easier.
2 Using a flathead ax and halligan, place the adz end of the halligan behind the plate. Strike the halligan with the flat head of the ax until the plate is sheared away; this will sever the rod or cable away from the plate. Shear the remaining plates in the same manner. When finished, the system will be compromised, and the covering will be free (photos 14-16).
 |
| (14) |
 |
| (15) |
 |
| (16) |
The second method of installation, similar to the first, uses rivets instead of plates as an attachment point on the face of the window covering. The rivet is then attached to the rods or cables on the interior. There are usually four rivets on each covering. To remove a covering installed in this manner, sever the visible outside rivet away from its attachment to the inside threaded rod or cable. The following are two methods for doing this:
1 Using a power saw equipped with an aluminum oxide metal cutting blade and angling the blade from the side, make a cut through the outside rivet. This will sever the rod or cable away from the rivet. Cut the remaining rivets in the same manner; when finished, the system will be compromised and the covering will be free. As in the previous method, when operating from the bucket of a tower ladder or an aerial platform, one member can hold pressure on the window covering while another member makes the cuts. This will hold the covering in place until cutting is completed and make the process easier.
2 Using a flathead ax and halligan, place the pike end of the halligan into one of the vent holes on the face of the covering and adjacent to the rivet. Strike the halligan with the flathead ax, driving the pike through the window covering. If the rivet does not come free, repeat this procedure using a vent hole on the opposite side of the rivet. This should compromise the attachment. Free the remaining rivets in the same manner; when finished, the system will be compromised, and the covering will be free (photo 17).
 |
| (17) |
The third method of installation uses a spring-loaded cross bar which runs behind the face of the covering. The bar is locked into the covering with two pins, one on each side. The spring-loaded cross bar is then attached to the cables or rods, which run to the cross-brace on the interior side. There are usually two spring-loaded cross-bars on each covering. If the covering is installed vertically, the bars will run horizontally, from side to side, with the pins located on the sides. If the covering is installed horizontally, the bars will run vertically with the pins located on top and bottom. This method of installation is recognized by the absence of plates or rivets on the face of the covering and by the locking pins located on the sides. To remove a covering installed in this manner, separate the window covering from the spring-loaded cross-bar. The following are two possibilities for doing this:
1 Locate the locking pins on the side of the covering to find the location of the spring-loaded cross-bars. Using a power saw equipped with an aluminum oxide metal cutting blade, make a cut about six inches in from either side and perpendicular to the cross-bar. (If the cross-bar runs top to bottom, this cut will be six inches in from either the top or bottom.) The cut should go through the face of the covering and deep enough to cut completely through the cross-bars. One long cut from top to bottom or left to right will compromise both cross-bars, and the covering will be free. If this cut is made in the middle of the covering instead of six inches in from the side, the saw blade will tend to bind under the weight of the covering. Once again, when operating from the bucket of a tower ladder or an aerial platform, one member can hold pressure on the window covering while another member makes the cuts. This will hold the covering in place until cutting is completed and make the process easier.
2 Locate the locking pins on the side of the covering. Using a flathead ax and halligan, place the pike of the halligan into one of the slotted holes on either side of the locking pin. Strike the halligan with the flat head of the ax to drive the pike through the slotted hole. When a good purchase has been achieved, peel the window covering back and away from the wall; this will separate the covering from the cross-bar. Locate the locking pins for the remaining spring-loaded cross-bar, and peel the covering away from it also. The system will now be compromised, and the covering will be free (photos 18-21).
 |
| (18) |
 |
| (19) |
 |
| (20) |
 |
| (21) |
DOOR COVERINGS
There are three types of door coverings used in VPSS. If encountering a structure with a system installed, you may see any one or all three types on the same structure. All three can be easily recognized and distinguished from each other. Door coverings are installed and secured into place using rods or cables attached to an interior steel cross-brace, the same as window installations. Unlike window coverings, the attachment points for the cables or rods cannot be seen from the outside; therefore, the system cannot be defeated in the same manner. Two of the three door types are easily opened from the inside; there is no need to defeat the system from the interior. From the exterior, however, all of the door coverings are more formidable. The construction design of these coverings renders our standard methods of forcible entry useless. You cannot force these door coverings conventionally with an ax and halligan; the rabbit tool will not work either.
Opening Fortified Door Coverings
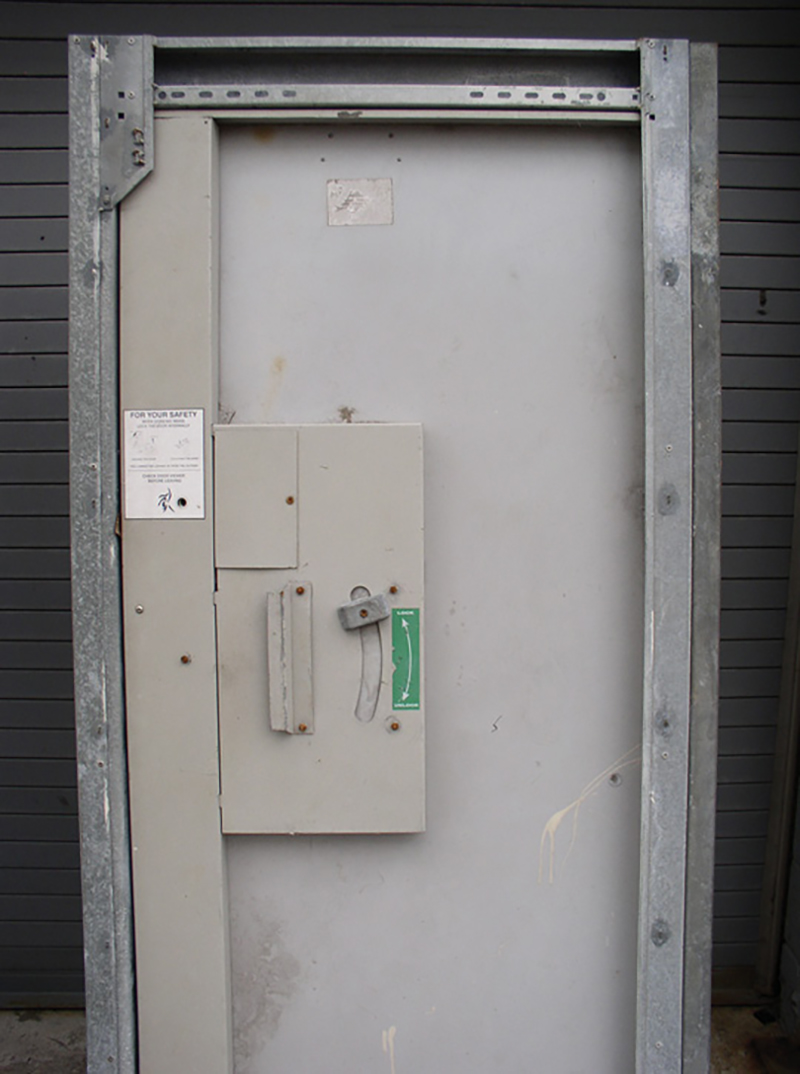
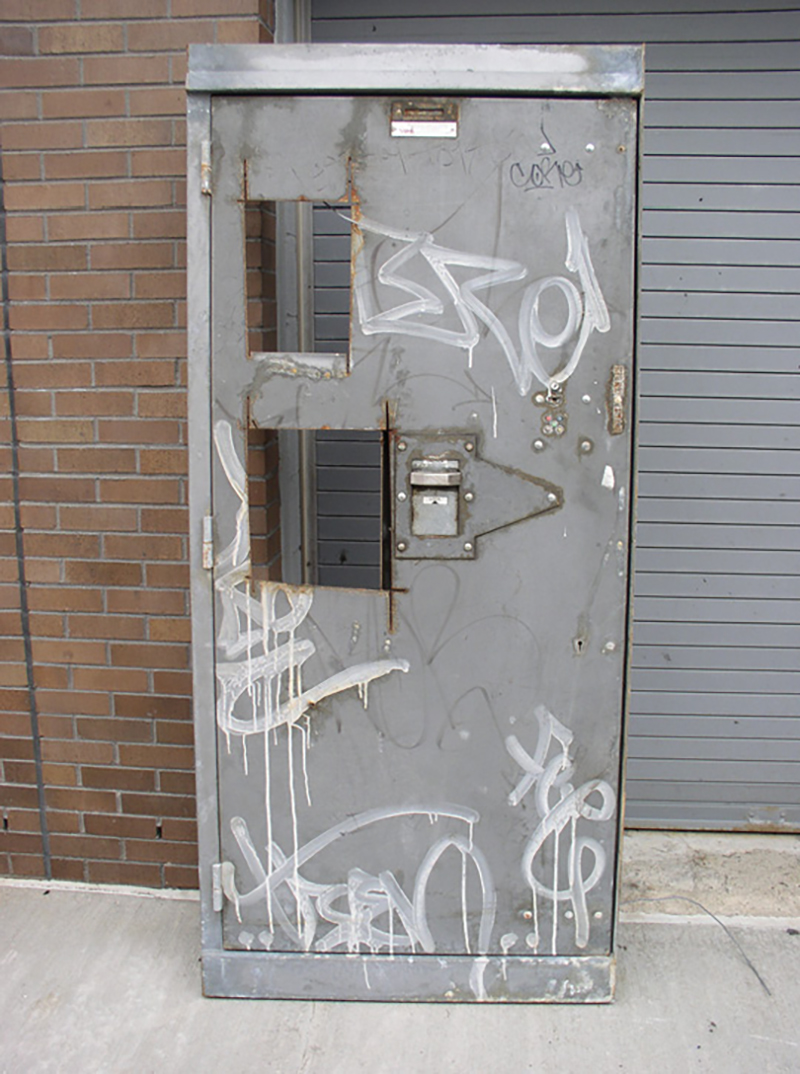
1 The first type of door is easy to recognize by the presence of a combination keypad and vertical slide handle on the exterior face. If installed, this door covering is usually found on the main point of entry only. When the correct combination is entered, the door will open. On the interior side, there is a vertical slide handle, which, when operated, will disengage the lock and open the door. The interior slide handle does not require the combination and is always operational. From the exterior side, use a power saw equipped with an aluminum oxide metal cutting blade to cut a triangle- or square-shaped hole through the face of the door. Cut this hole midway between the top and bottom, to the left of center and opposite the combination keypad. When complete, put your arm through the hole, and operate the interior slide handle to disengage the lock. The hole needs to be large enough to fit your hand and arm through. Note: In photo 24, there are two square holes cut in the door. The higher of the two cuts is useless, as it is too high on the door, and thus the vertical slide handle cannot be reached. A second option for this door would be to compromise it by cutting the hinges and then using an ax and halligan, driving the adz end of the halligan between the door and the doorjamb and prying the door out and away from the jamb (photos 22-24).
 |
| (22) |
 |
| (23) |
 |
| (24) |
2 The second type of door uses two or three simple slide bolts to secure it shut. The exterior face of this door is completely smooth and blank; nothing is visible except the hinges. This door cannot be accessed from the exterior and, therefore, is found only on entryways other than the main point of entry. On the interior side, locate the slide bolts and simply slide them horizontally away from the doorjamb to unlock the door. From the exterior side, use a power saw equipped with an aluminum oxide metal cutting blade to cut the hinges. Then, using an ax and a halligan, drive the adz end of the halligan between the door and doorjamb, and pry the door out and away from the jamb (photos 25-26).
 |
| (25) |
 |
| (26) |
3 The third type of door is easy to recognize by the presence of keyholes that are shaped for use with a skeleton key. There are usually two keyholes, one top and one bottom, on the outside face of the door. The door uses a three- or four-point locking system to secure the door closed. Without the proper skeleton key, this door cannot be accessed from the outside. Furthermore, this door cannot be unlocked from the inside either.
If encountered from the interior, the only way to egress from this door would be to defeat the system by compromising the cables, rods, or cross-braces. To do this, strike the cross-brace with an ax or a halligan near one of the cable or rod attachment points. The cross-brace will crease, allowing it to bend more easily. After the cross-brace is creased, use the fork end of the halligan to pry the brace away from the wall and inward toward the center of the opening. Since there are usually two cross-braces, repeat this for the second brace. When the second brace is pried away, you will see that the system has been compromised and the covering will be free. Simply striking the cross-brace multiple times may be enough to compromise the system without having to use the fork end of the halligan to pry.
From the exterior side, use a power saw equipped with an aluminum oxide metal cutting blade to cut the hinges; then, using an ax and a halligan, drive the adz end of the halligan between the door and the doorjamb, and pry the door out and away from the jamb (photos 27-29).
 |
| (27) |
 |
| (28) |
 |
| (29) |
LESSONS LEARNED/REINFORCED
- Be alert to changes in your response area. Remember, there are variations in fortified window and door-covering systems. Recognizing changes and differences in systems will enable you to be prepared for the situations when they happen.
- Ensure the response of a tower ladder or an aerial platform when fire involves a structure with fortified window and door coverings. Consider the need for additional units and personnel.
- When operating from the bucket of a tower ladder or an aerial platform, only two members should be in the bucket. Overcrowding the bucket will reduce the maneuverability of members and hinder the removal process.
- Though early removal of the coverings from the exterior of the structure is suggested, members should familiarize themselves and know what to do from both sides.
- Interior removal assumes the use of basic tools such as the ax and halligan or simple pocket tools such as diagonal cutters or wire cutters carried by most firefighters. There are other ways to remove these coverings. Explore and train on whatever works best for you.
- When committing to interior operations, conduct them with extreme caution and with due regard given to deteriorating conditions. A secondary means of egress may be seriously delayed or totally unavailable.
- Remember that falling coverings present a serious hazard on the ground below. Coordinate removal, and ensure that the ground below is safe. Control the coverings whenever possible, and lower them to the ground rather than letting them fall. Bringing them into the interior of the building is an option, but do not place them where they may become a hindrance to interior operations.
- In general, if the fire or emergency is minor, the IC should consider entry through a remote window. If the structure is entered in this manner, members can then easily open fortified door coverings from the interior without having to cut the door. When operations have been completed, one or two members could then relock the doors and exit from the same remote window through which they entered. This will maintain the integrity of the door and allow the IC to secure the structure when leaving the scene. The exception to this would be if you encountered the third type of door that cannot be accessed at all without the proper skeleton key. If operations can be completed through that remote window, there would be no need to compromise this door at all.
- Remaining openings such as scuttles, skylights, and small basement windows are all covered in a manner similar to the ones mentioned above. By recognizing the type of covering involved, the method of installation used, and then applying the proper techniques, you should be able to easily defeat them.
GEORGE GUINAN 5TH is a lieutenant in the Fire Department of New York, where he has served 31 years. He is assigned to Ladder 176, Brooklyn. He is an instructor at the Suffolk County Fire Academy and has been a volunteer firefighter for 34 years with the New Hyde Park and Selden (NY) Fire Departments.

