
Part III: How It Works
Article by Clay Magee
With the history of the halligan and tool quality and selection behind us, we can now move on to the really exciting stuff. Math! I’m just kidding, it’s probably the most boring part, but besides understanding where our firefighting tools have come from and understanding what makes a quality tool, it truly is important to know how your equipment functions. With an understanding of levers and mechanical advantage, firefighters will have a better understanding of the tool and how to apply it on the fireground.
The Ins and Out of the Halligan: Part 1: Chief and His Ugly Bar | Part II: There Are Many Halligans But This One Is Mine
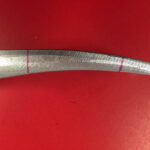

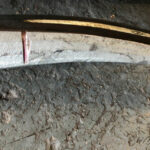


(1) Gap and set lines marked on forks.
Before we delve into levers and mechanical advantage, I’d like to take the time to talk about tuning your halligan. Tuning the halligan can be as simple or as complex as you’d like. You can square the shoulders for striking in confined spaces. You can gap the forks to allow you to pull key-in-knob locks for through-the-lock forcible entry. What I want to talk about is simple. It’s adding your gap and set lines. Adding gap and set lines gives you a visual reference when forcing the door. They help make sure you don’t set the tool too shallow but also make sure you don’t waste time driving farther than you have to. Gap lines are placed on the forks and the adz at 1.75 inches. Why? Because the typical door is 1.75 inches thick. We use the gap lines on outward-swinging doors. The set line is used on inward- and outward-swinging doors with the forks. The set line on the forks is at 5 inches. This helps make sure that the forks are far enough in so as not to slip out, but also helps make sure you don’t lose your tool by driving it too far. The set line on the adz is optional. It is placed at 3.25 inches. This is only used on outward-swinging doors, and 3.25 inches is plenty to make sure your tool is set behind the door and won’t slip off. Photos 1-4 show gap and set lines marked and then cut on both the adz and forks of a Pro Bar. Having this understanding of gap and set lines will help you see how they apply later on.
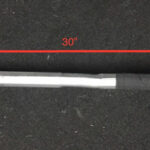
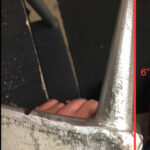
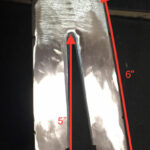
The next topic we need to cover is the anatomy of the Pro Bar. All of these measurements are based off of a standard Pro Bar. The Pro Bar is 3 inches in overall length (photo 5). The adz is 6 inches long and 2 inches wide at the edge (photo 6). The pick is 6 inches long (photo 7). The adz/pick triangle is 5 inches tall (photo 8). The forks are 6 inches long and the fork crotch is 5 inches long (photo 9).
ALSO: Bill Gustin on Tips for Improving Effectiveness in Forcible Entry, Part 1 | Part 2 | Part 3
Sam Hittle: Tools for Us, By Us
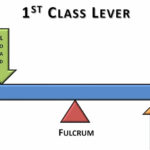
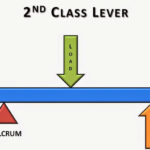
Now comes the fun: levers. There are three classes of levers, but when it comes to the halligan, we only use two of these, Class I and Class II. Now let me give a disclaimer. I’m not an engineer. I’ve seen different articles from respectable guys that all disagree on this topic. I’m giving you my best understanding and how I teach it in all my forcible entry classes. There are three terms that are important to understand: Force, fulcrum, and load. Force is the effort being applied to the end of the halligan. Fulcrum is where the load pivots; in our case it will be the door jamb or stop. The load is what is being moved, in our case the door. A Class I lever (photo 10) is the most common use of the halligan. It is used with all outward swinging doors and when gapping an inward swinging door with the adz. You can think of it like a see-saw. The load is on one end, effort is applied to the other, and the fulcrum is in the middle. A Class II lever (photo 11) is used with the forks on inward-swinging doors and when obtaining a crushing gap on outward-swinging doors. You can think of it like a wheel barrow. The load sits in the middle. The effort is applied to the end and on the other end is the fulcrum that it pivots off.
Mechanical advantage is a defined by Merriam-Webster as “the advantage gained by the use of a mechanism in transmitting force.” Mechanical advantage is figured by a specific formula. Mechanical Advantage = distance from the effort to the fulcrum/distance from the fulcrum to the load. The math presented below can change based on the positioning of the halligan in relation to the load (door) and the fulcrum (jamb). It’s also safe to say that it changes as metal bends and crushes during your force.
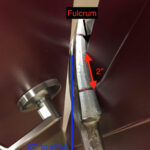
Obtaining a crushing gap on an outward swinging door has a mechanical advantage of 15:1 and is a Class II lever. Distance from effort to fulcrum is 30 inches. Distance from fulcrum to load is 2 inches. So 30/2 is 15 (photo 12).
The application on outward-opening doors with the adz has a mechanical advantage of 15:1 and is a Class I lever. Distance from effort to fulcrum is 30 inches. The distance from fulcrum to load is 2 inches. So, 30/2 is 15 (photo 13).
Forcing an outward-opening door with the forks has a mechanical advantage of 12.5:1 and is a Class I lever. Distance from effort to fulcrum is 25 inches. The distance from fulcrum to load is 2 inches. So, 25/2 is 12.5 (photo 14).
Forcing an inward-opening door with the adz has a mechanical advantage of 15:1 and is a Class I lever. Distance from effort to fulcrum is 30 inches. Distance from fulcrum to load is 2 inches. So, 30/2 is 15 (photo 15).
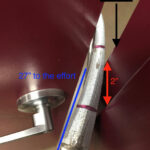
Forcing an inward-opening door with the forks can be performed two ways: bevel to the door or bevel to the frame. Bevel to the door is textbook and provides the most spread. When forcing with bevel to the frame, you lose spread because of the adz hitting the door, however it may be desirable when faced with a tight door as the natural curve of the forks will work its way around the door. The mechanical advantage does not change between the two. The mechanical advantage is 13.5:1 and is a Class II lever. Distance from effort to fulcrum is 27 inches. The distance from fulcrum to load is 2 inches. So, 27/2 is 13.5 (photo 16 and 17).
It’s important to remember this is just a brief overview. To maximize your mechanical advantage, you must grab the furthest point of the tool. If you choke up on the tool, you shorten the distance of effort to fulcrum and decrease your mechanical advantage. Mechanical advantage can be increased on outward swinging doors by marrying a 6-foot hook or another halligan to help force the door. Finally, the greater your mechanical advantage, the less spread you get, and vice versa.
Well, that’s it. Everything from the history of the halligan to why it works. It’s important, especially in the fire service, to know where we’ve come from, where our tools come from, and why they are the standard. This not only helps firefighters use them, but also gives you a sense of why they work. Having a deeper understanding of your tools allows you to have a better working knowledge when using them.
 Clay Magee is an instructor with Magic City Truck Academy and a Firefighter/Paramedic with Birmingham (AL) Fire and Rescue and Chelsea Fire and Rescue. He is currently assigned to Rescue 20 at Birmingham. Clay began his career with the East Oktibbeha Fire Department in 2004 while attending Mississippi State University. He has been with Birmingham Fire since 2013. He has a passion for forcible entry and high-rise operations. He holds a bachelor’s degree in business administration from Mississippi State University, an associate’s degree in Fire Science from Columbia Southern University, and multiple certifications from the Alabama Fire College.

