By Chad Foster
While preparing for Tulsa (OK) Fire Department’s fall company drill on below-grade fires, I became aware that most of our tactics for firefighter rescue rely on more people than will be available. Our minimum staffing of three leaves the driver with pumping and supply duties while the company officer and firefighter advance attack lines to extinguish the fire.
In the past, we taught the Nance drill or to bring a ladder to retrieve firefighters from below grade. In the Nance drill, the victim stands in a loop of hose and holds both sides of the loop while firefighters work in unison to pull both sides of the loop from above. The Nance drill usually takes four rescuers and is somewhat labor intensive. The use of ladders for rescue from below grade through a hole in the floor or basement window has its place in the fire service, but it can be time consuming depending on your location in the building (14-foot ladders don’t easily maneuver through residential structures).
The goal for this drill was to come up with some
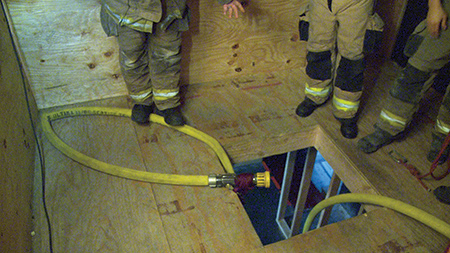 |
| (1) The double-horseshoe method. (Photos by Mark Haugh.) |
method to get one firefighter out with the resources available while waiting on the deployment of rapid intervention team resources. For Tulsa, that meant one firefighter, possibly a hand tool, and a 1¾-inch preconnect.
The Experimental Stages
During the planning process, my original idea resorted back to some rope training I had in the past as a rescue technician. We were taught to climb a rope using prusik cords that slid up the rope as you ascended.
Our members don’t carry prusik cord, but several members carry short sections of webbing in their pockets. I tried to climb a loop of hose using two pieces of webbing girth hitched around the hose. It worked great until I reached the top; then, my girth hitch wouldn’t slide past the edge of the hole. Our second attempt came out of that failure.
 |
| (2) Anchoring the hose. |
One of the other instructors used my looped webbing and girth hitch idea but added a clove hitch to the opposite side of the hose. He essentially made a three-step ladder out of the two pieces of webbing and hose. It worked great, was quick, and did not pose an extreme physical demand. We thought we had the next great thing.
On our full dress rehearsal, we found it was not the next great thing. With the self-contained breathing apparatus (SCBA) and bunker gear, we found our center of gravity, flexibility, and mobility severely affected. In five attempts, we had one successful rescue, and it came with a 50-percent air cylinder consumption. It just wasn’t worth pursuing, so we went back to the drawing board (you know, Google and YouTube).
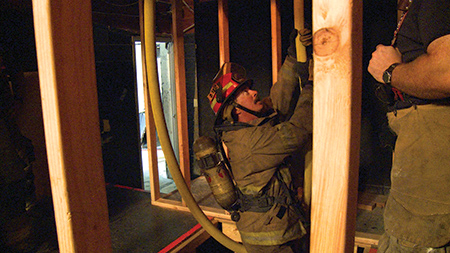 |
| (3) The firefighter to be rescued straddles the hose facing the anchored side. |
The Double-Horseshoe Method
We found the double-horseshoe method, thanks to those instructors who share ideas through media sources. It requires two firefighters above to perform the rescue.
A single loop of hose is lowered into the hole, and a second loop is laid on the floor approximately six to eight feet from the hole (photo 1). The hose will be anchored with the second loop. The firefighter places his feet on the bend and lies on the hose (photo 2). The firefighter being rescued straddles the hose, facing the anchored side (photo 3). The firefighter in need of rescue pulls himself up while the second rescuer pulls the supply end of the hose (photo 4).
A significant benefit of this technique is that someone has control of the nozzle and can protect the firefighter below during the rescue. It also resembles a two-to-one mechanical advantage, so everyone would have an opportunity to be successful. Note that, unlike the Nance drill, the firefighter does not stand on the hose because the hose is sliding between the legs of the firefighter to be rescued with the mechanical advantage.
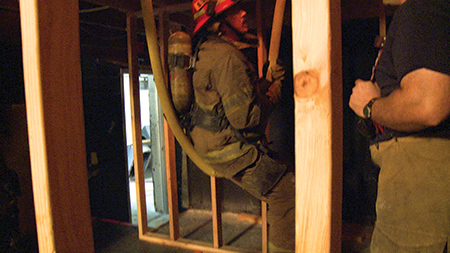 |
| (4) The rescuer and the victim pull in unison. |
The method was applicable, but it didn’t accomplish the original goal of getting one firefighter out with one person. We made a slight modification. It seemed to me that the easiest rescuer to get rid of was the anchor. We didn’t have built-in anchors in our prop or the vacant building we were using, so we improvised. By knocking a hole in the nearest wall between two studs, we were able to use a halligan as our anchor. It was attached to the hose with a clove hitch, and we used a girth hitch on the halligan with a 15-foot piece of webbing (photo 5). The webbing was stored in my pocket. It had already been doubled using a water knot.
This allowed enough friction on the hose so that we could use the anchor for more than 500 attempts without an anchor failure. It seems most of the load is carried by the hose and the bend over the edge of the hole.
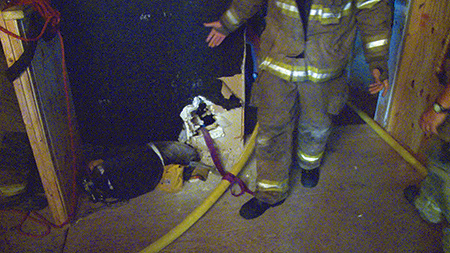 |
| (5) We anchored the hose with a clove hitch. Not pictured is the girth hitch on a halligan tool on the other side of the wall. |
Lessons Learned
During our company drill, we had a >99 percent success rate in removing firefighters from below grade. With the mechanical advantage of this method, we had some very uneven matches of rescuers and victims both in size and strength.
Some of the lessons we learned follow:
- Older and dirtier gloves made the technique very difficult; surprisingly, wet gloves gave a better grip.
- It was better if the anchor and the puller/rescuer were on opposite sides of the hole. The puller needed to be close enough to pull in an upward direction. The farther the puller was away from the hole, the more friction there was on the edge.
- If either the puller or the climber needed a break, the puller could push the hose to the ground and kneel on it.
- Efforts had to be in unison to get the mechanical advantage.
- The puller should take up all slack in the hose before starting to pull.
- Don’t let go of the hose to grab the victim, or you will lose your advantage. When the victim is waist level with the top, move the hose laterally to sweep the victim away from the hole.
- Communications may be difficult with the SCBA and hazardous environment. It may be necessary to work by feel.
- The victim/climber could gain a lot of height by starting with legs bent and pushing off the ground on the first pull.
This is a great technique, but, obviously, it will not be the best in all situations. However, if you never heard about it, you won’t be able to use it.
CHAD FOSTER is a captain and training officer for the Tulsa (OK) Fire Department, where he has been a member for 24 years.
Personal Harness Use for Firefighter Rescue
RAPID INTERVENTION TEAMS
THE RAPID INTERVENTION TIME LINE AND CREW SURVIVABILITY
Firefighter Survival: Training Minutes : Rapid Intervention Team (RIT) Operations

