TRAINING NOTEBOOK | By Steve Shupert
Stabilization is a fundamental skill in rescue, securing the surroundings/objects pinning a subject. Whether it is a vehicle, a collapsed building, or a trench, firefighters must address some basic factors for success. When stabilizing an object, you must consider and account for several items in your size-up.
The object’s weight. The average weight of a vehicle (minus passenger/cargo) is about 4,000 pounds or two tons. Use this figure to compare and estimate the weight of larger or smaller vehicles.
The rigging’s capacity. Once you know the object’s weight, you can determine what stabilization tools/techniques can handle the weight.
The object’s center of gravity. This is the single point that will balance an object. For a typical passenger car, it is usually at or near the transmission hump (whether front- or rear-wheel drive makes no difference); also consider the position and weight of victims and cargo. Crib and rig around this point to achieve stability and balance.
Anticipated motion of the object. Is the vehicle sliding downhill or is it balanced on another object? How is its structural integrity—i.e., is it rusted or damaged?
Secondary access. This is the path you will use to extricate the patient. You must position the stabilization tools so they do not get in the way of but rather complement the tools and techniques used. You can stabilize the vehicle/object by widening its footprint, defeating the suspension, and establishing firm contact with the ground.
Note: You must have reasonable expectations in your ability to stop vehicle motion. If your tools and techniques can allow no more than two inches of movement, then it is stable. Of course, you must formulate your own risk/benefit to fit your situation.
In a structural collapse, stabilization may just require shoring up a building component. For a vehicle rescue, it includes controlling traffic, securing leaking fuel tanks and other hazards, and interior and exterior stabilization tasks. Interior stabilization is part of “primary access.” As the rescue crew is setting up, you try to get an emergency medical services (EMS) member inside the vehicle through an undamaged door or window. As EMS personnel treat/triage patients, they should also do the following:
- roll down the electric windows before battery cables are disconnected/cut,
- push the seats back,
- unlock the doors,
- set the emergency brake,
- tilt the steering wheel up,
- shut off the engine,
- place the transmission in park,
- cover the patient to protect from glass breaking, and
- begin care.
All these actions will greatly aid in stabilizing the vehicle and may be enough to extricate the patient.
Load Paths
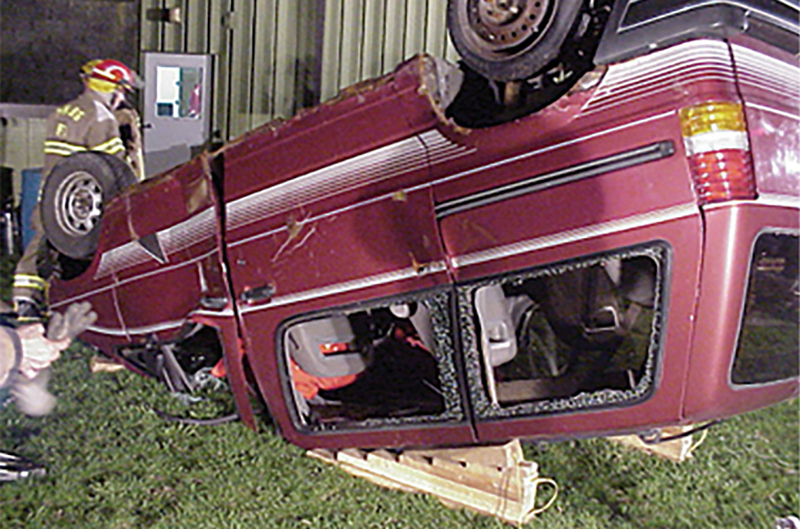
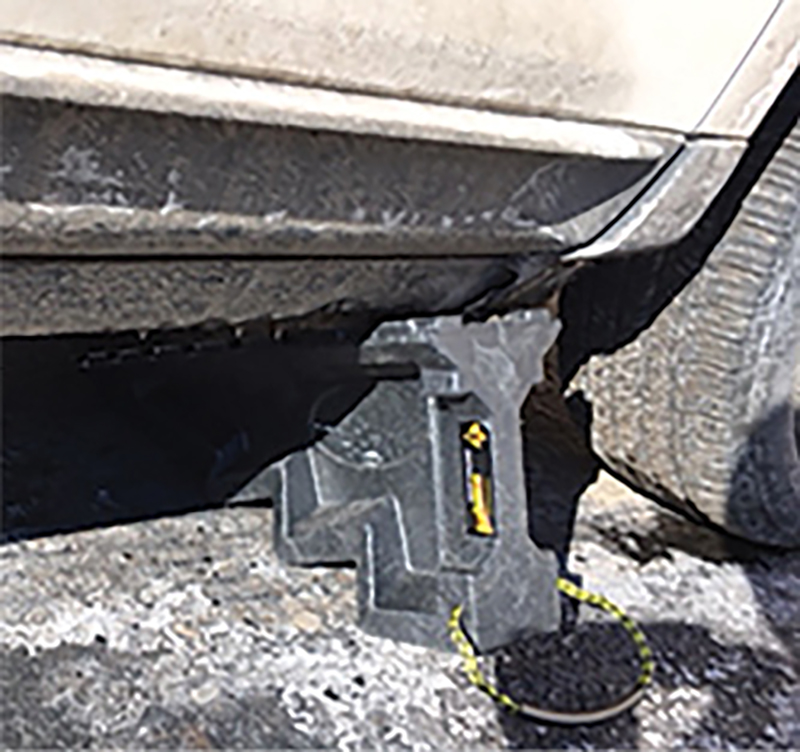
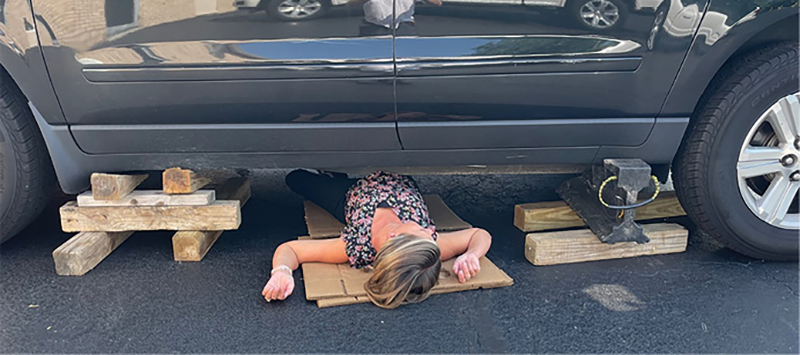
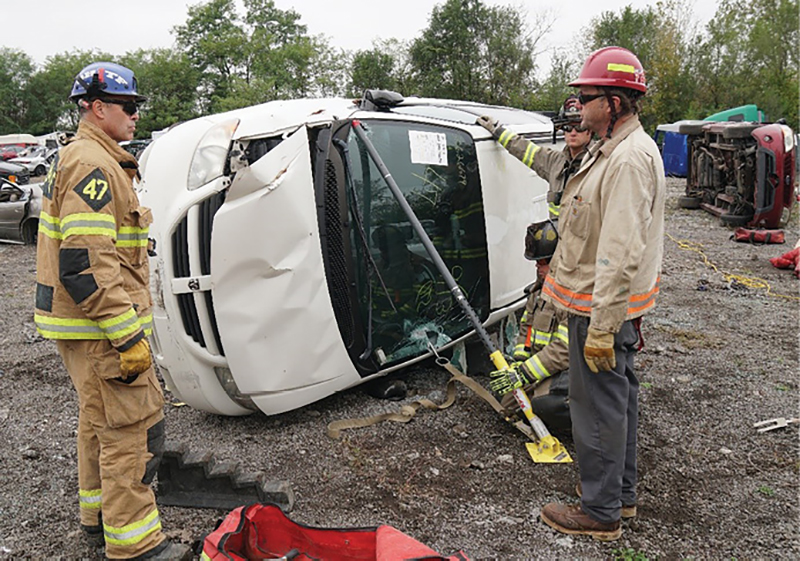
Visualize the vehicle and how it is oriented, using the strong parts of the car to create a connection between the car and the ground that will not be in the way of tool application and patient egress, that will not create a trip hazard, and that will enhance tool performance by giving the rescue tool something solid to push/pry against (photo 1).
Use the vehicle’s structural integrity to help your stabilization plan. Vertical and horizontal load paths are engineered into each vehicle. Identifying these tells you the strongest place to crib and shore.
Do not stabilize or shore to the following:
- flimsy, damaged, or rusted sheet metal;
- shock-absorbing bumpers;
- tires/wheel rims;
- fuel tanks;
- drive shafts; and
- exhaust systems.
Ground Stability
Don’t take ground stability for granted! Is the ground icy, muddy, or soft? The friction between the ground and cribbing/shoring must be high enough to counteract the forces we will apply. When the ground isn’t right, consider widening the base of the cribbing/shoring, pinning it to the ground, or changing/adding another technique such as using a strut or come-along to get the stability you need.
(1) Photos by author.
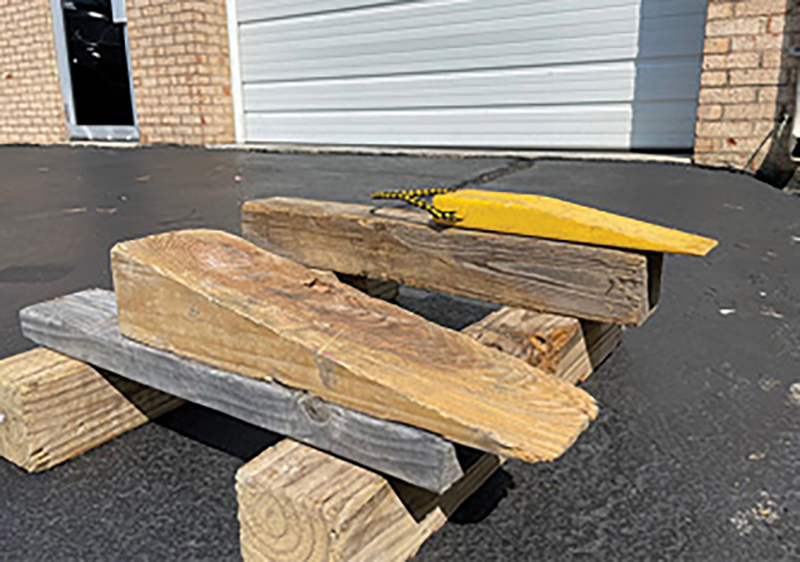
Plastic Step Chocks
After initiating primary access, the next step is to defeat the vehicle suspension (for a car upright on its tires) to keep the car from bouncing and swaying as you apply powerful tools. The two primary techniques involve using step chocks and box cribbing. Keep in mind these techniques will do little to prevent the vehicle from rolling.
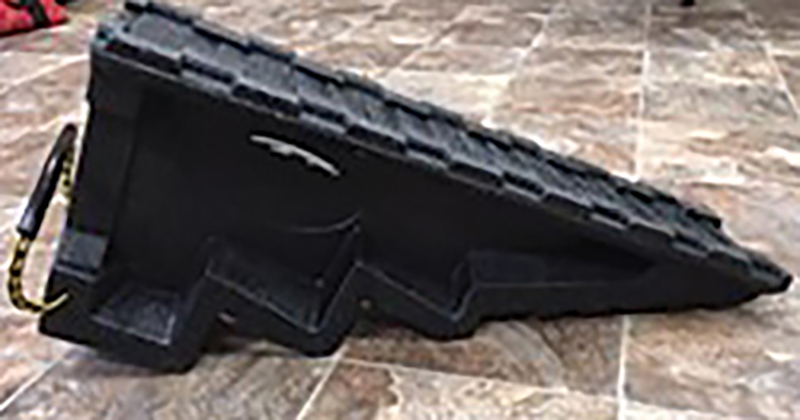
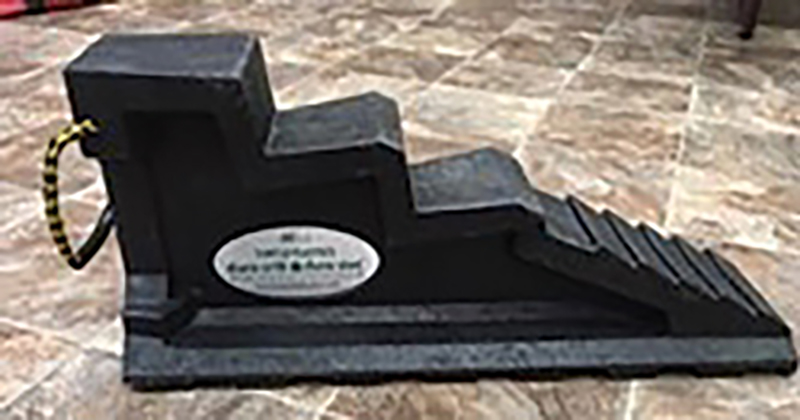
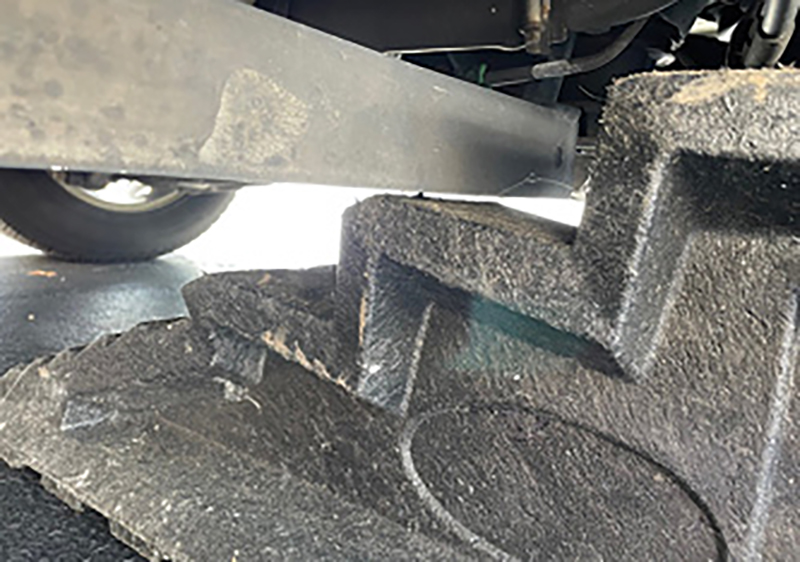
A plastic step chock’s working load limit (WLL) is about 5,000 pounds. Many of us “stick” this chock upside down like a wedge; this is not recommended by the manufacturer. To use this step chock to defeat the vehicle suspension, insert it upright to stretch the suspension so as to lift the car body slightly and then insert the chock and lower vehicle back down onto the highest step available. This tool works well on most passenger cars but is often too short for pickups and sport utility vehicles. For these vehicles, build a crib box or use a wedge under the step chock. Keep in mind if you rest the vehicle on the step chock’s highest step, the lateral stability is at its weakest.
The other extreme is low-ground-clearance vehicles, which often do not have enough room for a step chock. A simple “block and wedge” system works well for low clearance applications and keeps the step chock from becoming a trip hazard.
You can use a newer version of the plastic step chock with the beveled edges on its steps inverted or upright (photos 2-3). Using this chock inverted, the firefighter can push the chock toward or underneath the vehicle to lift the vehicle and push its suspension up to limit further movement.
This process widens the vehicle’s base of support and limits its ability to float on its shocks. The importance of this cannot be overstated, since it aids in limiting patient movement and makes your rescue techniques more efficient so you do not have to compress suspension or bend metal into voids before displacing vehicle components to free the victim.
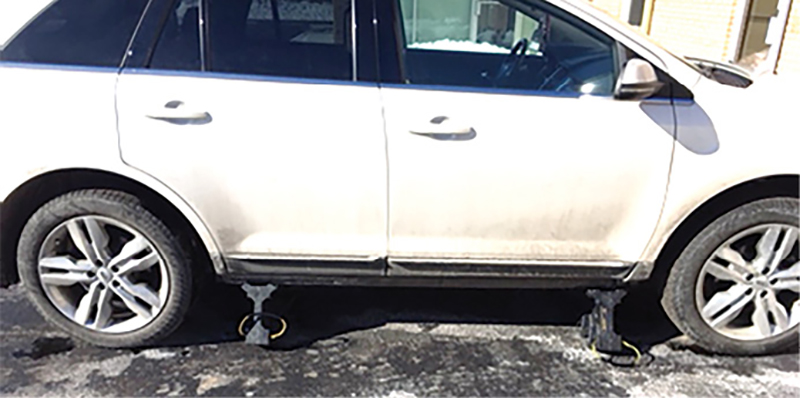
Photo 4 shows the standard placement points for step chocks. They are placed around the center of gravity and out of the way of doors you may need to pop. Ensure the step chocks make solid contact with car frame to ground.
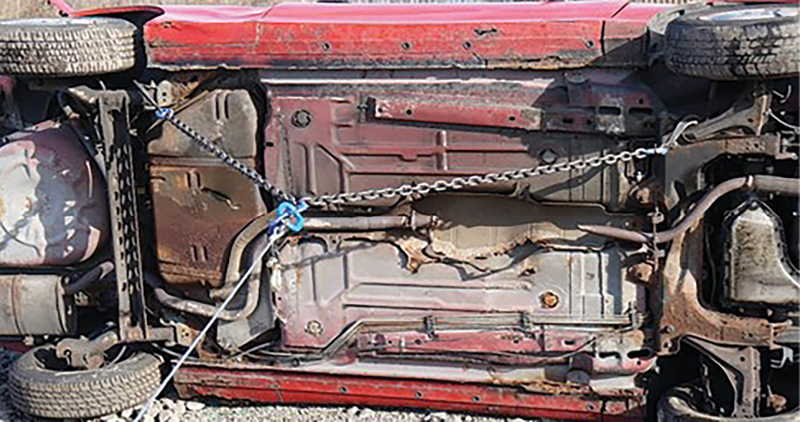
Photo 5 shows good vehicle-to-ground contact; photo 6, however, illustrates the need to lift or stretch the vehicle suspension and then lower it back down on the highest step for this chock to work properly.
(2)
(3)
(4)
(5)
(6)
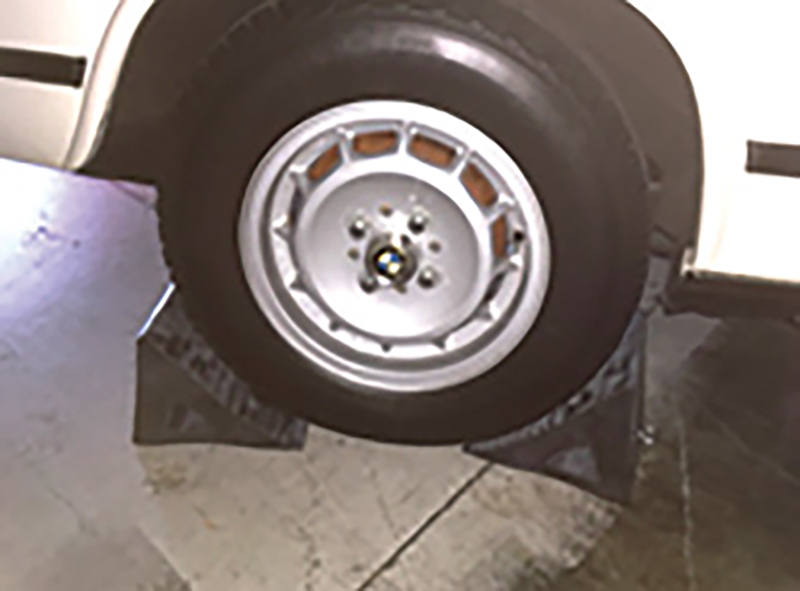
Stabilization techniques like step chocks and cribbing are vertical systems and do little to prevent rolling. After you install chocks or cribbing, an easy way to limit rolling is to deflate the tires by pulling the valve stem or to place wheel chocks for more horizontal stability. Slashing/stabbing the tire is not a recommended deflation method (photo 7).
Wood Step Chocks
Wood step chocks have many designs, using 2 × 4s or 2 × 6s, usually southern yellow pine (SYP) or Douglas fir, but this may differ also. If using SYP, the capacity is 500 pounds per square inch (psi). A solid column, 3½ × 3½ inches, can support 6,000 pounds.
(7)
Wood cribbing should have straight grain with at least eight hard winter growth rings per inch and no knots larger than a 1½ inch, no loose knots, and no other defects. Softer woods such as Douglas fir or SYP are used because under load they will crush and lock into each other, popping and cracking, giving us a warning sign they are loading up. Soft woods bend before they break. Hard woods like oak, while stronger, are too brittle and can fail rapidly. The strength tables are based on SYP and Douglas fir with these characteristics.
“Lift an inch, crib an inch” applies to lifting operations. As we lift a vehicle or other object, we control this load’s stability with cribbing. As it is lifted, it creates gaps between the object and cribbing, and we chase the lift/object with cribbing. Consider the gaps between the cribbing and the object like slack in rope. When an object falls with slack in the rope, it can hit too hard, maybe overcoming the rope’s strength. Objects fall heavier than their weight as they gain momentum. Capture the lift’s progress with cribbing to limit the buildup of momentum if something fails.
If you must edge load a crib box, reduce the overheight of the box to no higher than the length of the cribbing material. Crib boxes have little lateral stability; if edge loaded, they can tip over. Typically, 4 × 4 and 2 × 4 crib blocks are two to three feet long (Figure 1).
Figure 1. Crib Stability
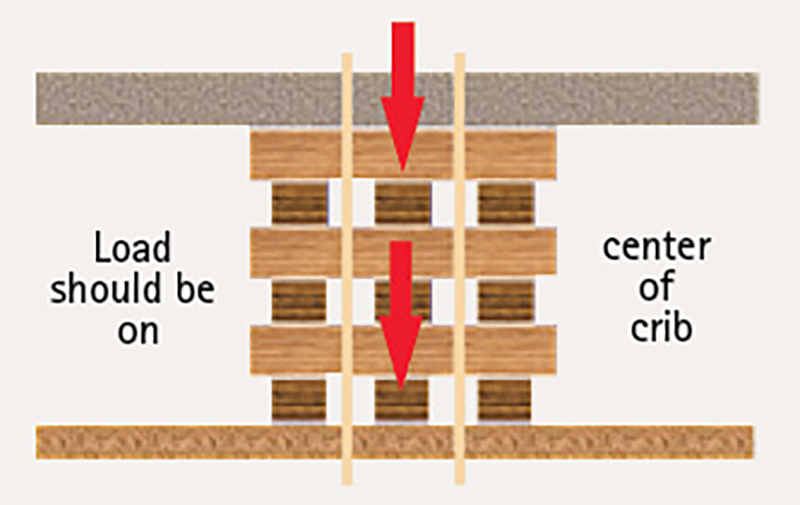
Source: Federal Emergency Management Agency
Always crib around the victim. It provides a margin of error should the load shift unexpectedly. As the car is lifted, push the wedges and chocks in. To tilt a crib box or fill in gaps, use 18-inch-long, 4 × 4 wedges (photo 8).
In a stabilization assignment, it can be critical to have 2 × 4s and wedges to make up all the “in-between” sizes and to capture progress during lifting operations (photo 9).
(8)
(9)
Plastic cribbing is becoming more popular; while heavier and more costly than wood, it lasts longer, interlocks with each other, is stronger (700 psi vs. 500 psi for SYP), and can be decontaminated.
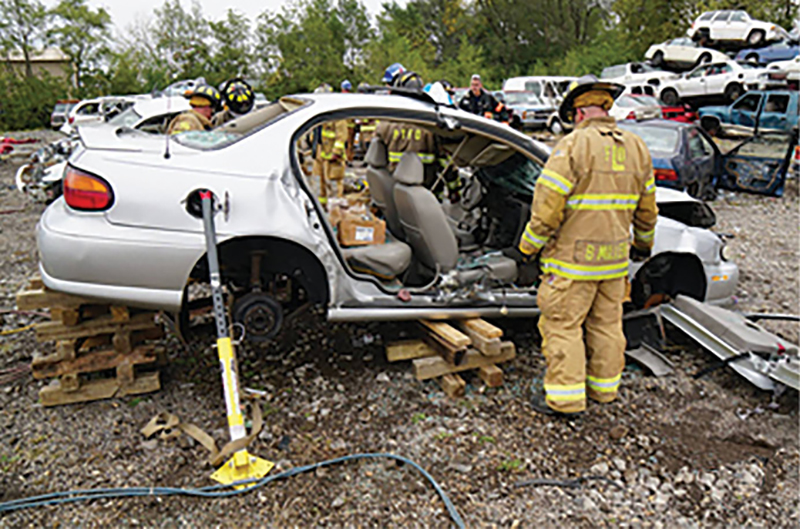
For poor ground conditions, make the bottom layer of the crib box solid with more blocks. Recheck chocks or cribbing as the rescue progresses. Removing doors or victims changes the center of gravity and the vehicle’s weight and will loosen the cribbing (photo 10).
Vehicle on Side or Upside Down
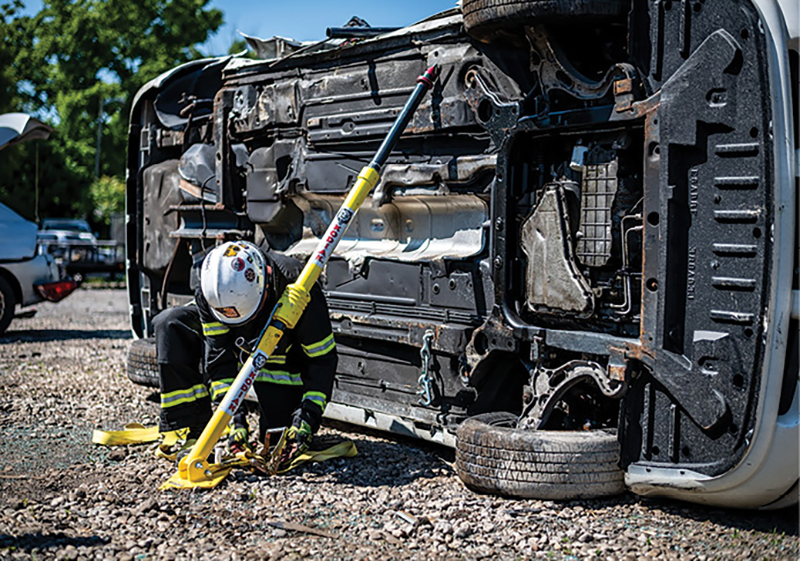
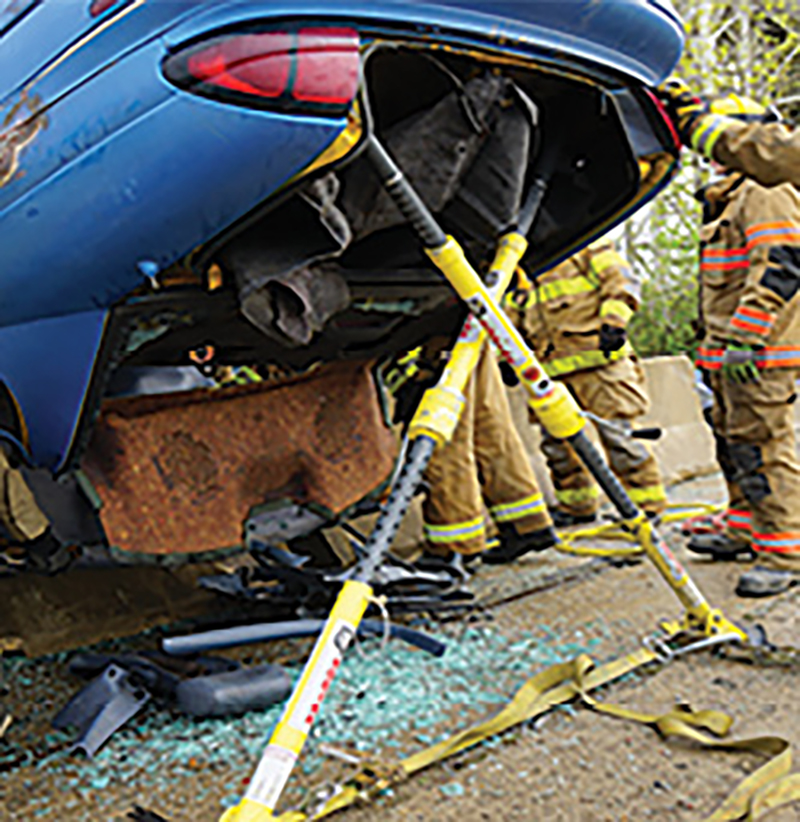
Stabilizing a vehicle on its side has several challenges. Stick a step chock against a post on the clean or rounded side to gain some resistance to rolling, and then place struts.
Install the struts at an angle between 45° and 75° as measured from the base of the strut and angled up to the car; adjust the length as needed (photo 11). Place the tip of the strut into a place that will capture the vehicle’s weight, inhibiting it from rotating/kicking out and so that the strut tip won’t punch through. Insert the hook on a substantial part of the vehicle (nearer ground level), and pull the excess webbing through the ratchet; crank the ratchet handle several times to draw it in tight. To connect the webbing to the strut base, insert the free end of the webbing into the ratchet in the closed position and pull tight. It should not take more than five or six cranks of the ratchet to tighten it. Do not overload the ratchet drum with webbing (photo 12). Note the rounded surface of the vehicle body in photo 13; install the strut on this side first when possible.
(10)

(11)
(12)
(13)
For typical stabilization applications, try to angle between 45° and 75°. If using the lifting device, keep the angle greater than 45°. Install some primary stabilization to create a “safer” workspace to install the buttress shore.
Vehicle on Side:
Come-Along/RiggingFor a vehicle sliding down a slope or at a high risk of tipping over, you can create quick, effective stabilization using some basic rigging. To reduce stress on the chain, try to keep this angle around 90° or less; 3⁄8-inch, grade 8 chain has a WWL of 7,100 pounds (photo 14).
(14)
Struts and cribbing are used in compression or pushing against the vehicle; when using chain and wire rope, we are using them in tension or pulling on the vehicle to limit unwanted movement. Note the chain attachments are located where step chocks would be if the car were upright, balancing around the vehicle’s center of gravity and capturing the entire weight. Use no less than 3⁄8-inch, grade 7 (transport) chain; Grade 8 is preferred.
Establish strong, solid connections. If using your vehicle as an anchor, shut off the ignition and chock the tires.
For a vehicle rolling down a slope but still on its wheels, it is the same principle of capturing and securing the load. It is best to have two points of connection to prevent the car from shifting and becoming a swinging pendulum. Don’t allow any work on the vehicle until it is secured.
Work with your local vehicle recovery provider to find out how it can help by using tow trucks and rotator cranes at rescue scenes. It will often help with training, too.
Upside Down Vehicle
A vehicle resting on its roof (flipped over) will typically be tilted down by the engine’s weight, leaving the rear of vehicle slightly elevated. This rear end area can be stabilized using the struts. There are two primary applications: One is placing the struts exterior of the car’s rear quarter panels; the other is to open the trunk lid and cross the struts interior to the trunk. Choosing which method involves a couple of considerations:
- Is there enough space on the sides of the car in which to angle the struts?
- Do you need to access the vehicle’s interior space through the trunk or the rear window? Will the struts be in the way?
Making the triangle here also has a couple of options. Connecting the ratchet strap from one strut directly to the other strut (photo 15) works well and saves a step, or keep the struts independent.
(15)
Stacked Vehicles
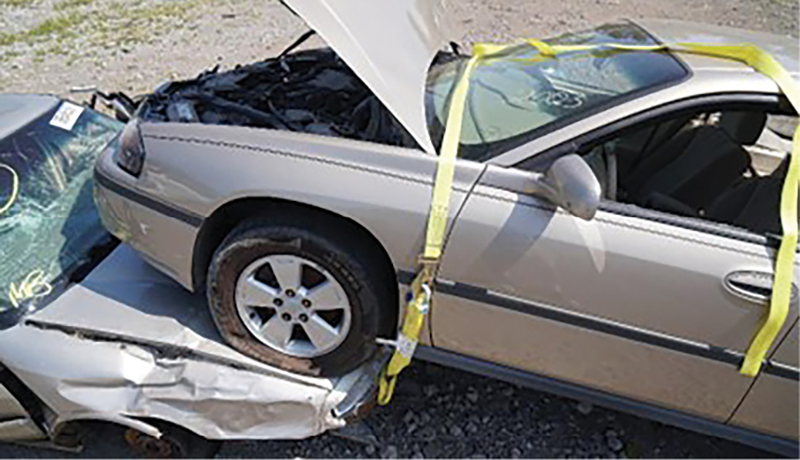
When you encounter stacked vehicles, remember to apply the basic principles discussed earlier. Instead of dealing with two separate vehicles, strap and tie them together so there is a common center of gravity and weight. The top vehicle could move without warning, so approach with caution. Strap/come-along the vehicles together tightly enough to compress the suspension and limit movement. Also keep in mind the extrication plan; don’t strap over doors you might want to open later (photos 16-17).

(16)
(17)
This situation may require several techniques to adequately stabilize the vehicles. As with any multivehicle crash, triage your patients and make rescue assignments based on patient condition.
Vehicles flipped on each other, “paint on paint,” can be especially slick and difficult to stabilize. No interior work should begin until you have stabilized all vehicles. Typically, we shore/crib from the ground up; if the top vehicle is very unstable, work on that one first. If lifting the top vehicle is part of your plan, remember to insert lifting devices into your struts and check how you may strap the vehicles together. If lifting the top vehicle, strap that vehicle to itself, compressing the suspension, so the lift does not have to stretch the suspension taut before it really starts to lift. Remember to crib as you lift.
Being well-practiced and competent in stabilization may ensure an efficient, successful rescue vs. a delayed extrication completed through trial and error. Get to the salvage yard and practice your stabilization skills.
References
Turtle Plastics. “Dura Crib – Interlocking Stabilization Products.” https://www.turtleplastics.com/dura-crib-cribbing-blocking/.
Genesis Rescue Systems. “Kodiak Stabilization System User Guide.” https://genesisrescue.com/app/uploads/2020/02/KODIAK_User_Guide.pdf.
Videos
“Battery Disconnect.” https://vimeo.com/226003421.
“Primary Access.” https://vimeo.com/205151064..
“Basic Cribbing.” https://vimeo.com/205156277.
“Car on Side – First Step.” https://vimeo.com/255903813.
“Side Stabilization with Chains.” https://vimeo.com/255390054.
“Car On Wheels Heading Downhill.” https://vimeo.com/255927685.
STEVE SHUPERT is a 37-year veteran of public service. He retired from Miami Valley Fire District in Montgomery County, Ohio, and serves as a rescue team manager for Ohio Task Force 1 (OH-TF1) US&R team. Shupert is also the chair of the FEMA Rescue Subgroup and the director of training for 501c3 Crash Course Village in Kettering, Ohio.
WS5-Battery Disconnect from HRS on Vimeo.
Working Smarter – Primary Access from HRS on Vimeo.
Working Smarter – Basic Cribbing from HRS on Vimeo.
WS9 – Car on Side – First Step from HRS on Vimeo.
Working Smarter 8 – Side Stabilization with Chains from HRS on Vimeo.
Working Smarter WS10 – Car On Wheels Heading Downhill from HRS on Vimeo.
Must View

Elevator Rescue: Rope Gripper Entrapment
Mike Dragonetti discusses operating safely while around a Rope Gripper and two methods of mitigating an entrapment situation.
Two Workers Killed, Another Injured in Explosion at Atlanta Delta Air Lines Facility
Two workers were killed and another seriously injured in an explosion Tuesday at a Delta Air Lines maintenance facility near the Atlanta airport.