By Josh Pearcy
As spring approaches each year, we enter what generally is referred to as the “rain season” and begin preparing for the reality of the swift-water calls ahead of us. For most responders, it is time to dust off the swift-water gear, look at known trouble spots, and preplan responses to areas in their districts.
For many crews in the nation, the swift-water refresher starts with the review of the throw bag. Throw bags can be a great resource. If you or someone on your crew is not familiar with it, now is the time that you HAVE to go over it. They can be used for several applications, and there are advantages to having them readily available. They are fast, lightweight, can be used for rescuing victims, and can help the responder to self-rescue.
Arguably, the biggest drawback I have to relying on a throw rope as the primary means of rescue is that the responder has to depend on the victims to be involved in their rescues. Many things can interfere with the victim’s ability to grab and hold onto the rope. In 60°F water, which isn’t that cold or unusual for many areas, victims may have only one or two minutes of useful feeling in their hands to assist the first responder. After entering the water, many victims become very panicked, which in itself may decrease their ability to grab a hold of the line. Other factors can also affect the victim’s ability to assist the rescuer.
The Rope Curtain Technique
This article explores another swift-water technique, the rope curtain. It can be quickly deployed as a downstream safety. It necessitates very little equipment, is easy to learn, and doesn’t require the victim to be involved in the rescue. The end goal of this technique is to have a tight rope secured across the waterway between two staggered objects, with a separate rope tied to produce the “curtain” that slides along the main line rescuing victims.
The following equipment is needed for this technique:
· Two ropes (preferably different colors).
· A throw rope.
· A few carabiners.
· Webbing or an anchor strap.
The Technique
• The first step, as with any downstream safety technique, is to find a location downstream suitable for deploying the rope curtain. Consider the following when selecting a downstream location: How far downstream is it? What is the water speed and how long will it take to access the water and set up the curtain? What is the width of the water and what is the length of the rope? The equipment may work better in narrow spots, but the surface speed of the water will be much faster in such a narrowing.
• Look for an object on each side of the waterway on which you can anchor the rope curtain; these objects should be staggered. An ideal location for a rope curtain is downstream from the incident and just upstream from an impassable area–for example, just upstream from a waterfall, pipe culvert, large strainer, or something you identify as the point of no return for survivability.
• Attach the two ropes to the rope from the throw bag.
• Throw the bag across the water to another member of your crew on the river’s right side.
• Identify one of the two ropes as the main line rope and the other as the curtain rope. Having each rope a different color will help to avoid confusion while setting up the rope curtain.
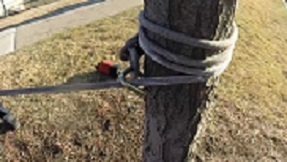
• Attach the main line around the object with a tensionless wrap downstream from the river’s left anchor point. The other side or, for this demo, the river’s left side, makes a hasty 3:1 in the mainline and tightens the line. The main line needs to be at least four feet above the water when tightened. This will help prevent the victim from reaching up and grabbing the mainline and possibly putting the rescuer and victim into a strainer or an entrapment scenario.

(1) Photos courtesy of author.
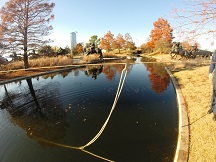
• Once the line is tight, estimate the distance from the mainline to the top of the water. For this demonstration, the distance is five feet (photo 2).

(2)

(3)
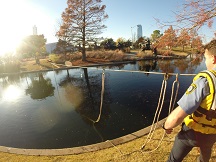
• Quickly make a bight in the rope that is double the distance you have estimated. Tie an eight on a bight, using the whole bight. For this demonstration we have a five-foot eight on a bight using 10 feet of rope. Then attach the bight to the mainline using a carabiner. This will allow the curtain to slide back and forth on the mainline. After attached with the carabiner, the “curtain” should touch the water.
• Now, move a few feet down the rope and continue to tie these large eights on a bight and attaching them to the main line. How many loops you should tie will depend on the number of carabiners in the cache, the width of the water you must cover, and the length of the ropes available?

(4)
• The crewmember on the other side of the river, and preferably downstream from your location, can pull the tail of the curtain to deploy it all the way across the water. Ideally, the curtain covers the water and leaves some additional curtain loops on the upstream side to be deployed as the curtain moves victims towards safety. As victims move downstream, they get caught by the curtain and moved to the downstream side where the other crewmember is waiting to assist the rescuer and victim out of the water. If needed because of current or other water features, the downstream member can pull the tail of the curtain to assist the victim in reaching the bank. As a nice bonus, as victim number one is caught in the curtain and being moved toward the bank, the remaining “extra” loops are being deployed across the water. This provides complete coverage of the water the entire time and allows for multiple victims to be rescued at one time. Also, while waiting downstream for possible victims, the curtain can be easily lifted up out of the water to allow for flood debris to pass by without it getting entangled in the rope curtain.

(5)

(6)
There are many variations to this technique to accommodate the different bodies of water that may exist in your district. The main line height and length of loops are adaptable to the area to which you are responding. The challenge is to practice. Start by walking though the technique and figuring it out and then work up to full speed and under the stopwatch. If you don’t have water in your area to train in, that’s not a problem. I teach most of our refresher courses over a street or driveway, pretending that it is a waterway and run through the skill multiple times. After a little practice, your crew will be proficient and can use this technique as another tool in the water response toolbox.
BIO
JOSH PEARCY has worked in fire/EMS for more than 14 years. He is a firefighter/paramedic for the Oklahoma City (OK) Fire Department, where he has served since 2007. For the past five years, he has been stationed at Station 8, the special rescue station for the Oklahoma City metro area. He has been a fire/EMS instructor for the past 12 years. He is a member of OK-TF1 and is certified as a firefighter II, a paramedic, a hazmat technician, a confined space technician, a structural collapse technician, a rope rescue technician, a trench rescue technician, a heavy extrication specialist, a swift water technician, an underwater dive recovery specialist, a dive instructor train-the-trainer, a fire department instructor, and a state EMS instructor.

