When we talk about high-angle rope rescue—in particular, pickoffs—we are talking about using two ropes to accomplish the task. One may be a main line and the other a belay, or safety, line. We may also be using a two-line system in which both lines act as a lowering or a hauling system in which the lines function as a safety for each other. The high-angle rope evolution is much different from the roof rope evolution, which employs a single line without a safety line for the pure reason that a life is in an immediately dangerous to life or health environment and time is paramount.
Pickoff techniques or protocols vary according to departments. Some have performed this evolution the same way since the inception of their departments. Others look at different techniques to determine which approaches will be safe and easy and work for them. This article discusses the two most common techniques in use and then combines them into another tool—the “Y” Technique—for your toolbox.
RELATED FIREFIGHTER TRAINING
HIGH-ANGLE OPERATION IN TIMES SQUARE
High-Angle Rescues, New York City
TRAINING BENEFITS EVIDENT IN SUCCESSFUL HIGH-ANGLE RESCUE
THE CHALLENGE OF MULTICASUALTY HIGH-ANGLE INCIDENTS
Before Initiating the High-Angle Rescue Plan
Deciding on your game plan when considering a rope rescue involves weighing multiple factors, including the following:
- Is a high-angle rope rescue the only way to access this individual? This type of rescue is low frequency, high risk. Is there a window or some other way that will make it possible to “grab” the individual? Rope rescue should be your last option.
- If rope rescue is your only option, are you going to lower or haul the individual? If you lower, are you going to the ground, the next floor down, or a platform? Do you have enough rope to do what you want to do? If you haul, are you going all the way up, to the next floor, and so on? This is critical because you need everyone to be well-informed on the evolution before you perform it. This is not a decision to make on the fly.
- Evaluate your anchors and rigging. Are the anchors substantial to hold the load and permit the evolution? If not, replace them. Experience and thinking outside the box are imperative. You may have to extend anchors, make anchors, or use things that are substantial; all may work. Or, you may have to come up with some funky rigging. As long as it’s safe and you have enough equipment, it will work.
Other considerations that have to be taken into account include the following: What are the condition and position of the victim? What is the viability of the victim’s harness (can you attach your system to it; is it damaged)? How long has the victim been in this situation? Is the weight of the victim fully suspended by the equipment (suspension trauma)? Should the victim stand on an object to help suspend the weight? Is there a language barrier?
Commonly Used Methods
Some departments use old-school techniques in which a pickoff strap is attached to the rescuer, who inverts when he reaches the victim, attaches the other end of the strap to the victim, and then hauls the strap to de-tension the victim’s line. If the main line fails, a tremendous amount of force and stress is placed on the rescuer. In essence, the rescuer is pulled in opposite directions—from the back, where the belay is attached, and the front, where his safety line is attached. The amount of force could cause trauma or internal bleeding to the rescuer, whose safety is paramount.
In other departments, two separate lines and a belay line are used. The victim has a separate “main line” and shares the rescuer’s belay line with a butterfly or prusik. The haul team on top of the building roof or on top of the object from which the victim is suspended will pull on the victim’s “new line” to de-tension the static line on which the victim was suspended. The rescuer then releases the tensioned line, which should be slacked now, and guides the victim to the bottom. This technique necessitates more equipment, more personnel, and a knowledge of rigging.
The “Y” System
The “Y” system is a combination of the two techniques described above. It uses a main line and a belay line. (You can also use a tandem line system, which would perform in the same way as having a main line and a belay line; however, in this system, each line acts as a belay for the other line. Also, the connection points to the rescuer and victim would change slightly because since this is a tandem-line system, each line acts as a main and a belay. Therefore, the connection point needs to be in the same place on the harness since both lines are lowering at the same speed and we need to have both lines tensioned together.) For the purpose of this article, we will focus on just a main line and a separate belay line, not a tandem-line system. The main line will be responsible for lowering and hauling. The safety line is there in case the main line fails.
When your team is in place and after you have double-checked the rigging, you are ready to load the line with the rescuer. The question now is, how do you attach the rescuer to the system so that the rescuer can easily and safely pick off the victim? Following is the procedure for loading the “Y” system.
-
- Attach the main line to the rescuer. Place the terminal knot on the rescuer’s upper chest attachment point. Attach a triple-wrapped 8mm prusik with a carabiner to the main line; this is for the victim (photo 1).
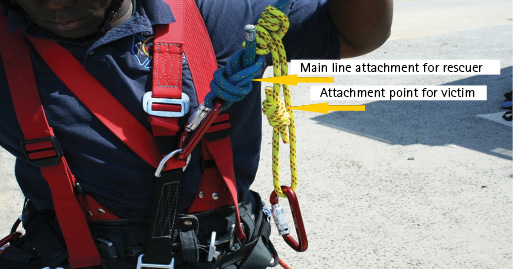
(1) Photos by author.
-
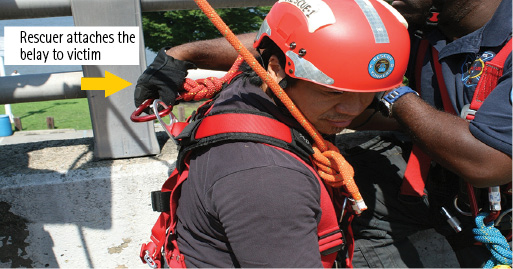
- Now, for the belay line. Attach a triple-wrapped tandem prusik with one carabiner to the rescuer’s dorsal attachment point on the harness. Place the terminal knot, which has a carabiner attached to it, on the side attachment point on the rescuer’s harness. This will be used for the victim (photo 2). You are now rigged and ready to load the line to get the victim.
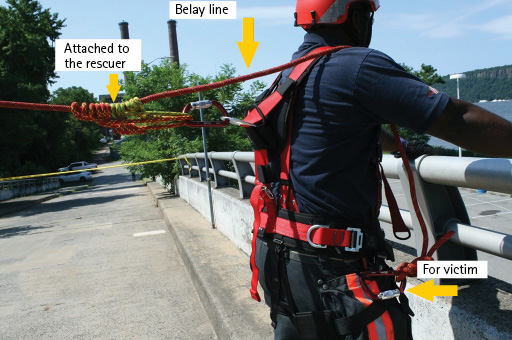
(2)
-
- Talk to the victim when you get close; do not just come down on him. This is when you more than likely will find out if there is a language barrier between you. If there is, use hand gestures so the victim doesn’t panic as you approach. When you get eye-to-eye level, evaluate his harness and see where he is attached to the tensioned line (photo 3). Attach the terminal end of the belay line with the carabiner to a structural part of the harness (photo 4).
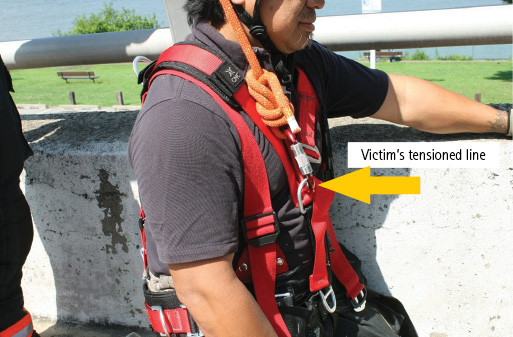
(3)
(4)
Note: This situation is different from one that involves a worker on a suspended platform such as a window washer or construction worker. Workers usually have on a fall protection harness, which is quite different from a technical rescue harness (Class III). You may have to think about where you want to attach the safety line on the individual should the main line fail. You need to ensure that in a worst-case scenario the victim will still be attached to the rope system. Once you place the belay line on the victim, you have him. His line could fail but you would still have him. Mitigation is beginning.
-
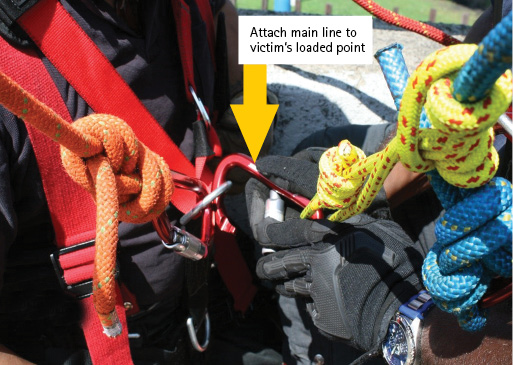
- Connect the main line to the victim. Take the prusik with the carabiner on it and place it on the tensioned attachment point on the victim (photo 5). Bring the victim as close to you as possible so you can position the prusik as high as possible on the main line (photo 6). This will take slack out of the system so your haul team will have to raise the rescuer and the victim because the victim is connected to the rescuer’s main line now, which is only approximately six to 12 feet. After the victim’s original tensioned line becomes de-tensioned, detach that line and transfer the victim to your system. The victim is now connected to the main line by the prusik and to the safety line by the belay’s terminal knot. The victim is now secured. The haul team above can now lower or haul both parties, depending on the action’s size-up plan.
(5)

(6)
-
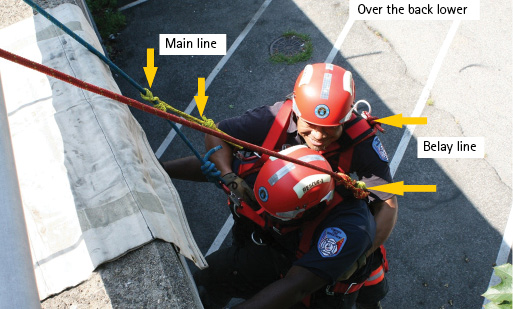
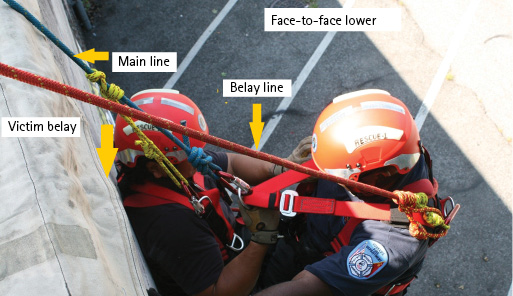
- During the rescue flight, the rescuer can face the victim and use his legs and arms to negotiate obstacles (photo 7) or “sling” the victim over his back (photo 8). The method of traveling with the victim may be dictated by the environment, the victim’s injuries, or the rescuer’s preference. As long as it is safe and works, it’s a good method.
(7)

(8)
This “Y” technique is another tool you can use. But, of course, you must train, train, and train on this method before using it in a pickoff emergency.
MIKE GIROUX is a lieutenant and a 19-year veteran with the Yonkers (NY) Fire Department. As a nationally certified fire instructor I and fire officer, he has taught all aspects of technical rescue for the department and around the country. He is also a senior chief instructor for Wright Rescue Solutions, Inc., based in Panama City, Florida.

