By Mike Giroux
Every time we train on patient packaging for a vertically-oriented litter lower in the fire station, it seems we shy away from the flexible litter. When asked why they tended to focus on the stokes basket and not the Flexible litter, firefighters generally replied with something like: “Well, we have some trouble with the rigging of the flexible litter’s vertical bridle and it’s so much easier to lash the victim into a stokes, especially with methods that use rescue straps with buckles.” I brought this problem to my friends and colleagues at Wright Rescue Solutions, Inc. and, with the help of them and the flexible litter company, we developed a very simplistic way to attack the rigging of the vertical flexible litter.
We all realize that the stokes and flexible litter are different types of packaging devices in that the stokes is a rigid basket whereas the flexible litter is flexible and wraps around the victim. In general, we prefer to use the stokes basket over the flexible litter because it offers more protection to the victim without squeezing their body. Whenever we cannot use a rigid litter, usually due to space limitations, we will opt for the flexible litter, our preferred flexible litter device. Being flexible, this option can greatly reduce the victim’s profile, allowing it to fit through narrower openings such as those commonly found in confined spaces.
RELATED FIREFIGHTER TRAINING
Throw Back to Basics: Stokes Basket
SECURING TAG LINES TO BASKET LITTERS
We also prefer to use litters in a horizontally oriented configuration whenever possible. This helps reduce victim apprehension since they often have no real sense of their elevation—they simply see “blue sky above.”
So, when should we go vertical? The simple answer is: “Anytime a horizontally oriented litter won’t fit.”
In short, we always attempt to use a horizontally-oriented rigid basket litter (stokes). We go vertical if a horizontal won’t fit. We generally reserve the use of a flexible litter when the basket litter won’t fit. This is why we focus our practice time with the flexible litter in the vertical orientation; if there is enough room for a horizontal litter, there is enough room to do the lower or raise using the basket litter.
When rigging the flexible litter for a vertical lower or raise, the bridle can be somewhat intimidating. Since our personnel don’t use it as frequently and it requires reeving of a vertical bridle, they may be unsure of whether they are rigging it correctly.
Of course, there are several flexible litter company-approved methods for rigging the vertical bridle. We’ll just introduce another tool for your toolbox with the addition of this method. This does not mean that this method is superior to that used by you or your company. It’s just another way to look at things.
At work, we always try to secure the patient to a long spine board first (assuming the opening we are trying to pass through allows the width of the board) and then lash the backboarded patient into the flexible litter. This does several things but primarily gives us a device we can attach to a little rigging to prevent the boarded patient from slipping down inside the flexible litter. This would mean the victim’s feet would come to rest against the bottom flap of the flexible litter. Since many fall emergencies are associated with lower extremity trauma, you can imagine that resting all the your weight on your legs wouldn’t be a pleasant prospect. Rigging the board so that it can’t slide further down keeps the weight off of the patient’s legs entirely and the bottom flap of the flexible litter can simply be used to “round up” its lower end so that it’s less likely to hang on obstacles during a lower.
An approximately 30-foot piece of 3/8-inch rope is provided to rig the vertical bridle of the flexible litter. Depending on the method used, this rope is usually doubled and anchor knot(s) are tied in the middle to create a kind of “Y” shaped rigging rope. The knot(s) are placed at the top of the flexible litter and the ends of each side woven downward in a prescribed manner, eventually being secured in some fashion at or near the bottom of the device.
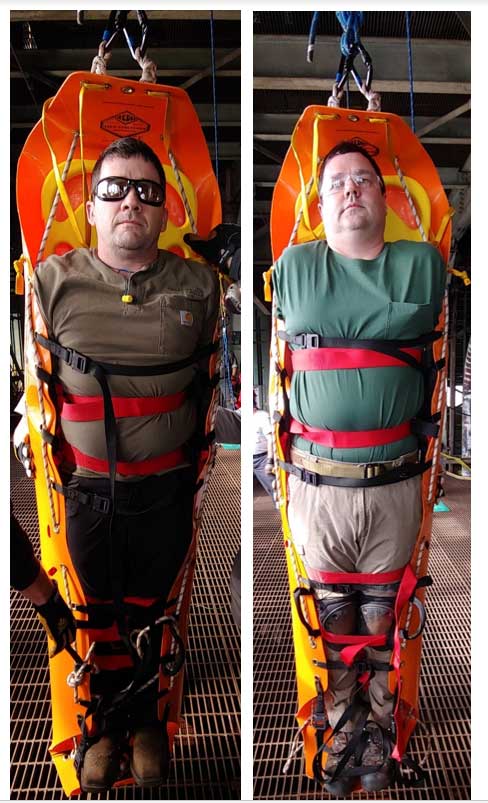
To prevent the backboard from sliding down, we formerly used the rope bridle to tie into the handholds of the backboard on each side. The rope exited a grommet on each side of the flexible litter near the victim’s thigh area and then passed the bridle rope downward, wrapping it through a lifting handhold on each side of the board with two complete wraps before bringing it back upward and through another grommet. This created a “closed loop” which, if the bridle’s slack was removed and the ends of the bridle rope secured properly, would prevent the backboard from sliding down once the litter was in a vertical orientation. I know some companies and rescue personnel do not wrap the board or even use a board for the vertical flexible litter. This is fine, as long as it works for you and your patient. We have found that, for us, this is our best solution for our victim’s comfort, especially where lower extremity injuries exist (photo 1).
The method just described has worked well, especially if the flexible litter grommets were numbered and arrows drawn to show the expected bridle rope path. However, it still took time and great attention to detail to make sure the rigging was correct. Our personnel seemed to have the most difficulty with wrapping the rope around the handholds and getting everything tight enough to accomplish our goal of preventing slip. We knew that we had to change our thinking to simplify the process without sacrificing our victim comfort or rigging goals. Only then could our rescuers feel comfortable. This simplistic solution from Wright Rescue Solutions and the flexible litter folks makes it very easy to package a victim in the vertical flexible litter in the same (or less) time than it would typically take if using the stokes basket.
The method incorporates a bridle rigging system that can be prerigged so that you don’t have to weave rope or tie knots on the scene. It also employs prerigged, simple buckled straps (like those used for lashing in many rigid litters) that can be fastened to the upper handles of the flexible litter to prevent slip. This combination allows rescuers to simply secure the victim to a long spine board, place the boarded victim in the open flexible litter, and secure the litter’s black lashing straps to tighten the flexible litter around the victim. One end of the two-piece, prerigged, rescue-grade straps are attached to a bottom backboard handhold on each side and the other end to the upper lifting handles on the litter. When the victim is placed inside the litter, rescuers simply buckle the straps on each side and take up all the slack before tightening the black litter lashing straps. It’s simple and effective. So much for the summary, here’s how we do it.
Although this method allows the bridle to remain “prerigged,” this is never a substitute for training. Every rescuer involved with the rigging of the vertical bridle should know how to do so proficiently from scratch. If they can’t do that, they have no business prerigging.
As alluded to earlier in this article, marking the path of the bridle rope and other key elements of the rigging directly on the flexible litter material can be very helpful. These markings act as a sort of “cheat sheet” to aid the rescuer in the rigging.
The very first marking is a simple outline of a face on the Flexible litter to mark where the victim’s head should be placed (photo 2). We then marked a number on all the grommets through which the rope bridle would pass. The first hole through which the rope passed on each side of the Flexible litter is numbered “1” followed by the next which is marked “2” continuing downward and ending with hole number “5.”
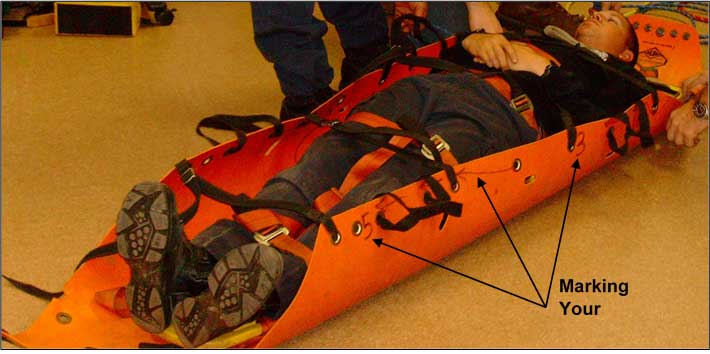
Note something very interesting about the number labeling. The numbers are labeled on the side of the grommet that the rope for the bridle should enter through (photo 4). Sometimes the rope should enter from the back side of the flexible litter and other times it should enter from the front side of the litter. As we continue down the flexible litter, you will notice that the bridle will go between the handle and then back down through the grommet (photo 5). If we were using some of the previous methods, we would have brought the rope to the backboard at this point to take two full wraps around a handhold. However, as will see later, we don’t need to follow this step anymore since we have another way to maintain our backboard from slipping down into the flexible litter. Once markings are finished (they may need to be re-marked from time to time with wear), you’re ready to rig the bridle.
Flexible Litter Vertical Bridle Procedure: Wright Rescue Method
The modified method demonstrated here has been approved by the manufacturer:
1. The first time the prerig is formed, find the midpoint of your 30-foot rope supplied with the flexible litter. Tie two compact anchor knots (figure 8 on a bight or butterfly), one on each side of the midpoint, three to four inches apart. These knots will be the attachment points to the rope rescue system.
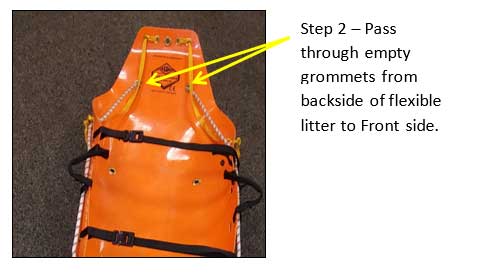
2. On both sides, pass each end of the rope through the empty grommets at the head of the litter (from the back to the front).
3. Center the knots between the grommets and remove the slack between the knots and the grommets.
4. On both sides, pass the rope along the inside surface and out through (inside to outside) the topmost side empty grommet hole.
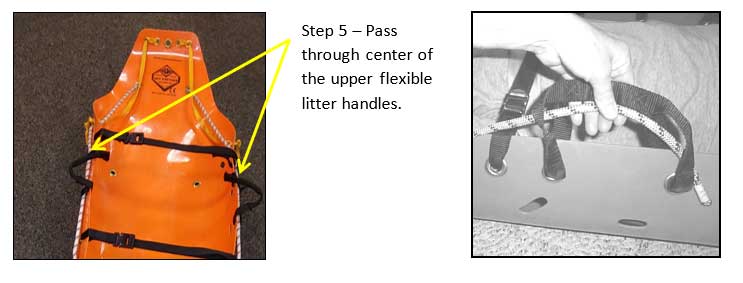
5. On both sides, proceed along the outside surface of the Flexible litter and through the center of the first set of webbing handles.
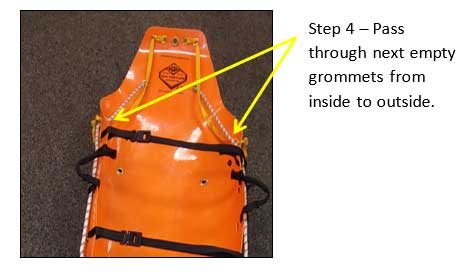
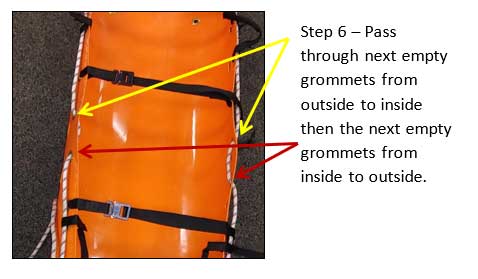
6. On both sides, continue downward along the outside surface of the flexible litter and through the next empty grommet hole (from outside to inside) then come through the next empty grommet hole a few inches down (from inside to outside).
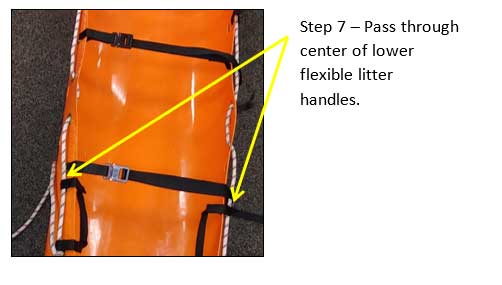
7. On both sides, continue along the outside surface of the flexible litter and through the center of the second set of webbing handles.
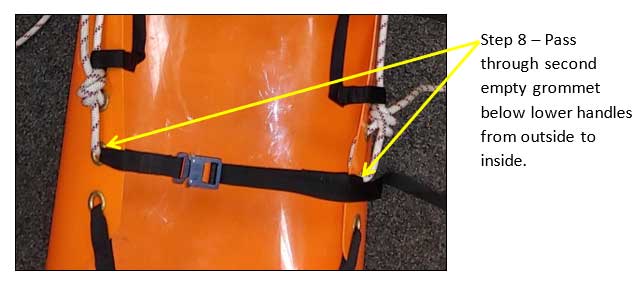
8. On both sides, proceed to the second empty grommet below the lower handle and thread the rope through it (from the outside to the inside).
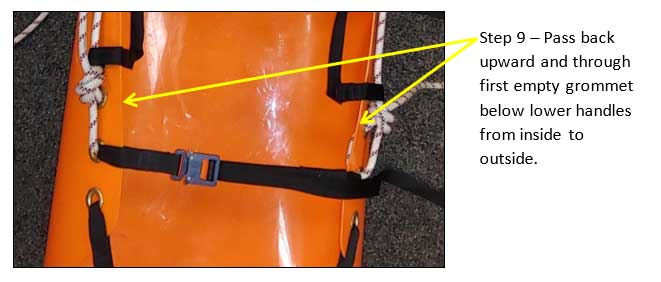
9. On both sides, moving upward along the inside surface of the flexible litter, pass the rope through the next grommet (the one housing the bottom cross-body lashing strap) from the inside to the outside.
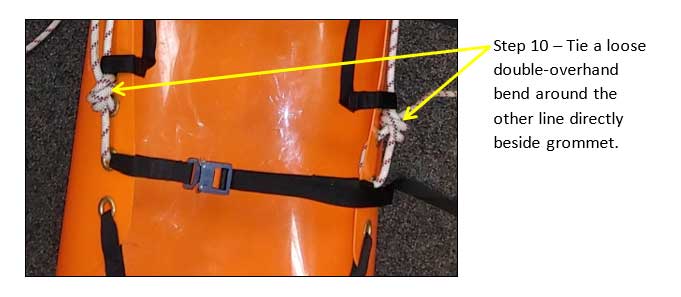
10. On both sides, tie the loose end to the rope issuing from the bottom of the lower flexible litter handle (directly beside grommet hole) with a loose double-overhand bend.
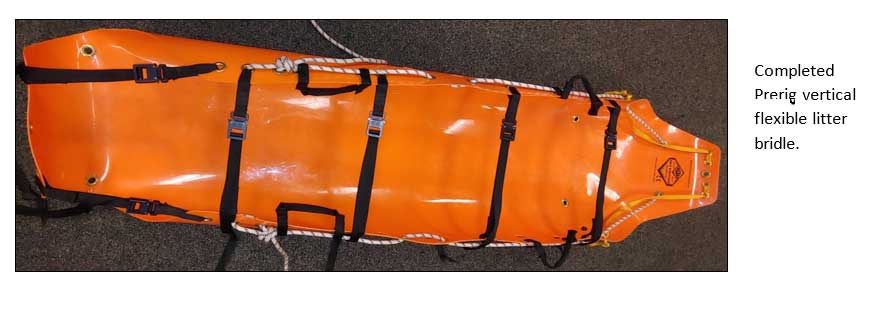
11. Start at the top of the flexible litter and, keeping the knots centered, pull all the slack out of the rope, moving all the way down to the loose double-overhand knot. Adjust and tighten this knot as tightly as possible.
12. The prerigged bridle is now finished. There may be several feet of excess tail rope on either side. Just cut off enough rope to leave no more than a foot of tail on either side. This tail rope may be secured to the other upward rope with electrical tape. This provides enough slack to allow retying if needed without concern about the rope becoming too short.
Attach the primary rescue system and safety-line belay system in the same way as for a vertical basket litter. Note that this shows a tandem line system. If we are using a main line and belay line, then you would connect your systems accordingly.
Inspection Requirements
This prerigged bridle MUST BE INSPECTED in two specific areas before and after each use:
- At every knot and surface of the rope for abrasion and knot integrity. These knots should be retied as needed and left loaded as opposed to the usual practice of loosening. Loose knots and bridle rope may allow slip when the patient goes vertical.
- At the point where the bridle rope passes through the grommet housing the bottom section of the lower flexible litter handle. The point where the bridle rope and webbing come together may allow abrasion if the two rub together under load.
- Replace any rope or webbing found to be damaged significantly.
By now you’re saying: “What about the slippage of the backboard that you have been talking about?” We’re very glad you remembered this and brought it up. As previously described, we’re using two two-piece, rescue-rated, quick connect straps and attaching one end to the top handle of the flexible litter; the other end is attached to the backboard around the thigh/ knee area of the victim. Once we tighten up on the straps as much as possible, we now have reduced the amount of “slide” we will get with the backboard in the flexible litter. Here are the steps:
Backboard Securement to the Flexible Litter
It is important that the backboarded patient does not slip down in the flexible litter when it is used vertically. If left loose, it could possibly slip enough to allow the upper flexible litter cross-body lashing strap to make contact with the patient’s neck. The following is a simple method recommended by Wright Rescue for securing the long spine board to the litter to prevent slip.
1. This method uses patient straps to connect the upper flexible litter handles to the lower backboard hand holds on the flexible litter’s interior. These straps secure the backboard in the litter to keep it from shifting when the flexible litter goes vertical and may be left on the flexible litter and backboard to accommodate either a vertical flexible litter lower/haul or a horizontal stokes internal lashing strap at the foot end of the litter.
2. You’ll need two sets of adjustable pass-through or other approved adjustable rescue-grade strap that can be girth hitched around an object.
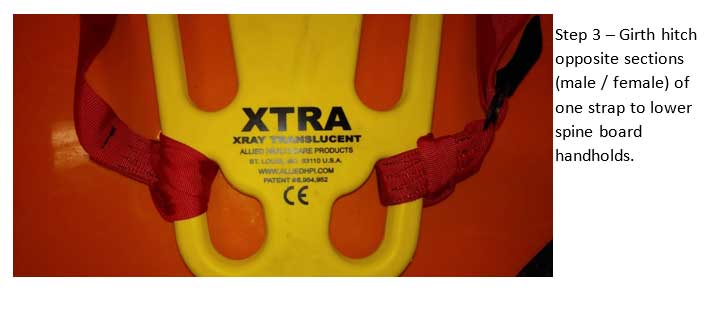
3. Girth hitch the loops of the male and female ends of one set of straps around the lower handholds of the backboard just as you would with an internal lashing strap for a horizontal stokes.
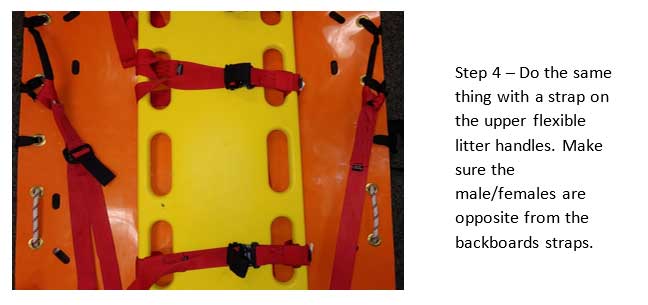
4. Girth hitch the loops of the male and female ends of the other set of straps around the upper webbing handles of the flexible litter. Be sure that the male/female couplings are on the opposite side of those used on the base of the backboard.
5. Simply place the backboarded patient in the flexible litter, positioning the board so that the top of the spine board is even or just below the first set of empty grommets near the head. This should position the patient so that the first cross-body lashing strap is around nipple line. The backboard should be positioned midline of the flexible litter horizontally.
6. Attach the male end of the backboard strap to the female end of the flexible litter handle strap and vice versa. Adjust both straps to take up all slack.
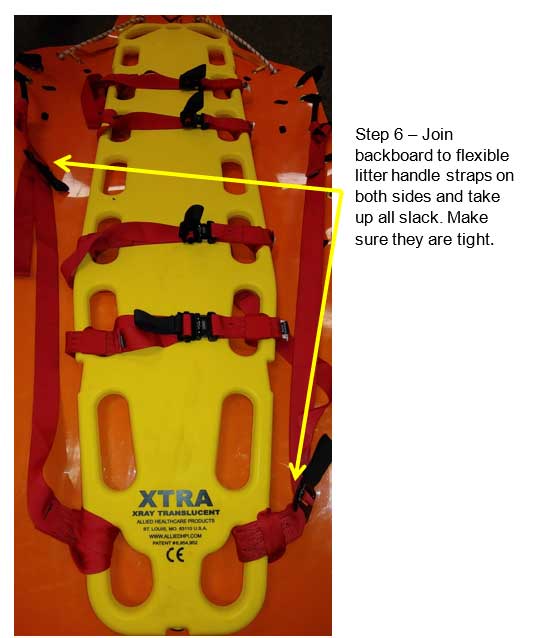
7. Fasten all the flexible litter cross-body and foot-end lashing straps and tighten (loosely on the bottom foot straps and make sure the chest strap is tightened only after inhalation by the patient). In most applications, the patient’s feet should be between the foot end lashing straps and not resting on the flexible litter flap. Pull any excess slack from the backboard securement straps. It is very important to make sure both the bottom three cross-body lashing straps and the backboard securement straps are very tight to prevent patient movement.
8. Field testing with several body types and heights shows that, if properly secured, a patient will slip no more than a couple of inches during a vertical flexible litter lower if these procedures are followed carefully.
This “new rigging” of the flexible litter has worked out very well. Remember when prerigging that rope will stretch a little. Once you load the flexible litter, you will have to re-adjust or re-rig the bridle to get rid of that slack. Always check the double-overhand knots holding the bridle in place to make sure they are properly tied. It is a good idea to remove and retie the bridle from time-to-time and whenever you are training on the device. When you train in the firehouse, practice rigging everything from scratch so that your personnel will know how to rig the bridle if they need to. Then, when someone has improperly rigged or forgotten to prerig it, everyone will be proficient with the rigging and can quickly correct the situation. Again, prerigging is no substitute for training.
This “new method” of rigging has been very useful in lowering the anxiety of the members of the unit when faced with a scenario requiring the use of a vertically-oriented flexible litter. We hope you try this method and see if it holds merit for your unit or department.
 MIKE GIROUX is a lieutenant with 20 years in the Yonkers (NY) Fire Department. The last 11 of those years have been with Rescue Co. 1 as a firefighter and an officer. He is one of the lead instructors for the City of Yonkers Rescue School and a chief senior instructor for Wright Rescue Solutions, Inc., a company specializing in regulatory safety compliance issues related to confined space and other forms of technical rescue.

