
By Greg Merrell
Natural disasters seem to occur more frequently every year. Whether it’s a tornado, a hurricane, a tsunami, or an earthquake, the consequences are similar. In the presence of the devastation, fear, and panic, quick, safe, and efficient first responder disaster response is paramount. As with all first responder emergency incidents, the safety of our crews and ourselves is the number 1 priority. Below are the basics of a natural disaster wide-area search, including preplanning; immediate response objectives; seeing the “big picture”; and readiness training for your crews, your agency/department, and your community. Regardless of the cause of the damage, the aftereffects and search techniques are similar.
Wide-Area Search Defined
Life safety is always the first priority at all emergency scenes. To ensure life safety, you must conduct an effective, systematic, and thorough wide-area search. This search differs from a typical search in some important ways. For example, the affected area is larger (from several to as many as 15 square miles). The number of victims is unknown (not just a person or a group), and you do not have their demographics such as age, sex, mental capacity, and physical condition. Often, we receive the names of people unaccounted for, who may or may not be missing. To search under these chaotic conditions, you will need many more resources than your community may have.
Hence, you must develop a strong mutual-aid or automatic-aid relationship. With that in mind, realize that the neighboring agencies/departments you are counting on for assistance may not be able to respond because of their own response to the same disaster in their area or because of damage that will prevent them from reaching your community immediately. The most difficult part of a wide-area search is to determine when the search is complete. Since you do not know exactly how many people are missing, it is important to be systematic and thorough during search operations.
To ensure readiness for a natural disaster wide-area search, your department should be proactive and develop an incident response plan that will ensure a safe and successful incident response that involves preparation/planning, practice, and execution.
Preparation/Planning
Get to know what community resources are available and the point-of-contact information for each entity. Your first contact with these individuals and agencies should be before disaster strikes. Below is a list of some agencies/departments that may assist in preplanning a natural disaster response and will prove invaluable in a large-scale event. Coordination with these groups and others may be necessary in your community.
Department of public works (DPW). The local DPW may have backhoes, excavators, dump trucks, sand bags, and other equipment available. The DPW can identify the main roadways in and out of town that should be cleared first to allow additional assistance access to your community. Prestage equipment prior to the event, if possible.
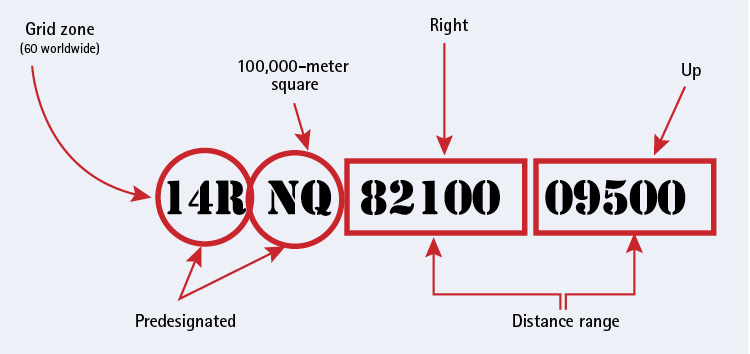
Figure 1. The United States National Grid (USNG) System
Public transit agencies. The public transit agency can provide buses to transport/evacuate/shelter victims in inclement weather.
Victim assistance programs. Find out about the availability of the Red Cross and other victim assistance programs in your area and what resources they can provide. Such agencies may assist in providing food, water, and shelter for victims and rescuers, too.
Large-capacity occupancies with numerous potential victims. These include schools, hospitals, places of public assembly, and government buildings. At these locations, consider the presence of backup generators; evacuation procedures; where victims can be relocated; and setting up accountability methods prior to releasing students, patients, and personnel.
Community “safe areas,” such as houses of worship, community shelters, storm shelters, schools, and places of public assembly. These are places where citizens can seek shelter from impending storms or gather for accountability following the event.
Local sources of lumber for shoring. These include lumberyards, home-improvement stores, and hardware stores to provide lumber for immediate shoring. Identify several, since the disaster may affect one or more lumberyards you have preplanned for assistance.
Law enforcement. Discuss scene security and limiting access to highly impacted areas only to necessary rescue personnel.
Educate community leaders on the incident command system (ICS). In addition to community leaders, all emergency response personnel [law, fire, and emergency medical services (EMS)] should be informed about ICS and the unified command system.
State urban search and rescue (SUS&R) teams. Determine their capabilities and response protocols.
State office of emergency management. Obtain information about state aid agreements and the notification process.
Identify residences and businesses with storm shelters. Determine whether the shelters are indoor or outdoor to expedite finding lost/trapped victims following structure collapse.
Practice
Involve all community resources in training exercises—police, fire, and EMS; the DPW; and the public transit authority. Use high-target hazards identified in the planning/preparation stage for mock scenarios. If possible, involve citizens to act as victims; local actors and school drama clubs can add realism to the scenarios.
Train with your mutual/automatic-aid agencies and also without them in case they are unable to respond. Base your training with SUS&R teams on their likely response time to your area and their capabilities.
Execution
The execution is at an actual disaster. This is when all your planning and training should pay off. Be prepared to modify and change plans as the situation dictates, since these events are dynamic and always evolving. Coordination prior to the actual event will make response go more smoothly, safely, and efficiently.
Communications
As with all emergency incidents, effective communication is vital. With the large number of resources and personnel on scene, effective communication is critical. All personnel on scene must use the ICS and speak in clear, plain text. Ensure that all personnel, local and from outside agencies, have access to radios that allow interoperability among all agencies. If possible, have different tactical channels to avoid cluttered radio traffic. Have backup charged batteries in case of power outages. Additionally, do not rely on cell phones as a primary means of communication; often cell towers will not work because of significant storm damage.
As part of proper communications, many locations in and around the incident must be identified for various reasons. These locations should be marked/identified using the United States National Grid (USNG) System (Figure 1). USNG is the recognized coordinate system for the Federal Emergency Management Agency (FEMA) and any agencies that may be responding to the incident. This allows all on-scene and en-route units to understand and locate critical areas. These areas may be victim locations, specific addresses, collection points, triage areas, landing zones, hazards, or incident command posts. The USNG system uses two numbers and a letter to identify one of the 60 worldwide grid zones; followed by two letters that identify a 100,000-meter square within the grid zone; followed by a series of four, six, eight, or 10 numbers identifying the east/west and north/south locations. The number of digits further identifies the area as follows:
- four digit: 1,000-meter area (a neighborhood).
- six digit: 100-meter area (a particular block).
- eight digit: 10-meter area (a specific house).
- 10 digit: one-meter area (a pinpoint location; victim location).
Phases of a Wide-Area Search
The disaster wide-area search process must be planned and methodical. With the devastation and destruction associated with these disasters, it is easy to become overwhelmed. A wide-area search is broken into four segments:
- Recon. Gather intelligence; determine scene access points, estimate the total area affected by the disaster, try to get a 360° perspective, and provide an initial estimate on the type and the number of resources needed.
- Hasty search. Look for surface survivors, and remove and evacuate.
- Primary search. Search accessible voids.
- Secondary search. In this final search, ensure that you have accounted for all victims (alive or dead).
For success, first develop an initial action plan (IAP). Do not let the event’s magnitude overwhelm you. Break the area down into searchable segments according to the resources and staffing available. Also use damage assessment surveys to break areas down further. For example, two to three city blocks that are only lightly damaged may be searched more quickly than one to two streets within a block that are significantly damaged. Assign search teams a designated area and exact search parameters. As areas are cleared, notify incident command so that personnel can be reassigned to search other areas or to a rehab area.
Recon is a preliminary check of the area in which you look for immediate victims who are easy to find and extricate. Basically, it’s a windshield survey of the full area of impact. During recon, identify usable access points that law enforcement personnel should staff to restrict access.
A hasty search is a rapid search in which you move quickly to get the walking wounded and lightly trapped victims to a collection point for accountability and triage. The goal is to get as many people to a safe area as quickly as possible. This may seem harsh, but it is important to do the most good for the most people during our initial response. We may have spotted the hard-to-get-at victims during our recon or we may have found and marked them (victim marking) during our hasty search.
A primary search is more thorough than the hasty search. You will look in structures but still will not enter them because of the danger of potential sudden collapse. You are still in rapid search mode. Live-scent canines may be used to find live victims in these structures. If you find heavily trapped victims, you must move on, but first notify incident command that a technical rescue team and other resources are needed to facilitate the rescue. Searchers may provide quick immediate care for life-threatening injuries, but they maintain a mass-casualty triage mentality during primary search.
Figure 2. Completed Search Markings
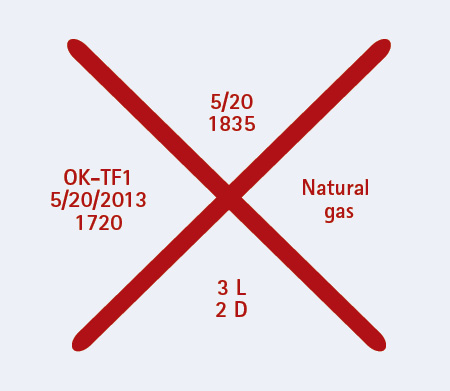
Clockwise from the left quadrant, this designates the team and the date and time of structure entry; the date and time of structure exit; the hazards present; and the number of live and deceased victims.
A secondary search is the final search of the area. Searchers go inside a structure if a structural engineer has approved entry or if the structure has been shored. This systematic search necessitates covering all areas. Avoid duplicating efforts, and have a plan in place to ensure all areas are searched thoroughly without unnecessary repetition. Cadaver canines may be used in conjunction with live-scent canines to confirm that the areas are clear and to enter the structures deemed unsafe for humans to enter. Once you complete the secondary search, you should be sure that no victims alive or dead are in your designated search area.
The four phases of search are important and vital to success. Searching is dynamic and always evolving throughout an incident. Although you can perform each phase individually, you may also perform them simultaneously if the situation and conditions allow. If an area of town has minimal damage, a search team may be able to perform the hasty, primary and secondary searches all at once, which allows more resources to respond to the harder-hit areas. If this is possible, searchers must notify command that they completed all phases of search and identify the exact area in which they completed it. This will prevent duplication of efforts and allow command to allocate resources to other areas that require more rescue personnel.
Figure 3. Survivor Markings
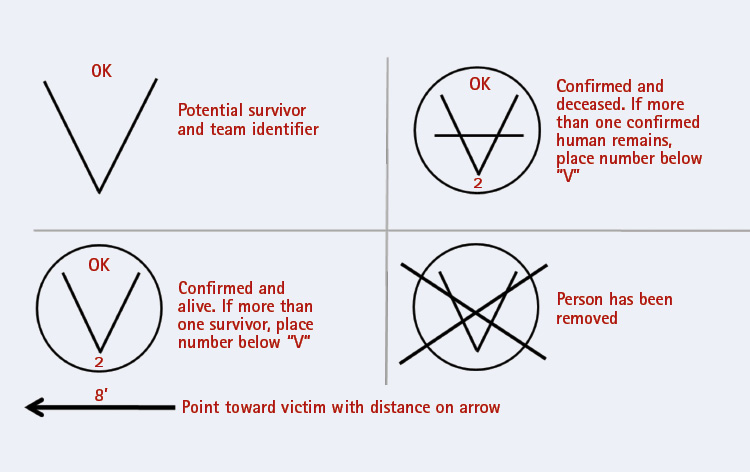
Proper Markings
Along with the search itself, it is important that rescuers understand the markings that are part of the search. These markings are for the safety of rescuers and victims, to identify victim locations, and to reduce duplication of efforts. Figures 2 and 3 show two examples. For more information on search markings, see the U.S. Army Corps of Engineers’ Urban Search and Rescue Specialist Field Operations Guide (Seventh ed., 2012), https://bit.ly/2v5MuAH.
Natural disasters are occurring all across the United States. As first responders, we must always be ready to respond. Whether it’s a tornado, a hurricane, a tsunami, or an earthquake, the results are similar. The wide area of destruction and large number of victims can be overwhelming. Have a plan in place, and be prepared. We owe it to the citizens we serve to always be ready when the situation is at its worst.
GREG MERRELL is a major with the hazmat and technical rescue team at the Oklahoma City (OK) Fire Department and the leader of OK-TF1. He is a lead technical rescue instructor in all rescue disciplines for Mid America Rescue Company and Oklahoma State University-Fire Service Training.

