COLLAPSE SEARCH AND RESCUE OPERATIONS: TACTICS AND PROCEDURES
Part 7: The Steel Square
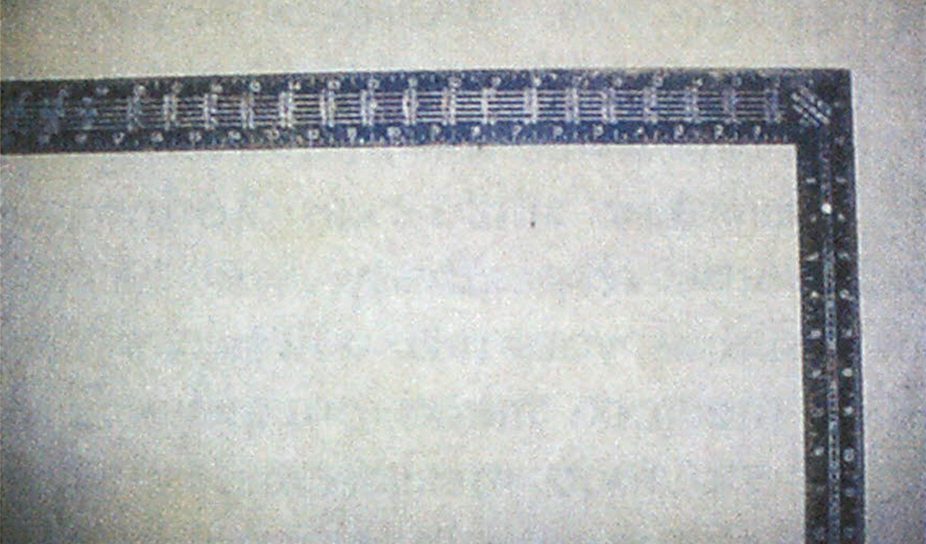
In almost all building construction work, the steel square, also known as a framing or rafter square, is an invaluable tool for measuring and determining angles. It is most commonly called a framing square because of its various scales and tables, which are used extensively in house framing.
The steel square consists of two main parts, the tongue and the body (or blade, as it also is called). The tongue is the shorter, narrower part, usually 16 inches long and 1 1/2 inches wide. The body or blade usually is 24 inches long and two inches wide. The point at which the tongue and body meet on the outside edge of the square is called the heel. The face of the square is the side on which the manufacturer’s name is stamped—-the side that is visible to you when you hold the body in your left hand and tongue in your right hand. The back of the square is the side opposite the face. As w ith any tool, it pays to buy a square of good quality; the best squares have their tables and scales etched into the metal, making them the most wear-resistant. A square with the tables painted on does not wear well —the numbers quickly wear off with use, rendering the square ineffective as a measuring device.
Good-quality squares have seven scales and tables—a rafter or framing table, an Essex table, a brace table, an octagon scale, a hundredths scale, an inch scale, and a diagonal scale. Their characteristics and uses are described below.
The rafter table. This table is always found on the face of the square, on the body. It is used to determine the lengths of common, hip, valley, and jack rafters and the angles at which they must be cut to fit properly to the ridge board and top plates for roof framing. It’s invaluable not only for determining the lengths of rake shores but also for laying out the angles needed for these shores. This table consists of six lines of figures whose uses are scribed on the left end of the body.
The first line provides the lengths of common rafters per foot run. The second line gives the lengths of hip and valley rafters per foot run. The third line gives the length of the first jack rafter and the differences in length of adjoining jack rafters at 16-inches on center. The fourth line gives the length of the first jack rafter and the differences in length of adjoining jack rafters, spaced at 24-inch intervals. The fifth line provides the figure to be used to determine the edge bevel for the side cuts of jack rafters. The sixth line gives the numher of the edge bevel for side cuts of hip and valley rafters.

(Photos by author.)
The Essex table. You always will find the Essex table on the back of the square, on the body. This table provides the board measure in feet and twelfths of a foot of boards one-inch thick and of common lengths and widths. This table usually is not needed in rescue work, and you will rarely use it for such.
The brace table. This table, found along the center of the back of the tongue, gives the lengths—from 24 to 60 inches—of common braces, where the rise and run are equal, forming a 45° angle. The brace table can be very useful when short rakes are being installed or additional bracing is required.
The octagon scale. This scale, located along the center of the face of the tongue, is used for laying out a figure with eight sides on a square piece of lumber. The graduations generally are a series of dots located five twentyfourths of an inch apart and numbered every fifth dot. This scale is not necessary for rescue shoring.
The hundredths scale. This scale is located on the back of the tongue, near the heel, between the brace and Essex tables. It consists of one inch divided into one hundred parts; underneath the scale, one inch is divided into sixteenths, making it easier to convert decimals to more commonly used fractions. This scale is especially useful for dealing with rafters and braces whose lengths are given in hundredths. This scale will be applied wTien you are determining the lengths of bracing and rake shoring.
The inch scale. On both the body and tongue, along the inside and outside edges of the square, inches are graduated in eighths, tenths, twelfths, and sixteenths. On the square’s face, the outside edge of the body and tongue is graduated in sixteenths. The inside edge of both sides of the face is graduated in eighths of inches. On the back of the body, the outside edge is graduated into twelfths, while the inside edge is broken down into sixteenths. The back of the tongue on the outside edge also is broken down into twelfths, and the inside edge is graduated into tenths of inches. These scales are used in measuring and laying out work to precise dimensions.
The diagonal scale. Many squares include a diagonal scale, the object of which is to give minute measurements without having the graduations so close together that they are hard to read and work with. This scale rarely is used in rescue work.
USING THE STEEL SQUARE TO DETERMINE THE LENGTH OF RAKE SHORES
You can determine the length of any rake shore quickly and easily byusing a steel square; no on-site measuring is required. Since the rake shore technically is the hypotenuse of a right triangle and is based on the same principles as the common rafter, the steel square’s use is quite effective.
Several procedures can be utilized to obtain the lengths of rake shores. The three methods discussed here were chosen because through them the angles and lengths of the rake can be determined without personnel having to scribe the lumber or measure on site. Thus, none of the rescuers are exposed to any more danger than necessary. The methods discussed here in detail are the diagonal method, the “step-off” method, and the “length-per-foot run” method.
One factor in the rescuers’ favor during these collapse operations is that the rake shores do not have to be an exact length. The shore can be one or two inches larger or smaller than the “ideal” length without hampering the effectiveness of the shore in any way. Placing wedges behind the bottom of the rake at the base of the shore will compensate for any discrepancies in the measurements.
THE DIAGONAL METHOD
This method is the least accurate of the three methods. Using it will allow you to quickly determine the length of the rake. It requires the use of only the steel square and a folding rule or tape measure.
l et’s look at the following example: An unstable wall has to be shored, and you determine that the rake is to bear against the wall at a point nine feet high and the base of the rake is to contact the floor at a distance of 12 feet from the wall. In this case, the length of the rake can be calculated easily. By using the tongue of the square as the wall and the body of the square as the floor, you could measure the angles of the rake and the length of the shore.

Determining the length of the rake will be simplified if you adopt the inch marks on the square as foot measurements of the wall and floor. Taking the number nine on the tongue and the number 12 on the body will give you the angles to cut. The tongue will be the top cut and the body will be the bottom cut. To determine the length of the rake, place the rule at the nine-inch point on the tongue and lay it across the square until it intersects with the number 12 on the body. The length on the rule when it is intersecting the numbers nine and 12 on the tongue and body, respectively, will be 15 inches; thus, your rake will be 15 feet, since the inch marks on the square represent foot measurements. The length of the rake from a point nine feet high against the wall and 12 feet back from the wall will be 15 feet from tip to tip.
THE STEP-OFF METHOD
Another method that is both simple and practical is called the step-off method. After you determine the angle, you apply the square in consecutive steps (hence the name “stepoff”). All you need to employ this method is the square and a sharp pencil. No measuring or calculating is required, and the results are more than accurate enough for rescue work.
Let’s look at the same shoring problem we used before with the diagonal method: A rake shore nine feet high and 12 feet back from the wall will be erected. The same basic principles apply for any method used to determine the lengths of the rake shores. In this method, you also will use the inch graduations on the square to stand for foot measurements of the height and length. Place the square on the 4×4, with the number nine on the tongue and the number 12 on the body lined up along the edge of the lumber. Scribe a line, which will be your top cut, along the edge of the tongue. At the point where the number 12 on the body meets the edge of the 4×4, make a mark with a sharp pencil. Now, holding the square with the angle constant, “step” over the pencil mark and place the number nine on the tongue on the pencil mark. The number 12 on the square’s body must be on the edge of the 4 x 4 to keep your angle consistent and give you a properly measured shore. Repeat this “step” as many times as there are feet in the length of the base. If the base of the rake is 12 feet back from the wall, repeat the step 12 times. On the last step, scribe a line along the body of the square. This will be your bottom cut.
THE LENGTH-PER-FOOT RUN METHOD
The length-per-foot run method is the most accurate method of determining the length of the rake; however, it requires some math calculations. The length-per-foot run table, part of the rafter table, normally is located on the body of the square (on the face). It is the first line under the inch graduations. For accuracy, most of the lengths are broken down into inches and hundredths of inches, but the hundredths of inches must be converted to larger fractions of inches for practicality. This conversion takes a little more time; however, a goodquality steel square with a hundredths scale will have a fraction table beneath it, for ease of conversion.


When using this table, it is important to know the “pitch” (slope) of the rake. The pitch of the rake is the ratio of the rise on the wall plate to the length of the horizontal run. Use the number 12 as your horizontal constant, regardless of the length of the vertical rise; this will simplify the process and eliminate additional figuring to determine the proper pitch. This will become evident as you perform the operation. If the height of the rake on the wall is eight feet, then the pitch will be 8/12; if the height of the rake is nine feet, the pitch will be 9/12. AS stated above, when the rake contacts the wall at nine feet and the base is back 12 feet, the pitch will be
Look at the length-per-foot run table on the square. Under thenumber nine on the first line, you will find the number 15. Since you are using the inch numbers on the square to stand for foot measurements of the rake, the nine inches on the square will stand for nine feet, and the 15 inches will stand for 15 feet. Thus, the length of your rake will be 15 feet from tip to tip.
In some situations, debris, major obstructions, or short lumber may prevent you from bringing the base of the rake back 12 feet. If this is the case, the 45°-angle principle will work effectively.
HOW TO CUT A 45° ANGLE WITHOUT USING A SQUARE
The 45°-angle cut can be made easily without using a steel framing square. If. for some reason, you do not have access to a square, follow these four easy steps to make the proper angle cut.


- Make sure that the piece of material you select to work with has a square end. It generally is a good idea to use the factory edge, because in general, lumber supplied by reputable mills will have a square factory edge. If you use a piece of lumber that does not have a square edge, your angle will be incorrect.
- Determine the exact width of the lumber you are using. “Two-by-four,” “2 x 6,” and “4 x 4” refer to nominal sizes; the exact sizes of the lumber will differ. Generally, a piece of lumber under six inches will be one-half of an inch smaller than its nominal size —i.e., a 4 x 4 piece of lumber will be 3 1/2 x 3 1/2 inches in actual measurements.
- To determine your 45° angle, first place a pencil mark, back from the square end, extending the exact width of the material. For example, if you are working with a 4 x 4, the mark would extend exactly 3 ½ inches.
- At this mark, draw a diagonal line to the opposite point of the square edge. This will give you an angle of 45°. Cutting along this line will give you the exact angle you need.
RETURN CUT FOR RAKE SHORES
When installing a rake shore of any kind, you must make a return cut to butt square against the cleats anchored above and below’ the rake shore. In general, the cleats for any interior shore will be two-inch nominal dimensional lumber (their exact width will be 1 ½ inches). The easiest way to determine the angle of this cut is to lay a scrap piece of lumber, which will be used for the cleat, on its edge on top of the rake shore, flush with the 45°-angle face. Slide the piece down along the face of the angle cut until the edge of the scrap intersects with the edge of the shore. At this point, scribe a line and make your right-angle return cut on the shore. The rake is now ready to be erected in place.


LUMBER SIZE
When conducting interior shoring operations, you may use several different lumber sizes. Consider three main factors when deciding which lumber size to use.
- The type of building involved and the type of framing (method and materials). Is it framed or unframed? Is it residential or commercial? Is it constructed of lightweight or heavy building materials? What is the condition of the structure? What is its size?
- The type of collapse situation involved. Some of the key points to look for are, Is it extensive or localized? How much collapse debris has been generated? Are there structural bearing members involved?
- Location of the collapse within the structure and location where the shoring is to be erected. Some of the key points to consider are the following: Is it on an upper or lower floor? Will there be several floors of shoring? Will the shoring be used to support main structural elements?
These are some of the factors to take into consideration.
Although every collapse situation will have its unique problems and each incident must be evaluated separately, some procedures that have worked well in the past can be instituted initially. In any wood-frame structure or smaller brick-and-joist construction, 4 x 4 timber generally should be sufficient for shoring purposes.
Whenever rake shoring is to be erected, keep one principle in mind: The wall plate, sole plate, and rake all should be the same width. This will enable the shore to be connected together as one integral unit with gusset plates or diagonal bracing. The rake itself should be of square stock—4 x 4, 6 x 6, or 8 x 8 if necessary. As the main function of the rake is to take the load oft the wall in question, it will come under compression and, as such, it is technically considered a column. Any load applied to a column is transferred through its axis and spread out from its center. Using square lumber gets the most efficient use out of the common building materials readily available to the fire service today.
USING THE NUMBER 17 TO DETERMINE LENGTH OF RAKE
Whenever you are installing a rake or any diagonal brace at a 45° angle, multiplying the height of the rake or brace by the number 17 will give you the length of the shore in inches.
This only works when the angles formed by the floor/rake intersection and wall/rake intersection are 45° angles, because of mathematical principles to be explained later. For example, if a rake is to support a load at eight feet, multiply eight by 17, which will give you 136 inches, the length of the rake from tip to tip. The number is based on the geometric principles of the right triangle. A right triangle is a figure with three sides, the base (i.e., the floor), the altitude (i.e., the wall), and the hypotenuse (i.e., the rake). The altitude and base intersect and form a 90°, or right, angle. The hypotenuse is the longest side of the triangle and is always opposite the right angle. When the base and altitude are the same length, the angles opposite them will be 45° angles.
The entire steel framing square is based on this principle. Whenever the altitude and base of a right angle are the same length, the hypotenuse will form 45° angles where it intersects w ith the base and altitude. When the altitude and base are both 12 inches long, the hypotenuse will be exactly 16.97 inches long. For purposes of practicality in the field, the number can be rounded off to 17. A rake shore 12 feet long will be less than three-eighths of an inch longer, well within accepted standards in rescue situations.

As the altitude and base increase in equal proportion to each other, the hypotenuse also will increase proportionally (based on the Pythagorean theorem —i.e., a2 + b2 = c2, where “a” and “b” are the base and altitude and “c” is the hypotenuse). For example, a rake installed three feet high will be 51 inches long (i.e., three times 17); six feet high, 102 inches long (i.e., six times 17); eight feet high, 136 inches long (i.e., eight times 17); and so forth. This geometric constant does not change, whether you go one foot high or 100 feet high. It is an easy number to remember and can help you to quickly and easily determine the length of the rake.

THE “SPEED” SQUARE
Another type of square that has been developed recently is known as a “speed” square. It was developed to simplify the framing of roof rafters in building construction. The speed square utilizes a one-number method of determining the pitch, instead of the two-number method of the steel square.
The speed square is available in two sizes. Generally, the smaller size is easier to handle, which makes it better suited for use in collapse rescue situations. Basically, the square is a right triangle, with the base and altitude congruent at 7 1/4 inches. A ⅛-inch scale is along one edge; the other edge is a “T” bar. Along the hypotenuse are graduations for degrees, common rafters, and hip and valley rafters. The T bar enables the speed square to be placed against the rake shore and lock into the edge, where it will not shift. As a result, it makes an excellent guide for a circular saw’ at 90° and 45°, the two most common angles used in rescue shoring.
If you decide to utilize the 45° angle consistently, this tool should be one of your top choices, as it saves time and eliminates possible mistakes in the determination of the 45° angle. One of the drawbacks of the speed square is that to determine the lengths of the rake shores, you will have to perform mathematical calculations, which is not always the easiest thing to do in the field.

