By Billy Leach Jr.
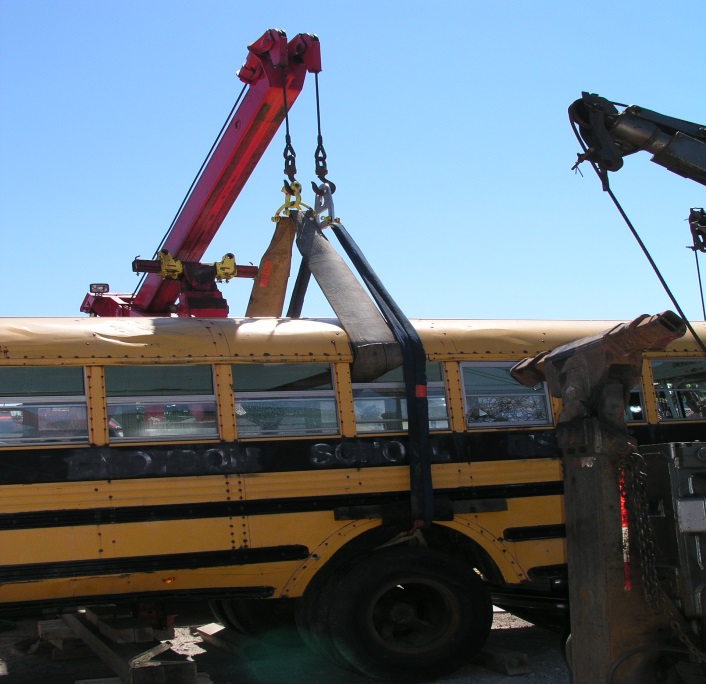
Many rigs are equipped with winches that are used for a variety of tasks. To properly and efficiently use this tool, rigging is required to connect the winch line to the load (or resistance).
This article offers information about various rigging tools and their proper use, plus inspection. Calculating an accurate line load is fundamental when using rigging gear. No rigging component should ever exceed the manufacturer’s established working load limit (WLL).
Chains
Chain begins as a continuous wire. Once testing has verified the required properties are met, the wire is drawn into a specific diameter. From this wire, proper size wire “slugs” are cut into an exact length. These slugs are then formed into a link and welded into a continuous chain sling.
Once the chain is formed, it is proof tested to twice the WLL. After proof testing, samples of each production lot are tested by pulling to ultimate load (UL). This test is a controlled laboratory evaluation. The testing figure is four times the WLL. If the sample fails to meet the specified value, the entire production lot is considered to have failed.
Figure 1. NACM Chain Identification System
Chain Grade Marking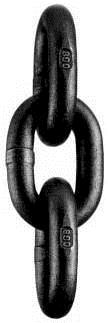

|
The National Association of Chain Manufacturers (NACM) has developed a system for identifying chain. This system uses a letter and a number. The letter identifies the manufacturer, and the number represents the chain’s grade. Chains are typically marked on the link approximately every foot. Rescuers shouldn’t use a chain without a grade indication. Although there are several grades of chains available, the two commonly used for rescue operations are Grades 8 (80) and 10 (100).
The design factor for chain slings Grade 8 (80) + hooks and shackles is 4:1. The UL is 4 × the WLL. Alloy steel chain rated for overhead lifting and rigging possesses a high strength to weight ratio and is the minimum grade preferred for rescue operations.
One-half-inch link diameter Grade 8 (80) or higher chain is preferred for rescue; however 3/8” Grade 8 (80) chain is very useful. Grade 10 (100) alloy steel chain is rated for overhead lifting and rigging and is suitable for rescue.
Chain Inspection
It is vitally important that a ‘competent person’ inspect chains according to all federal and state Occupational Safety and Health Administration any other applicable regulations. Document these inspections fully, and keep the records on file for inspection. Inspection should include the following steps:
• Examine each link of chain. Look for defects such as wear, stretch, distortion, nicks, gouges, discoloration, and cracks. Wear will generally be found at the ends of the links, where they rub against one another. Lift each link, and measure the cross-section. Remove the chain from service if a worn link is 10 percent less than its original new diameter. Look for binding of links, which indicates a collapse of a link because of stretch.
• Look for any rust, and thoroughly clean the chain. Lubricate as suggested by the manufacturer. Store the chain in a clean, dry location; hang the chain vertically if possible.
• Measure the entire length (reach) of the chain when it is new. Record this measurement for future reference. During inspection, measure the reach of the chain to determine any stretch. Consult the manufacturer for advice regarding replacement.
• Make certain that all connectors, hooks, and attachments carry the same WLL rating as the chain.
• Make certain that the certification tag supplied by the manufacturer is attached and legible. The certification tag will indicate size, grade, reach, and, WLL.
• Ensure that all hook latches (if equipped) are in place, operate freely, and are properly aligned.
Chain Use
• Never exceed the WLL of a chain.
• Properly inspect every chain as specified by all applicable rules, regulations, and manufacturer recommendations. Document every inspection.
• Don’t “knot” a chain to shorten or join two chains.
• Don’t “shock load” a chain, wire rope, fitting, or sling.
• Don’t repair chains by welding.
• Don’t expose chains to high or low temperatures.
• If a chain is repaired, it must proof tested by a manufacturer or supplier. The same applies if the chain has been exposed to very high or very low temperatures.
• Replace the chain as necessary, based on manufacturer’s recommendations.
• Don’t drag a chain along any surface.
• Use only those attachments that meet the grade of the chain and have a proper application method.
• Destroy unusable chain. Don’t use it for training.
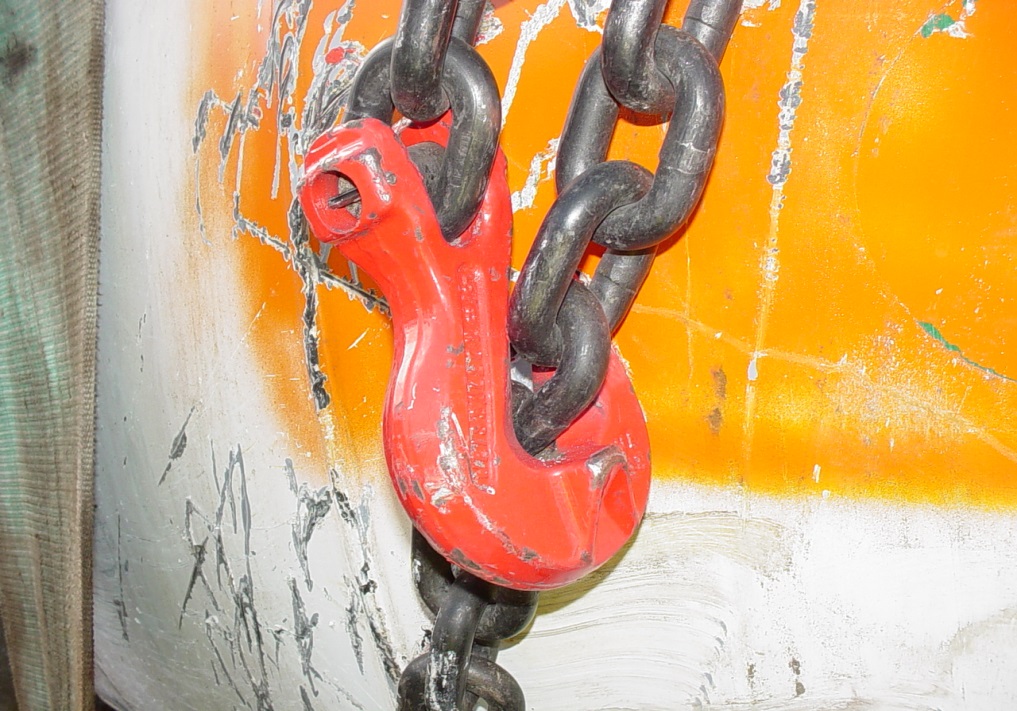
• Properly seat the chain link into a hook; never “tip load” or “side load” a hook.
(1) Cradle Grab Hook. Rigging a chain into a “choker hitch” with a standard grab hook de-rates the WLL of the chain by a minimum of 20 percent. For example, A grade 8 (80) chain with a WLL of 7,100 pounds rigged in a “choker hitch” should be used to pull/lift a load of 5,680 pounds. A slip hook in a “choker hitch” de-rates the WLL of a chain sling 40 percent. Using a cradle grab hook doesn’t de-rate the chain; thus, the chain maintains 100 percent of the single-leg capacity.
(2) Use cribbing pieces for “padding” when passing a chain over a sharp edge, to prevent point loading. If a chain passes over a sharp edge (radius of a corner [edge] < link diameter), a reduction of the chain’s WLL is calculated. Take all slack out of a chain before applying any force. Remove all kinks or twists from a chain before applying force. Keep the chain straight. Don’t paint a chain or attachment unless it is approved by the manufacturer; it may hide a crack or discoloration.
Table 1. NACM Working Load Limits for Chain
|
Nominal Chain Size |
Grade 80 Alloy May be used for overhead lifting |
Grade 100 Alloy May be used for overhead lifting |
|
3/8-in |
7,100 lbs |
8,800 lbs |
|
½-in |
12,000 lbs |
15,000 lbs |
Hooks and Shackles Hooks
(3) Eye Slip Hook. There are various styles of hooks used for rigging. A few are clevis grab hook, eye grab hook, eye slip hook, cradle grab hook, and swivel slip hook. It is important that the hook and any connecting component be of the same grade as the chain to which it is attached. Remove any deformed hook from service immediately. The load should be applied to the “bowl” of the hook, never the tip. A safety latch that will prevent the load from slipping out of the throat should be in place on each hook. The safety latch should never support the load.
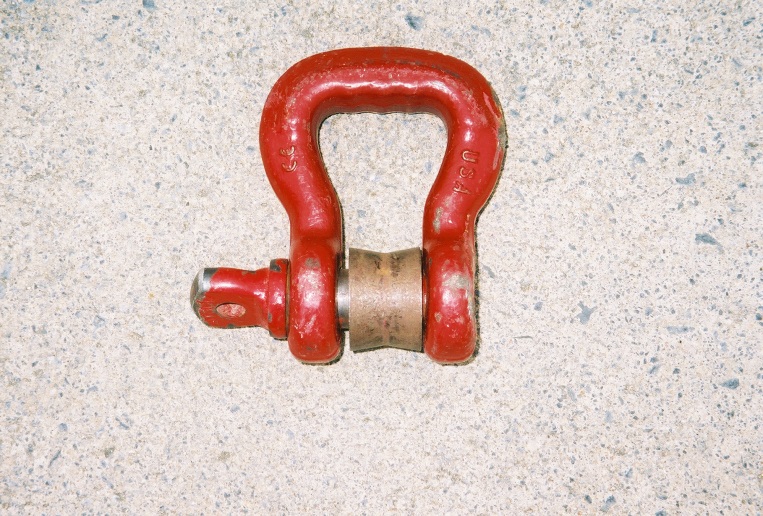
Shackles
Shackles are a “U” shaped device with a pin inserted to prevent the load from slipping out. They are very useful in rescue rigging operations, especially when connecting slings to hooks. The pin inserted into the shackle may be a screw pin type, a cotter pin (round pin), or a bolt type. For rescue rigging use, only screw pin or bolt type shackles are recommended. Beware when using screw pin shackles; the pin may loosen during use. Hooks are connected to the pin.
Use of Hook and Shackle
Never exceed the WLL of a hook or shackle. Periodically inspect all hooks and shackles according to applicable standards, and document the inspection. Any permanent deformation or change in shape indicates the device has been overloaded and must be removed from service immediately. Never use a hook whose throat opening has been increased or whose tip is bent from the original plane of the hook body unless it is permitted by applicable standards. Don’t repair a hook or shackle by welding, heating, or bending.
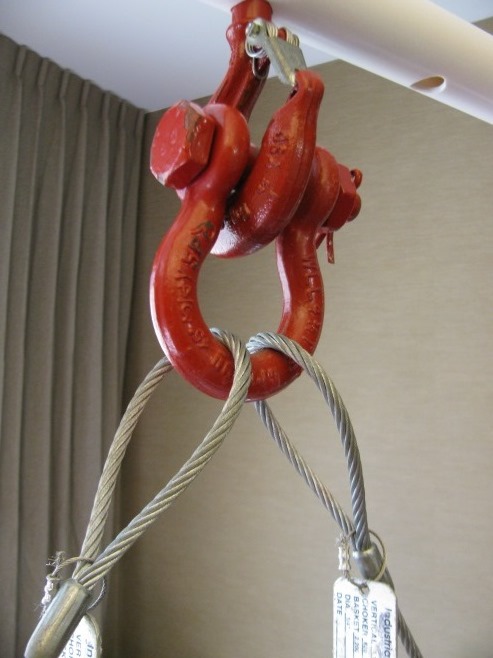
(6) Load shackles “pin up” (arrow).
Do not side load a hook. Shackles may be side loaded if it is permitted by the manufacturer and the capacity reduction is calculated. However, never, side load a round pin shackle. The maximum included angle for multiple leg slings collected in the bow of a shackle is 120 degrees. Load the hook so that it is concentrated in the “bowl” of the hook. Don’t paint a hook or shackle unless approved by the manufacturer. Avoid pinching or bunching a synthetic sling in a shackle or hook.
When placing a synthetic sling eye over the pin of a shackle, ensure that the pin diameter is less than one-third the length of the sling eye. Do not open the sling eye any greater than the eye length. The synthetic web sling width should be no greater than 75 percent of the shackle width. The diameter of shackle pin should be greater than the wire rope diameter if no thimble is used in the sling eye. A synthetic or wire rope sling eye must not be placed over an object (usually a hook or other collector) that is greater than one-third of the sling eye length. Never replace any part of a hook or shackle with anything other than a part specified by the manufacturer. Don’t use hooks or shackles for lifting personnel unless approved by the manufacturer. Shackle screw pins should be tightened fully when installed.
Slings
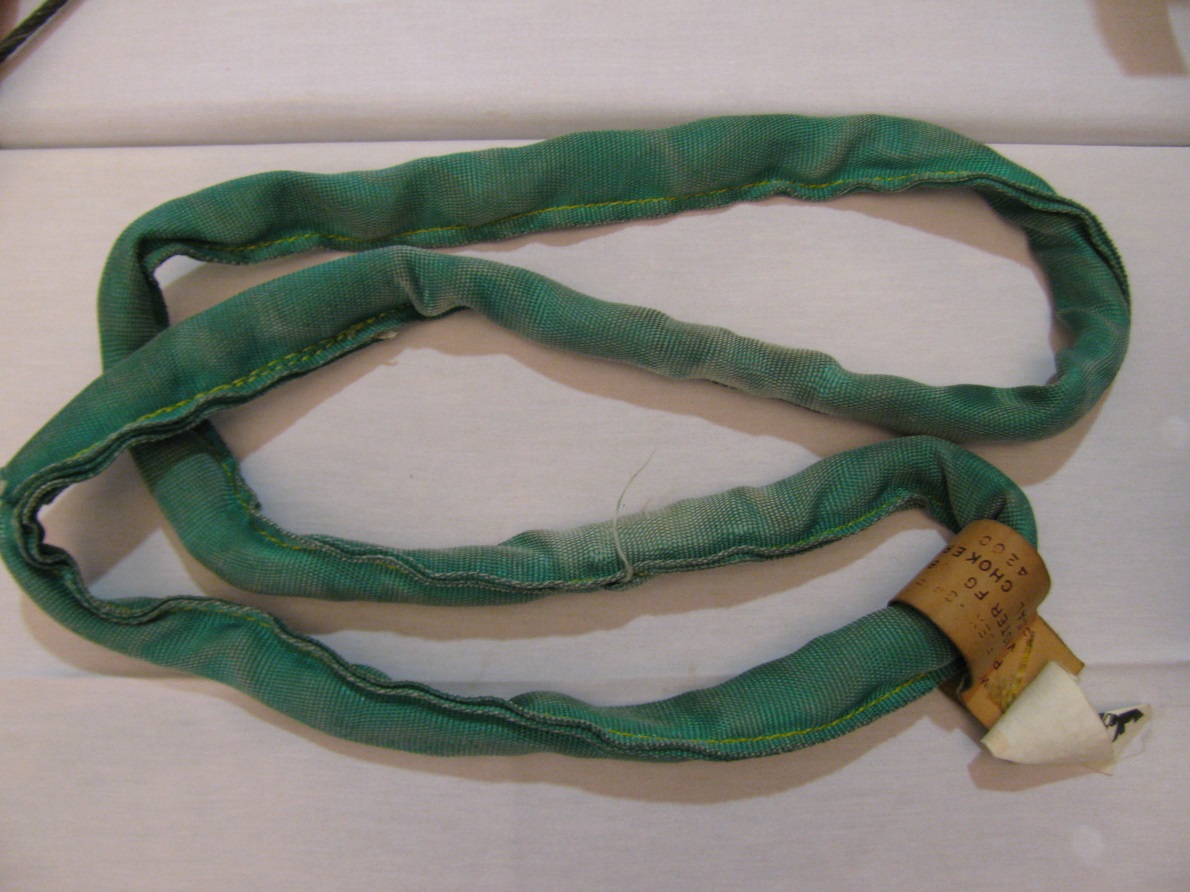
(7) A synthetic sling.
Slings may be constructed of synthetic fibers such as nylon, polyester, or other high-performance fibers. They may be flat or round. The two most common types used in rescue/recovery are the Single Leg Sling and the Spliced Endless Sling. The advantages of synthetic slings are that, generally, they are lighter in weight, more flexible and stronger, and less expensive than chain slings. These slings have the advantage of spreading the load out over a greater area as opposed to chain slings. Some slings have inspection devices built into them, such as colored fibers or fiber optic cables. Their disadvantages include stretching, tearing, or cutting of the material and degradation caused by exposure to sun, heat, cold, or chemicals. The design factor for synthetic slings is 5:1.
Hitches
(8) The vertical hitch and (9) the basket hitch.
Basically, three types of hitches are formed with synthetic slings: vertical, basket, and choker. The vertical hitch supports the entire load on a single leg. The basket hitch has twice the capacity of a single leg if the legs are vertical to the load and loaded proportionally. Choker hitches are used primarily for round stock where gripping is important for load control.
The capacity of a choker hitch is based on the hitch being formed properly. For full choker hitch capacity, the angle of the choke for all types of slings should be a minimum of a minimum of 120 degrees. According to the Web Sling & Tie Down Association, synthetic slings have a reduction of up to 25 percent at an angle of choke greater than or equal to 120 degrees (75 percent of WLL for a single-leg hitch). If the angle of choke is less than 120 degrees, the sling capacity will decrease even more.
Figure 2. Angle of the Choke for Slings
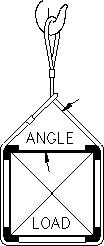
The angle of the sling leg to the load, known as the horizontal sling angle must not be less than 30 degrees. Tension (load) increases as the angle between the sling leg and the load decreases. Generally, the longest sling practical should be used within overhead lifting clearance. Rigging close to the load with a choker hitch increases sling leg tension.
Sling Inspection
All slings must be inspected according to all applicable federal and state OSHA and other applicable rules and regulations. Document all inspections.
Visually check for signs of deterioration; wear; and physical, thermal, and chemical damage. Closely check for any broken threads or strands, and replace them according to manufacturers’ recommendations.
Ensure that the certification tag or label is present, clean, and legible.
Repairs should be made only by the manufacturer. After repair, slings must be proof tested and a certification label must be attached to the sling.
Closely check each sling for signs of ultraviolet degradation. These signs include bleaching of color, increased stiffness of material, and surface abrasion in areas not normally in contact with the load.
Closely check the entire sling for embedded particles or snags.
Replace any sling that fails inspection.
Sling Use
Avoid dynamic loading of any sling. Always pad contact points of the sling and load. Protect the sling from sharp and abrasive edges and hot surfaces.
Don’t expose slings to excessive heat or cold temperatures, and don’t leave slings lying in the sun for extended periods.
Never exceed the WLL of a sling or any attachment.
Make hitches correctly to prevent slipping. Don’t know two slings to extend them or tie a knot in a sling.
Avoid kinking or twisting slings when in use or storage. Store them in a cool, dry, dark area. Avoid pinching or bunching a sling in an attachment.
Do not place the sling eye of a synthetic or wire rope over an object (usually a hook or other collector) greater in width than one-third of the eye length.
Do not stand under a freely suspended load or in line or next to a sling that is under tension. Do not place a body part between the sling and the load or between the sling and the hook.
Do not pull slings from under a load when the load is resting on the sling. Do not drag a sling over a surface.
Rig loads to the center of gravity (COG). A load properly rigged will lift level; otherwise, the load will shift.
For more contact with the load, use a double-wrap basket hitch. Make certain the double-wrap basket doesn’t overlap at the bottom of the load. Adjust the double-wrap basket hitch to equalize the load in each side of the basket.
The maximum included angle when slings are collected in a hook is 90 degrees. When slings are collected in a shackle bow, the maximum included angle is 120 degrees. The minimum horizontal sling angle is 45 degrees if slings are placed into a hook. The minimum horizontal sling angle is 60 degrees if using a choker or basket hitch. The fittings at the load connection see the same load as the sling itself.
Do not use a sling that appears damaged.
Removing Slings from Service
Remove a synthetic sling from service if any of the following factors are present:
• Holes, tears, cuts, embedded particles, or abrasive wear that exposes core fibers.
• The rated sling capacity tag is missing or not readable.
• The sling was tied into a knot.
• Melting, charring, or weld spatter is visible on any part of the sling.
• Chemical burns or degradation is seen on any part of the sling.
• There is broken or worn stitching on the cover that exposes the core fiber.
• There is distortion, excessive pitting, corrosion, rusting, or other damage to a fitting
attached to the sling.
• A condition that creates doubt as to the sling’s integrity or strength.
Inspection of Slings
Initial Inspection: Before any new or repaired sling is placed into service, it shall be inspected by a designated person to ensure the correct sling is being used, the sling meets applicable specs, and the sling was not previously damaged.
Frequent Inspection: The user handling the sling should inspect it each time it is used.
Periodic Inspection: A designated person should conduct this inspection on a schedule that is based on: frequency of sling use, severity of service conditions, and experience gained on the service life of slings used in similar applications. An inspection must be made at least annually.
Wire Rope
The general makeup of wire rope includes the core, wire, and strands. There are basically two types of wire rope, steel core and fiber core. Steel-core wire rope has stands of wire wrapped around a steel core. It resists crushing better than fiber core.
Fiber core is wire wrapped around a fiber or a synthetic center. The core forms the center or heart of the wire rope and is the center around which the main wire strands are wrapped. The core supports the wire strands, preventing jamming and compacting of these strands. The core material depends on the specific purpose and conditions for which the wire rope will be used. Fiber core wire rope is adequate for towing and rescue operations because it offers maximum flexibility, elasticity, and is lighter in weight than steel-core wire rope. Fiber core wire rope isn’t as strong as steel-core wire rope of equal size and grade. Fiber core material is usually sisal or manila; however synthetic fibers such as polypropylene may be used.
Lubrication
During manufacturing, wire ropes are lubricated internally and externally. After use, they should be provided special care through proper lubrication. When in use, the wire rope is constantly moving, and proper lubrication offers maximum life of the wire rope. Prior to lubricating the wire rope, it should be thoroughly cleaned with wire brushes, compressed air, steam, or a recommended solvent. Frequent light lubrication is preferred over infrequent heavy lubrication. Follow the wire rope manufacturer’s specific recommendations when lubricating wire rope. Storage should be in a clean dry location that is protected from the elements.
Design Facto-
The design factor for wire rope slings is 5:1.
How to Use Wire Rope
Never exceed the WLL of a wire rope.
Properly inspect every wire rope as specified by any applicable rule, regulation, or manufacturer recommendation. Document every inspection.
Don’t “knot” a wire rope to shorten or join two wire ropes.
Don’t “shock load” any chain, wire rope, fitting, or sling.
Use only wire rope slings with a legible certification tag attached.
Don’t repair wire ropes by welding.
Don’t expose wire ropes to high or low temperatures.
If a wire rope is repaired, it must proof tested by a manufacturer or supplier.
Replace the wire rope as necessary, based on manufacturers’ recommendations.
Don’t drag a wire rope along any surface.
Use only those attachments meeting the WLL of the wire rope, and use a proper application method.
Destroy unusable wire rope. Don’t use it for training.
Use cribbing pieces for “padding” when passing a wire rope over a sharp edge to prevent point loading. Remove any kinks or twists from a wire rope before applying force. Keep the wire rope straight.
Don’t paint a wire rope or attachment unless approved by the manufacturer.
Inspection
All wire rope must be inspected periodically as specified by the manufacturer. Stretching, damage, and deterioration of the wire rope occur during use.
Always wear complete personal protective clothing that meets applicable standards when working with winching operations, including inspection and maintenance.
Never allow the wire rope to slide through your bare or even gloved hands. Broken strands can easily injure you.
Measure the wire rope’s length when new as supplied by the manufacturer, and record this number. Measure the wire rope’s length during inspection. Consult the manufacturer for an acceptable stretch measurement, and replace as necessary. Severe stretch may indicate overloading or loss of strength.
Measure the wire rope’s diameter when new as supplied by the manufacturer, and record this number. Measure the wire rope’s diameter during inspection. Consult the manufacturer for an acceptable diameter reduction, and replace as necessary.
Visually inspect the entire rope length for any sign of damage, deterioration, distortion, core protrusion, and broken or cut strands or wires. The manufacturer will provide a recommendation regarding replacement depending on the number of broken wires in a rope lay or wires within a strand in a rope lay. A rope lay is the length of wire rope in which one strand makes one complete revolution around the core.
Inspect all fittings attached to the wire rope as specified by the manufacturer.
Record every inspection, and maintain all records associated with inspection and maintenance.
Termination
Wire rope may be terminated with various fittings (wedge sockets, clips, swaged, for example). For maximum strength, choose a steel swage termination with a heavy-duty thimble. Wedge sockets are intended for temporary on-the-job applications only. The efficiency of wedge sockets is approximately 80 percent if properly installed. Installing wire rope clips as a permanent fitting is not recommended, as their efficiency is approximately 80 percent of the WLL if properly installed. Wire rope clips should not be used on coated wire rope.
Example:
A 5/8-in improved plow steel wire rope has an ultimate load of 20.6 tons. Wire rope clips will be installed as a termination, thus 20.6 × 0.80 = 16.5 tons. To determine the WLL, the figure of 16.5 tons is divided by the design factor of 5 = 3.3 tons.
All manufacturers will provide specific instructions for installing, using, inspecting, and maintaining their fittings. These instructions must be followed precisely, along with applicable federal and state OSHA and other rules and regulations. More than one broken wire at any (within one wire rope diameter of the fitting) termination is cause for removal from service.
These tools are used extensively for rescue rigging operations. It is vitally important that components are never operated beyond their WLL. Proper use and maintenance are fundamental to offer greater safety for all.
BIO
Billy Leach Jr. has been actively involved in emergency services since 1976, combining career and volunteer experience. He is the developer of and senior presenter for BIG RIG RESCUE™. Frequently, he conducts training in vehicle rescue and has presented at the International Vehicle Extrication Learning Symposium, Fire Department Instructor’s Conference (FDIC), Fire Rescue Magazine’s First Due Conference, FDNY’s Technical Rescue School, and Los Angeles County Fire Department Special Operations Division. Numerous presentation experiences include national and international audiences. He has co-authored BIG RIG RESCUE© on the topic of heavy truck anatomy and extrication. Also, he is a certified rigger and signal person according to the National Crane Operators Certification Commission. He is a certified Wreckmaster 6/7 and Crosby Rigging Trainer. As a selected committee member, he helped develop the National Fire Protection Association Hybrid and Electric Vehicle program.

