
By Ken Fowler
 |
| (1) Photos 1-7, 11, 12, 14 by author; photos 8-10, 13, 15-21 by Dave Casey. |
Scenario: It’s 0200 hours, the tones have dropped, and you scramble into your gear and climb onto the rig. Dispatch has informed you of a confirmed motor vehicle accident (MVA) with entrapment. As you have done countless times, you think about your “plan of attack” en route to the scene.
On arrival, you jump off the rig, do a quality size-up, and complete your scene survey; hopefully, lines are now getting pulled and charged, and the hydraulics are being staged. As with every good crew, all of this happens flawlessly. As the captain barks orders to take the driver’s door, the hydraulic pump goes down. Only when you return to the station and the rescue is complete can you spend all your time fixing, repairing, or troubleshooting any issues with the hydraulic pump. So, what do you do? Do you have a backup plan in place? Does the crew gather around and start wasting precious seconds trying to get the pump operational? Being a well-trained officer, you immediately go to the backup plan: the jack. This article will discuss the use of jacks as the primary means for manual extrication operations.
Using manually operated jacks is just one of many methods available to accomplish the same objectives. The objective here is to remove your entrapped victim in a safe, efficient, and controlled manner. Following are some alternative methods when using hydraulics to accomplish a standard door pop, a steering wheel displacement, and a brake pedal displacement.

Methods of Extrication
As stated, there are various ways to approach extrication after you have lost your hydraulic operations. One method is not necessarily better than another, but this article’s goal is to promote the idea that, on the emergency scene, you must often “adapt and overcome.” As with any fireground or emergency operation, the keys are to train on and understand the various tools you have in your toolbox; this will result in a seamless operation accompanied by quick decision making by company officers, which translates to a quicker rescue effort.
The methods and tools that can be used in the above scenario include some low-cost equipment (low cost compared to the overall cost of hydraulics). I am not advocating that these methods and tools replace modern technology, but keep in mind that the basic concepts still apply. Regardless of the techniques employed, certain things will always remain constants such as scene size-up, the circle survey, and vehicle stabilization. The methods and equipment include the use of the following:
- Jacks (old-school bumper jack type).
- Chains.
- Reciprocating saws.
- Cribbing.
- Webbing.
Through proper training and equipment familiarization, these tools will still allow us to accomplish tasks such as the door pop, steering wheel displacement, brake pedal displacement, top removal, and roof flap in a quick time frame. Can you accomplish this as quickly as when using modern technology? Perhaps not, but it is fairly amazing what a couple of well-trained and highly motivated firefighters can accomplish.
Tools
When speaking of the tools mentioned for this method, it is important to note some particulars. The intent is not to be vendor- or manufacturer-specific, but you must know and understand things such as rating capacities and product design.
Chains. Chains come in various types and capacities and with numerous end connections. Although it does not matter which connection or end device you use or which manufacturer produced the chain, it is important to ensure – for the purpose of safety – that you are using the correctly rated chains. All chains come with a rating “grade” and are marked or tagged as a “#70,” “#80,” “# 100,” or even “#120,” all of which meet the requirements for this method. A chain grade of #70 is probably the most common grade of chain and is considered to be a transport chain. Never use it for overhead lifting. However, in terms of cost effectiveness, it is the most affordable. When combined with the appropriate hook and end connections, grades #80, #100, and #120 are used primarily for overhead lifting operations. Grade #80 is the lowest end of the spectrum; the #100 affords a 25-percent higher lifting capacity; and the #120 offers a 50-percent higher lifting capacity than #80.
Cribbing. This piece of equipment remains constant regardless of the extrication method. Cribbing is required not only for stabilization but also to provide solid push points. Reciprocating saws fall within this same category regardless of their type (battery or electric) or the manufacturer; they are items you need to cut posts and hinges, make “V” or wedge cuts, or cut around the Nader pin. Like most of the other items, jacks often fall within the realm of personal preference. However, one manufacturer does make a specific jack for fire and rescue work that comes in several sizes with somewhat higher rated capacities and a slightly different makeup of connection points at the end base.
The Door Pop
The door pop is one of the most common rescue efforts performed on scene. Regardless of whether the vehicle is two- or four-door, the techniques should remain consistent. However, for the purposes of this article, the vehicle in this scenario will be a four-door. Once again, let’s assume all of the standard operating procedures have been performed such as scene size-up, stabilization, and so on.

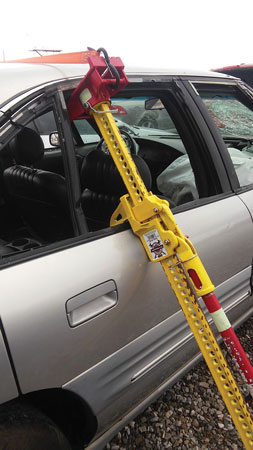
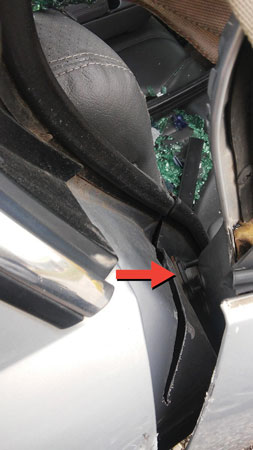
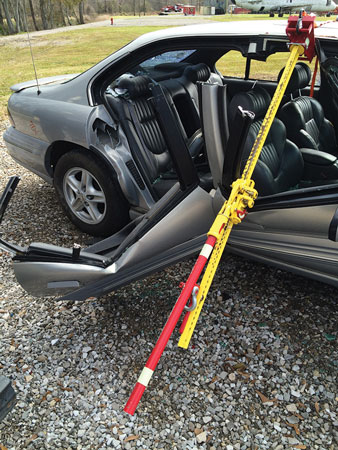
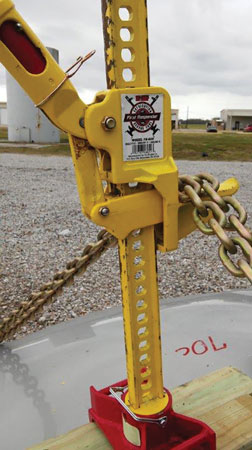
First, remove the glass from the rear door. Keep patient protection in mind, and follow all safety requirements for responders and victims when removing or taking glass. Once you have a clean (glass-free) area of operation, place the jack inside the window with the jack base against the top of the door and as close to the C post as possible. The lifting lip will then catch the bottom of the door (where the glass goes into the door); this should place the jack handle on the outside when lifting the jack handle upward. The responder can then tighten the jack into place (photo 1). Placing the jack in the upside-down position allows the responder to push in the desired direction as well as gain a more mechanical advantage by lifting upward as opposed to pulling downward.
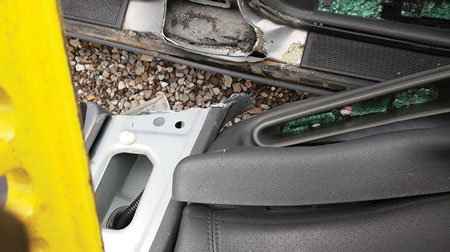
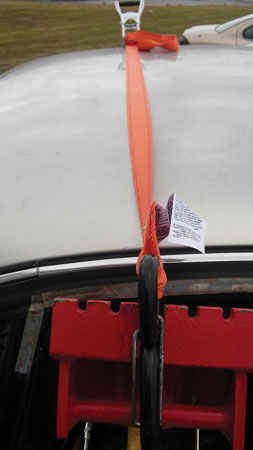
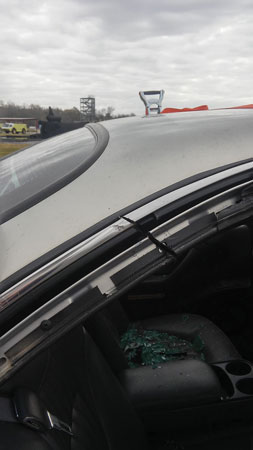
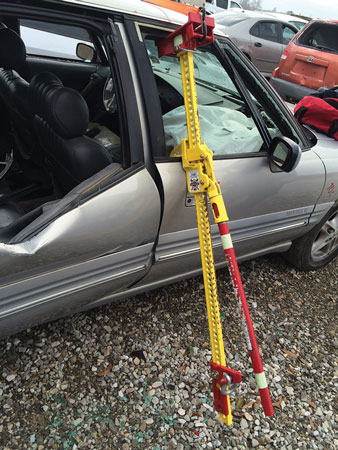
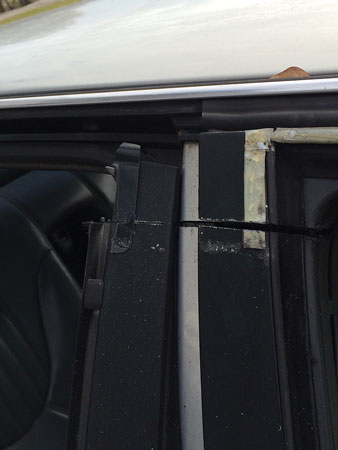
Once the jack is secure and in place, attach a safety strap to the base of the jack, stretch the strap across to the opposite side of the vehicle, and connect it to the other window frame (photo 2). Once it is secure, use a reciprocating saw to cut high up on the window channel next to the C post. Do not cut the C post (photo 3); this would allow the roof – rather than the door – to push upward. On completion of the cut, wrap a section of webbing around the lower part of the window frame and the C post (photo 4). This allows you to keep the door from bouncing back into you after the pop is complete.
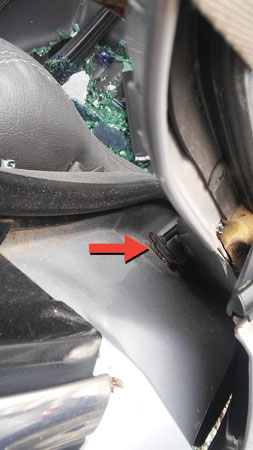
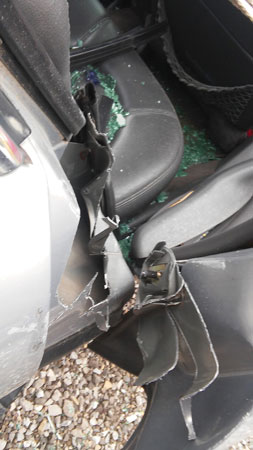
Next, commence operating the jack by lifting the handle to spread the door away from the vehicle frame, which should cause the door to start pulling away from the frame. The Nader pin will probably not release, but the metal around its base should begin to tear or separate. Once enough space is allowed and the tear begins, another member can cut the metal around the Nader pin’s base with the reciprocating saw, releasing the door from the frame once the cut is complete (photos 5-7). Once the door releases, release the webbing and the jack. Then, move and reposition the jack into the front door in the same manner as the first door pop operation. Once the jack is in place and secure, repeat the cycle.
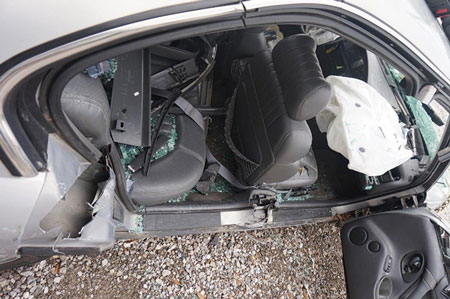
Next, use the reciprocating saw to cut through the front door’s window frame all the way through the B post; remember to cut up high (photos 8, 9). At this point, operate the jack, keeping pressure by spreading the door in a downward and outward direction (photo 10). The second rescuer can then cut with the reciprocating saw to the bottom of the B post just above where the seat belt tensioner should rest at the bottom (photos 11, 12).
After completing the B post cut, remove the jack; both doors (they are still connected as one unit) should swing out, or you should be able to move the doors in an outward direction away from the vehicle, fully exposing the front door hinges (photo 13). If necessary, you can then cut the hinges with the reciprocating saw or take them off mechanically by removing the bolts, allowing the two-door section to be completely removed. Two things to remember: (1) Make sure to cut the seat belts prior to the operation and (2) cover the exposed posts at the bottom of the vehicle frame with some sort of soft protection before you package the patient.

Steering Wheel Displacement
At some rescue scenes, responders will not only have to remove the door for patient access but they may also have to move or lift the steering wheel from the patient’s lap. You can accomplish this fairly easily, but you must consider that the vehicle features articulated steering columns and front-wheel drive. First and foremost, note that when moving or displacing a steering column, move it only enough to allow for removal of the entrapped victim. If for any reason you believe the movement should be more than eight to 10 inches, consider using alternative methods such as a dash roll or a push. However, these methods are not the first or recommended choices of procedures for articulated steering columns.
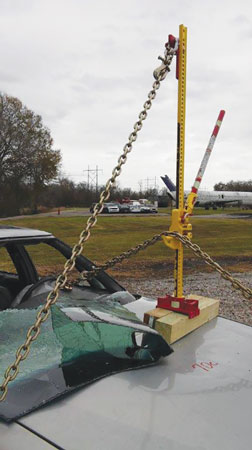
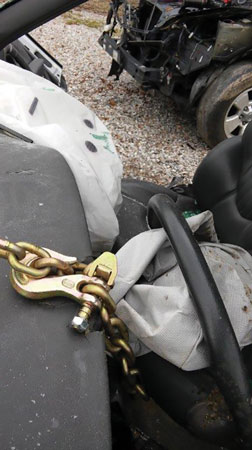
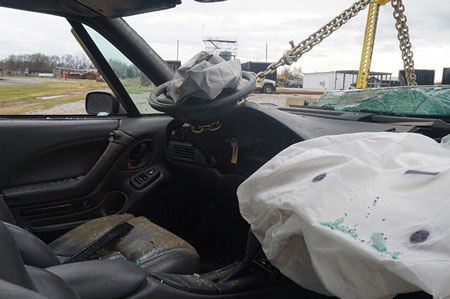
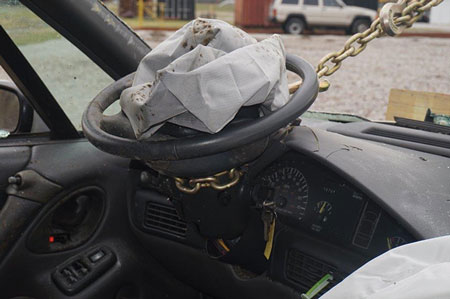
The first step in steering column displacement is to remove the front windshield. Again, remember to follow all proper safety protocols when removing the glass. Once you remove the windshield, wrap a chain around the base of the steering column (photo 14). Run the opposite end of the chain over the hood of the vehicle and find a connection point below the front bumper. Pull as much slack out of the chain as possible, but leave enough room to get the jack in place. Use a couple of sections of 4 × 4 cribbing to build a base on which you can rest the jack’s base. Slide the lifting lip up under the chain, and begin the lift by operating the jack handle (photo 15). As the lip raises, pressure will be placed on the chain; this should cause the steering column to start moving in upward. Often, the jack will want to lean toward the rescuer operating the jack handle. To eliminate this issue, provide more stability to the jack during the operation by using a third chain. Connect the third chain to the top shackle of the jack with one end and connect the opposite end of the chain to the underside of the vehicle or to the tire (photos 16, 17); this will give additional stability to the lifting operation. Remember to apply just enough lift to displace the steering wheel to allow for patient removal (photos 18-21).
Brake Pedal Displacement
This is another fast, easy procedure. Turn the lifting jack sideways and stick the jack base onto the frame rail below the door, close to the A post. Wrap a piece of webbing around the brake pedal and then around the lifting lip of the jack. Next, operate the jack handle, and the lifting lip will pull the webbing tight, thus pulling or displacing the brake pedal toward the A post. If the desired direction of the pull is in the opposite direction, use the same procedure with a longer piece of webbing.
If you need to move the pedal in an upward direction to free the patient’s foot, loop the webbing around the pedal and bring it upward through the top portion of the steering column; sometimes, side-to-side directional pulls are not the direction required to move the pedal. As the rescuer, you can use the jack resting on the engine compartment/dash area to tension the webbing; this will also pull the brake pedal in an upward motion. Other methods work to pull tension on the webbing to move the brake pedal in the desired direction, but always remember to use only the minimum amount of movement or displacement needed to free the patient.

The main goal of any extrication is the successful completion of an operation that provides the quickest, most efficient way of freeing the patient and keeping responders safe. These methods are not meant to replace hydraulics or modern technology; they are just a few methods that you can use if needed. Remember, the keys to success with any method are training, understanding your equipment, and using it correctly. As rescuers, we have many tools in our toolbox, and we should always train to use a variety of methods and approaches to accomplish our objectives. If you are ever faced with an emergency situation and the hydraulics go down, are you prepared?

KEN FOWLER is a 28-year fire service veteran of and a regional coordinator with the Louisiana State University Fire Emergency Training Institute. He has worked in various facets of emergency services at the local, state, and federal levels including working in suppression and special operations with the South Carolina US&R Task Force I as search team manager and task force leader. As a member of the FEMA Prepositioned Equipment Team (PEP-POD), Fowler was the team leader for the FEMA PST-5 PEP-POD team, which responds to national and international incidents. Fowler also trains firefighters and emergency responders throughout Louisiana.
The Best Tools for Breaching Bullet-Resistive Glass
Municipal Response to Extrication Incidents Involving Military Vehicles and Equipment
Extrication: Who Makes the Call?
Fire Engineering Archives

