By Lynn Morgan
What type of burn building should your fire department purchase? First, develop the questions on how this structure would help you meet your department’s firefighter training needs. What is your budget? What will you use it for—training in fire behavior, search and rescue, different attack modes, or all of the above? Do you want a mobile or a fixed facility? One place to start is National Fire Protection Association (NFPA) 1402, Standard on Facilities for Fire Training and Associated Props, with which such a facility must be in compliance.
- Live-Fire Training: What Do You Train On?
- How to Build a Firefighter Training Facility with Private, Public Money
- Creating Your Own Training Facility
- Live-Fire Training: Much Preparation for Safety
Strategic Needs
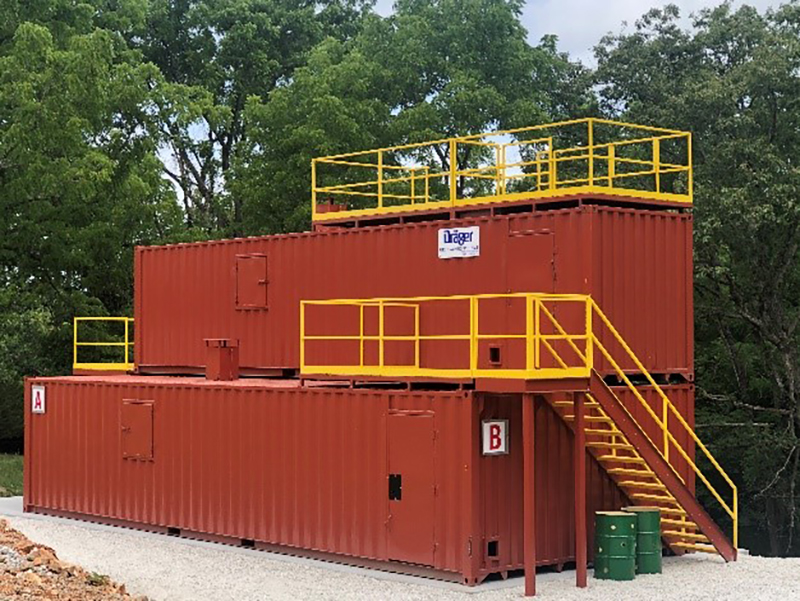
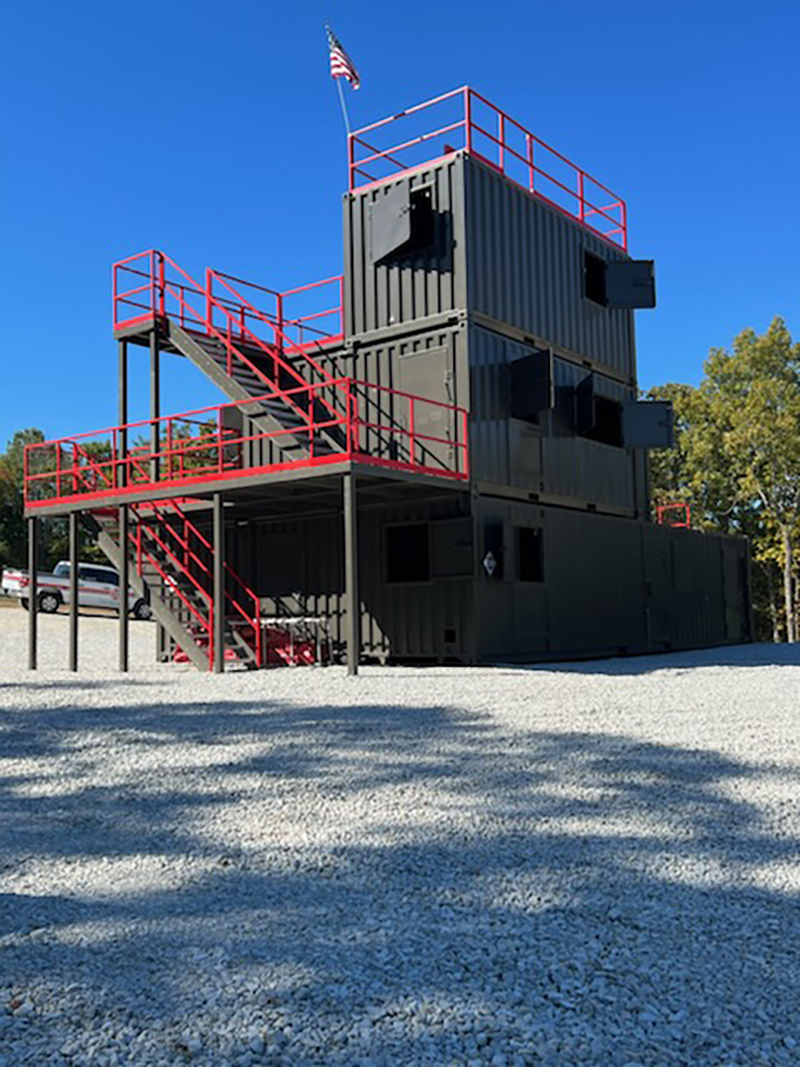
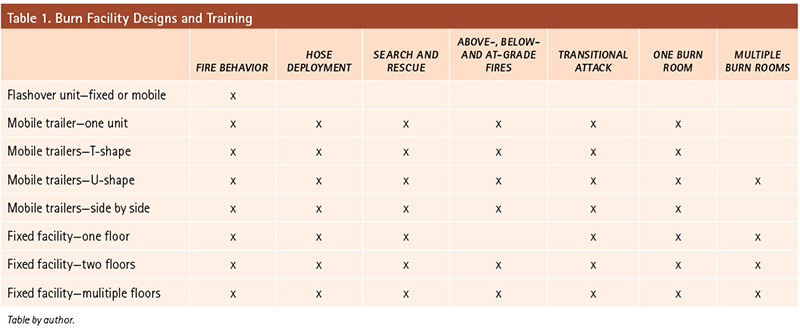
Consider your strategic training needs—i.e., what training needs do you want to fill? What conditions do you want to be able to demonstrate with this burn building—fire behavior, search and rescue, flashover (photo 1), and fire attack (including hose advancement; below-, above-, and at-grade fires; and transitional attack)? For the design, do you want a fixed or mobile facility, one or more trailers, and a T- or U-shaped layout? Single or multiple floors or burn rooms? Table 1 lists the various configurations and the training for which they are appropriate (photos 2-3, Table 1).
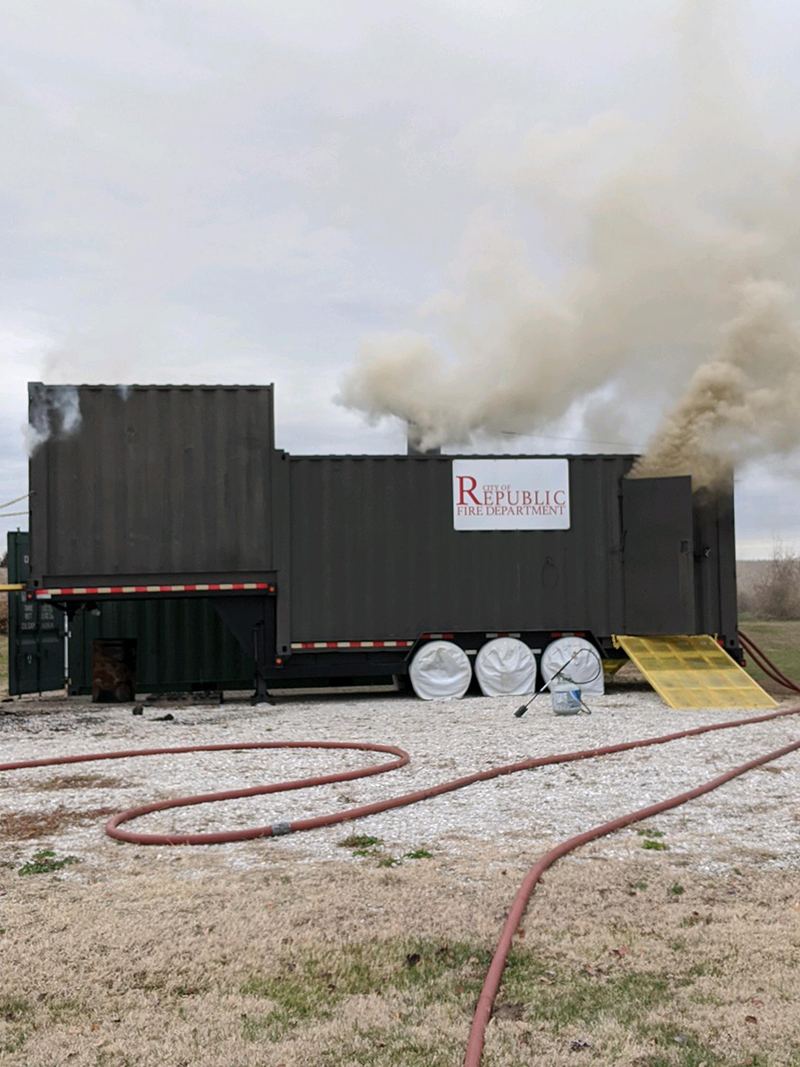
(1) Photos by author.
(2)
(3)
Mobile vs. Fixed
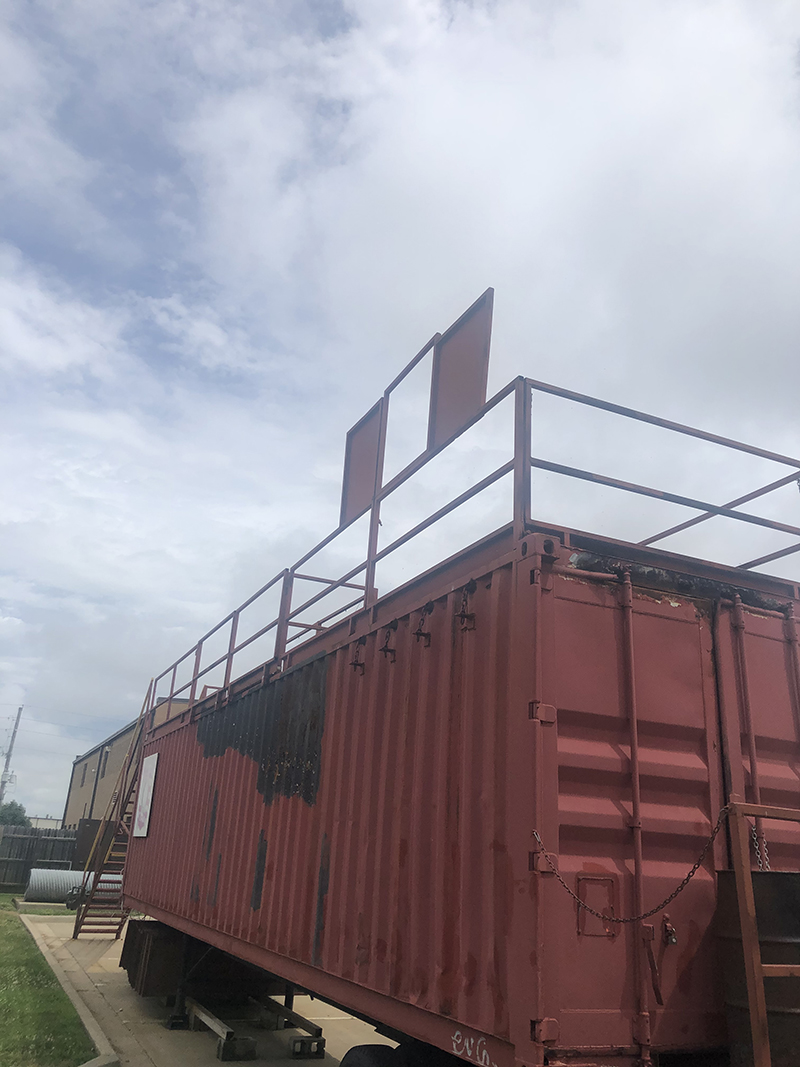
Choosing a mobile or fixed trainer depends on the training goals you have listed in your needs assessment. How many fire stations do you have? Will it be available for your mutual-aid or auto-aid companies to use? Will they want to move it into their districts for training so they don’t have to pay overtime or shut down stations to attend training? This is also where you determine if you want a Phase 1 (a flashover container), Phase 2 (one container with one burn room), Phase 3 (a three-container system), or a Phase 5 (a five-container system) facility. You can build on from there or build a permanent structure with corrugated metal exterior walls.
You can move a mobile burn facility from station to station for training. Keep in mind that you will need to inspect the trailer before it travels to different departments to ensure that it doesn’t need any maintenance or repairs before the road trip. After it returns, you need to inspect it and do a performance test to ensure everything is in place and works properly. Mobile burn buildings take a beating during transport from location to location and require a lot of maintenance. The jarring movement could upset sensor calibrations; cause removable walls to fall off the hangers; and, with the modern technology, cause electrical problems with the ignition controls. Before and after transport, carefully inspect the facility (photo 4).
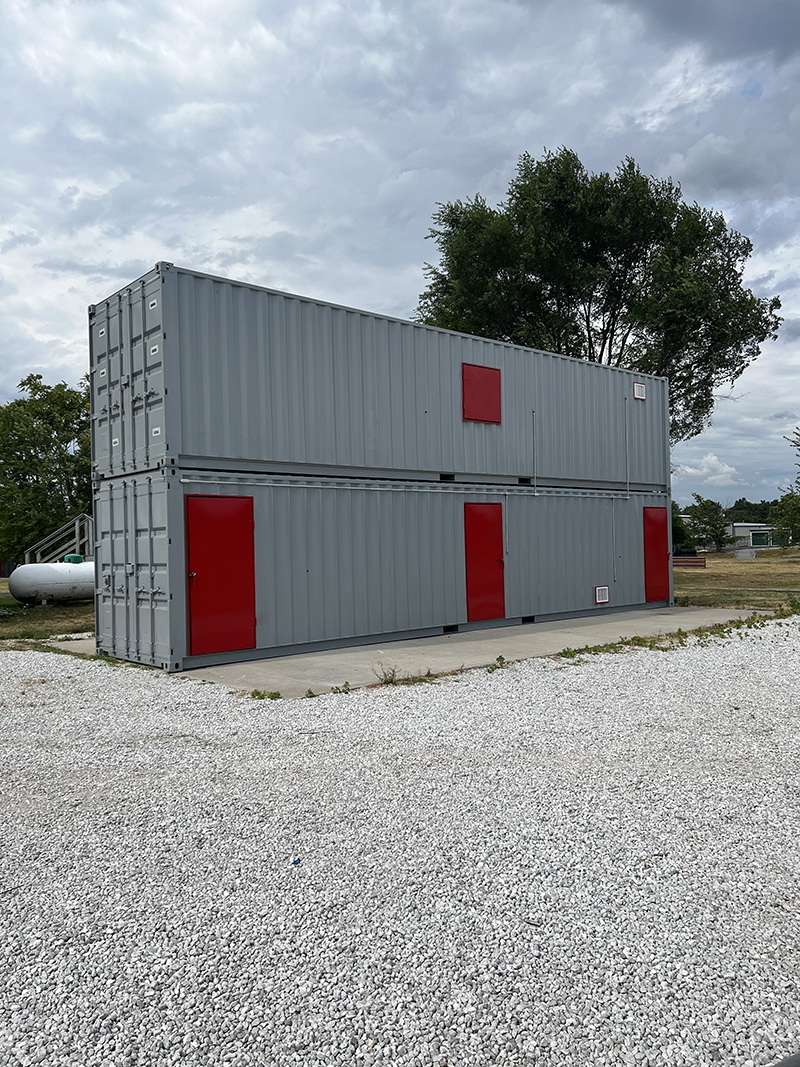
For a fixed burn facility, do you want a single- or a multiple-unit setup? The burn facility site will need enough space for the concrete pad on which the facility will sit. A Class A burn facility will generate smoke, so will that be hazardous for the area around it? As a practical consideration, it can’t go in a residential area or near nursing homes, medical facilities, or schools. Also consider the water supply needed in choosing the site and that you have enough area to expand in the future (photo 5).
(4)
(5)
Fuel Sources
Will this be a Class A or Class B fuel facility? The fuel used affects the fire behavior and suppression tactics, too. Class A offers realistic fire, heat, and smoke and realistic fire behavior when you extinguish it and if the fire reignites after overhaul. The disadvantages include the cost of the burn materials needed for burns and the training downtime between each crew rotation. The burn room must be cleaned out and reloaded with fuel; after training, the burn building must be decontaminated.
The Class B fuel is a cleaner and more controllable fuel source. You can have multiple burn types in one building—e.g., involving a stove, a bed, or a sofa; quicker rotation between burns for training crews because you do not have to clean or reload the burn room; and minimal cleanup because propane fuel burns more cleanly. You can control the burn better using the emergency shutoffs.
The disadvantages include the additional cost of all the sensors and emergency shutoffs needed in the initial build and the yearly maintenance they require on sensors/stops throughout the entire burn building. Other costs include the electronics related to the pilot flame for igniting the props that are also an initial cost and annual maintenance factor. The biggest disadvantage is this doesn’t give your crews an authentic experience of fire behavior. They don’t see the fire stages from ignition through flashover. The smoke dissipates when the room heats up and reaches certain temperatures, so they don’t experience the real effect of smoke on their ability to see or get a realistic sense of fire extinguishment since the instructor controls starting and stopping the fire. When he is satisfied that you have extinguished the fire, he then takes his finger off the “dead man” switch, which kills the fuel, and the fire goes out.
Options
Your budget is the big question in considering what type of building your department needs for its evolutions. You can design these structures with all different props and attachments and have burn rooms on each floor or in different hallways. There are different options you can pick from for use in training evolutions in your facility. You can get a closed burn room with a door that can simulate a closed-door burn or the opposite as an open-door burn. This gives the burn room manager the option of how he wants his crew to perform the evolution. You can put standpipe connections on each floor and sprinkler heads on each floor so the flow of water can be stopped/controlled. You can make these buildings as tall as you want. You can add removable walls so you can make your own training maze in the room. You can add different walls for entanglement training or a false floor for the realistic sense of a floor collapse. Half walls enable you to monitor the crew’s progress in the evolution. You can add forcible entry doors between rooms or on the exterior.
For roof props, you can use a flat roof for training on ventilation for strip malls or a regular roof prop that is adjustable for different angles. Now, roof props are available so you can vent the roof and then punch out the gypsum board in the room ceiling below to remove the smoke. This is a great feature since most crews do not get to do that until their first structure fire.
Technical Rescue
For technical rescue training, you must decide what training you be able to perform and the capabilities you want in the structure. You can have all the needed anchors for window bailouts or rappelling off the top of the building. You can place a confined space prop in the clean area of the building. You can put a prop in one room to simulate structural collapse scenarios for training (photo 6).
Electronics
Electronics are mainly used in the Class B burn buildings. Most structures have an option to put in heat detection sensors to control the building’s temperature, which are all connected so the operator can monitor the temperatures. Even though these are mostly in Class B buildings, some departments put them in their Class A buildings also. Manufacturers now install cameras in each room so you can monitor each room as the crews go through the evolutions. With this excellent feature, if you notice something going wrong, you can shut down the burn and order the crew to evacuate. The control room now has touch screens for easier access to all your operations or switches for the shutdown, if you prefer, and wireless or wired remotes for the burn room kill switch.
Props
There are a lot of choices for props to use in your facility—a bed, a sofa, a stove, or a grill (photo 7). Simulations include a ceiling rollover or a hidden wall fire. You can simulate a garage fire with a car prop. You can arrange any number of props any way and anywhere you want in the building.

(6)

Windows
How many windows and doors do you want and where do you want them? You should have at least one window and one door in the front and back on each level.
Fire Behavior
A flashover trainer is the best option for a class on fire behavior. You can place your crew in the simulator’s observation portion and show them the stages of fire: ignition; growth (incipient), which could have flashover conditions; fully developed (free burning); and decay (smoldering). Also, this gives you the opportunity show students the four warning signs of flashover: high heat, free burning, heavy dark smoke, and rollover. If you want to show different fire scenarios and practice attack evolutions, consider whether to have one or multiple burn room buildings. You could have multiple rooms burning for different evolutions. These are good for showing firefighters ventilation-limited fires and the flow path for door control.
Fire Attack
What methods of fire attack do you want to teach? With a Phase 1 (flashover) unit, remember, you are just teaching the crew fire behavior without attack. Many instructors fail to differentiate the control of the demonstration for actual fire attack. For training in hose advancement and fire attack, you need to get either a single container, preferably in an L or T configuration, or multiple-floor containers, in which you can teach transitional, offensive, or defensive fire attack. Crews can get a realistic experience of pulling hose through a structure and performing the T, Z, or O attack stream patterns to ensure that firefighters are hitting the ceiling, the walls, the floor, and the base of the fire.
Search and Rescue
For search and rescue, I recommend that you have a clean or separate section or room of the training building so you can use a smoke machine instead of actual smoke to perform the evolutions. This cuts down on the crews’ exposure to carcinogens and soot from the fire, but this can be difficult if your budget does not allow you to have it in a separate portion or area adjacent to the burn facility.
Final Design Considerations
Now you need to decide on the final design of your burn building structure to meet your needs. Your building can use from one to seven or more containers, which can be stacked and include exterior and interior stairs. Some manufacturers build a regular building using concrete or metal studs, add siding, and then use calcium silicate liner panels to provide a thermal lining in the walls in the burn rooms. This can be a cost issue when you must replace these panels, so you need to budget in the additional cost of the future replacements. Using these panels can be one of your biggest decisions when doing bid specifications for your facility.
Visit departments that have burn buildings and have your design committee look at the different styles available from different manufacturers. Note what features you like and dislike; features in the main parts of the building are important design factors. All interior stairs should be easily accessible and made with materials that won’t damage your gear or equipment. For Class A burn rooms, locate the vent cables such that you can operate the vent and the door at the same time. Ensure that the holes through which you feed your safety hoselines in the building will not interfere with the egress doors or affect evolutions. Make sure you will be able to build a usable self-contained breathing apparatus maze. If planning to do both Class A and Class B fires in the burn facility, decide where and what floor they will be installed. For Class A, you need to consider loading the burn materials and, after the burn, the cleanout.
Looking at facilities from each manufacturer will be a tremendous help in deciding. They can make your facility a safe training environment for your crews and local training partners. You must get your fire department administration and your firefighters and training officer on board with your selection, do a needs assessment, and establish a design committee. You should not make this decision lightly within a week or even a month. Some departments have taken two to three years to make the final decision to put out bids.
Remember, this is a big-budget item; whether you are a fire protection district or a municipality, you must document in detail why you need this building, the training benefits it will provide, and the costs involved in building and maintaining it throughout the year and beyond. You must select the company you want build your facility and then make sure it will include training for your instructors on how to use it safely. They must review all the inspection processes and the details for the Class A and Class B burn buildings based on what you purchased.
Lynn Morgan is a 35-year-veteran of the fire service and a captain with the Republic (MO) Fire Department. He is an adjunct instructor with the Missouri University Fire and Rescue Training Institute and a member of the advisory committee for the fire science program at Ozark Technical College and on the board of directors for the Southwest Regional Training Academy.

