By Michael Donahue
Confined space operations are challenging, but what many people don’t expect is how heavily rope-involved they are. I’ve taught many confined space classes over the years and there is always a hand full of students that overwhelmed by the amount of rope skills and knowledge they must learn in a two- or three-day period. This article will give you a good head start prior to enrolling in a confined space class.
What you first need to understand is that when building rope systems they all hinge on the same few things.
- A good anchor. Nothing is going to work without a solid anchor.
- Safety: You need to ensure that your rigging operation is safe for all those involved. That means no cutting corners and adhering to the basic principles of rigging. (more on that later)
- Effective: Ensure the systems you’re building are going to be effective. It’s counterproductive and a waset of valuable time to create a rigging system that’s not going to be effective for the operation on hand.
- Efficient: You have a lot of rope and hardware at your disposal, but that doesn’t mean you need to use it all. The best rope systems are the simple ones. The more clutter you add, the more confusing things get should something go wrong. It’s also a nightmare for an outside agency coming in to your rescue to assist. I should be able to look at your rigging system or systems and quickly understand what you have going on.
If you apply the above principles you your rigging operation, the operation as a whole should run a lot smoother.
In a confined space operation you’re going to design rigging systems for a few different entry possibilities.
- Vertical
- Horizontal
- Vertical with a horizontal transition
- Horizontal with a vertical transition.
If you can create a well-thought-out rigging system adhering to the principles listed above, it will be interchangeable between vertical and horizontal. The few subtle changes are:
1. Anchor location
2. Actual rigging area.
There will always be some unforeseen bumps in the road, but a strong set of rigging skills will help you navigate right over them. Let’s break down and take a look at an overview of a rigging operation and the development of the rigging system.
- Size-up: Much like any operation firefighters perform, your size-up will be your initial action at a confined-space operation. During your rigging size-up, look for things like types of anchors and anchor locations in relation to your target area. Based on the entry direction, look for areas to run horizontal systems or vertical transitioning to horizontal systems. You may need to essentially steer these rope systems to direct them to a desired point. Because of that, additional anchor points will be needed for the directional pulleys. You can see an example of this in photo 1 and a detailed overview in the video below
- Equipment needed: I include this to make a point. Your equipment should be packed in such a manner that whatever you need is there for you. If for some reason you’re missing a needed item, it’s time to adapt and overcome.
-
Medical considerations: Ascertain the condition of the victim or victims in the space. This is important information for two big reasons.
- Is this a rescue or recovery operation?
- Conditions may dictate the method of patient packaging you use. Patient packaging is the most important operation you will perform. If we don’t protect and prevent the victim from further injury, we’re not doing our jobs.
- Design of the the rigging system: This is the meat and potatoes of the entire operation. Without it, your rescuers aren’t going in and the victim or victims aren’t coming out. Let’s now go over a rigging set-up to help you gain more understanding of this operation.
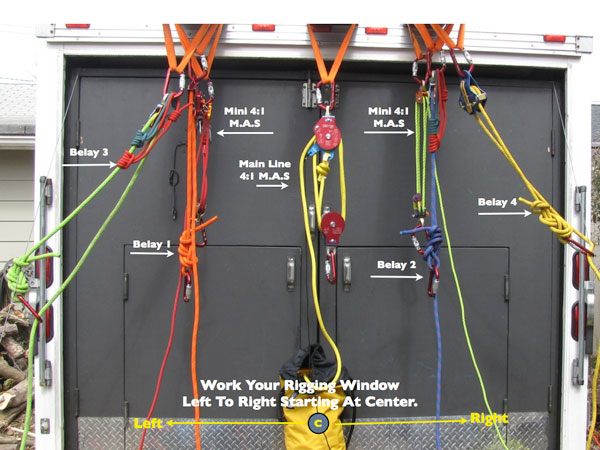
Let’s look at a vertical rigging set-up first. Here we’re using several overhead anchors, allowing us to position our systems vertically and independently. Positioned in the center is a 4:1 mechanical advantage system. This will act as an “elevator” in the sense that it will bring our rescuers up and down or in and out of the space. Initially we’ll rig for two rescuers, so we need two belay or “safety” lines. It’s important to remember that the belay lines are there in the event the main line fails or there is a catastrophic failure at the anchor end. With that being said, each belay line needs its own separate anchor attachment. We can now add an additional two belay lines for our back up team. For the time being, rig them and pull them out of the way. If they’re not being used, there’s no need for them to be cluttering up your window of entry. In the pictures, I’ve used several different belay methods to show you a variety choose and learn about. I’ve used a CMC Rescue multi-purpose device (MPD) a 540 Belay Device and tandem triple-wrap Prusiks. I’ve positioned a mini-4:1 mechanical advantage system on either side of the main line. These will be used to off load the Prusik belays in the event they are engaged or can act as a retrieval tool should something happen to the main 4:1 system The MPD and 540 on the other hand can off load on their own without assistance from a hauling system. Looking to the right and left of the main line, your systems are mirrored.
(Left Side) Belay-Belay-Haul-Main Belay-Belay-Haul (Right Side)
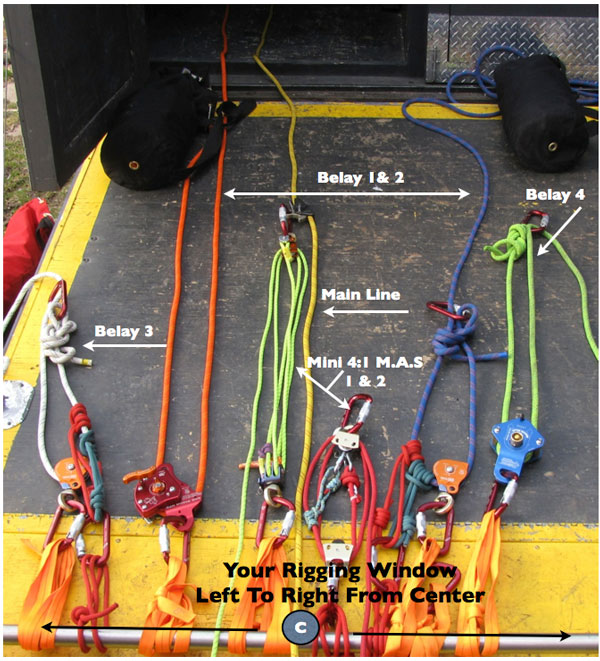
In my opinion, that makes a rigging system easy to read for anyone else in the operation that will be working with it. The other side of the coin–horizontal entries–can use the same exact setup. Take a look at the pictures of the horizontal rigging system. Notice that it’s the same as the vertical system; the only difference is the anchor point. For picture purposes only, what we’re using for the horizontal anchor point is considered “bombproof.” Just like the vertical system, every line has its own independent connection point. They are one in the same. I mirrored these systems to show you that, minus a rigging curveball or two, the same system will work in either direction.
Make your rigging Safe, Effective, Efficient. The key to rigging success is to develop a strong game plan and stick to the SEE acronym.
 Mike Donahue has 17 years of fire service experience and has been a career firefighter in the city of Elizabeth, New Jersey, for the last 13 years, working out of Rescue Company 1 for the past 10 years. Mike teaches a Middlesex County College as an adjunct professor and acts as the Fire Service Program Coordinator. Mike is the owner of Progressive Rescue and can be reached at progressiverescue@gmail.com.

