By Michael N. Ciampo
Think back to your first ventilation class. Most of you can recall learning that “you need at least a four by four hole to get the most out of your ventilation opening.” Many of us older firefighters were handed an ax and, before we even got to swing it, were taught to strip a few shingles off to look at the type of roof sheathing we were dealing with. We were also taught that removing the asphalt shingles in the cutting pattern reduced the friction of the ax blade as it penetrated and cut through the sheathing. In addition, only one material had to be cut, and you eliminated the chances of a buildup of asphalt residue on the ax blade.
After we went over these steps, we were shown how to cut a square on a roof prop with an ax and then the power saw, and we instantly became schooled on the art of roof cutting. We also noticed how much easier it was to use the saw and how much physical stamina and finesse it took to use the ax.
Sure, you all can recall the four lines of a square cut, but many of you might have accidentally forgotten that to pull the roof shingles and sheathing off the joist, you might need a “knockout.” The knockout hole should be a diagonal cut across the two 90-degree corner cut lines so you can insert the tool you’re using into the space and pull the roof open. Many firefighters often make this knockout too small or don’t overlap the cuts enough to cut through the roof sheathing on both sides. Ensure your cuts overlap and the space is large enough to accommodate the head of a hook. It’s also very important that you make more than one knockout cut to allow another firefighter to help you open the cut up or, if one side is difficult to open, you can try it on the opposite side to release it more easily from its attachment point.
With today’s modern power saws and advances in blade construction, firefighters seldom check the makeup of the roof sheathing because they know the powerful saw will cut through just about anything they encounter on the roof. But aren’t we missing something? You must understand the physical characteristics of building construction and materials to become a well-versed firefighter. Understanding the differences between a roof decked with tongue-and-groove planking and a roof sheathed with 3⁄4-inch plywood will help you immediately choose your tactic. And, in turn, choosing the proper tactic will cut down on the time it takes you to open the roof and make it easier to open.
You can perform the pull back method of roof cutting on roofs that are sheathed with tongue-and-groove decking and plank decking. It can be performed on flat roofs, walkable pitched roofs, off of roof ladders, and out of tower ladder buckets on pitched roofs. It resembles the square cut pattern (four cuts and two knockouts) but needs only three cuts and two knockouts. Eliminating the bottom cut speeds up the process, and it doesn’t have to be done on tongue-and-groove boards because they will separate at the connection seam. On roofs with planked decking (1⁄2- to one-inch thick and four, six, eight, or even 12 inches wide), the boards are not interlocked or connected. They will separate where they meet the next board when you pull back the sheathing. After tearing off a few shingles to reveal your sheathing or after making an inspection hole with a saw, you will find decking and are now ready to begin the cut.
THE PULL BACK CUT
First, make the horizontal top cut or head cut. The location of the fire determines the location of the cut. Normally on pitched roofs, cut just below the ridge to ensure that you ventilate the highest point; on flat roofs, make all attempts to cut over the fire. As you make the cut, try to keep the length to about a three- or four-joist spacing. Any longer makes it harder to pull open the decking because it’s attached in more spots. Many times, once you make this cut, you will be able to spot the rafters through the space or kerf. If not, some firefighters pull the saw out of the cut when they hit the rafter and make a small score into the shingle to mark its location. While making this cut, if you feel increased pressure on the saw, you’re probably contacting a rafter; roll the saw over it while still cutting the decking. This eliminates cutting into the structural members, reducing the chances of a collapse. Also, always maintain full revolutions per minute (rpm) while operating the saw to prevent the saw from stalling or becoming bound in the material. Watch the material being thrown from the saw; if you see only black grit from the shingles and no wood chips or sawdust, your saw blade isn’t cutting the sheathing. If your saw is equipped with a depth guard, set it for the material thickness of the roof you’re cutting.
Next, find the end of the head cut and go about six inches in from the end. At this point, begin the knockout cut from over the top of the head cut and down on an angle past where your first vertical cut will be. If this knockout cut hits a rafter during the angled cut, remember to keep that side’s vertical cut inside this rafter. That will make one less point that the decking is attached to and will assist in pulling the roof boards open.
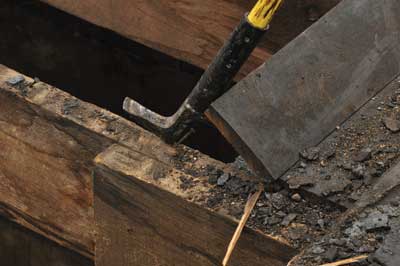
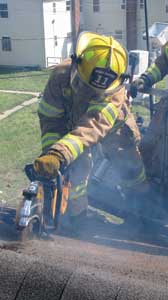
Then cut the vertical downward about four to six feet long (photo 1). Repeat the same pattern for the opposite side. Note: Prior to cutting the same pattern on this side, some firefighters make another knockout or “V” notch in the middle of the top/head cut. This notch along with the two knockout cuts on the sides can assist in removing the first piece of roof decking. The cut should resemble an upside down “u” or an “n” (photo 2). An important safety tip for the length of the vertical cut is that it should not be made longer than the reach of the hook you’re using, and you should not step onto the area that has been cut. If the area is burnt through or the roof boards were staggered or a vertical seam exists in the run, a firefighter could fall through. If the hole has to be expanded, then the vertical cuts are just increased.
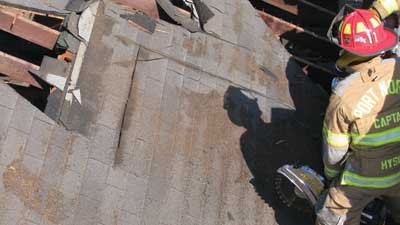 |
| (1) After completing the horizontal cut, make a knockout and vertical cut on one side, then cut the same pattern on the opposite side. (Photos courtesy of the Port Norris Fire Department unless otherwise noted.) |
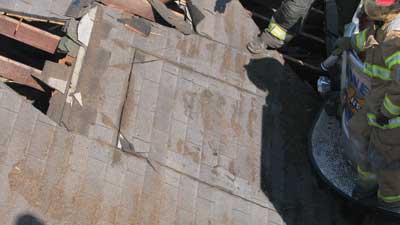 |
| (2) The pull back cut resembles an “n” or upside down “u” pattern once it is completed. |
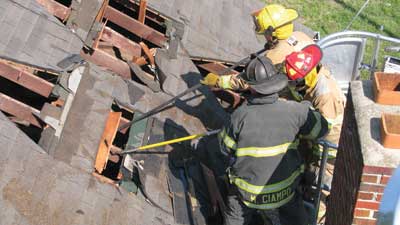
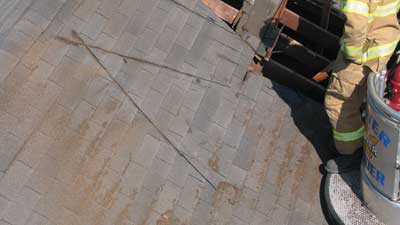
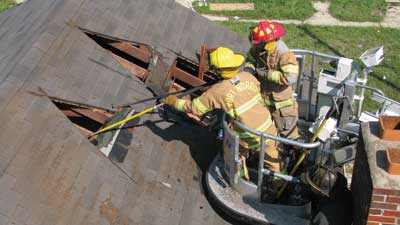
If the two knockouts on each side of the cut didn’t fall into the hole while you were making the cut, you can punch them in or pull them out with a hook (photo 3). Then insert the head of the hook into the hole and begin pulling the roof boards off. The strokes should be short and as near the joist as possible to put pressure on the nails holding the decking down. If two firefighters are removing the decking, try to get in the same rhythm with your hooks to make opening up easier (photo 4). If one piece of decking is stubborn, one firefighter can slide the hook over toward the spot or next joist and continue the short pulling strokes. If using a pulling motion still won’t release the piece, use the hook as a pry bar and pry the piece away from its attachment point. Do this by placing the hook’s head either on top of the joist and sliding it under the sheathing and pry upward or next to the joist and under the sheathing and make a quarter turn so the hook’s head tip or point sits on the top of the rafter, and then pry upward. The hook’s head becomes a fulcrum and assists in removing the roof board (photos 5 and 6).
 |
| (3) Use the butt end of the hook to push in the knockouts; this way, if the hook’s butt end lunges through the material, it won’t get hung up on anything while being removed. |
 |
| (4) Two firefighters work in unison to remove the decking and open the roof from the safety of the tower ladder bucket. |
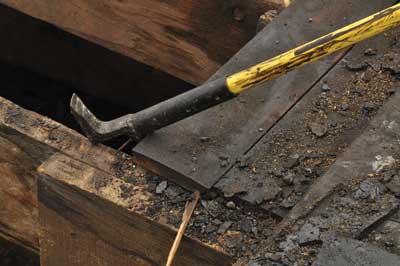 |
| (5) The hook’s tip is placed on the top of the joist, and the remaining portion of the head is placed under the roof sheathing. Then the hook’s handle is lifted vertically, and the tip acts as a fulcrum to pry the sheathing off. (Photo by J.J. Cassetta.) |
 |
| (6) As the hook is moved forward as a giant lever, it lifts the roof board from its attachment point. Note that the sheathing separates at the seam. (Photo by J.J. Cassetta.) |
The value of the pull back method is that it’s quick and reduces the time needed to open up roofs when faced with tongue-and-groove or planked sheathing. It also allows the decking material to be pulled back and off the rafters; it does not fall into the structure, possibly injuring an operating member below. You may encounter roof repairs made of plywood in some sections of the roofing while using this method. If this is the case, use the saw to make horizontal relief cuts in the material so you can pull it off the rafters.
THE TEPEE CUT
Normally you think about using a tepee cut on a roll-down gate or commercial garage door. However, you can also use it as a pull back method of cutting a roof on a steep-pitched roof or one covered in ice or snow. It is extremely useful when operating out of the tower ladder bucket at a Queen Anne or Victorian, which often has the third floor converted into a living space. Since many of these structures are so old, we often find their roof sheathing made of tongue-and-groove or plank decking. They also have a version of a hip roof, which may be the area to cut open for roof ventilation. Since many of these roofs are steep, accessing them with a tower ladder will increase the safety factor than operating off roof ladders.
The first cut is a diagonal downward cut from the ridge about four to six feet long. The longer you cut the first leg, the wider it will get at the bottom and will also be attached to more rafters, meaning that there will be a little more work to be done to pull open the roof boards. When working out of the tower ladder, one firefighter could cut this side while the firefighter on the opposite side makes the next cut from the safety of the basket. You can also position the basket of the tower ladder just off the roof and use it as a substantial object for the cutting firefighter to lean into and for support (photo 7). Prior to any member stepping onto the roof, ensure its structural stability. Whenever operating in or out of the tower ladder basket, use the safety belts installed or your own personal safety belt.
 |
| (7) You can use a tower ladder basket as a brace or lean up against it for support while cutting a roof. Always ensure you check the roof stability prior to operating on it, and wear a safety belt on steep roofs or when they are wet from rain or ice and snow covered. |
The next cut is the second diagonal downward cut from the ridge going in the opposite direction. It is very important that these two cuts overlap to ensure the tip of the tepee is cut. As this cut starts to travel downward, firefighters may notice that the first piece of decking is folding into the cut (the board is separating at the seam). If so, there may not be a need to make the third cut, the crossover cut at the top of the tepee (photo 8). Just continue with the downward cut and maintain a foot position on the outside of the tepee, cutting this leg the same length as the first. Do not step into the middle of the tepee, in case the material is compromised by fire or other conditions such as faulty repairs or cheap materials used exist.
 |
| (8) The tepee cut pattern. Note that the cross cut knockout hasn’t been made. Often the peak of the tepee will start to fold inward as the second diagonal cut is made. |
If the top board hasn’t fallen into the hole or isn’t bending inward, the last cut is the knockout or crossover cut. The cut is a short horizontal one about six to eight inches below the acme of the tepee. The hole or knockout must be large enough to accommodate the head of the hook that you’re using. Most firefighters will choose to cut the crossover cut when they initially proceed about eight inches downward when cutting the second leg of the tepee to be on the safe side and ensure an opening exists for tool placement. Remember, if it is going to be your last cut or if you forgot the knockout, avoid walking up the center of the cut; work from the side of the tepee to ensure you don’t fall through the roof decking.
Next, begin pulling the roof boards open and downward (photo 9). When opening both of these cuts, you might have to pull back the material a little distance from the hole so that when you proceed, the debris doesn’t get in the way of making the rest of the opening. Also, all members operating below must realize that these materials have a tendency to slide off a pitched roof and crash to the ground. With the tepee cut, if you need to expand the hole, you can cut the two side legs farther downward on an angle, which will widen the tepee. This could make removing the roof sheathing difficult and require two firefighters to perform because of all the attachment points to the rafters. Another tactic is to switch the direction of the cut: Simply stop extending the diagonal cuts and make the cuts two downward vertical lines to increase the opening, similar to a regular pullback method. In some instances, you can perform this cut off the tip of an aerial ladder, but be sure to follow proper safety procedures. And, as with all cuts, remember that once you pull back the roof, push down the top-floor ceilings to ventilate the area.
 |
| (9) Two firefighters work in unison from the safety of the tower ladder to open up the tepee cut. |
These two pull back methods of cutting roofs offer more options for opening up. They might not be the standard four by four square you were once taught, but they have certain advantages in certain situations. Conduct a proper size-up of the roof in the initial stages of operations to help you determine the types of cuts to perform.
For more information on these cuts, go to fireengineering.com and watch Training Minutes Truck Company Videos.
● MICHAEL N. CIAMPO is a 27-year veteran of the fire service and a lieutenant in the Fire Department of New York. Previously, he served with the District of Columbia Fire Department. He has a bachelor’s degree in fire science from John Jay College of Criminal Justice in New York City. He is the lead instructor for the FDIC Truck Essentials H.O.T. program. He wrote the Ladder chapter and co-authored the Ventilation chapter for Fire Engineering’s Handbook for Firefighter I and II (Fire Engineering, 2009) and is featured in “Training Minutes” truck company videos on www.FireEngineering.com.
More Fire Engineering Issue Articles
Fire Engineering Archives

