Forcible Entry Part 2
FIREFIGHTING BASICS

In our first forcible entry article (FIRE ENGINEERING, May A 1984), we spoke about the locking devices found on both private dwellings and commercial occupancies. In this issue, we will cover the techniques used to manipulate high security locking devices, those devices that force a tactical shift of the forcible entry team’s normal operational procedures.
These high security devices cause us to spend more time at the door than we would like to, and, in some cases, they force us to seek an alternative means of entry. Some of these devices, although very powerful looking, are simple and pose no great problem once the entry technique involved is understood. Other security devices will cause forcible entry nightmares to the uninformed firefighter.
As with all forcible entry problems, size-up of the door is the first and most important step. However, an examination and working knowledge of high security locks and devices cannot start on the fireground. These must begin with a classroom or textbook approach. We must encourage our firefighters to become familiar with high security devices and to discuss and learn about known methods of successful entry. The entire fire operation and its strategy depend, most times, upon the expert manipulation of these anti-crime locking devices.
First, let’s review. In our first forcible entry article, we discussed rim and mortise cylinders and the locking devices that they manipulate. These two types of cylinders are found in most buildings’ door panel locking devices, and neither cylinder should give us cause for frustration. Barring unusual circumstances, we can use our through-the-lock techniques, pulling the cylinder with either a Ktool, an A-tool, or a modified Halligan tool and manipulating the locking devices with our key tool. We know this, the thief knows this, and the people who have been victimized know this.


THE CYLINDER GUARD
The logical solution is to try and protect the cylinder from being pulled from its housing by the installation of some type of guard. These guards are normally one of two types. The first is just a flat plate of 1/4-inch steel with four holes (one in each corner) to accept carriage bolts which then fasten the guard to the door. In the center is a hole large enough to allow the key to enter and turn the plug, but small enough to prevent the cylinder from being pulled. The second type is basically the same but has the carriage bolts hidden within it. However, the four bolts are located in the same position, one in each corner. (This point will become more important later.)
Most of these cylinder guards come with the center hole dimpled and are capable of covering both flush-mounted as well as raised cylinders. Other than a few additional seconds, these guards pose no problem to the forcible entry team. Just shear the bolts (hidden or not, since we know where they are) by driving the adz end of the Halligan or the blade of the flathead axe down, chisel fashion, onto the bolt body between the plate and the door at each bolt location. With flush type cylinders (flush with the door sheathing) we need only to shear three of the bolts and rotate the guard out of our way. The raised cylinders require us to shear all four bolts. In both cases, it is a fast operation and once the guard is removed we are again faced with only a rim or mortised cylinder and locking device. Pull the cylinder with the K-tool or A-tool.
THE FICHET LOCK
A natural development from the cylinder guard was the Fichet lock. (Remember, we are one step behind the burglar and at the mercy of a very reactive lock industry.) When this Fichet lock was introduced to the home security market, it was described as “unpickable.” Its key has an “H” shape and each of its four blades raises a set of tumblers. Only after the tumblers are raised can we turn the key and open the locked device.

Even today, if you ask a locksmith about the Fichet, his response will be that it is a very difficult, if not impossible lock to pick. We are sure that some of our readers are expert lock pickers, but for the majority of us, picking a lock at the fire door takes too much expertise. It is so much easier to pull the cylinder. The Fichet, in this case, makes our job easy, as the lock is nothing more than a rim cylinder that is made part of the guard itself with hidden bolts. If we shear the four bolts, the guard becomes the pulling device for the attached rim cylinder. Remember, the Fichet is a rim cylinder built into a guard. The locking device (which is usually purchased separately) is now manipulated by use of our key tools or by the modified through-the-lock method (driving the device from the inside of the door through the cylinder hole).


MULTI-LOCK
A new addition to the ever-changing security market, and one that is causing us one of those nightmares we spoke of before, is the multi-lock door. The multi-lock is not a new idea, in fact, it’s a very old one. It is a streamlining of the four-way Fox sliding bar lock that may be found on factory or heavy commercial occupancies. The multi-lock door employs four rods that are built into the door itself. When the lock is activated, these rods move out of the door and into the jamb on all four sides. The rods penetrate the top, the knob side, and the hinge side of the jamb and also the floor material.

In our size-up, we want to determine two important pieces of information: one, do we have a multi-lock? And, two, if so, is it locked? Both questions will be answered by passing a thin object (a piece of paper or shove knife) under the door in search of the presence of the locking rod in the floor.

Removing the cylinder of this device accomplishes nothing for us. The rods are gear driven and, as of this writing, we do not have a replacement for the operating mechanism within the lock to manipulate it.
When these doors first appeared on the market, they were fitted with an interior thumbscrew so that the lock could be activated from inside the premises without the use of a key. Cut a triangular piece out of the door in the lower quadrant on the doorknob side. Put your arm through this hole and unlock the door by turning the inside knob behind the cylinder.

The “improved” multi-lock doors are manufactured with key operations on both sides of the door. This negates the forcing method just mentioned. In this case, we have found that by actually cutting the lock out of the door with the circular saw, we will expose these rods. We may then reach in and pull the rods out of the jamb (it’s usually only necessary to remove the knob side and the floor rods, as gravity will take care of the top rod).
Sound difficult? It is.
STATIC BARS AND SLIDE BOLTS
Static bars (drop bars) and slide bolts, either alone or in combination, are commonly found on secondary or rear exits of commercial occupancies. We must be able to recognize these security devices and understand how the door they are holding secure may be forced.

There are two basic strategic factors* at oneand two-story taxpayer type occupancies which will determine the success of our operations. One is, naturally, the ability to effectively ventilate vertically over the fire. The second is that we will be able to vent or open opposite the advancing nozzle. In most cases, this artery is the door at the rear of the commercial occupancy.
- Drop or static bar
- Location and description:

- center or at the top and/or bottom of the door.
- The bar may be constructed of wood or metal stock.
- The bar traverses the door and is held in place by riveted or bolted cradles on the inside of the door and at the walls of the occupancy (see drawing in first column).
- The telltale sign of the presence of these static bars is the patterned rivet or bolt heads on the outer side of the door (see drawing below).
- Sliding bolts
- Description and location:

- The bolts may be located on both the doorknob side and/or the hinge side.
- There may be as many as four of these sliding bolts on a heavily secured door.
- The throw of these bolts is about one inch into the jamb or behind the door frame.
- The presence of these bolts is indicated by patterned bolt or rivet heads on the outside of the door.
- Methods of forcible entry:
- Start at a point furthest from the bar or bolt location and, by coordinated use of at least three forcing tools, work around the door. Heavy “bull” work will eventually free the devices and open the door. This is an old, time-consuming method and a waste of manpower.
- Shear the heads of all bolts or rivets found on the outside of the door.

- tion, use the axe blade at the rivet location and strike the axe with the Halligan, maul, or another axe.
- If we find that the above tasks are impossible for any reason, we may:
PADLOCKS
A padlock is a portable latching device. It has a pivoting or sliding shackle (bow) that passes through some type of fixed and/or nonfixed staple device and then locks into the body of the padlock.
General types of padlocks
There are two general types of padlocks encountered by the forcible entry team.
Continued on page 34


Continued from page 32
- Construction of regular padlocks:
- Shackle is of 1/4-inch steel (or less).
- Non-hardened steel assembly.
- Exposed tumbler plug.
- Flimsy, able to be opened by almost any forcible entry means or technique.
- Construction of heavy-duty padlocks:
- Shackle is of case-hardened steel.
- Body also may be of casehardened steel or of softer metal.
- Key plug may be of casehardened steel.
- Lock (hold-down device) on both sides of the shackle; known as heel and toe locking.
- NOTE: A section must be cut from this shackle. (It requires two cuts with the cutting device that you choose to use.)
- A covering device over the padlock prevents the key plug from being pulled. This is common on the Master series of pad-
- locks and is not found as frequently on the others,
- Internal (hidden) shackle. This is particularly common on the American 747 (rectangular) and the American 2000 (round) series of padlocks.
General forcible entry theory for padlocks
Our size-up will enable us to attack the weakest point of the locking device or the area that will offer the least resistance. Our choices of attacking padlocks include:
- Staple. Cutting or prying away the staple destroys the integrity of the lock/latch assembly and leaves most of the device in a reusable condition. Strong locks are sometimes hung on flimsy hasps or staples.
- Chain (cable) and padlock. Cut the chain rather than the lock. Cutting the link nearest to the padlock will accomplish our purpose and allow the owner to re-lock the premises.
- Shackle. Cut or twist the shackle to spread or drive the lock body
- from it with a prying or spreading force from heavier tools.
- Tumbler. The key plug may be pulled from the body of the lock with a dent puller (bam-bam tool). The lock device is then manipulated by a “key” replacement.
Tools and their uses at padlock forcible entry
- Halligan (type)—all parts (point, adz, and fork) can be used.
- a. Adz (chisel end of the Halligan-type tool)
- b. Fork
NOTE: The older method of twisting the shackle should be abandoned. Twisting may remove the lock, but the now bent staple binds the hasp and, in effect, re-locks the device.
- Place the fork across the shackle and find fulcrum for the fork and pry up or down.
- Place the fork across the shackle and drive it downward on the “expanded” surface, forcing the body from the shackle.
- Hook (pull point)
- Pry the hook against the body of the lock.
- Strike the back of the hook point and drive it into the smaller shackle opening. The lock body will come away from the shackle of the regular padlocks. (You may be able to use this method on the older heavyduty locks also.)
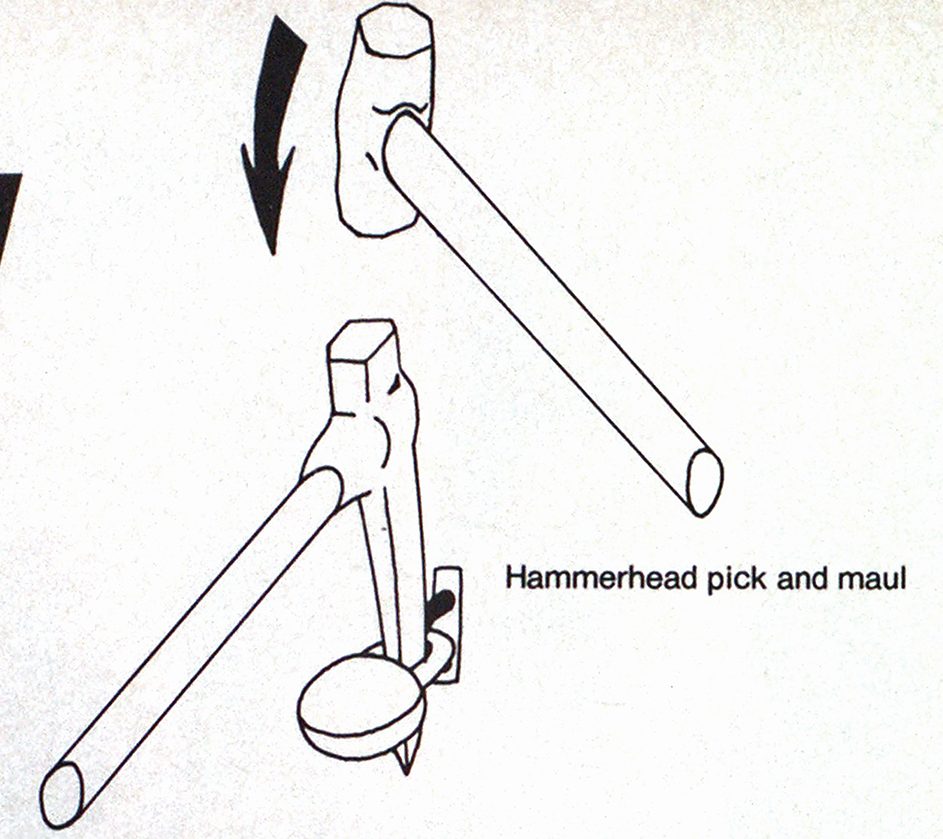
- Hammerhead pick and maul— for heavy-duty exposed shackles (lead drawing).
- The pick end is inserted into the shackle of the lock and held by one man. The hammer end is then struck by heavy, repeated blows from a 10to 12-pound maul (long-handled sledge-hammer).
Continued on page 36
Continued from page 34
NOTE: This set of tools replaces the Halligan used in method 1C on page 34. The heavy-duty locks, case-hardened, need these heavier tools before they will fail.
- Duckbill lock breaker—is a commercially sold improvement to the hammerhead pick. The duckbill lock breaker is a wedge of soft metal. The heel is about five inches and it tapers to a point, making an eight-inch wedge. A short handle (two to three feet) allows the wedge to be held into the shackle by one man from a safe distance. This device proves its value on the larger shackles found on the newer heavy-duty locks.


NOTE: There have been complaints of the hammerhead pick or duckbill lock breaker in combination with the maul. The failure of these tools to do the job easily are usually founded in the following faults:
- The tool must be hit with a 10-pound maul or its equivalent minimum. A 6-pound axe is useless here.
- The person using the maul must use force. We are not here to play games.
- The heads of the wedge tools must be “dressed” (burrs ground off) after each operation, otherwise they’ll create a false striking surface and account for glanced or missed blows of the maul. Even more serious, eye injuries can result from poor maintenance in this area.
- Keep your feet away from the area directly below the lock. The body of the lock may separate from the shackle suddenly and hit your feet. Although not fatal, it can distract you and keep you hopping.
- Bolt cutters—can be used for regular and a few heavy-duty padlocks.
- Regular padlocks
- Heavy-duty padlocks
NOTE: There are casehardened blades on the market for bolt cutters. However, it is our experience that two immovable objects (blades and shackle) meet and the result is that the bolt cutter slides off of the lock bow. We are saying here that if you are faced with heavy-duty padlocks, leave the bolt cutter in its compartment.

- Dent puller (bam-bam)—this tool is a direct result of feedback from a burglar. It is a slap hammer with a self-tapping screw head. It is a common tool around body shops for removing dents (pulling) from automobiles. When screwed into an exposed lock plug (keyway) it will remove it by slapping the hammer against the handle. We then insert our screwdriver key tool (most of the time) and manipulate the locking device with a 1/4 turn.

NOTES:
This tool works well, especially if only one lock is preventing access.
The tool must be screwed straight into the plug (90°) or the screw will break off.
- The screw must penetrate ¾ to 1 inch into the keyway or it will pull out of the soft brass.The dent puller will not work on protected plugs such as found on most Master locks and the newer American 747 series locks.
- Newer locks have case-hardened plugs. The screw device is unable to be used on such padlocks.
- Power (circular) saw—equipped with a metal cutting (aluminum oxide) blade. This is an excellent tool to remove more than one padlock or if the locks look exceptionally strong.

- Let the lock hang and turn the saw in a horizontal position.
- This lets you cut both sides of the shackle at once.
- If there is more than one padlock placed vertically, cut the higher location first. Cutting in a horizontal position saps most of the operator’s strength, so this top lock must be opened first. The lower locations will be a welcome relief.
- Once this saw is in operation, many locks can be cut with ease and entry will be greatly speeded up.
- When faced with hidden shackles (American 747 or American 2000), the use of a circular saw is a must as we shall explain later.


- Portable oxygen/acetylene equipment (cutting torch). If you are lucky enough to have this equipment, it is an excellent tool for removing padlocks. As a matter of fact, the torch or circular saw (in some cases, both) is a must when faced with a multi-padlock problem. Such would be the case with a taxpayer type occupancy (see FIRE ENGINEERING, March 1984) fitted with roll-down security doors or gates (forcible entry techniques for these high security devices will be discussed in a future issue of FIRE ENGINEERING). The shackles heat up readily and are cut easily by use of the cutting torch. The torch also is used to cut away wrapped metal and angle iron, to protect the padlock from attack.

NOTE: An additional homemade tool using a vise grip and dog chain is sometimes helpful when cutting padlocks with a torch and, in some cases, with the circular saw (lock on chain is a good case in point). Place the vise grip on the lock body and hold it rigid at the safe distance provided by the dog chain (or facsimile), thereby allowing the safe operation of the saw or circular blade without the lock flopping about.

Special type heavy-duty padlocks commonly encountered
- Case-hardened imported
- Description:
- Methods of forcing:
- Description:
- Methods of forcing:
Description:
- Heavier, more formidable looking steel locks.
- Usually chrome colored.
- Double locking (heel and toe).
- Key plug may be protected by “pressed” metal piece, making it impossible to pull the plug.
- Methods of forcing:
NOTE: Many of these type padlocks have a long shackle. The use of the hammerheaded pick will, in this case, be useless because the pick will just bury itself in the shackle and not be wide enough to provide necessary pressure to the top of the lock body. Here, the duckbill lock breaker proves invaluable.
Continued on page 86
Continued from page 37
- Cut the bow with a circular saw or torch (cut both sides).
- Internal (hidden) shackle (American 2000 series)


- Description:
- Round body, chrome colored, no visible shackle.
- Fits over the staple and keeps it hidden from attack.
- Locks by a moveable steel pin attached to the key plug.
- When opening, the key and the plug drop one inch out of the lock body. This also drops the attached lock pin and frees the staple,
- b. Methods of forcing:
NOTE: The plug separates from the locking shackle. This shackle must be given a 1/4 turn and no more or it will lock again. The shackle must now be at the mercy of gravity and vibrations, for it must fall out of the lock. The shackle is not spring loaded and if it cannot be loosened from the body, another method must be quickly employed.
- Cut the lock with a torch or circular saw equipped with an aluminum oxide blade. (In view of the restrictions of the previous method, this should be the rule if it’s necessary to enter the premises for fire operations.) The cut must be 2/3 of the way up from and perpendicular to the key plug.
NOTE: The rule in the past was to cut through the number 2000 on the face of the lock and you would be sure to cut the locking pin. Recently, however, the manufacturer has noticed that the locks must be installed at right angles in some cases and has rotated his name 1/4 turn to take advantage of the advertising of so strong-looking a lock. The rule now is to make sure to find the key plug first and then place the saw cut 2/3 of the way up from and perpendicular to it, irrespective of the position of the nomenclature on the lock’s face.
Our series on forcible entry will conclude with a study of the techniques and methods used to gain access to structures protected by scissor gates, roll-down security doors, etc.
* Strategic factors are those factors unique to a fire operation which, if not accomplished or overcome, will seriously hamper our strategic success.


