
Responders assigned to clear collapse areas with a known or an unknown number of victims have a difficult task. The building’s structural components and the room contents can create voids with areas of survivability. The people inside the structure may be smothered in the room contents, or they could be pinned under concrete floors or roof beams. Some survivors may not be pinned in the void space but are unable to leave because the egress is blocked. Time is of the essence when rescuing trapped persons. You must see inside the collapsed building to locate the victims and determine how to get to them. A search camera will allow you to see what is beyond the wall.
Using Search Cameras
Your technical rescue team should evaluate its knowledge, skills, and abilities and balance them with its equipment needs. For executing rescues that require breaching concrete, a search camera is a must-have tool. It may have a flexible neck or a rigid extension.
Most search cameras have a light at the end to illuminate the void space, with one or more settings to increase or decrease the amount of light. Once you find a victim in the void, you may want to dim the light for the trapped victim’s comfort. Also, too bright a light creates shadows inside the void; too dim a light may not allow you to distinguish the victim from his surroundings.
Florida Task Force 2 (FL-TF2) Technical Search Specialist Joseph Russoniello notes that, in a concrete collapse, the victims and all of the contents may be covered in white concrete dust, making it difficult to distinguish a victim lying on the floor from an inanimate object inside the room. The infrared lens allows the viewer to pick up body heat signatures, which make it easier to distinguish victims from inanimate objects coated in chalky dust.
Certain cameras enable two-way verbal communication through a microphone at the end of the camera. The operator can hear what the victim is saying through the microphone end. Some cameras have a microphone that can be detached and lowered 25 to 50 feet into a shaft. The receiver may allow recording of search images and sound.
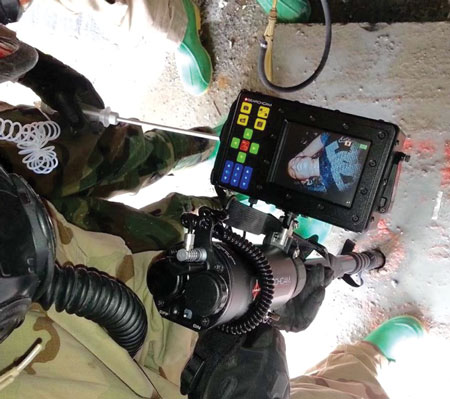 |
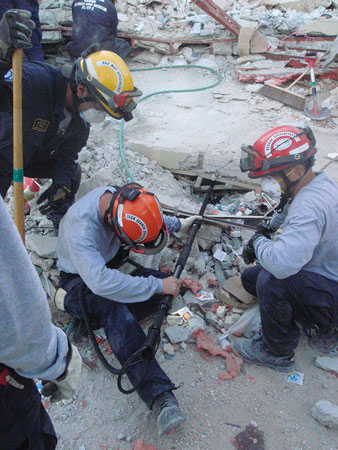
| (1) Photo by author. |
As you slowly search a void space, your body position and the camera position may change. Once you have found a victim, you must document his location. Mark the area around the insertion hole with clock numbers 3, 6, 9, and 12. Position your body at the 6 o’clock mark and note at what “hour” the patient was found relative to your position. Note the approximate distance of the victim from the insertion point and whether the patient is above or below your camera access hole. Regardless of the type of camera you use for searching, the keys to an effective operation are training, repetition, and documentation.
The search camera’s function allows you to see what is on the other side of the material in front of you (photo 1). To obtain this view, you must penetrate the material with a certain tool and technique. If the barrier in front of you is a load-bearing structural component, you must move to an area of less structural significance. A load-bearing component of the building is more difficult to breach, and breaching it may weaken the damaged structure. You may need to perform the victim access process described below more than once to reach all the areas that you want to visually search.
Before you use the search camera, you must make an access hole in the building material. Rarely does a collapsed structure have an exposed access point exactly where you need it. The access hole should be slightly larger than your search camera; a two-inch-diameter circular hole is large enough to insert most search cameras. When creating an access point, minimize the amount of vibration and force exerted on the structure; strong forces could initiate a void space collapse.
Positioning the Access Hole
Before making an access hole, try to determine whether there is a victim or a structural component in an area you want to inspect. If you strike a structural member, it may collapse the void space, causing death or injury to the entrapped. If a victim is lying on the floor of the void, make your access point away from that location or at a level above the victim’s body to avoid injuring the victim. If you believe that the trapped victim may be lying horizontally in the first two-foot vertical area above the floor, make your access hole at least three feet higher than the floor.
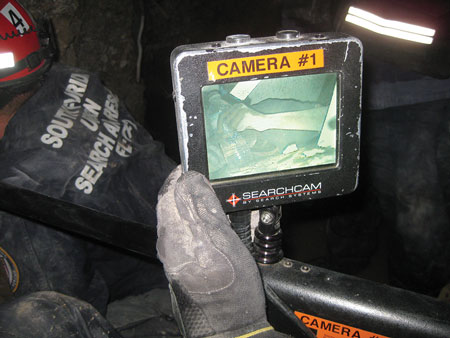 |
| (2) Photo courtesy of FL-TF2. |
During the 2010 Haiti Earthquake response, FL-TF2 responded to a concrete pancake collapse in which a female was entrapped. She was in a tight area less than 30 inches high. When we made visual and voice contact with her, she advised us that she was not pinned under debris and she could crawl a few feet away from the wall that we wanted to breach. Her relocation allowed us to proceed with the breach at the most desirable location, and she avoided possible injury (photos 2, 3).
Creating the Access Hole
You can usually breach lightweight metal or wood structures with a common drill or hole saw bits. Avoid heavy steel components and structural concrete. Breaching these components is more time consuming, and it can cause a secondary collapse. You can defeat nonstructural concrete components by boring, cutting, chipping, or breaking them.
Boring
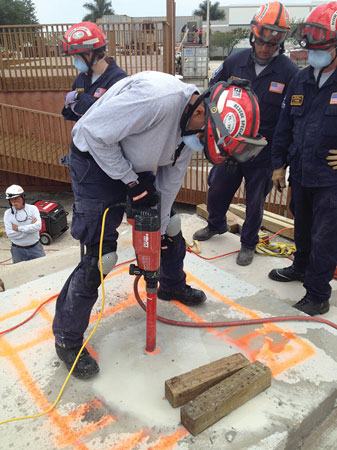
The tool of choice is the concrete core drill, which uses a tubular, diamond-tipped core drill bit. This tool will go through concrete and steel rebar. The spinning diamond bit needs water attachments to provide a steady supply of water through the center of the bit to aid in cutting the concrete, preserving the tip, and reducing the dust (photo 4).
The bit may be one, two, four, six, or more inches in diameter. For an efficient boring operation, choose a bit that creates a hole slightly larger than your camera. A larger bit will need more time to bore since it will come in contact with more steel and more concrete. If your search camera diameter is two inches or less, don’t use the four-inch bit, which may take three times longer than a two-inch bit to bore through reinforced concrete.
On inspecting the area with the search camera, you may find that you need to move to another area, so why waste time making a large hole? Also, boring a larger hole will cause the breached concrete surface to lose strength. Less material will be removed if you use a smaller bit. Be efficient, and choose the correct size bit.
Cutting
This is the second option for accessing voids because a cutting tool can make a larger hole than a round core drill bit. The tool can be a concrete-cutting chain or rotary saw featuring gas or hydraulic power. For best results, use a diamond-tip blade. As with a core drill, the cutting tools should have water attachments that will provide water to keep the blade cool, preserving the blade and minimizing the dust.
 |
| (3) Photo courtesy of FL-TF2. |
Cutting tools will make a triangular or a square access hole. The saws will plunge through the concrete and the steel rebar. The cut concrete’s smallest dimension must be wide enough to accept the search camera. Triangular cuts may need to be oversized to accommodate the camera.
Chipping
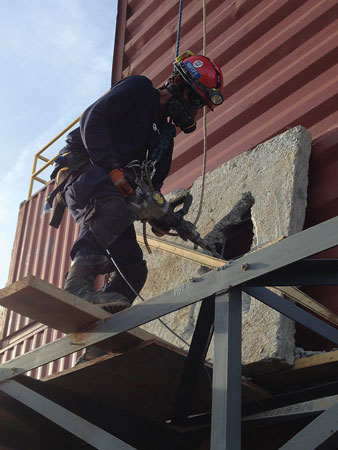
You can chip your access point using hammer drills and demolition hammers to remove concrete in the size desired. However, the two main disadvantages of chipping are the impact that the tools make on the concrete and the need for a second tool to cut the steel rebar. In photo 5, the rescuer uses an electric demolition hammer to chip an access point through concrete. He will need a metal cutting tool to remove the rebar. Note that in this precarious position, the rescuer and the tool are attached to a fall arrest rope.
The tool must fit the task. Thin concrete can fail in adjacent areas under the impact of a 90-pound hydraulic demolition hammer. A smaller electric hammer drill may be a better choice for four-inch-thick concrete, but using the smaller drill to breach a 12-inch-thick concrete floor will take a great amount of time. Use the appropriate tool.
After chipping the access hole, a grid of steel rebar may block insertion of the camera. Use a metal-cutting tool such as a reciprocating saw with a metal blade. Rough metal edges will remain in the concrete if the opening is chipped to create the access because the metal cutting tools cannot cut rebar as close to the concrete as can a concrete cutting saw. If you use a rebar cutter, note that the tool grabs the rebar and snaps the steel, leaving a steel nub protruding into the access hole and thus reducing the true diameter.
Breaking
Breaking using hand tools is the least desirable access method. The two tool options are a sledgehammer and a mallet/chisel combination. Each tool has a disadvantage. The sledgehammer provides a greater impact and will fracture more concrete than a chisel, but the greater impact increases the chance that the void space will fail, endangering the victim.
 |
| (4) Photo by Coral Springs (FL) Regional Institute of Public Safety. |
The sledgehammer is less accurate than the chisel, which you can place at the precise location where you want to fracture the concrete and then strike it with a mallet. However, the chisel removes less concrete per strike compared to a sledgehammer. Since both tools are powered by humans, their use can be tiring.
See Beyond the Concrete
When using the search camera to view inside the void space, try to identify the following: the victim, the best way to access the victim, and the building’s structural components. In addition to the camera, insert a four-gas monitor through the access point to provide information about the void space’s atmospheric conditions. These data will help you develop a rescue plan and determine whether you will operate in rescue or recovery mode (photo 6).
The Victim
Using a search camera will tell you much about the victim. You can verify whether the patient is breathing and moving, has any obvious injuries, and is trapped by debris that must be removed. If there is debris on the victim, you can stage the proper tools near the void space so they are ready for immediate use.
 |
| (5) Photo courtesy of Eric Cintron, Always Ready 24/7 Incorporated. |
The camera may verify whether a void space has living or deceased victims inside. Confirming that the void has no live victims can free your team to focus on other collapse areas with the potential for a rescue.
When our team operated in Haiti, we made visual contact with multiple live trapped persons who had been buried in small concrete rubble voids for four to five days-a long time with no water, food, or body movement. One of the first things we did for these people was to provide some water to keep them alive by passing water bottles through the inspection holes as we worked to free them (photo 2). Using search cameras increased the victims’ survivability since we could inspect the area before creating large holes in the concrete to physically pass through.
Best Access
Scenario: Your squad is operating on a slab, inserts a search camera, and views a victim directly under your camera access hole. The best choice may not be to breach a hole at that exact spot. If the victim is directly under you, the concrete you are chipping will fall onto him and possibly cause injury. If the victim is directly under your camera access hole, you can first ask (a conscious victim) if he is able to move away from this location. If he cannot move or if he is unconscious, move to a spot where you will not cause additional injury to the victim. If neither option is feasible, you must proceed with a concrete lift out, which is a longer process. The search camera will provide a view of the void space and help you locate the best breaching access point.
 |
| (6) Photo by Joe Russoniello, FL-TF2. |
With the search camera, you can view the layout of the void. Evaluate all six surfaces: the four walls, floor, and roof. You can see whether the void’s interior is filled with debris, where the structural columns are, and possibly an easier route for accessing the victim. Take full advantage of the search camera to note these features.
A search camera is an excellent tool for collapse rescue response, but the cost of the device may prevent its inclusion in every technical rescue team’s cache. It requires training to operate the camera correctly. Use the best breaching tool and technique to create access for the camera. Take care of the search camera, and it will lead the way for your rescue.
JEREMY RIFFLARD has been a Florida firefighter since 1991. He is a captain with the Fort Lauderdale (FL) Fire Department; an officer of its technical rescue team; and a rescue squad officer of Florida Urban Search and Rescue Task Force 2 (FL-TF2), which was deployed to the Haitian Earthquake (2010) and Hurricane Ike (2008). He teaches technical rescue programs for the Coral Springs (FL) Regional Institute of Public Safety. For the past 10 years, he has been an instructor and a safety officer for military urban search and rescue exercises through ATEC Incorporated.
Anatomy of a Challenging Deep Shaft Rescue
LESSONS EMERGE FROM COLLAPSE OF GREAT WESTERN INN
TOOLS AND EQUIPMENT FOR SPECIALIZED RESCUE
Fire Engineering Archives

