Step-by-step instruction for firefighters on the most efficient method for cutting rakers
During structural collapse specialist training, one of the most difficult tasks for students to grasp and perform is making raker cuts accurately. The process seems a little more challenging in today’s fire service because carpentry skills are not as prevalent as they once were.
There are numerous approaches to teaching raker cuts, all of which work. However, time and time again, rescue specialists struggle to remember some of the more perishable skills, such as how to properly lay out and cut a raker, unless they are fresh out of a structural collapse class.
RELATED FIREFIGHTER TRAINING
- Urban Search and Rescue and Structural Collapse: It’s Everyone’s Job to Know
- Anatomy of a Building Collapse
- O’Connell: A ONE-DAY COLLAPSE RESCUE TRAINING PROGRAM
This article will review how to use the speed square and how to make basic 45° and 60° raker cuts. I will also discuss an instruction method on raker cuts that stands above all others when training students who have limited experience using a speed square and circular saw.
Speed Square Basics for the Rescue Specialist
Although the speed square is used primarily by framing carpenters, it can be an indispensable tool for the rescue specialist. Let’s take a look at this tool that many of you already have but may not fully understand how to use.
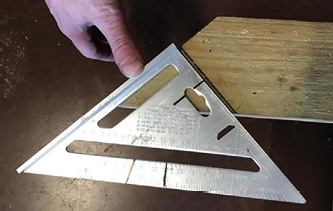
A speed square combines a ruler, a try square, a protractor, a line scribing tool, and a saw guide all in one tool for making accurate 45° and 90° cuts. The three main uses for a speed square are as a try square, a miter square, and a protractor. When using the tool as a try square, you can quickly measure a line that is perpendicular to the edge of a board. When using it as a miter square, you can accurately mark 45° angles. When using it as a protractor, you can find and mark various angles easily (Figure 1).
For this training, use the protractor in the following way:
- Go to the pivot point marked in the 90° corner of the square.
- Place the pivot point on the factory edge of the board.
- Rotate the square’s protractor/degree and move it to the desired degree on the factory edge of the lumber in line with the pivot point. The square’s scribe side/inch scale will now be at the desired angle across the side of the lumber.
- Use the square’s scribe side/inch scale to mark across the lumber to indicate the desired degree angle.
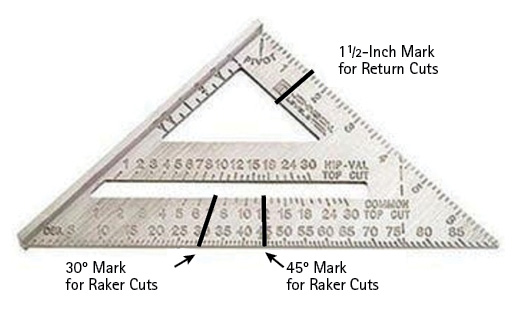
One of the unique keys that makes the mark/cut-mark/cut method simple when cutting rakers is to premark the speed square. To premark at 45°, line up a straight edge from the pivot point to the protractor/degree scale at 45° and draw a line on the side of the square. Follow that with premarking at 30° by lining up the straight edge from the pivot point and the protractor/degree scale at 30° and drawing another line on the side of the square. Since all return cuts are 1½ inches, premark a 90° mark at 1½ inches on the inch scale (Figure 2).
Note: If you wish to mark your square at 60°, you can. However, if you need to make a mark at 60° but you are using the mark/cut-mark/cut method for cutting rakers, there is no need for a 60° mark.
Figure 1. The Speed Square
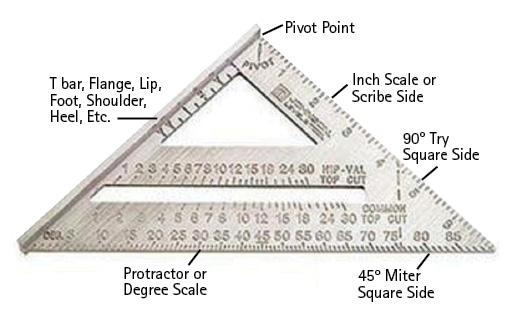
Figure 2. Degree Marks
Figures courtesy of author.
This is by no means a comprehensive description of everything a speed square can do, but it covers most of the situations a rescue specialist would come across at an incident or in training.
Circular Saw Basics for the Rescue Specialist
The two sizes of circular saws used in the structural collapse environment are the 7¼-inch saw for cutting material 2¼ inches or less in depth and the 10¼-inch saw for cutting thicker material. The significant components of a circular saw include the switch; the motor housing; the electrical cord; the saw blade; the blade guard; the arbor; the shoe; and two adjustment knobs (photo 1), one for making a bevel cut (not commonly used for structural collapse purposes) and one for adjusting the cutting depth. The cutting depth is normally set just beyond the depth of the material being cut to reduce the amount of surface contact between the blade and the lumber and to keep the blade from binding up as much as possible. Not binding up the blade reduces the load on the saw motor and makes it easier to correct an errant cut.
The marks on the leading edge of the shoe line up with the saw blade. There are several inches of separation between the mark on the leading edge of the shoe and the leading edge of the saw blade. With that in mind, practice using the mark on the leading edge of the shoe to line up your cut, but also look at the shoe cutout, where the leading edge of the saw blade is going to contact the lumber. By watching the leading edge of the saw blade, you can watch the cut while it is being made, enabling you to correct the path of the cut as early as possible if you start drifting off the mark.
When making a cut in lumber, it will be done in one of four following types:
- A cross cut (cutting perpendicular to the grain of the wood),
- a miter cut (an angled cut on the face of the wood),
- a rip cut (cutting parallel to the grain of the wood), or
- a bevel cut (an angled cut into the edge of the wood, which can be either a cross cut, miter cut, or rip cut).
Anytime you are using a circular saw, ensure that you use proper safety precautions, such as the following:
- Use safety glasses or a face shield.
- Wear a dust mask or a respirator (especially if cutting in an unventilated area).
- Check the lower blade guard and ensure it retracts properly.
- Keep electrical cords clear of the cutting area.
- Never look away from your work.
- Wear hearing protection.
A circular saw operates best when making a 90° cut coming off the edge of the lumber. During training and on the scene of an incident, the rescue specialist will be required to make a cut at an angle. Keep in mind that the greater the angle, the more difficult it is to make a good cut.
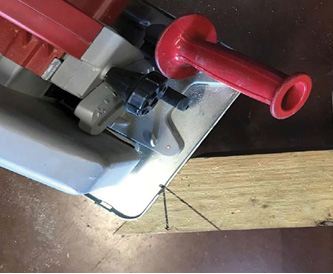
When making a miter cut, it is imperative you keep the shoe flush with the cutting surface. If making a miter cut and the shoe is not flush on the cutting surface (such as the one seen in photo 1) when you start cutting, two things happen: You are making a bevel cut (photo 2) and the angle of the blade will rotate as the shoe starts to plane out on the lumber’s surface.
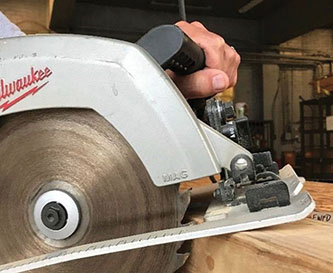
(1) The shoe is not flush with the cutting surface. (Photos by author.)
(2) The bevel cut.
As the blade rotates from a bevel cut to a straight cut, the blade will bind up in the kerf (the cut being made by the blade). Anytime the blade binds up while making a cut, more amperage is required to keep the blade rotating, which will result in the generation of excessive heat and eventual damage to the saw’s motor. Do your best to keep the shoe of the saw flush with the surface of the lumber you are cutting.
Rescue specialists will soon learn that, when cutting raker shores using the mark/cut-mark/cut method, the cuts will only need to be made at 45° or 30° from the edge of the lumber, and the need to make a 60° cut from the edge of the lumber is eliminated.
There is no hard-and-fast rule regarding which direction to make the cut, but whenever possible, position the saw with the motor facing toward the larger section of the lumber and away from the drop-off. By doing so, the shoe will be fully supported throughout the cut, and the weight of the lumber will not need to be held up as the cut lumber drops off.
Kickback
One of the most dangerous and common mishaps associated with a circular saw is known as kickback. Kickback is the sudden reaction to a pinched, bound, or misaligned saw blade and occurs when the blade binds on the wood, causing the saw to lift up and out of the lumber and back toward the operator. It is the result of improper use of the tool and not using correct operating procedures. You can avoid kickback by doing the following:
- Maintain a firm grip with both hands on the saw and position your arms to resist kickback forces.
- Cut the outside of the lumber positioned between two supported points (e.g., sawhorses), not the lumber in between the supports, which causes the lumber to pinch the blade as the cut is being made.
- Position your body on either side of the blade, not in line with the blade.
- Do not place your hand behind the saw blade (kickback can cause the saw to jump backward over your hand).
- Release the trigger and hold the saw motionless in the material until the blade comes to a complete stop if the blade is binding or the cut is interrupted for any reason.
- Never attempt to remove the saw from the material or pull it backward while the blade is in motion.
- Investigate and take corrective action to eliminate the cause of the blade’s binding.
- Do not use dull or damaged blades.
- Do not use unsharpened or improperly set blades; this produces narrow kerf, causing excessive friction and blade binding.
- Ensure that the blade depth and the bevel adjusting locking levers are tight and secure before cutting.
Additional circular saw safety precautions include the following:
- Use extra caution when making a plunge cut.
- Never secure the lower guard into the open position.
- Check the operation of the lower guard. If the guard and spring are not operating properly, service them before use. The lower guard may operate sluggishly because of damaged parts, gummy deposits, or a buildup of debris.
- Only retract the lower guard manually for plunge cuts and cuts made at an angle. Raise the lower guard by the guard lift lever and, as soon as possible, release the lower guard.
- Ensure the lower guard is covering the blade before placing the saw down on a bench or floor. An unprotected, coasting blade will cause the saw to walk backward, cutting whatever is in its path.
- Do not run the saw while carrying it at your side. The lower guard may accidently be opened by contacting your clothing.
- Avoid loose clothing, hair, or jewelry that can be pulled into the saw.
- Periodically remove the blade and clean the upper and lower guards and the arbor area with kerosene and wipe it dry or blow it clean with compressed air. Preventive maintenance and a properly operating guard will reduce the possibility of an accident.
The “take home” message is that the circular saw is one of the most dangerous tools that you will use, either in training or on the scene of an incident. Always ensure that you take all safety precautions to protect yourself and those close to your operating area.
Let’s Cut Some Rakers!
The 45° raker cut. When you need to make a 45° raker cut using the mark/cut-mark/cut method, do the following:
-
- Start with the end of the 4 × 4 on your right side.
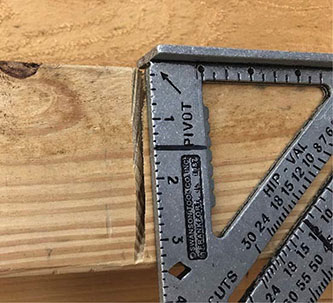
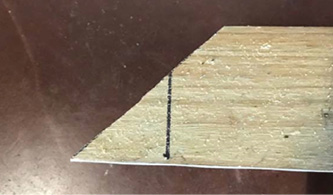
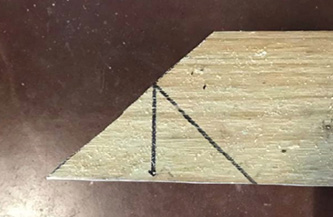
- Place the flange of the speed square on the edge of the lumber with the end of the protractor side close to the end of the lumber as shown in photo 3. Scribe a pencil mark along the 45° side of the speed square (photo 3).
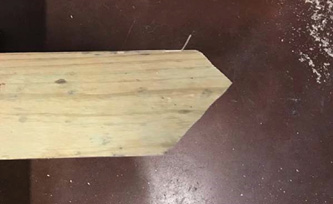
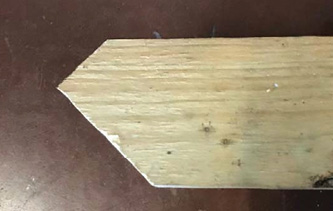
- Make the 45° cut (photo 4). Note: When making an angle cut (that you are comfortable with), you can raise the lower guard of the saw, which will prevent the guard from pushing the saw away from your scribe when you start to make the cut. Release the lower guard as soon as the cut is complete (or as soon as possible).
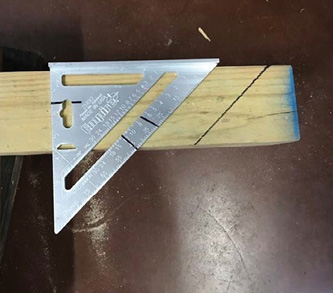
(3) The scribed 45° angle.
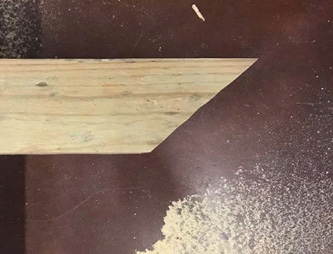
(4) The 45° angle cut.
-
- Place the flange of the speed square on the face of the cut and slide it to the point that gives you 1½ inches, for a return cut at 90° across the scribe side of the square (photo 5). Draw a pencil mark down the scribe side of the square (photo 6).
(5) The 1½-inch return cut.
(6) A scribe mark for the return cut.
-
- Make a 90° cut starting on the cut face of the lumber with a 10¾-inch circular saw, using proper cutting techniques (photos 7, 8).
- From the tip of the raker cut, measure out the prescribed length and make a mark (photo 9). For example, we will use a 10-inch insertion point, so 10 × 17 inches equals 170 inches. Mark a perpendicular line at 170 inches. Note: Do not cut this mark!

(7) The 90° cut on the cut face of the lumber.
(8) The cut 90° raker.
(9) A perpendicular mark for the prescribed length.
-
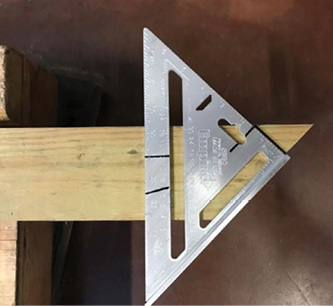
- With the flange on the return-cut side of the lumber and the pivot point toward the middle of the raker, rotate the speed square to 45°. Next, slide it into position where the 1½-inch mark on the square intersects the perpendicular pencil mark at the 45° line drawn on the square. Draw a pencil mark down the scribe side of the speed square (photo 10). Then, cut the resulting 45° mark with a 10¼-inch circular saw using proper cutting techniques. Marking and then cutting the return cut initially ensures that the finished product will be the proper length (photo 11).

(10) Mark the return cut first.
(11) The return cut is made.
-
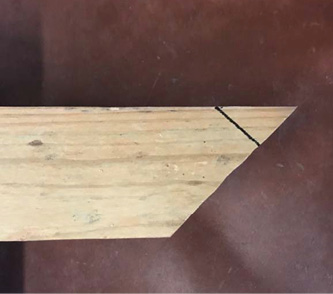
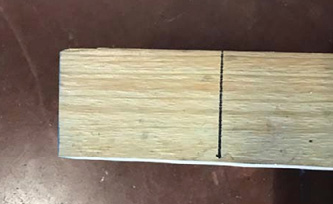
- Place the flange of the speed square on the face of the cut and slide the pivot point to the perpendicular pencil mark (photo 12). Next, draw a pencil mark along the scribe side of the speed square, coming off the cut face of the lumber at 90° (photo 13). This will give you a mark for the 1½-inch return cut.
(12) The 90° mark off the return cut.
(13) The scribe mark for the 1½-inch return cut.
- Cut the mark starting on the cut face of the lumber with a 10¼-inch circular saw, using proper cutting techniques (photo 14).
10. The final product will be a 45° raker, cut properly at its prescribed length (photo 15).
(14) Making the 90° cut off of the return cut.
(15) The 45° raker, properly cut at its prescribed length.
The 60° raker cut. The 60° raker cut is made following the same steps, except for the first cut on each end, which will be made at 30° instead of 45°:
- Start with the end of the 4 × 4 on your right side.
- Place the flange of the speed square on the edge of the lumber with the pivot point near the end of the lumber. Rotate the protractor side of the speed square up until the 30° mark is in line with the pivot point. Draw a pencil mark across the scribe side of the speed square.
- Cut the mark with a 10¼-inch circular saw using proper cutting techniques.
- Place the flange of the speed square on the face of the cut and slide it to the point that gives you 1½ inches, for a return cut at 90° across the cut side of the lumber. Draw a pencil mark down the scribe side of the speed square.
- Cut the mark starting on the cut face of the lumber with a 10¼-inch circular saw using proper cutting techniques.
- From the tip of the raker cut, measure out the prescribed length and make a mark. For example, we will use a 10-inch insertion point, so 10 × 14 inches equals 140 inches. Mark the lumber at 140 inches and make a perpendicular pencil mark across the lumber at that point. Note: Do not cut this mark!
- With the flange on the return cut side of the lumber and the pivot point toward the middle of the raker, rotate the speed square to 30°. Slide it into position with the 1½-inch mark on the square intersecting the 140-inch perpendicular pencil mark.
- Draw a pencil mark on the scribe side of the speed square. Then, cut the 30° mark with a 10¼-inch circular saw using proper cutting techniques. Marking and then cutting the return cut first ensures the finished product will be the proper length.
- Place the flange of the speed square on the face of the cut and slide it to the perpendicular pencil mark. Draw a pencil mark on the scribe side of the square coming off the face of the lumber at 90°. This will leave you with a 1½-inch return cut.
10. Cut the mark starting on the cut face of the lumber with a 10¼-inch circular saw using proper cutting techniques. This gives you a 60° raker cut properly at its designated length. Note: Both ends of the raker were first cut at 30°, which allowed you to make a 90° raker cut from the cut face of the 30° side. This eliminated the need to make a 60° cut from the milled side of the lumber.
With the mark/cut-mark/cut method, take one step at a time; this eliminates the need to make the 60° cuts from the side of the lumber, which seems to give many students a bit of difficulty. By using the mark/cut-mark/cut method, the only cuts made from the side of the lumber are at 30° and 45°, which are then cut at 90° from the cut face of the lumber to complete the 60° and 45° raker cuts.
The mark/cut-mark/cut method is the easiest, most efficient, and safest way to teach and make raker cuts. Fewer mistakes will be made, which will lead to greater conservation of time and lumber.
MIKE WALTERS is a lieutenant with the Fort Worth (TX) Fire Department, where he has worked since 1988. He has also been a rescue specialist for Texas A&M Task Force 1 since April 1999 and a Federal Emergency Management Agency (FEMA) structural collapse instructor since 2000. Walters is also an instructor for Texas A&M Engineering Extension Service, the Alabama Fire College, Spec Rescue, and Safety Solutions. He also served as a member of the FEMA Rescue Sub-Group from 2017-2020.

