
By SAMUEL VILLANI
The fire service portable radio is a firefighter’s most used piece of equipment; it is also the most undermaintained and least understood piece of equipment. The fire service must address the latter statement by performing quality portable radio service checks, keeping radios clean, and training on how to resolve reception issues on the fireground.
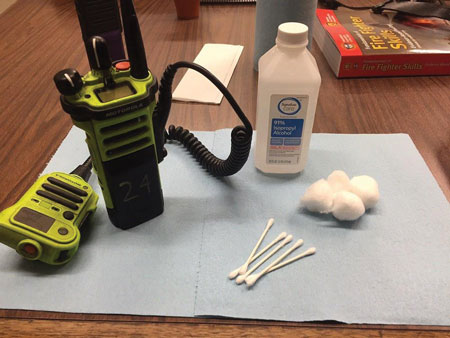 |
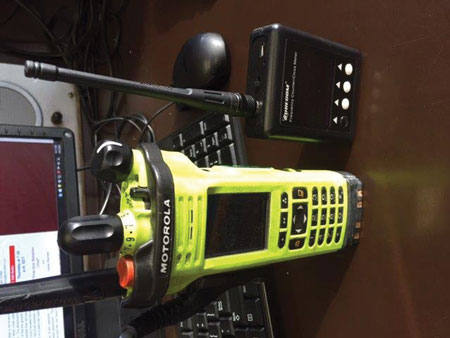
| (1) A quick setup for portable radio cleaning includes isopropyl alcohol, cotton balls, cotton swabs, and a few paper towels. (Photos by author.) |
The Portable Radio Service Test
There is a lot of information to process and equipment to check when you show up to ride the apparatus. Arguably, your self-contained breathing apparatus (SCBA) and the operational readiness of the rig receive the most attention during these vital checks. However, one of the often-neglected – if not forgotten – items you must check is the portable radio assigned to your riding position.
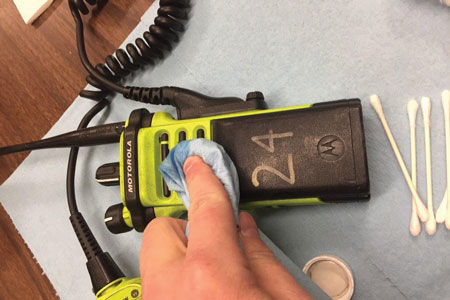 |
| (2) Wipe down the exterior of the radio before removing the antenna and the remote speaker mic (RSM). |
Your battery should be fully charged; turn on your portable radio and ensure it goes through a self-check (if it has that option) and that the speaker inside the portable and the remote speaker microphone (RSM) are functioning. Tune it to your preferred talk group, usually the main or dispatch talk group/channel.
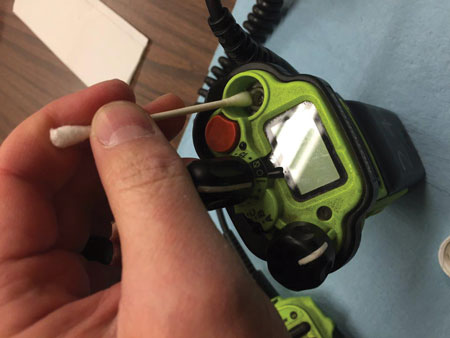 |
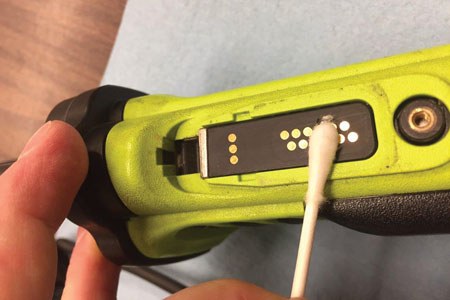
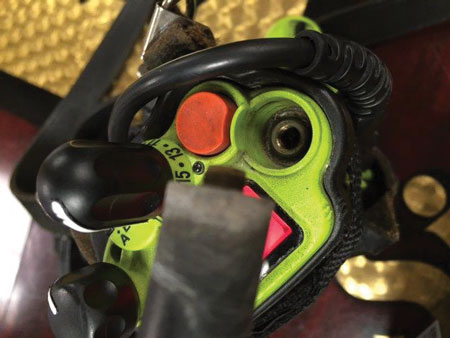
| (3) Slightly dampen the cotton swab with alcohol and clean around the antenna connection. |
Next, inspect the radio for damage; examine the portable radio itself, battery, antenna, volume, talk group selectors, keypad, digital display, and RSM. If the radio is dirty, clean it by wiping a damp shop towel over the radio, antenna, and RSM. Ensure your RSM and antenna are attached and fully tightened or attached to the portable.
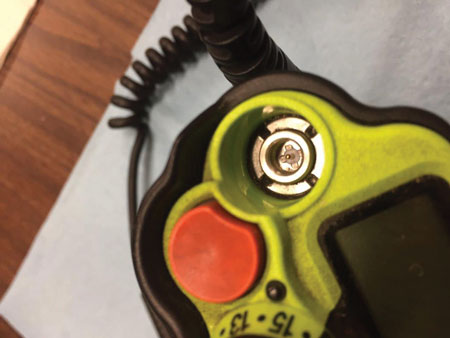 |
| (4) A nice, clean antenna port. |
Finally, perform a push-to-talk test. Some departments practice this routinely through their communications center. Do this by switching to a local/talk-around/direct (analog/simplex) channel and attempting to transmit. Another member of your crew can listen in and then test his radio. If you find damage or the radio isn’t performing optimally, place it out of service for repair and grab a spare or loaner portable.
 |
| (5) A quick swipe of a fairly clean RSM connection on the radio body. |
Keep Your Radio Clean
Recently, my department’s radio shop approached me about a portable radio that was assigned to my station and that had been sent in for repair because of transmitting and receiving problems. On examination, it was obvious this radio needed some repair. It had quite a lot of soot and debris on its exterior. I cleaned it off with a damp towel and then unscrewed the antenna and speaker mic connections and removed the battery. There was a significant amount of debris in the antenna connection. The speaker mic connection had less debris, but it was still there. The battery guides and notches that allow the battery to lock onto the radio had debris in them as well. After I cleaned the affected areas of the radio, it transmitted and received well.
 |
| (6, 7) Clean both the battery guides and locking tabs on the radio body. |
I wanted to replicate this issue and, with little effort, I found another radio in the firehouse that needed cleaning. I took a signal strength meter that communications specialists use to diagnose radio problems and conducted a signal strength test. I then took a clean radio and tested it. The difference in signal strength was around 25 percent. Subsequent tests revealed differences as high as 30 percent.
The message was clear: A dirty portable radio will fail you. Not unlike a dirty saw or an SCBA, the products of combustion and debris from opening up and overhauling can significantly affect a portable radio’s performance.
 |
| (8) Removing your portable from the radio pocket will allow you to orient the antenna vertically. |
Cleaning your portable radio is easy and will take only a few minutes. Get an old toothbrush or a nonmetallic small bristle brush from any hardware store. Gather a few cleaning towels, cotton swabs, and rubbing alcohol or alcohol prep pads, and you’re ready to clean your radio.
 |
| (9) Reaching high up will yield significant gains in your ability to transmit and receive. |
Lightly dampen one of the towels with water and wipe all visible debris from the radio’s exterior. Then lay the radio on a clean towel and take the RSM, the battery, and the antenna off. DO NOT attempt to disassemble the radio; the only screws you should unscrew are the RSM connection screw and the threaded antenna.
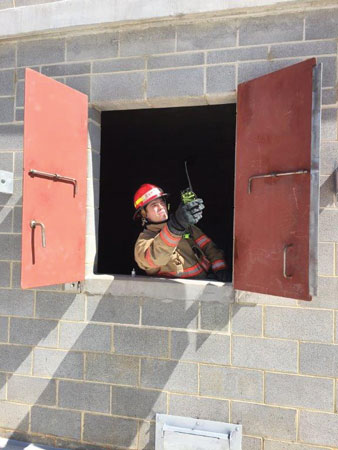 |
| (10) Moving to a window defeats the shielding created by the brick, block, or slab found in your type I, II, and III buildings. |
Next, take cotton swabs; dampen them with a little rubbing alcohol; and clean the antenna, RSM, and battery connections. Pay particular attention to the slides that guide and lock the battery to the radio; if they get too dirty, your battery won’t properly lock in.
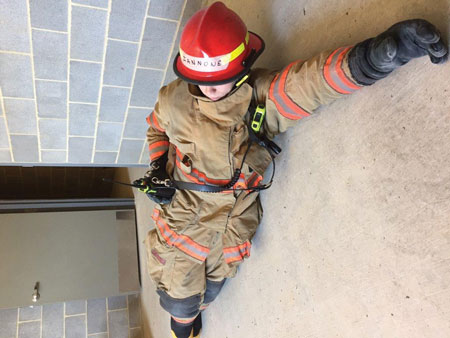 |
| (11) Use your body to vertically orient a portable radio carried by the strap and case. |
Once the radio is clean, reassemble it and perform a service check to ensure everything is operating as it should. I recommend cleaning a portable radio after every fire. Find additional information on cleaning your specific fire service portable radio model in the manufacturer’s user guide (usually found online).
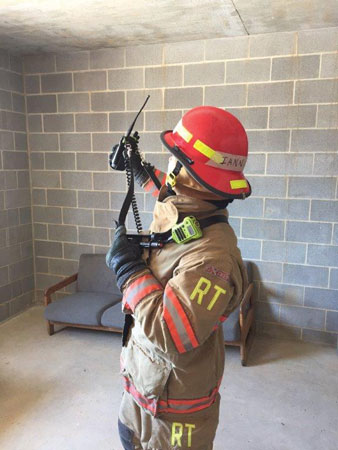 |
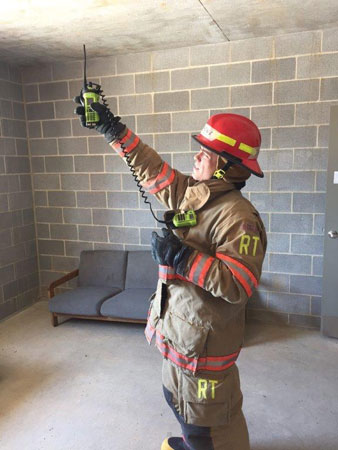
| (12) Raise your portable radio up high. Even a few inches can greatly increase your ability to transmit and receive. |
Resolving Communication Problems
In nearly all National Institute for Occupational Safety and Health (NIOSH) line-of-duty death reports, you will find communications cited as a contributing factor. These reports also contain recommendations on fireground communications. Although some of these recommendations are broad-based and not fixable during operations, others are easy to resolve by troubleshooting communications problems on the fireground.
 |
| (13) This frequency counter has a signal strength feature that you can use to measure the difference between a clean and a dirty radio. |
A common issue cited in NIOSH reports is difficulty transmitting and receiving. Part of this issue can be attributed to radio decorum and firefighter discipline. A greater contributor is reception, either from a dirty radio, geographic locations with known reception issues, or a firefighter’s fireground position. The first two are issues that you cannot resolve on the fireground. However, you can correct a firefighter’s physical position on the fireground even when he is faced with entanglement or entrapment.
 |
| (14) This dirty radio’s signal strength increased by 40 percent postcleaning. |
Following are five ways to resolve your own reception-related communications issues:
- Orient your radio vertically. Our portable radios are designed to work optimally with the antenna pointed toward the sky (also called “polarization”). The antenna on your portable radio is polarized vertically because it was engineered to be worn vertically; that’s why your radio case and radio pocket are oriented vertically. For example, let’s say you’re operating in the basement of a house and you find yourself on your stomach (or back) as a result of becoming entangled in cable wire. You attempt to call for help, but there’s no reception. You notice your portable is also lying flat, with the antenna parallel to the floor. Grab your radio and rotate it vertically. This little adjustment in position can yield significant results.
- Raise your radio high. This tactic works well if you’re belowgrade or in an area with known reception issues. Moving your portable from your waist to your chest will increase your chances of transmitting and receiving. Raise it above your head, and you’ve greatly increased your chances of getting out.
- Move to a window or clear air. Buildings do a great job of insulating occupants from the outside environment. They also do a great job of blocking radio frequency. If you’re deep in a building and you experience a loss of communication, move to an outside wall or a window. Radio reception increases significantly when you move from a corridor or a hallway to a room or an apartment with windows.
- Switch to a simplex channel such as talk-around or direct. Most radio systems are designed to allow end users to either monitor or routinely use a simplex channel – a channel that is not tied to the communications system where transmitting and receiving occurs radio to radio. Some radio systems even program their portable radios to transmit at a higher strength (five watts instead of three) when operating in simplex mode. This significant increase in power improves the chance that your message will be received.
- Switch to a vehicle repeater systems (VRS) channel. This tactic requires units equipped with VRS, which is a local repeater that requires the end user to switch to a channel often labeled “VRS” or “Tactical.” This channel communicates with the VRS, which is tied into the radio system. In my department, our radio system is designed so that only users experiencing communications problems have to switch to the VRS channel. Because this channel is tied to the incident talk group, all units – regardless of whether they’re on the VRS channel or the incident talk group – are able to communicate seamlessly.
Now is the time for you to begin treating your fireground portable radio like you do your SCBA. Perform a service check and clean your radio regularly and after fires. Incorporate fireground communication troubleshooting in company drills. Add these good habits into your firehouse routine and, as always, share what you know. A clean, properly functioning radio paired with an educated firefighter will keep you on the air.
SAMUEL VILLANI is the recruit training coordinator for the Montgomery County (MD) Fire & Rescue (MCFR) Training Academy. He has been a communications specialist with the MCFR since 1999 and has served in special operations and communications as a member of the FEMA/DHS Maryland Task Force 1 and the National Capital Region (NCR) Radio Cache. Villani was previously assigned to MCFR stations 3 and 16 and served as the first battalion float officer. He is an All-Hazards Communications Unit leader training manager for the NCR Communications Interoperability Group. He has a BA degree in sociology from the University of Maryland – College Park, where he earned semester honors in the College Park Scholars program. Villani was also an instructor at FDIC International 2017.
Outside In: Wearing Portable Radios
Mayday Monday: Radio Communications
Training Minutes: Radio Tips
Fire Engineering Archives

