A last-resort method for rescuing victims using bailout lines when firefighters have exhausted all other options
TRAINING NOTEBOOK ❘ By ALEXANDER DEGNAN
An infrequent but ultimately disheartening instance in the fire service is when a victim requires removal from a window that is not immediately accessible (photo 1). This can occur when there is a large setback or an H-, E-, or I-type building that is beyond an aerial’s reach, interference from live wires, or even a window beyond the scope of our highest ground ladders.
A victim who is in danger from smoke, heat, or panic (yes, panic) requires our immediate attention. Whether or not the conditions necessitate an unprotected jump from a window, the end result is ultimately the same: a dead or severely injured civilian. For this reason, many departments carry a “roof rescue kit” or a modified means of lowering a potential rescuer down to the window of a hanging victim. The victim is grabbed and lowered away from the immediately dangerous to life or health (IDLH) conditions that are enveloping him. Such kits generally contain at least 150 feet of rated rope, a lowering device, an anchor strap, and some means of lashing the victim. Manufacturers have made great strides in this area in recent years, making some kits very user-friendly.
Unfortunately, some departments carry no such equipment or, worse, the equipment is not at the scene. In other cases, such kits may not be readily available at the fire, and the event has unfolded with incredible speed. A quick example would be a setback H-type building where the throat of the H has been trenched. Firefighters and their roof kit are on the “wrong” side of the building to effect the rescue of a victim at the window on the other side. It is for these reasons that we should consider a means of “picking off” a victim quickly without additional equipment.
RELATED FIREFIGHTER TRAINING
- Bailout, for Your Life
- Finding Last-Chance Anchors Inside Structures
- Bailout: A Technique We Need to Know But Hope We Never Have to Use
Although it does not violate National Fire Protection Association (NFPA) standards for loading rescue rope, the following maneuver should be considered only after all other means are deemed unachievable. It is vital to exhaust all practical means of rescue prior to attempting a top-side rescue from the window above or roof with dual bailout lines. These methods include contacting the victim; sheltering in place; removing the environment (aggressively ventilating); providing air; guiding victims to a safe stairway; and, of course, extinguishing the fire or, at least, keeping it from the victim at all costs. However, fire service members know, especially at larger buildings, how quickly a window can pop open and they will see a victim hanging from it. This can often happen after arrival, the lines are in place, searches and venting have begun on the fire floor and floor above, and water is flowing.
Again, if there are no other means to keep the victim from jumping, and a suitable rescue kit is unavailable, two firefighters can quickly and cleanly complete the rescue from the floor above/roof with dual bailout lines. Depending on departmental standards and NFPA 1983, Standard on Life Safety Rope and Equipment for Emergency Services, the minimum set forth for most fire bailout lines is as follows: a minimal breaking strength (MBS) of around 3,000 pounds, sewn eyes and grommets of more than ¾ of that strength, the rope cannot begin to deteriorate and melt at under 400°F, and a descent control device that cannot exceed more than 20 pounds of usable force. The Jersey City (NJ) Fire Department uses such a kit with a 7.5-millimeter rope. The ropes on these bailout devices are designed for one-person loads; we strive not to go over that. However, with a MBS of 3,000 pounds, exceeding a one-person load would hold.
Making the Rescue
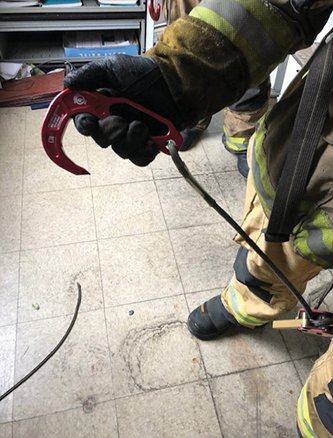
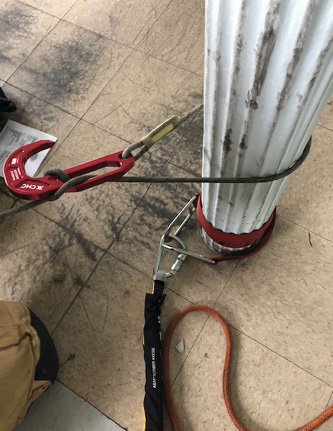
To achieve rescue in such fashion, let’s assume that a ladder company is searching two floors above the fire, where the victim needs to be rescued. An interior descent to the victim is not an option because of conditions and time and the victim is at the window panicking and near exiting. If a two-member team can align themselves above the victim and find at least one suitable anchor, they can rescue the victim. In this case, Rescuer #1 would deploy his bailout rope in a manner similar to bailing out himself (photo 2): He would find an anchor, affix it to his rope, and proceed to the window (photos 3, 4). Unlike a bailout, conditions may be a little more favorable, and the rescuer may be able to stand and roll out the window more comfortably.
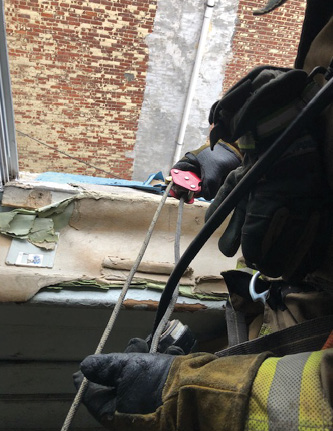
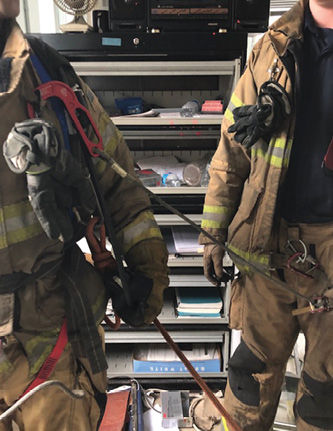
Prior to exiting the window and lowering toward the awaiting victim, Rescuer #1 would then take the anchor/hook end of Rescuer #2’s bailout device and affix it loosely to himself (photo 5). If it is a hook-type anchor grab, he can simply affix it to his self-contained breathing apparatus. If it is a carabiner, he can simply clip it anywhere that is easily accessible to his personal protective equipment (PPE). Rescuer #2 is now responsible for keeping his descent control device in the open position while Rescuer #1 ferries this line to the victim (photos 6, 7). If possible, Rescuer #2 should watch from the window and brace himself against the sill (photo 8); a sitting position with feet firmly against the sill is preferable.

(1) Photos by author.

Once Rescuer #1 has descended on his own device to the victim, he unclips Rescuer #2’s rope from his PPE, wraps the victim’s chest with it (photo 9), reclips it, signals for Rescuer #2 to tension the rope, and assists the victim out of the window (photos 10, 11). He then lowers himself alongside the victim while Rescuer #2 lowers the victim on his own bail line from above (photo 12) In this manner, we can keep the rescue as controlled, fast, and safe as possible. With one firefighter lowering himself to contact and then wrap the victim, merely carrying the other rescuer’s line does not violate the one-person loading of bail lines. In fact, Rescuer #2 is in total control of the victim’s descent and cannot be affected by the actions of the victim whatsoever; no additional equipment or extra wrapping is needed. Next, calm the victim’s fears to prepare him to exit in a manner that does not involve him “jumping and hugging.” Also, make sure to keep the victim from leaping out of the window and grabbing onto Rescuer #1’s descent device, which may place it in the “open” position and send them both careening downward. Many bail systems have a descent controller that sits at nearly chest height as you lower yourself. A panicking victim may try to grab the “beefiest” thing in front of him—squeezing that device would be perilous.


If lowering the victim to the window below, Rescuer #1 should clear the window, enter, unclip his own bailout rope, and assist the victim inside. It is best to exit the building by a safer interior stair. It is important to keep yourself and the victim on rescue lines for as long as is needed; although the line is flame- and degradation-resistant, if you can easily get the victim inside through a safe window underneath the IDLH environment and then out, do so. Bail lines, by their nature, are not as girthy and flame-resistant as dedicated rope rescue kits. Limit such exposure, if possible. The importance of the communication between rescuers; command; and, most essentially, the victim is crucial. Radio attempts at getting a possible aerial, a ground ladder, and water to the victim are all prerequisites to this move.
Note: It is possible for Rescuer #2 to use the back end of his bail line to complete this maneuver. You can create tension by wrapping the rope two to three times around your waist-seated rescue carabiner once the line is wrapped around the awaiting victim. The benefit of doing it this way is that the line runs freely downward toward the victim and not through a descent controller. The drawback is that it requires a little more prowess of operation and loose line management once the victim is contacted. Also, with a rated descender in play, using the carabiner and back end would be a second choice. This would be my first choice only if a chance exists that Rescuer #2 would have to bail from the window above after the victim is retrieved. In such a case, the rescuer could immediately exit, having the “front end” of the rope with him and the back end “rewinding” up to his position as he exits.
From the Roof
Completing this rescue from the roof has one ultimate consideration: distance. Bailout lines are generally only 50 feet in length. You cannot expect a rescue to go from roof to ground in a very high apartment building with this method. You may, as stated, get the victim to a lower window or even down to an awaiting ground ladder.
Pursuant to the consideration of distance is your anchor, which should be close enough to the roof edge to maintain maximum distance of descent but not so close as to impede your deployment. Also note that if you are electing to cut roof decking to expose roof joists to wrap for an anchor, consider the time it will take. However, also consider that Rescuer #2 will be able to brace his feet against the joists. If a hole that has been cut is available and no longer venting fire, use it if it is close by. Of course, natural roof anchors are preferable—good chimney, solid opened scuttle hatch, roof door, and so on.
Again, after contacting the victim and ensuring that help is on the way, Rescuer #1 should slowly roll over the edge and load his bailout system. Rescuer #2’s rope should be affixed, with Rescuer #2 holding his descent controller in the open position. He should also be away from the edge and seated, his feet braced against something sturdy, preferably with additional members available to hold him back. As Rescuer #1 descends, the action is the same. Whether from the roof or a window, it is advisable to stop your descent slightly above the victim; this is to keep the victim from jumping down onto you and to keep you in a position to wrap the victim should your rope slide slowly through your descender.
Some bailout ropes develop a “sheen” of grime on them, making them slippery. When stopping to work, it can be difficult to keep the rope from sliding slowly through the descender. Much of this is dependent on the firefighter’s weight. Suffice it to say, if possible, in a two-firefighter team, the smaller firefighter should ferry the rescue rope, and the larger one should remain as the victim’s “anchor.”


An important point to consider when taking the victim in through a lower window is to make sure that the rescuer from above does not lower the victim past the entry window. There are ways to retrieve the rope easily, and Rescuer #1 can affix many things to the rope to assist in pulling it back up, but it is best to stop the descent with the victim’s feet just near the sill. Once inside and safe, unclip and either exit from the inside or await a ladder.
One Rescuer
As stated earlier, a bailout line and two-point harness carry strength sufficient to handle two people. Although not “rated” for it, the capacity required is of such strength that it is a simple fact. However, this maneuver is harrowing enough to begin with, so doing it on one line could be considered exceedingly arduous if not reckless. In this manner, we once again see the importance of staying together. It is crucial to have the firefighter at the window independent of the firefighter lowering the victim. Having said that, even under the most dire of circumstances and while operating alone, rescue in this manner is achievable. In this instance, the only extra equipment needed would be a strap of some type—a sling link, a wide rescue strap, or anything to wrap the victim’s chest. While descending from above, the rescuer should reassure the victim that he will soon be out and to not jump! (You may go as far as saying, “If you jump, we will go flying.”) Here, affix the victim to your harness and system prior to continuing the descent. To do this, wrap a strap around the victim’s chest in a “hitched” or “choker” fashion. Then, clip the strap to the rescue carabiner on your two-point harness, which should only take a few seconds. Assist the victim, ensure he is secure, and proceed with the descent. Having the victim strain against your seat harness will be both trying and painful (but is acceptable if the rescue is achieved). I stress that this is not a first- or even second-choice rescue; this is reserved for situations where death or grievous injury will immediately result and no other action is available, a rare circumstance indeed.
The policies, procedures, and practices of most fire departments are set up to ensure that, on arrival to the scene, the standard methods of accessing the victim are put in use. There is no substitute for an aerial, a workable fire escape, an evacuation stair, a tormentor ground ladder, or a dedicated roof rope rescue system. There is no quick fix for unacceptable staffing allocation to cover interior rescues. There is no excuse not to work together. There are no policies that will cover the myriad of circumstances we may face. For that reason, there is no excuse not to try.
Quickly recognizing that this may be all that is left is a sad realization that should be trained on repeatedly before ever attempting, filed away as a last resort, and hopefully never employed. That said, it is an efficient, a safe, an effective, and an acceptable practice to rescue a victim (or firefighter) who may otherwise succumb to the situation.
ALEXANDER DEGNAN is a 16-year member of the Jersey City (NJ) Fire Department (JCFD), where he is the captain of #618 Squad Co. 4, a position he has held since 2015. Prior to his captain’s position, he was a 10-year firefighter with the JCFD’s #1013 Squad Co. 4.

