So, you’ve made the search, but there are water supply problems, and the fire is starting to take off. You have told the nozzle team that you have gone to the floor above for a primary search, which proved negative, and reported to the incident commander. The fire is on the sixth floor of a six-story occupied multiple dwelling and is spreading rapidly through the void spaces and channels of the Type III construction. You seek refuge in a room, shut the door, and take out a window. Seeing no portable or aerial ladder for various reasons (height, access, staffing), you think about your options. The fire is now starting to burn through the top of the door.
RELATED FIREFIGHTER TRAINING
Bailout: A Technique We Need to Know But Hope We Never Have to Use
Training Minutes: The Importance of Bailout Training
It’s time to make a decision. Thankfully, you have been trained on the bailout technique and are equipped with an integrated bailout system. You get on your portable radio, call a Mayday, pull your anchor hook out of your bunker pants, and drive it into the wall under the windowsill. Next, you take your descent control device (DCD) and toss it outside the windowsill. You roll out the window headfirst, down and low, and your body follows. Your DCD catches you, your system is loaded, you then operate the DCD, and you lower yourself to the ground safely. The rapid intervention team and other firefighters come to your aid. You are okay but will be evaluated by emergency medical personnel. This was a close call that could have gone bad, but you had the proper training and equipment to effectively save your own life.
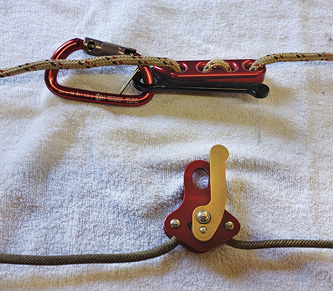
(1) There are several different types of descent control devices on the market; they work using a positive grab between the rope and the device as well as a friction release handle. (Photos by author.)
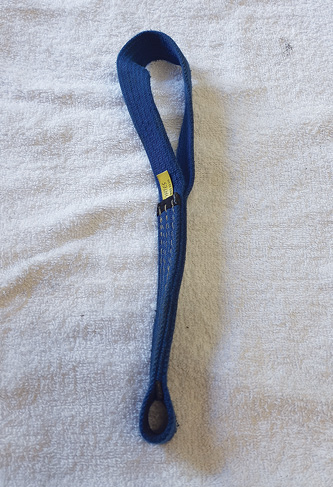
(2) A Class 1 tether—a typical rated tether strap for Class 1 harnesses.
(3) A loaded anchor hook. This will load into the wall; when used in gypsum board/drywall, the anchor will sink into the drywall and load on a wall stud.
This scenario has been played out multiple times through the years. Some departments are ready for it; some are not. Having the training in self-rescue techniques to include ladder bailouts and integrated and nonintegrated bailout systems is paramount and was evident in the “Black Sunday” incident involving the Fire Department of New York in January 2005. This article reviews training considerations, situations, equipment, and the technique for integrated bailout self-rescue systems, which could be the difference between life, serious injury, permanent disability, and death.
Training Considerations
As with anything in the fire service, training is paramount. From Firefighter 1 skills to the most technical information in hazardous material mitigation and technical rescue operations, bailout training is no different. When choosing bailout systems, most departments go through a series of evaluations with different manufacturers until they decide what will work best for their department, including everything from anchor hooks to DCDs to the class of harness. Once they choose a system, both classroom training and hands-on practical evolutions follow. Classroom training should include case studies, situations for bailout, system review, and the technique. Hands-on evolutions start with basic bailouts, progressing to bailouts with smoke conditions and full personal protective equipment with self-contained breathing apparatus. Some departments start the hands-on training on a first-floor window to work on technique and operation of the system and then progress to upper floors. Once members gain confidence in the skill and equipment, you can issue systems to each member and place them in service.
Refresher training should be at minimum once a year. This includes multiple bailouts and classroom review. Also, inspect systems and hardware at least once a month and after every working incident to ensure they are in operational order. As with any National Fire Protection Association (NFPA) 1983, Standard on Life Safety Rope and Equipment for Emergency Services, compliant rope equipment, document use and inspection.
Situations
There are countless situations in which firefighters have found themselves in trouble with no way out except to call a Mayday, activate their personal alert safety system, and basically hope for the best. One of the biggest factors in a situation where a bailout would take place is a rapid fire event resulting from loss of water, inability to reach the seat of the fire, or building unknowns (booby traps, accelerants). Another scenario is getting disoriented, lost, or separated from your crew with no known way out.
Of course, not getting yourself into those situations is key. This has a lot to do with situational awareness and the skills and tactics of other members performing their duties. Understanding that some things on the fireground just happen and there are some situations that we just can’t control, hopefully we will have the knowledge, experience, and leadership to recognize potentially serious issues early.
An extremely important factor is early recognition of a situation in which you may have to perform a self-rescue. Just as with knowing when to call a Mayday (lost, structural collapse, low on air, trapped), knowing that you may have to bail out and find a place of refuge if one exists may mean the difference. Rapidly changing heat/fire conditions, increased smoke conditions, and the temperature of smoke are some awareness factors to recognize.
Being separated from your crew and not oriented to where you are and your escape route may dictate a bailout, as long as you can find an exterior window. If you cannot find an exterior window or other means of egress, managing your air after calling a Mayday may be the proper option.
Interior structural collapse may block your means of egress or other path of escape; therefore, you may have to secure a place of refuge and bail out. Knowing your air level is important, especially in commercial or complex occupancies. If you are low on air, which is now less than 33% of your cylinder’s air supply, you may have to find a safe haven in the building and bail out if you are unable to escape the building before running out of air. Having a safe-haven option will buy you time; if that is not an option, conditions will dictate how rapidly your bailout will be, unfortunately.
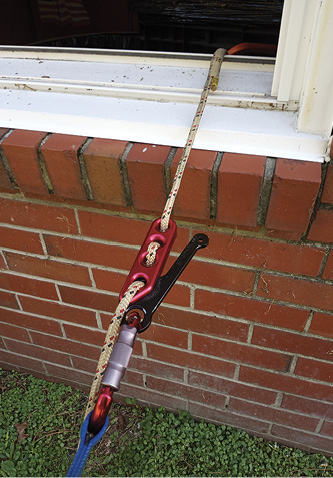
(4) Loaded system 1—the anchor device is loaded (tensioned) using body weight from the firefighter as he rolls out the window.
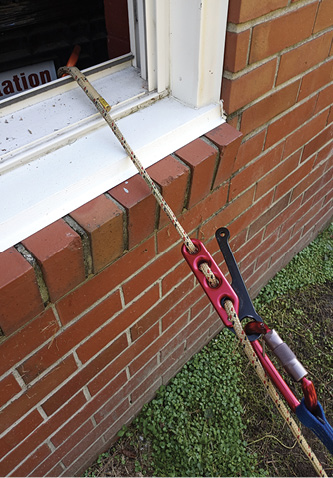
(5) Loaded system 2—it is imperative that the DCD not be too close to the window to be able to operate the system. Six inches from the windowsill is a good distance; this limits the “fall factor” while the system is loading.
These are just a few but very important fireground events that could lead to a self-rescue. Knowing these events, recognizing the conditions, and hopefully finding that “safe place” are positive steps in your survival.
Equipment
Before integrated bailout systems, many training sessions consisted of using a body wrap rope style system and a carabiner or some other attachment to an anchor point—anything from a wall stud, tool driven into the wall, or tool driven into the flooring with the rope wrapped around it. As simple as these seem, they involved tying knots with gloves on in a high-stress environment under rapidly deteriorating fire conditions. It has also been shown that once a firefighter gets to a window, he will not leave the window farther than an arm’s length, so going back into a room to breach a wall and wrap a wall stud with rope is an option but somewhat impractical.
When you perform a rope body wrap, you must get the rope about mid-back around the cylinder. This is sometimes difficult in training, so doing it in a life-or-death situation will be extremely difficult at best. There is also no good way to control your descent other than using your hands; if you lose grip and your hands slip, you are going to fall. Using a body wrap is an option, but it has been proven through training and real situations that an integrated system preconnected to your body using either a Class 1 or Class 2 harness is preferred.
Anchor point. A lot of systems use some type of hook anchor. There are several on the market, all of which work well. Some have handles for the gloved hand; some have a sharper hook than others for better drive into the anchor wall or sill. Find what works for you based on your training and comfort level. The bailout rope should be a fiber that is highly heat resistant and made of a strong material such as Kevlar and be between 40 and 50 feet in length, depending on your response area. Diameter should be between 7.0 and 8.0 millimeters and be compliant with NFPA 1983.
>DCD. There are many DCDs on the market. They all aid in the descent based on the amount of friction applied. Most DCDs have a handle that allows you to control your descent by releasing or applying friction on the rope based on how it is reeved through the DCD. One feature they all have is that once you release the descent “handle” completely and apply the maximum friction, the device will stop you, preventing a catastrophic fall.
Attachment to bunker gear. This attachment is usually based on the class harness the firefighter has. A Class 1 harness is basically a rated belt similar to a ladder belt placed in the firefighter bunker pants. The bailout system can be attached to the firefighter using an NFPA 1983-compliant tether strap from the DCD to the harness. The DCD will have a carabiner attached to make this a smoother connection. A Class 2 is a seat harness—the harness goes through the legs, and the attachment point to the DCD is two loops that attach straight to the DCD using a carabiner. Either harness will work; choosing one will be based on personal preference, department policy, or training experience.
Technique
The experience of instructors and students plays a huge factor in techniques, skills, comfort level using the system, and the actual bailout, as it’s not natural to bail out of a window. Many departments require members to perform bailouts at least once a year to maintain skills and comfortability. Also, this equipment, being life safety equipment, falls under NFPA 1983; inspect it in accordance with NFPA 1983 and departmental policy.
- Keep yourself as calm as possible; control your air; and, if possible, get to a safe haven.
- If conditions allow, call a Mayday, and make sure it is acknowledged.
- Shut the door behind you if you are in a room that has one.
- Take the window out completely (it is imperative that you have some sort of forcible entry tool—a halligan, preferably). If you have no tool, consider using some item in the room as your tool.
- Once the window is removed, stay as low as possible, pull your anchor hook out, and drive it into the wall around the window close to the windowsill (this will allow the hook to load on the wall stud once you bail out).
- Take your DCD and toss it out the window. This brings up a very important predeployment step: You must premeasure your DCD from your hook so that when you toss the DCD out the window it is about six inches below the windowsill on the exterior. If you do not premeasure your DCD, you will have to do it in a bad situation, which wastes time, and if it’s too close to the windowsill when you bail out, you will not be able to reach it or even operate the system. Therefore, you may be out of the event but hanging on the side of building.
- Once your DCD is out the window, keep your head low and your left or right hand (depending on which side you bail out) over but not grabbing the DCD. This will help keep it in place until it’s loaded with your body weight as you bail out. Don’t grab the anchor, as you may dislodge it or get your hand caught in it.
- Do a body roll out the window. This is where the six inches below the windowsill measurement comes in. In our training, this seems to be a good distance. If it’s any farther set, you are going to “fall” farther until the DCD catches you. If it’s any closer than six inches, you run the risk of the DCD getting pinned against the windowsill. Also, watch your finger and gloves: In our training, several firefighters got their gloves stuck underneath the rope, which possibly could get you hung up.
- When rolling out the window, do your best to not shock load the system, which could cause system failure. Rely on discipline, training, and experience to prevent shocking the system.10. Once you are out the window, you are not safe, but you are in a much better situation. Now is the time to operate the DCD. The DCD should be free of the side of the building where you can operate the descent/friction handle. First, calm yourself down. Emotions tend to overpower our actions, so take a deep breath—you just saved your life in a rare event. If possible, get your feet up on the side of the building and gently operate the DCD. Remember, the faster you squeeze the handle, the faster your descent is going to be, so go slow.
11. Descend to the ground. If that is not possible because of building height, obstacles, or other hazards, descend to a floor below that is not as affected. Interior crews on those floors will assist you.
Once you are safely removed from the structure, you should be evaluated by medical personnel, and other personnel should notify the incident commander that the Mayday has been cleared. After the incident, the department should collect and review your equipment; typically, the equipment is placed out of service permanently. Also, it is important to conduct an after-action review to learn from what happened and train so the same situation doesn’t occur again.
Bailout is a last-minute, final attempt to save your life. The equipment you have and the training you’ve done are vital. Recognizing the different situations and even your gut instinct of “I’ve gotta get outta here now!” will dictate a bailout situation. This is a true Mayday and should be recognized as such, so train on this and be proficient in the skill. Understand it is not a guarantee but an option, and if you don’t have the option, you may become a statistic as another unfortunate line-of-duty death.
Greg Sellers is a 29-year fire service veteran and an instructor in engine and truck operations. He has been a member in both the career and volunteer fire service, beginning in the City of Tonawanda, New York.

