BY SCOTT JOERGER
Modern construction techniques and lightweight wood construction are not new. Wood roof trusses have been around since the 1960s. Modern construction refers to a newly built structure or a structure that has undergone significant renovations. Lightweight wood construction refers to engineered wood products used in modern wood-frame structures; they have less area mass and are lighter than components used to build older houses. Firefighters have been faced with additional challenges in modern wood-frame structure fires as the buildings have become more and more lightweight. Today, wood trusses and wooden I-beams are used as framing or structural members; thin boards are used for sheathing or decking made of 4- by 8-foot oriented strand board (OSB) and plywood; and dimensional wood pieces are used for studs, joists, and beams that are different in size and time to failure under fire conditions than the wood components used prior to World War II.
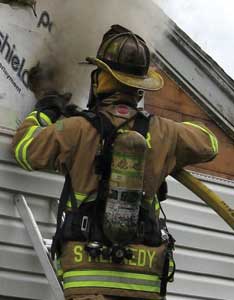
In addition, current building and construction techniques allow for a rapid spread and propagation of fire. Examples include attic and soffit vents, which draw in large quantities of fresh air, permit exterior fire to quickly enter the attic space, and burn easily in the truss space and exterior finishes that readily ignite or melt away and expose unprotected wood sheathing, enabling exterior fires to quickly race up the building’s surface. We encounter modern wood-frame construction mostly in residential homes, but these construction features are also seen in other new buildings, including office buildings, places of worship, and strip malls where a sprinkler system may or may not be present. If one is present, it is not usually in attic spaces and on the building’s exterior. When responding to fires in modern wood-frame buildings, a fire that has extended beyond the room-and-contents fire has a great potential to develop rapidly; spread to exposures; and cause structural members, floor or roof decking, and exterior wall sheathing to fail early (photo 1).
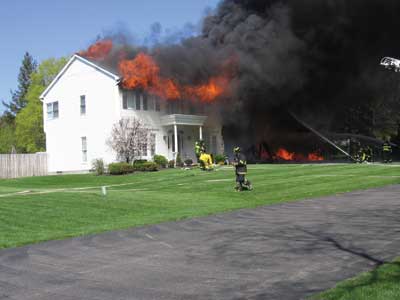 |
| (1) The garage fire quickly spread to the attic because of the wood products and construction techniques used in these new wood-frame buildings. (Photo by Brad Cowan.) |
RAPID FIRE DEVELOPMENT
There are four areas of concern relative to rapid spread of fire: the type of wood used, combustible exterior walls, the open design of wood trusses and open wooden I-beam joists, and attic spaces. Wood-frame structures have always provided plenty of fuel for a fire, but today’s modern wood-frame construction is so much more accessible to the fire. Today, soft wood from spruce, pine, and fir trees is used. Besides lacking the density of harder woods used in the past, soft wood ignites more easily, burns faster, and produces more intense flames.
Another problem is that vinyl siding is used as the covering in the majority of modern wood-constructed homes built.1 When vinyl siding is used, the raw wood exterior sheathing is typically covered in a thin moisture barrier wrap and polystyrene insulation and then finished with vinyl siding. When exposed to fire, as when a room-and-contents fire breaks the window and vents flames, the wrap, insulation, and siding quickly melt or burn away. This exposes raw wood sheathing that rapidly ignites in its vertical position, sending flames up and across the combustible surface of the exterior. Houses and buildings that use painted wood clapboard as an exterior finish will also present this problem, but not as severe.
The open nature of wood trusses used in floors and attics and the wooden I-beam joists with holes through the web part, used in floors, provide void spaces for the fire to spread. This problem is more severe with wood trusses than with wooden I-beam joists. However, these joists are becoming more “open” as they are designed with holes into the web part to accommodate tubes; vents; and wiring from plumbing, heating-ventilation-air-conditioning, and electrical wires. Openings in the truss or I-beam joist allow fire to spread throughout the inside of the entire floor or ceiling space. Also, since more surface area of the trusses and I-beam joists are exposed as compared with solid wood joists, more fuel is available to intensify the fire. In ceiling spaces that may be encased with drywall, fire intensity is influenced by the amount of oxygen available. This is not the case with attic spaces.
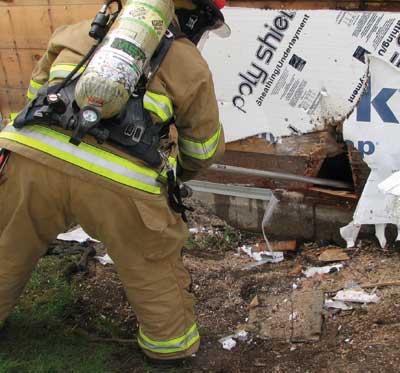
In attic spaces, oxygen is readily drawn in from the open soffit while smoke is vented out the top through the ridge vent-a perfect chimney and fireplace! Attic vents and openings in the soffit are linked to asphalt shingles and have been required by codes since the mid-1980s. Since then, openings at the peak and in the soffit have become larger, allowing more air to easily enter and ventilate the attic space. Fire easily enters the attic from an exterior fire on the load-bearing sides of the structure through the open soffit, which is covered only by a vented piece of vinyl siding (photo 2). Fire can also enter the attic from a fire inside the house, but do not underestimate how easily it can enter from the outside. Once the fire gets to the attic, it will develop quickly and can spread faster than firefighters pulling ceiling, removing insulation, applying water from the interior floor below, and then moving to another location to do the same again, to control the fire. Trusses are common in attics, making the space difficult to access.
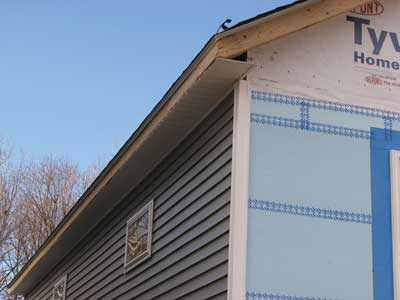 |
| (2) The soffit on the load-bearing side is open and covered with vented vinyl siding to allow air in so hot air can be vented out at the top of the roof at the ridge vent. Fire will enter through here just as easy as air does. (Photo by author.) |
EARLY FAILURE OF STRUCTURAL MEMBERS
Structural members made of wood trusses and wooden I-beam joists lack mass and have a greater surface area-to-mass ratio. This causes fire to attack a greater area and quickly weakens the strength of that lightweight member. In fire tests, unprotected wooden I-beam joists have failed in just over six minutes; unprotected wooden floor trusses fail in less than 14 minutes. Unprotected wooden I-beam joists and wooden floor trusses are typically seen in the basement of a house supporting the ground floor in new construction. Also, wood trusses that use gusset plates as connectors may fail at the gusset plate connections under fire conditions. This may be the result of the inadequate depth of the gusset plate teeth into the wood at the connection. In many cases, the depth of gusset plate teeth is just 0.38 inches.2
Today’s structural support members made of dimensional wood we commonly refer to as “2 × 8” or “2 × 10” and the like are only somewhat better when compared to trusses and I-beam joists. These new dimensional wood pieces have less density and measure less than their names indicate. For example, the real size of a “2 × 8,” commonly used for floor or ceiling joists, is 1½ inch × 7¼ inch when found in a structure. The decreased density has compromised the board’s ability to hold up under fire conditions. Expect failure in less than 20 minutes on the ground floor with a raging fire in the open basement and unprotected floor supports.
Also expect early failure of roof trusses because of the severe propagation of fire in the attic. In addition, early failure could be seen in ceilings with wood trusses and wooden I-beam joists that have openings in the web part. There is a large open void space here; when a fire enters, it can spread throughout the area. Most codes require draft stopping and limit the size of this void to 1,000 square feet. That can be an area that is 20 feet × 50 feet, and a two-story, 2,000-square-foot home with one floor over the other equally would not meet this requirement (photo 3).
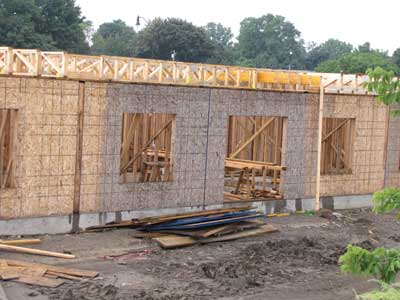 |
| (3) Wood trusses used in ceiling and platform framing. Wooden I-beam joists with openings in the web part are similar in that areas between the top and bottom chords are removed to allow for wires, pipes, and ventilation ductwork to run inside the joist. (Photo by author.) |
FLOOR/ROOF DECKING AND EXTERIOR SHEATHING
Fire tests of 4 foot × 8 foot boards of OSB and plywood show the same time to failure.3 OSB is cheaper than plywood and is used in home production today about 75 percent of the time.4 The problem with OSB and plywood is thickness. Floors today can be just 5⁄8 inch or ¾ inch thick while exterior sheathing and roof decking can be just 7⁄16 inch thick. Under fire conditions from below, floor decking usually fails after the supporting wooden I-beam joists or wood trusses. The floor decking is too thin to support any weight on top of it after the floor support has burned away. This is not the case with exterior sheathing and roof decking. Under fire conditions, sheathing and decking may burn away and fail faster than wood trusses and wooden I-beam joists because of thickness and a more vertical position. In one area of the home, the nonload-bearing wall at the gable end of the attic, the thin width of the exterior sheathing will fail before the wood trusses because of the vertical position of the sheathing and the spread and intensity of attic fires. A wall of flames will vent out the gable end and could cover a large area. This could also occur at the end of the structure where the roof creates a void space behind a knee wall (photo 4).
 |
| (4) The thin exterior wood sheathing on the gable end of the structure can fail before the roof decking or roof trusses. (Photo by Brad Cowan.) |
SPREAD OF FIRE TO EXPOSURES
Do not underestimate exposures and flame development. It would not be uncommon for first-in units to find a well-involved structure fire and exposures on both sides involved on a residential street. Flame development will be intense for exterior fires from an attached garage, along vertical walls, or from flames venting from the attic and other void spaces. Structures less than 50 feet away with the same construction features, including vinyl siding, exposed to radiant heat can ignite if large flames are present from the adjacent side of the burning structure. I have even seen damage to vinyl siding on exposure structures more than 50 feet away. As the exterior finish melts away on the exposure structure, the raw wood of the exterior is exposed and can ignite. Depending on the fire, construction, the wind, and weather conditions, all adjacent structures can be exposures.
FIREFIGHTING TACTICS
Firefighting strategic objectives are still rescue, exposure protection, confinement, extinguishment, overhaul, ventilation, and salvage. Of course, rescue of trapped occupants is the highest priority. However, the tactics used to achieve strategic objectives must change.
Size up for modern wood-frame construction, and consider exposures, water, location, and extent of the fire before interior operations. Identify the building as new construction wood-frame as soon as possible. If your department has preincident guidelines or computer-assisted dispatch information, enter the presence of these types of structures. Assume that recent additions and renovations made to older buildings used lightweight wood construction. Communicate this information to all personnel working on scene. This way, all firefighters operating on scene will know that different tactics and safety precautions must be followed. Some states have adopted codes where buildings with this type of construction are marked with a standardized placard. This code does not apply to single-family residential structures.
At large fires, monitor exposures and consider the water supply. Categorize any structures built with the same construction features that are 50 feet or closer to the burning structure as exposures if large flames are present on the original burning structure and the adjacent exterior walls of the exposure are made of vinyl siding. Increase this distance for surrounding structures based on the effects of the fire, the wind present, and other weather conditions. With a large fire and exposures, water supply could be a problem. Engines will need to connect to multiple hydrants and ensure maximum flow of water. Dead-end mains or lower-diameter water mains, common for residential areas, may not be able to supply the water needed.
Try to size up all sides of the exterior to determine the fire’s location and severity and in which direction it is spreading. Do not enter a building where heavy fire conditions are still burning and weakening floors, ceilings, or the roof. This type of fire requires a risk vs. benefit assessment. It is very important to rule out fire in the basement before entering. If you are unsure of the fire’s location and cannot rule out the basement, make an inspection opening at a basement window. After a handline has been deployed, try to open or force a basement window. If this doesn’t work, break a small hole in the basement window using a tool to check for smoke, heat, and fire. If you determine that the fire is not in the basement and that the fire is a room-and-contents fire, follow normal interior and offensive firefighting guidelines and procedures. If the fire has extended beyond this point, you may need to begin with a defensive approach and transition into offensive operations after another size-up of structural conditions has been completed.
Stop the spread of fire into the attic from windows and the exterior. If fire is coming out of a window, use a handline to darken down the fire on the exterior of the building. Consider using a 2½-inch handline or an appliance such as a portable monitor if heavy fire is venting out of the window. This will stop exterior fire spread to the attic and exposures. Use a straight stream, and play the stream above and around the window so water cascades down the exterior. It is especially important to do this on the load-bearing sides of the structure with vented soffits, where exterior fire will quickly spread into the attic. It may be necessary to direct the straight stream of the handline into the window to knock down the fire. Direct a steady stream low into the window opening and up onto the ceiling to knock down fire and allow heat and smoke to continue to vent out the window. After the exterior and vented fire is knocked down, quickly transition to interior operations and completely extinguish the fire from the interior. Continue to monitor the exterior to ensure fire does not flare up again while interior firefighting crews are headed inside for extinguishment.
Quickly control heavy fire on the exterior with a deck gun or a portable monitor. If heavy fire is on the exterior of the building, deploy the deck gun or a portable monitor. The larger quantities of water will quickly knock down the fire and prevent exposure fires. Nothing deploys faster than the deck gun, but the use of the deck gun may mean parking the engine more toward the front of the building for effective stream application. This area is usually reserved for ladder trucks, so coordinate and leave room for the truck. Consider also that the heavy impact of the stream from the deck gun or portable monitor may damage lightweight structural members and supports. This also is a transitional fire attack, and offensive operations should begin as soon as the exterior fire is knocked down and another size-up is completed.
Knock down heavy fire in the attic with water streams into soffits and gables. If heavy fire is in the attic, consider applying water defensively using the following tactics before going interior. Apply water from the ground using a hoseline to spray water from the load-bearing sides of the house directed into the vented soffit overhang. For small or one-story structures, the 1¾-inch handline will work; on large buildings of two or more stories, a 2½-inch handline or a portable monitor may be needed. The larger hoseline or appliance is needed to maximize gallons per minute, force, and pressure. Force and pressure from the water stream will create and expand an opening through the vinyl siding soffit and the insulation into the attic space. This soffit can also be opened by a firefighter on a ladder using a pike pole to pull down and remove the vinyl siding covering the soffit. Work the water stream throughout the open soffit to improve penetration into the attic space between the underside of the roof deck and the insulation from the attic. It may also be practical to apply a water stream from the ground to the open soffit on other load-bearing sides of the structure (photo 5).
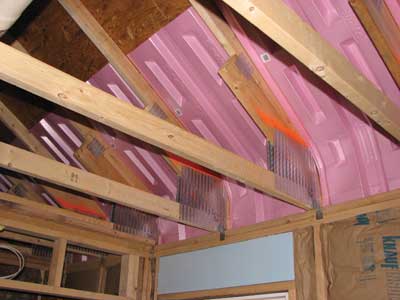 |
| (5) Attic space during construction before the insulation is installed. Note the pink Styrofoam® is in place to maintain an air opening after the insulation is installed. (Photo by author.) |
The other tactic is to apply water from the nonload bearing gable end of the roof. A well-involved attic fire will burn through this vertical gable wall in the attic space quickly, exposing a large opening of venting fire. Anticipate this, and order a handline or a portable monitor, as needed, to this area beforehand so it will be available if and when fire breaks out. If fire has not burned an opening on the gable end, you can make one from the exterior. Consider using an aerial device or a ground ladder. Position the tip of the ladder above the top-floor ceiling and low into the attic space well below the roof gable or peak. Use an ax or a halligan bar to remove the siding to cut/smash a hole into the thin exterior OSB or plywood sheathing.
You can also use a saw to cut this hole if operating from the platform of a ladder tower. Spray water into the hole using a 1¾-inch handline from the aerial device or ground ladder. Direct it upward to deflect it off the underside of the roof throughout the area. This was not opened to be a ventilation hole and should be more effective than directing water through a hole at the peak of the roof. This tactic can be dangerous if heavy fire exists in the attic because the thin wood sheathing on the gable end will burn away quickly and open a large area of venting fire. Therefore, only consider this after the fire in the attic space has been knocked down by a water stream directed into the open soffit from an adjacent side of the structure.
When applying water into the attic space, shut down the line as soon as the fire has been controlled; transition to an offensive fire attack. This will prevent excessive water buildup in the attic space and the potential for interior crews working below the attic to have large, heavy pieces of drywall ceiling fall on them while they are working (photo 6).
 |
| (6) Water is applied from a ground ladder using a 1¾-inch handline from the gable end of the attic to knock down the fire. [Photo courtesy of the Victor (NY) Fire Department.] |
Evaluate, control, and coordinate ventilation. Performing vertical ventilation on peaked roofs above attic spaces with wood trusses and ridge vents is very dangerous, and it is difficult to safely work on this roof with fire burning below. All attempts to vent these roofs should be done from the safety of a ladder tower bucket or from an aerial ladder. Expect early failure because of wood trusses and thin wood roof decking. Roof trusses can be 24 inches on center, making roof work dangerous even if a firefighter is supported on a roof ladder. Roof ladders are also not effective here because there is no ridge board at the peak to support its tip. The ridge vent provides some vertical ventilation. If the ridge vent uses plastic to create the vent opening below the top cap shingle, it may melt down and seal off the vent opening. It might make sense to remove the ridge vent from the peak using a pike pole and an aerial device, but weigh the merits of doing this against the speed with which the roof may fail from the fire attacking the roof decking and trusses.
Horizontal ventilation can also be dangerous if it is not controlled and coordinated with interior firefighting crews. Modern buildings are built to be energy efficient, so interior fires in the living spaces may be oxygen starved and will rapidly develop when firefighters open doors or break windows. Make sure handlines are charged and in place when doors are opened or windows are broken in a fire area. Control and coordinate breaking windows for horizontal ventilation with the interior firefighting crews.
Control basement fires from the exterior before entering the floor above. If the fire is in the basement that has a walk-out basement door, start the fire attack from this opening at grade. From the door opening, use the reach of the stream to knock down fire. Assess damage to the floor supports before entering. If there is not a walk-out basement door, look for basement windows to break, and apply water from an exterior hoseline. Basement windows should be below the wooden floor supports, so direct the water stream up and side to side for penetration. For windows that are completely above grade, a handline might be effective. For windows that are below grade and inside a small well hole, the handline may not be effective. An effective way to apply water from the outside into a basement is to use an altered gooseneck applicator. Unscrew and remove the fog tip to produce a better stream with reach and penetration up to 30 feet and with a tip pressure of 50 pounds per square inch (psi) (photo 7).
 |
| (7) A triangular hole is cut into the ribbon or rim board. Place the altered gooseneck applicator with the fog tip removed into the opening and move it in all directions to control the fire. [Photo courtesy of the Victor (NY) Fire Department.] |
Even at 50 psi at the tip, there is a fair amount of backpressure on this awkwardly shaped appliance. This can be easily overcome by bracing the appliance’s long neck against the basement wall while directing the opposite end tip into the basement while spraying water. Maneuver the applicator to spray water up, down, and side to side. The handline would always be the first choice to apply water into the basement windows and should be deployed until the altered gooseneck applicator is readied. If basement windows are not an option, use a saw to cut a triangular hole from the exterior of the house into the rim board (or ribbon board, if one exists) at the ground level.
A rim board, also called a “rim joist,” is used to toenail wood trusses and wooded I-joists at each floor and is typically made of oriented strand lumber or laminated veneer lumber. The rim board is the same height as the trusses or joists that support the floor and runs completely around each side of the structure. The rim board can be found above the foundation sill plate and below the floor level at the ground floor. It is not always used on the ground floor because, in some applications, the I-beams and trusses are supported by a recess below the top of the foundation wall. The ribbon board is similar to a rim board, but it is made of dimensional lumber and used with dimensional lumber floor supports.
To determine if a rim board or ribbon board is present, remove the exterior siding, the foam underlayment, and any moisture barrier to expose the board if it is present; this should be just above the masonry foundation wall where the siding starts. You can do this quickly if you use a hand tool to pull up and remove the siding. The foam underlayment and moisture barrier easily break and tear away. If the rim board or ribbon board is present, use a saw to cut a triangle into the board with its point up and to the top of the board. You may need to cut only the two sides of the triangle because the bottom of the board is sitting on top of the foundation wall sill plate and is only toenailed in. The hole should be just large enough to direct in a water stream from the outside. Pry the cut piece of the board out to expose the wooden floor supports, and direct a water stream in to knock down fire.
Again, an effective way to apply water from the outside is to use the gooseneck applicator as described above. You could cut another hole on the same side of the house, but space it out at least 10 feet. You could also cut additional holes for fire attack on other sides of the house. These cuts should not greatly affect structural stability as compared with the fire’s burning and destroying the wood floor supports.
Some modern buildings do not have basement windows; the ground floor supports are recessed into the masonry foundation wall. Floor supports below the top of the masonry foundation wall are difficult to determine from the exterior. If, from the exterior, you have made a triangle cut close to the ground and above the top of the masonry wall where the siding starts and find the ground floor-not the floor supports for the ground floor-the floor supports are recessed into the masonry foundation wall. The opening will need to be expanded farther. Expand the exterior hole enough so you can cut a second hole inside into the floor. The second hole should be big enough to allow the gooseneck applicator with the fog tip removed to be inserted into the opening and into the basement to knock down the fire.
For any serious fire in the basement, after the fire is knocked down, assess the damage to the floor supports before entering and transitioning into an offensive operation.
Consider an inspection hole to check floor stability before entry. If making an interior attack, check the floor stability if you know or suspect fire below this location. Beware of carpeted and tiled floors, which can hide the severity of the fire below, including “fooling” thermal imaging cameras. Do not operate on floors with a raging fire below or where floor supports have been damaged to the point that they will not support your weight. Check stability by sounding the floor with a hand tool and by creating a small inspection hole in the floor. This hole is needed because relying on just sounding the floor has proved to be deadly. Making a small inspection hole will be difficult on floors finished with hard wood flooring or tiles. Try to drive the pick of the halligan or an ax into the floor to get an inspection hole; if it is too difficult, use a saw. The hole should be just large enough to enable you to inspect damage to floor supports and check for smoke, heat, and fire using a thermal imaging camera. You can do this from the outside doorway before you place your weight on the floor. You can do this at different points throughout the house during fire operations, but avoid using the saw in smoke and limited visibility. Place a cellar pipe nozzle, a distributor, or a penetrating nozzle into an expanded hole to assist in extinguishing fire in the wooden floor supports and the area below.
Consider making an inspection hole in the ceiling before entry. An inspection hole may also be needed for ceilings on every level of the structure, based on the location of the fire. Remember that wood trusses and wood I-beam joists with holes in the web part create a large void space that should be checked for fire spread. Use a pike pole or a hand tool to make a small inspection hole just large enough to inspect damage, and check for smoke, heat, and fire. The first floor can be done from the outside before making entry, except at the front door when there is a foyer and no first-floor ceiling. This may be needed at different points throughout the structure during fire operations. You will need a larger hole at the ceiling level below the attic to ensure that all the insulation above the ceiling opening is removed when you check fire conditions and damage in the attic space.
Use caution when working on the level below the attic after water has been applied from the exterior into the attic space to knock down the fire. Consider the weight of the water and water-soaked material above you. The weight of the water can cause large sections of ceiling to fall down on firefighters working below. For safety, open the attic ceiling from under the doorway before entering the area to inspect for remaining fire and to relieve water buildup.
An inspection hole cut into the ceiling may have an unintended result: It will allow oxygen to enter the area and may cause the fire to grow rapidly. Have a handline in place and ready to deploy when making an inspection hole in a ceiling.
Maintain situational awareness for the effects of the fire and fighting operations. As you work inside the structure for search and rescue, fire control, ventilation, or overhaul and salvage, remember that failure and collapse of lightweight wood products and new construction wood building components occur quickly and many times without warning. Always evaluate the effects the fire and firefighting operations have had on the roof and floor decking; exterior sheathing; and the structural supports for the floor, ceiling, and attic.
These tactics were developed to provide for firefighter safety and to control the spread of fire at modern wood-frame buildings. They are quick and effective defensive operations because firefighters must control fire and make an assessment for collapse before entering an area with weakened structural members. These tactics are not designed to inhibit interior operations, which should commence as soon as possible for search and rescue of trapped occupants and to complete fire extinguishment.
Endnotes
1. http://www.buildingonline.com/news/viewnews.pl?id=5220.
2 http://fire.nist.gov/bfrlpubs/fire07/PDF/f07004.pdf.
3. http://osbguide.tecotested.com/pdfs/en/tb117.pdf.
4. http://www.builderonline.com/products/product-pros-and-cons-oriented-strand-board-vs-plywood.aspx.
SCOTT JOERGER is the captain of Engine 5 in the Rochester (NY) Fire Department, where he has worked for the past 20 years. He is also an assistant chief with the Pittsford (NY) Volunteer Fire Department and a former wildland firefighter with the U.S. Forest Service in Oregon. He has an associate degree in fire protection and a bachelor’s degree in management.
Fire Engineering Archives

