By Nick Esposito
Mental preparation is a key component to ensuring that an aerial operator can maximize the potential of the apparatus at an emergency. Having a strong understanding of the operations and capabilities of the apparatus is only one aspect needed to gain a successful aerial position. What is equally important is that the operator understands the expectations that will be placed on him at an emergency scene to meet the demands of the situation as it unfolds. Being mentally prepared and having a methodical process to position the aerial apparatus will increase the chances of successfully contributing to positive outcomes on the fireground.
- Aerial Positioning on College Campuses
- The Do’s and Don’ts of Positioning Aerial Apparatus on the Fireground
- Aerial Apparatus Stabilization: It Starts from the Ground Up
- Positioning Aerial Apparatus When You’re Not First Due
Apparatus Considerations
Regardless of the style of aerial or manufacturer, each vehicle is unique and requires a solid understanding of the design characteristics and operations before an operator can respond to alarms. Knowing the constants of your specific apparatus—the location of the turntable and outriggers, the spread of those outriggers, and the bedded length of the aerial—is crucial. These features will be different based on each manufacturer and aerial type. As the operator, you must be able to visualize all this from the front seat of the cab. You need to be able to look in the mirrors and know where the turntable and outriggers are, identify if you can fully extend them, and then be able to swing the aerial into place.
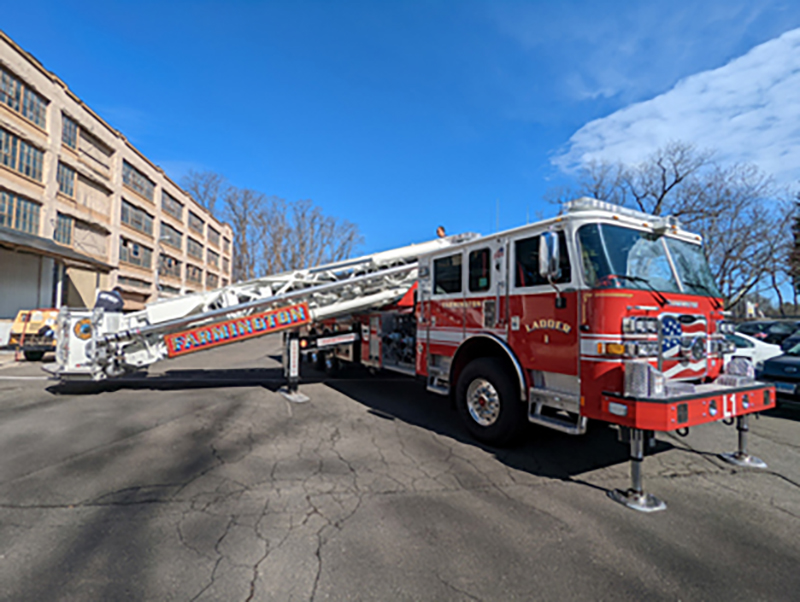
When you position your apparatus at an emergency, you are working to ensure that your turntable is in a location that allows you to achieve your objectives with the aerial. Typically, mid-mount and tractor-drawn aerials have their turntable located behind the cab; rear-mount aerials have their turntable farther back, usually behind the rear axle.
Having a sense of the bedded length of the aerial—the length of the aerial as it sits in the cradle fully retracted—is important as well. In situations where operations will be close into your objective, you want to ensure that when you rotate your retracted aerial, it can swing into position. Aerials that have more sections will typically have a shorter bedded length than an aerial with fewer sections. As an example, a 95-foot mid-mount tower with five sections might be 28 feet bedded, while a 100-foot rear-mount tower with three sections will be closer to 42 feet bedded. This will determine how close you can position to your objective and whether you will be able to swing into position.

(1) Being mentally prepared will allow you to achieve a productive apparatus position on the fireground. (Photo by Andrew Ellis.)
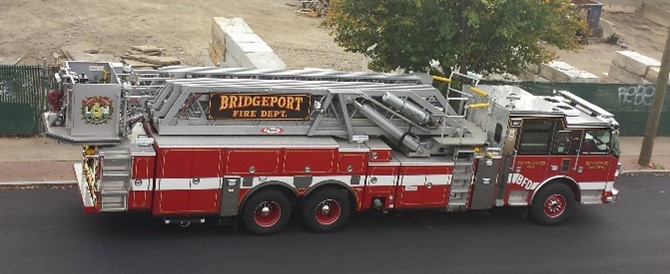

(2, 3) Both aerials have two sets of outriggers but are in different locations. The mid-mount turntable is directly behind the cab, while the rear-mount turntable is behind the rear axle. It is important to be able to identify where these features are while seated in the cab. (Photos by author.)
(4) Mid-mount aerials are known for their shorter bedded length, which can be helpful when positioning close to obstacles or your objective. (Photo by author.)
It is equally important to ensure that you can fully deploy the outriggers, particularly on the operating side of the aerial. Each manufacturer has its own specific outrigger design and location on the vehicle. Some apparatus are designed with one or two sets of outriggers, while some may also have a system of jacks. Be mindful of the distance that outriggers extend out from the apparatus. It’s important to be able to spot the outriggers from the cab and have the confidence to know that they can be fully deployed on the operating side.
Understanding when it is appropriate to short jack will be based on the situation you encounter, the capabilities of your apparatus, and your department’s policies. Some manufacturers may allow you to operate on the short-jacked side, but the majority of apparatus will not permit this operation unless you use an override. If it is necessary to short jack to achieve a required position, orient the vehicle so the outriggers are short jacked on the nonoperating side. If you cannot deploy your outriggers as needed, you will have to modify your position to ensure you can. Visualize from the cab where to position so that you can fully deploy the outriggers on the operating side.
Vehicle height and aerial orientation are important to understand as well. Rear-mount aerials are taller apparatus that typically have three- or four-section aerials. Since the aerial tip is directly overhead and in front of the operator when driving, you can often successfully position these rigs by nosing into the desired location. I call rear mounts “point and shoot” aerials: Drive up to the desired location; point the aerial at your target; and, as long as the aerial will reach, you’re in good shape!
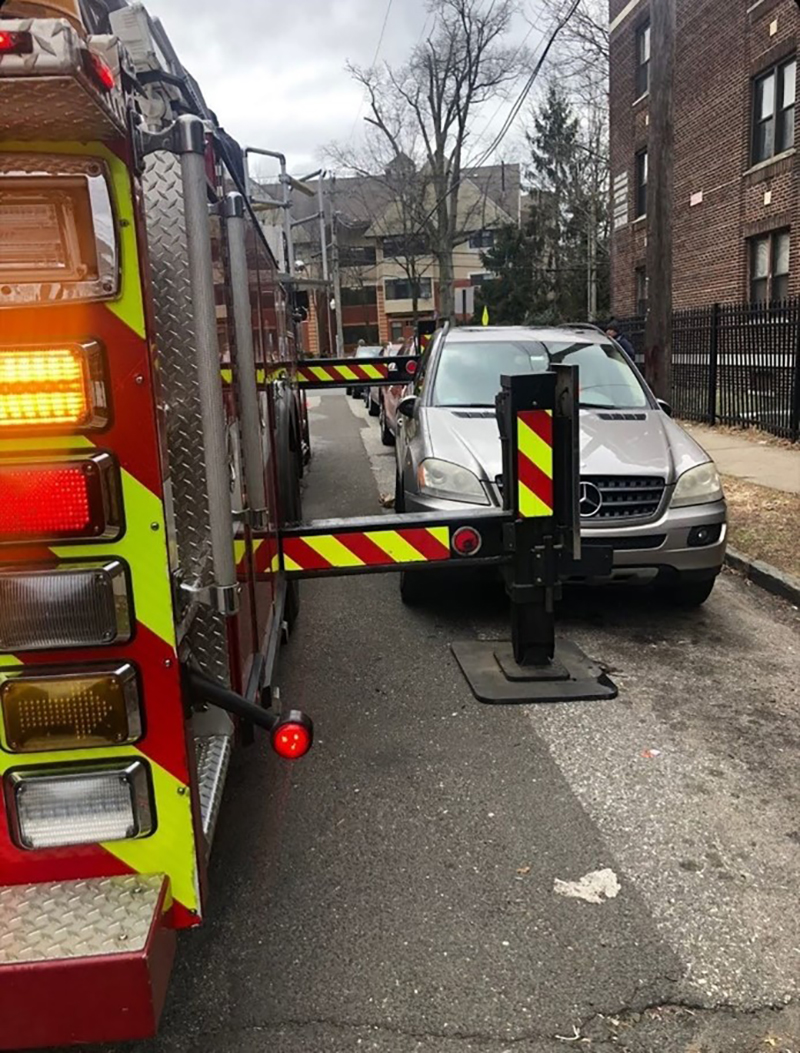
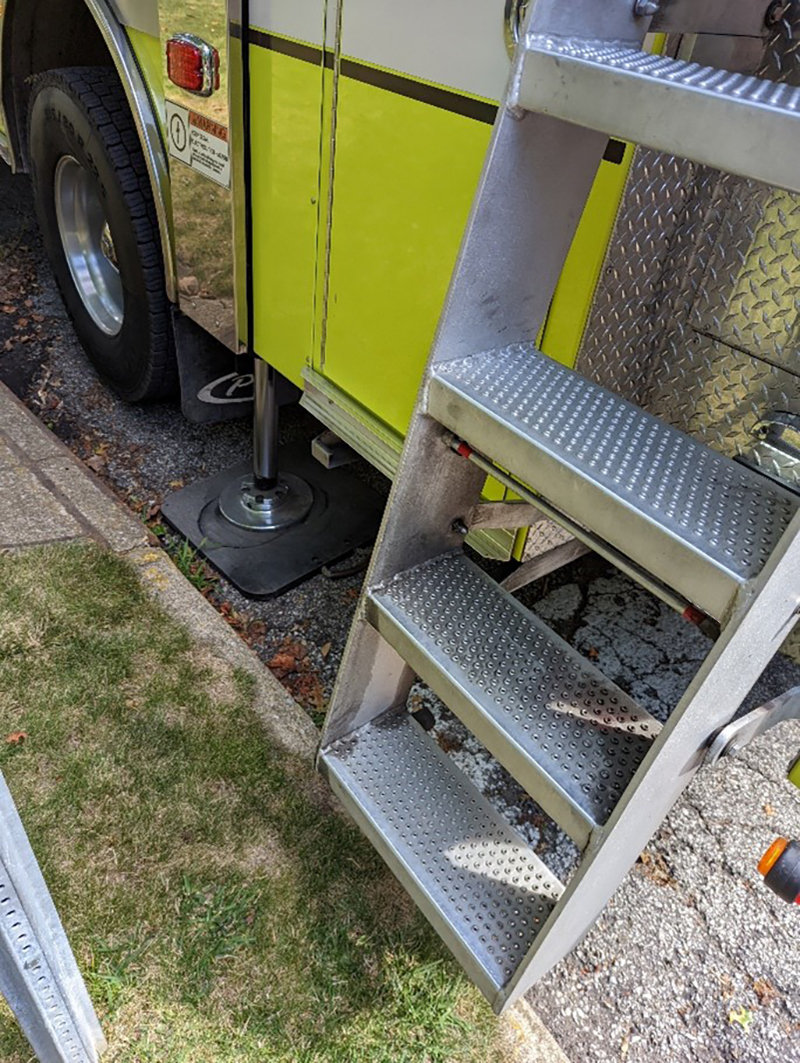
(5, 6) Being aware of the location of your outriggers when positioning will give you the confidence to work close to obstacles and obstructions. Short jacking can be an effective tool to ensure that you can achieve a solid placement of your outrigger or to avoid an obstruction on the nonoperating side. (Photo 5 by Tim Hannigan; photo 6 by author.)
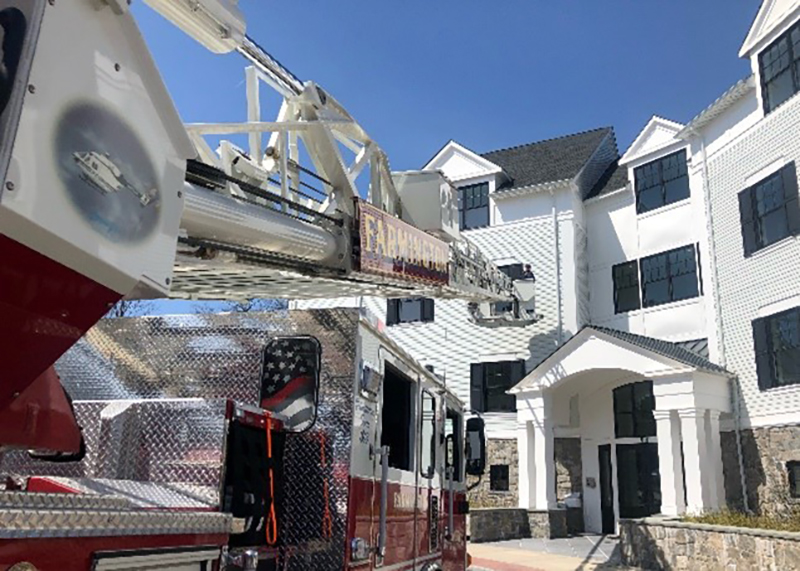
(7, 8) Nosing in and shooting your aerial over the cab or backing in and then shooting the aerial back can be an effective way to work around hazards and obstacles. (Photos 7-8 by Kelley Geffert.)
Being able to visualize the distance away from the objective is important. Be mindful that with a rear mount, you will use one full aerial section to extend the aerial over the cab. With rear mounts, you can drive past the target occupancy and then shoot the aerial back off the rear. By positioning in this manner, you can use the entire length of the aerial.
When driving a rear-mount tower, be aware of how the bucket can become an obstruction, since it sits prominently out in front of the cab when stowed. This will be a consideration when driving but can limit visibility during positioning as well. The operator may need assistance when making that final approach, so have a spotter to assist. Clear and concise communications will go a long way to ensure that the operator and spotter are on the same page when working around any obstacles or obstructions that may not be visible from the cab.
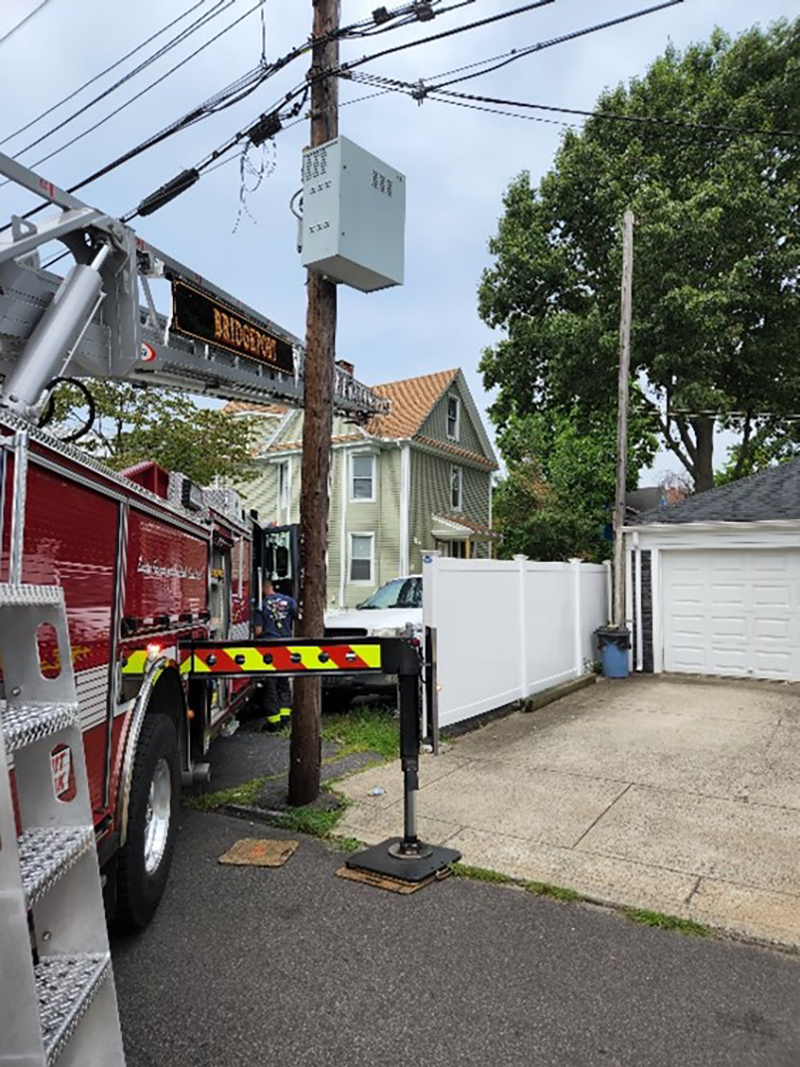
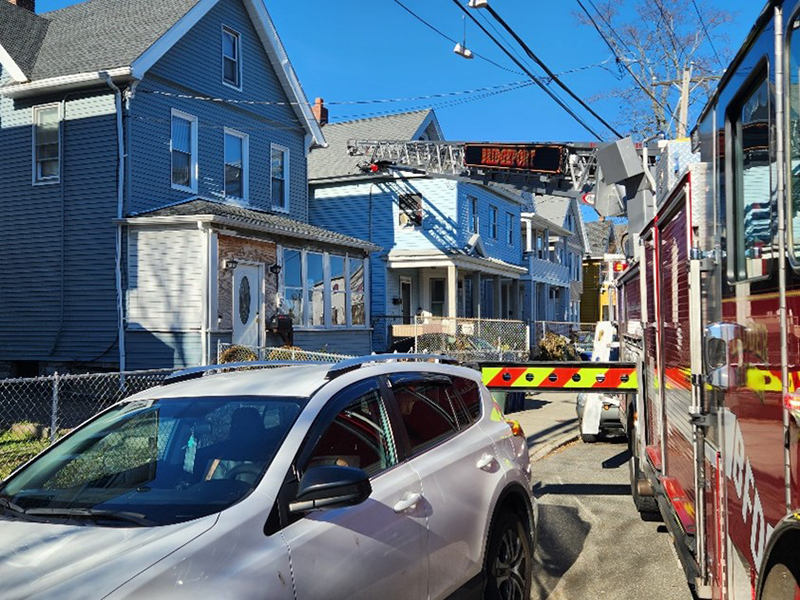
Mid-mount aerials typically will have either four or five sections, depending on their length, and a lower overall vehicle height. These apparatus work best off the side, where they can take advantage of their shorter bedded length. Having a more compact aerial will allow these apparatus to work in congested areas as well as maneuver around obstacles and obstructions such as wires, tight streets, and parked cars. Mid-mounts will also work well when driving past the target and shooting the aerial back; be aware that you will use one aerial section to cover the length of the apparatus. Depending on the manufacturer, mid-mounts may not perform well when operated over the cab. Some models will have better range than others, but typically the operational capability is greatly reduced when working over the cab.
(9, 10) It may be difficult for a mid-mount to achieve a workable position when shooting the aerial over the cab. Working to position the turntable between the hazard and objective puts these wires safely behind the operation. In some areas, operations near wires are very much a part of the daily reality. (Photos 9-10 by author.)
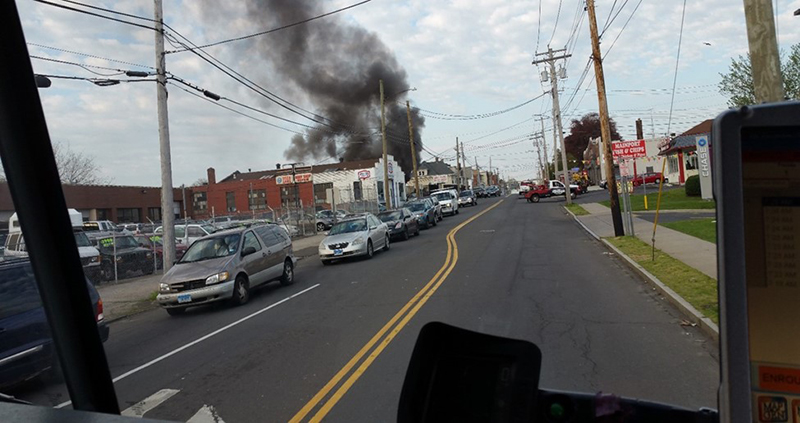
(11) You are moments away from arriving on scene, and there is no clear indicator of what is burning. Using dispatch information and community awareness and communicating with your crew will help you gain focus and begin to formulate a plan. (Photo by author.)
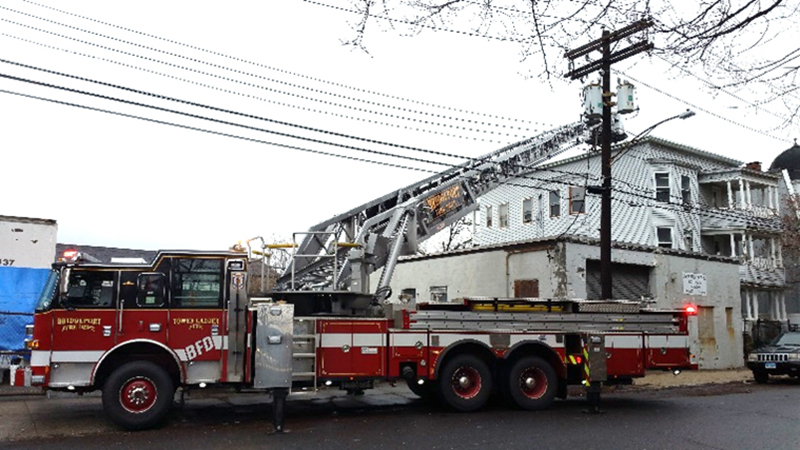
(12) Maximizing scrub area with a rear-mount. By backing into position, the operator can use the full length of this aerial to access the structure. (Photo by author.)
Response Considerations
Understanding your district will help you prepare prior to response. Do you have large planned communities with modern or lightweight construction? Old neighborhoods with legacy construction? Do certain areas have more multifamily dwellings, while others are exclusively single-family dwellings? Are occupancies built very close to the street with little setback, or are they off the road, requiring positioning on a driveway or in a parking lot? Are commercial occupancies scattered throughout, or are they more centrally located to one area? When you have a sense of what type of structure and occupancy you will be responding to, you can begin to think about your priorities and anticipate how you may have to position the apparatus. It is easier to modify a plan that was built on a basic understanding of the community than to arrive without a plan and try and put one together at the last moment.
Knowing the most direct route of travel, particularly when driving a large apparatus, is important. Being aware of the height and length of the apparatus will determine which travel routes are best suited for that vehicle. You may have to choose a different route to avoid low overpasses or steep hills. Consider the time of day and year, as this can have a significant influence on traffic patterns. Is it the beginning of the school day or dismissal, or congestion from rush hour traffic? Is there a large construction project going on in a certain area? All of this should influence your route when responding to an emergency. Remember that you can’t speed. It takes as long as it takes to safely arrive at the alarm; however, communicate significant delays over the radio if appropriate.
When you first receive the alarm, use the information to formulate your own size-up. Start to gain a sense of the type of neighborhood, building construction and occupancy, as well as any other considerations noted from the dispatch information. The address will help you consider the best response route and direction of approach based on the time of day and other factors within your community. This information will influence where and how you attempt to position the apparatus.

(13) Positioning the turntable on a corner will allow you to access two sides and the roof. (Photo by author.)

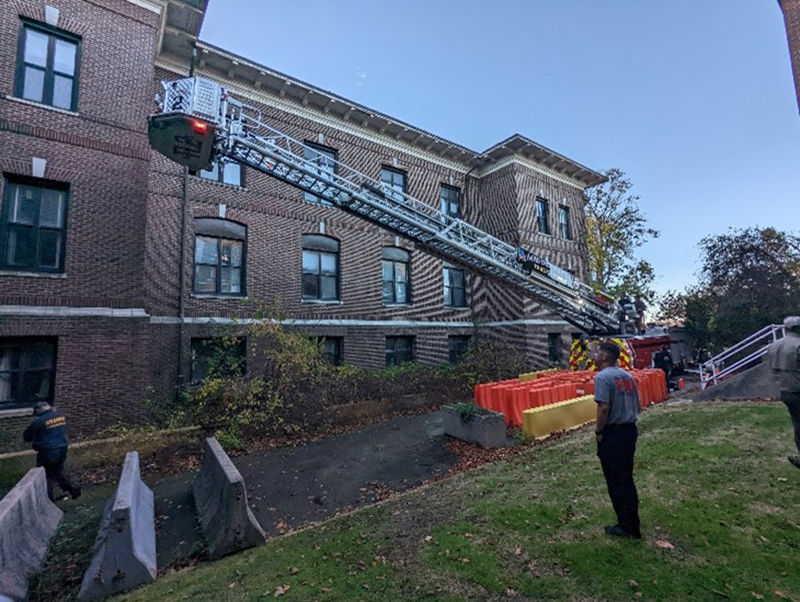
(14) Finding a workable position when given a specific task may be difficult. With the many hazards and obstacles present, the crew was able to access the roof with this position. (Photo by Kelley Geffert.)
(15) As you approach your objective, slow down. Take in what you see and begin to formulate your plan. (Photo by author.)
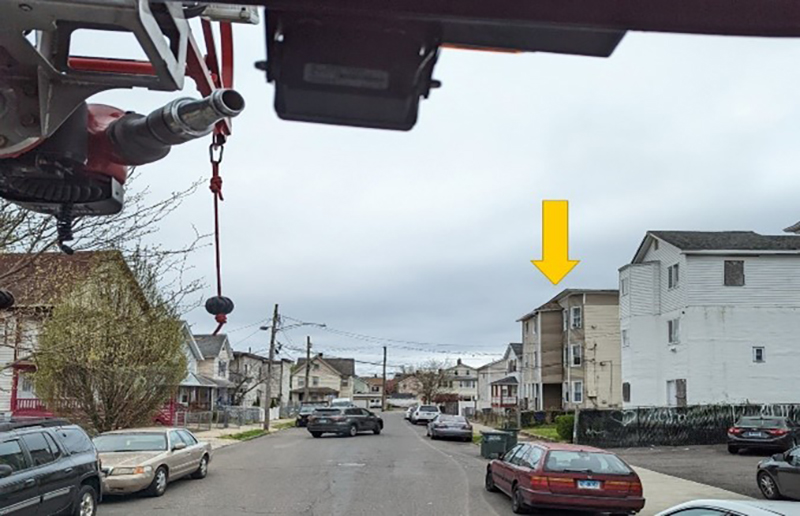
(16) As you get closer, identify obstacles and obstructions that will prevent you from finding a productive position. Here, we see the electric and communication service drops are on the near corner. (Photo by author.)
Always respond with the assumption that residential structures are occupied. Life safety is a top priority, and your positioning must work to support operations that contribute to a successful outcome. If you are dispatched to a commercial occupancy, think about the nature of that occupancy. Is this manufacturing, office space, retail, a storage facility, or an unknown business? What are the potential hazards associated with it? Do you have any specific preplan information to consider? Does this address have a history that you should be familiar with?
While responding, it is important to communicate with others on the apparatus. Using the dispatch information, discuss where the emergency is, what the current situation might be, and how best to position the aerial on arrival. Consider travel routes, directions of approach, building construction, and occupancy. As you receive more information from the dispatch center, mobile data terminal, or units on scene, you can develop a baseline plan but should be able to change the plan as more information becomes available.
Listen to the radio for the size-up report from the first-arriving fire unit and be prepared to process what the information means to a responding ladder company. Hopefully, this first-arriving unit’s report reinforces what was being discussed with your crew and allows you to fill out your plan or make changes as needed. From the information given, visualize your role and how the aerial will be used at this alarm. Did you get a direct order from that first-arriving incident commander (IC)? Does your department have procedures that place expectations based on the information given in the initial size-up? Are you the first-arriving or later-arriving aerial apparatus? In the absence of a direct order from the IC or a policy, LIP (Life Safety, Incident Stabilization, Property Conservation) should be your guide to determining how best to position your aerial. This allows you to focus in on and establish a list of positioning priorities.
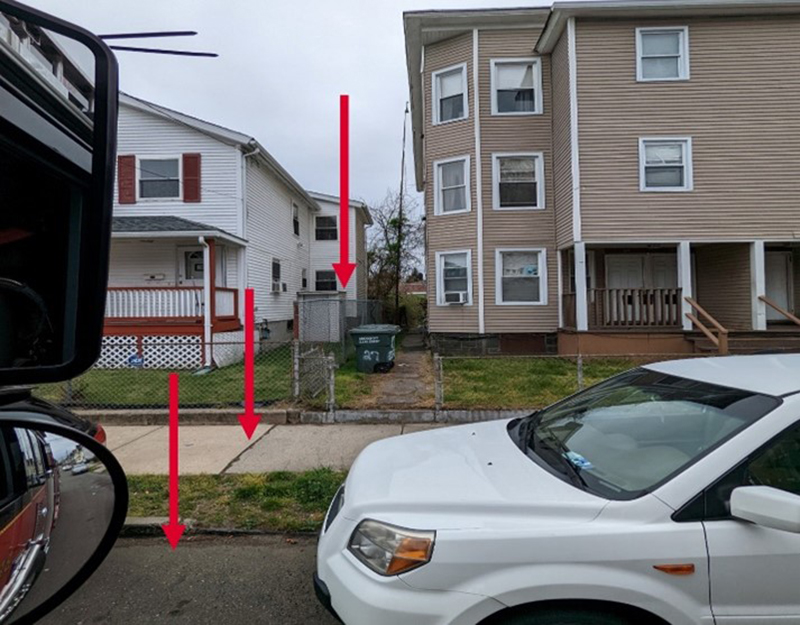
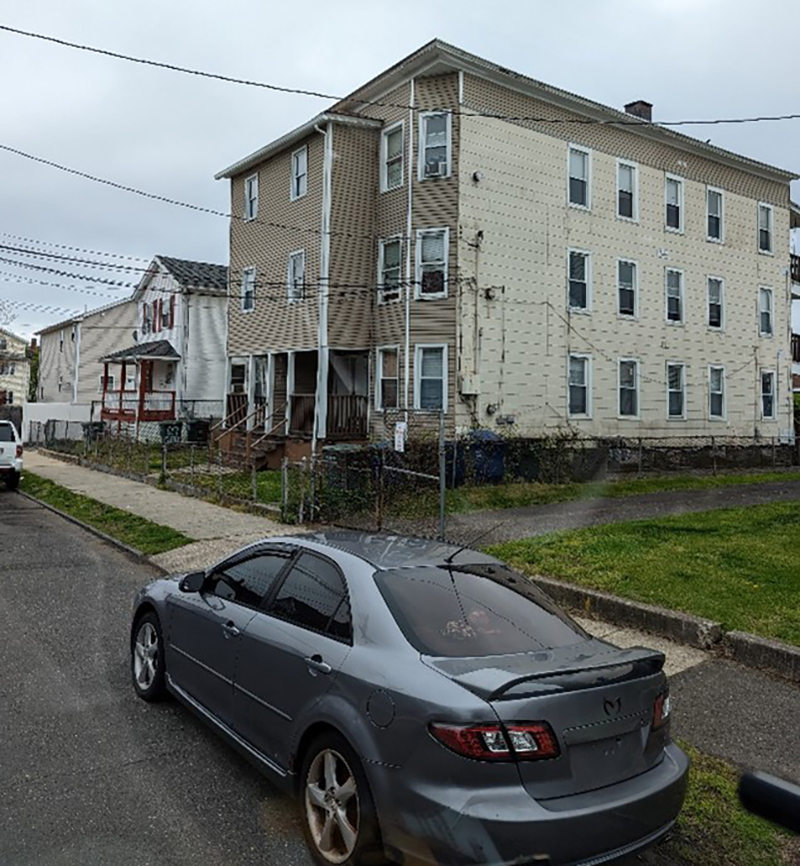
(17) Pulling past to the far corner, you can gain a productive position. Stop, look at where you want your aerial to operate, and then look down. Draw a line out to your positioning area. In this example, follow the fence line out to the seam in the sidewalk, then to the crack in the road. This will be your mark to position the turntable. (Photo by author.)
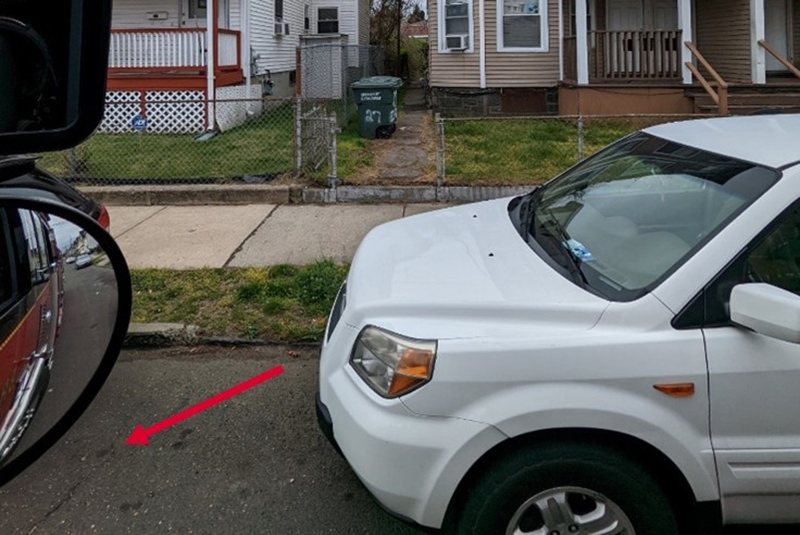
(18) If you are having a hard time seeing the crack in the road, use the gap between the parked cars. (Photo by author.)

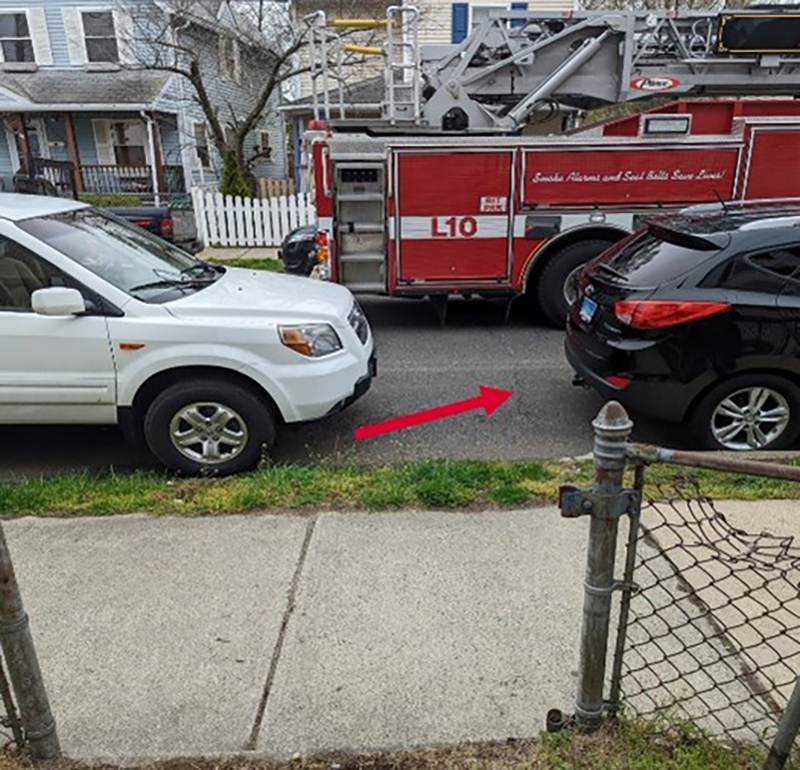
(19) Rolling forward, locate a crack in the road or a gap between the cars. Use a spotter if needed. (Photo by author.)
(20) Once your turntable is positioned at your mark, get out of the rig and confirm the placement. (Photo by author.)
Positioning Considerations
As you approach the block, slow down. Do not rush in. If you move too fast here, you run the risk of missing important information, not recognizing a hazard or an obstacle, and positioning in a way that doesn’t support the operation. Take these few moments to not only see what’s going on but to also give yourself a little time to take it all in and process what it means. Do the current conditions match what you envisioned based on dispatch, the initial size-up, and any other radio transmissions? Has the situation escalated? What are the immediate priorities? What will be the needs as this situation evolves? Can you position the apparatus to meet these needs? Now is the time to develop specific plans, prioritize them, and determine which one will accomplish your goals based on current conditions. Talk this out with your officer and crew. What is Plan A? Plan B? Plan C? When you communicate with each other, your confidence increases. When you discuss what you see and what you are planning, everyone gets on the same page. You may see a hazard or problem that nobody else sees. The more eyes that you can put on the problem, the better.
When you position at an incident, you are trying to maximize the capabilities of your apparatus to work toward the desired outcome. This can be difficult to accomplish, based on the nature of the emergency, the size and location of the occupancy, and the obstacles you might encounter. As a result, you need to focus on your priorities and position to support the needs of the fireground. It will be difficult to cover all areas, so work toward one of these three operations: maximizing scrub area, covering multiple sides and the roof, and focusing on a specific point of priority.
Scrub area. Try to maximize your scrub area (the area you can reach with the tip of your aerial device) on one side, such as the front of an occupancy. This operation is typical at apartment buildings, condominiums, townhomes, mid- or high-rises, and strip malls, where you are trying to cover as much area as possible. These are typically larger occupancies where you usually have access to only one side.
Multiple sides and roof. Position the aerial to access two sides of a structure and the roof. This position works well in residential occupancies where maximizing scrub area on only one side usually is not the concern. Here, you can operate on two sides and also have access to the roof. By doing so, you support firefighter access and egress to the upper floors to perform search and rescue operations and horizontal and vertical ventilation, as needed.
Point of priority. Locate the turntable so the aerial can access an area of high importance. This could be to position for a specific window or other location to effect a rescue. This may limit your ability to operate in other areas of the occupancy, but the priority should always be life safety. If the aerial can be positioned to make a timely rescue, then that is what you will do. You may find that you may only be able to access one particular area because of hazards and obstacles.
Once you determine the highest priority, ensure that you can get the turntable where it needs to be. Without a good turntable position, you will not be able to achieve your goals and hit your objectives with the aerial. Remember that hazards and obstacles will influence what positions you can and cannot get with your aerial. You need to anticipate this and be prepared to modify your plan. If hazards and obstacles make it impossible to achieve a position, make sure that you communicate this to the IC.
With your plan announced and your position selected, now slowly roll up to that spot. Line up your cab with the location where you want to spot your turntable. Take a look—this is where you will ensure that the hazards and obstacles that you identified earlier will not prevent you from achieving your goal with the aerial. Can you get the window? Can you get the roof? Are you trying to maximize your scrub or get two sides and the roof? Once you confirm that you can hit your objective, look down to identify the exact location where you want to position the turntable. Once you pick that location, ensure that you will be able to deploy the outriggers in this position.
Use any markers or guides to help get the turntable where it needs to be as you move the apparatus into position. Use the built-up environment as much as possible here. Maybe there is a crack in the roadway, a pothole, a shadow from a parked car, or the car itself to use as a guide. At night, use your emergency and scene lights to help with positioning. If it is a difficult spot, there is nothing wrong with communicating to a firefighter exactly where you want the turntable to be and then having him step off the rig to spot you.
If there is nothing directly in line, you can still use what you see. Maybe you want the turntable to be three feet past a crack in the road or two feet away from the bumper of a car. This visual mark can also be on the nonoperating side; use whatever is available. Now, use that mark to achieve your position. Take your time. If you overcommit, you may not be able to back up safely if other apparatus are arriving or you don’t have a spotter. Just lift your foot from the brake; there is no need to use the throttle here. You’re only rolling forward somewhere between 10 and 30 feet. Slowly maneuver into place using the mirrors, focus on your mark and the location of the turntable, and be mindful of your outriggers.
Once you’re confident with your position, set the parking brake and get out of the cab to take a look. Before you place your wheel chocks and deploy the outriggers, stand at your turntable and look at your objective. Can you achieve your goal from this position? If not, find another mark. It just might be a one- or two-foot slight reposition at this point. If you need to adjust, take the time to do so. Taking a few extra moments to maximize the position could mean the difference between success and failure in the coming minutes.
By developing an awareness of the operational capabilities of the apparatus and an understanding of the demands of the fireground, operators will be better prepared to methodically obtain a productive aerial position with their apparatus.
Nick Esposito is a second-generation firefighter who started his fire service career in Verplanck, New York. In 1999, he joined the Bridgeport (CT) Fire Department and is the captain of its rescue company. He has a bachelor’s degree in public safety and a master’s degree in public administration. He is the owner of Truck Tactics Training and teaches on the regional and national level. Esposito has published articles related to aerial apparatus operations and building construction. He posts truck company related information on his Facebook and Instagram pages Truck_Tactics, as well as at www.trucktactics.org. He is also a co-founder of the Facebook page Truck Floor Training.

