
By William C. Peters
In 1987, I was promoted to the rank of battalion chief in the Jersey City (NJ) Fire Department. As an unassigned battalion chief, I was detailed to assume the position of apparatus officer because of my civilian background as a heavy truck mechanic.
In addition to trying to get the fleet maintenance program on track, one of my first duties was to perform a final factory inspection on two 110-foot aerial trucks manufactured by a company from which the city had not previously purchased aerials.
Having not been involved in the research or specification process, I was at a complete disadvantage as to what I should examine and how to perform the inspection. I didn’t even have preconstruction notes or change orders to rely on.
 |
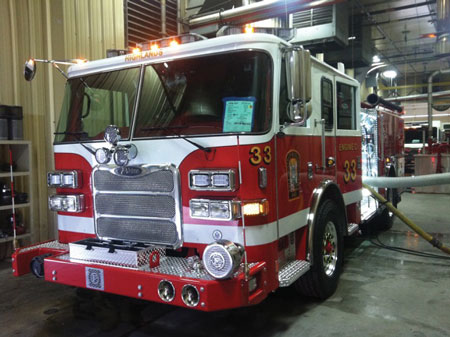
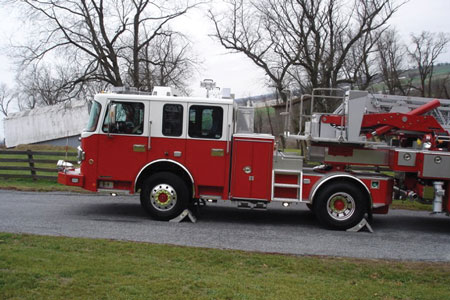
| (1) Performing a thorough inspection at the manufacturer’s facility is an essential part of the apparatus purchasing process. (Photos courtesy of author.) |
National Fire Protection Association (NFPA) 1901, Standard for Automotive Fire Apparatus (1985), was of little assistance. The entire body of the standard was only 30 pages long, and relatively few paragraphs were devoted to aerial apparatus! Compare that with the current standard, which contains more than three times as much material!
I spent several days reviewing the manufacturer’s specifications in preparation for the trip. When the notice finally came that the apparatus was ready for inspection, off I went with the only documentation available – the manufacturer’s spec – and an apprehensive determination to get this done. When we arrived, I said to myself, “It’s big, it’s red, and it has our name on it … now what?”
Unlike today, where most manufacturers provide clean, well-illuminated inspection bays with “creepers,” tape measures, flashlights, and marking tape, I had to inspect these two units outside in a parking lot reserved for completed apparatus ready to ship. The manufacturer was in a sunny, southern state, and for two days I labored under bright sunlight to get the job done, going from paragraph to paragraph in the extensive spec to ensure the city received everything it paid for.
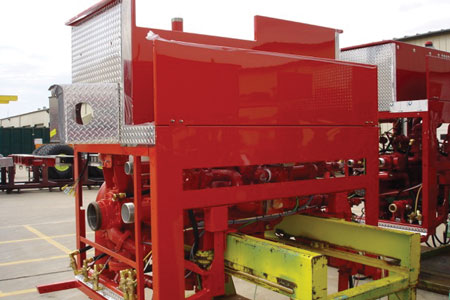 |
| (2) During a chassis or in-progress inspection, the pump module might be available for inspection. |
When I returned to my office with deep red sunburned arms and neck, the big joke was that I must have been “on vacation at the beach”! Nothing could have been further from the truth! It was at that point that I decided there had to be a better way to conduct a proper apparatus inspection.
In the past 30 years, I have been involved in hundreds of factory inspection trips. The best advice I can give to firefighters who are in the same predicament that I was in is, “Organization and preparation are the keys to success.”
Purpose and Justification
Factory inspection trips are an essential part of the apparatus purchasing and refurbishing process. Quite often, city officials or city managers consider factory trips to be free vacations or junkets as a reward to the truck committee. However, when you conduct a proper preconstruction meeting or final factory inspection, nothing could be further from the truth.
There are typically three types of factory inspection trips:
- Preconstruction conference.
- Chassis or in-progress inspection.
- Final inspection.
When specifying a complex piece of fire apparatus, there are several ways to proceed. Many purchasers outline their needs and allow one manufacturer to produce specifications with their name in all the right places. Others use the information contained in the manufacturer’s spec and create their own document. In either case, NFPA 1901 calls for the purchaser to specify the details of the apparatus. Typically, anything that you do not totally specify is left up to the manufacturer’s discretion and accepted practices. This could lead to some items that are inconsistent with the purchaser’s expectations.
In addition, modern apparatus is composed of numerous parts and assemblies that are incorporated into the final finished product. The manufacturer will attempt to satisfy all the purchaser’s wishes, but there are bound to be questions as to how to accomplish this. In addition, the experienced experts at the manufacturer’s facility often suggest easier or more efficient ways of accomplishing your goals.
Preconstruction conference. The common way to convey the exact wishes of the purchaser or truck committee to the manufacturer’s representative overseeing the project is through a good preconstruction conference.
 |
| (4) Examine the cab and chassis for the routing of wires and hoses as well as the installation of components. |
I encourage fire departments to avoid having the preconstruction conference in the fire station with a salesperson. At the factory, you can examine apparatus in various stages of completion to get ideas and an indication of what the finished product will look like. In addition, quite often a department supervisor in the pump, plumbing, electrical, or aerial department might be called on to render an opinion or suggest how to meet your goals in the most efficient and expedient way. Often, the manufacturer will be able to produce a drawing of a previous apparatus that was manufactured with the features you desire, which will help in the decision-making process. This vast pool of knowledge is not available when you are thousands of miles away from the facility and the people who are going to manufacture your rig!
When justifying a preconstruction trip, a comparison that I often make is between the construction of an addition to city hall and an aerial apparatus, each costing up to $1 million. Do you think your town administrator or mayor would just hand the architect’s drawings over to the construction company and say, “Build it, and we will see you at the ribbon cutting”? Probably not! He would probably be involved daily, checking on everything from the paint color to the type of door hardware being installed. The same types of questions need answers when building a piece of fire apparatus.
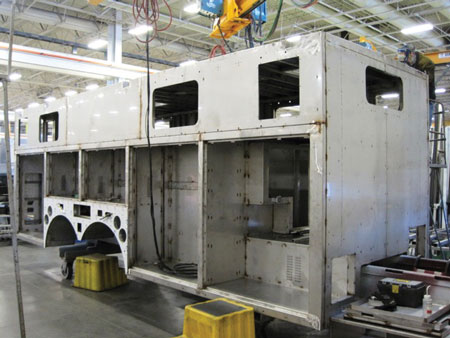
Chassis or in-progress inspection. In the past, many manufacturers used to encourage a “prepaint” inspection where the apparatus was fabricated “in the raw” and unpainted. The committee would inspect the truck and make any required changes before the rig went into the paint shop. Now, thanks to modern computerized painting techniques, the cab, body, pump house, compartment, cab doors, and other painted components are painted separately. A computerized system controls the color mix so all the painted components match, making a prepaint inspection unnecessary.
Some truck committees desire to do an in-progress inspection during construction. Most manufacturers only take six to eight weeks from the time the frame rails are set until the apparatus is complete. This provides a very small window of opportunity between the in-progress and the final inspection. Often, you can inspect the body in one part of the facility, the cab in another, and the chassis in another.
 |
| (4) Examine the cab and chassis for the routing of wires and hoses as well as the installation of components. |
Of the three types of trips, I consider this one to be the least important unless you are using a “purchased” chassis. It affords you the opportunity to adequately inspect a purchased chassis, either a commercial truck or a custom fire chassis, prior to final assembly. Since these components are considered an outside purchase, it is important to be sure that the chassis is complete and correct before final assembly. During one in-progress inspection, we found that the commercial chassis did not have the proper power take-off (PTO) to drive the hydraulic generator.
Final factory inspection. This is probably the most important of the three trips. It is essential to ensure that the apparatus is built and tested to your specifications and to detect and have corrected any deficiencies you discover.
At the final inspection, you must verify every item in the specifications and any change orders incorporated into the specs. You should report to the manufacturer’s representative anything from the fit and finish to defective components for correction prior to shipping. Often, some components and equipment need mounting when the apparatus is in finished condition. It is better for the committee to define the exact locations at the final inspection than to have an employee use his own judgment, only to have to have it moved later.
Trip Costs
Whether the cost of the trips is included in the bid price of the apparatus or is billed separately, the number of trips and number of participants can add up quickly. Costs associated with the trips include commercial transportation, lodging, and meals. Depending on the manufacturer’s location relative to the purchaser, there could be a vast difference in the cost of transportation. This could seriously impact the bid price of the apparatus and give an unfair advantage to a bidder who is located closer to the purchaser or close to a large airport.
To level the playing field, the city or fire district could opt to pay for the trips separately. Some jurisdictions indicate in the specifications that the cost of the trips must be segregated and will not be considered part of the bid price of the apparatus when awarding the bid.
 |
| (5) Locating all the spec items at the front of the apparatus will speed the inspection. You can check the bumper, horns, sirens, lights, suction and discharge connections, and mirrors from one location. |
It is best to have the manufacturer’s representative make the arrangements, as he is most familiar with flights, hotels, and restaurants near the facility. If the trips are not included in the cost of the apparatus, an itemized invoice could be presented after each trip.
Taking into account the cost of the trips, many committees split up – half go to the preconstruction conference and the other half to the final inspection. This can save money on the cost of the trips, but it can also create confusion if the group who did the preconstruction conference don’t completely brief the final inspection group as to the outcome of changes and clarifications. If possible, the same personnel who do the preconstruction conference should inspect the finished project.
Preconstruction Conference
A good preconstruction conference is the best insurance that the manufacturer’s representatives totally understand the truck committee’s wishes. As I stated earlier, organization and preparation are the keys to a successful meeting. The end result will be a finished apparatus that will serve your community well.
During the conference, there are bound to be changes the committee wants to make to enhance the originally specified apparatus. It is extremely important that prior to your departure you have a total understanding of the purchasing laws and regulations for your jurisdiction. What is the budget for changes? Is there a cap, either in dollars or percent, that can be set before the project must be rebid? Will the municipality or fire district pay for changes by adjusting the contract price or by separate invoicing?
A number of years ago, a nearby fire department attended a preconstruction conference for a large, heavy rescue apparatus. At the conference, members added tools and equipment and made numerous changes in the shelving, roll-outs, and compartment organization without considering the method of payment. Prior to delivery, the municipality was presented with an invoice that was nearly $14,000 more than the bid price! There were many questions about authorization for the changes and how to pay for them. The delivery was delayed while the details for payment were worked out.
Just prior to the trip, the committee should sit down and go over every item in the specifications, including any possible exceptions that the bidder may have taken. Often, there is a lengthy amount of time that passes from when the committee produced the spec until the preconstruction conference is held. In a typical bid purchase scenario, the committee holds a number of meetings before finally producing the bid spec. Then the governing body needs to approve the spec and advertise it for bid. Bids are taken and evaluated. Once the successful bidder is selected, a contract between the bidder and the purchaser needs to be executed and a purchase order issued. Then the salesperson must coordinate with the factory to arrange the preconstruction conference. This could easily take six months or more! An in-depth review is essential just prior to departure to refresh everyone’s memory as to what needs to be discussed.
 |
| (6) Carefully inspect the routing of hoses and wires for wear points. |
During this committee review, any outstanding questions among committee members need to be resolved. The preconstruction meeting is NOT the time for committee members to iron out differences. At one preconstruction meeting I attended, a member of the committee wanted to bring up changing the pumper to a top-mount control instead of the side-control that the committee had decided on months before. The committee must present a united view of what has been specified and what is needed.
Don’t get me wrong: Decisions as to changes and clarifications must be made at the preconstruction conference. Prior to travel, the committee must resolve how it will deal with these decisions at the meeting. Will there be a democratic vote, or will the chief, commissioner, or committee chairperson have the final say?
In preparation for the meeting, bring photos, drawings, and information about your current apparatus or vehicles that you have seen in your research. This is especially important if you desire to have the graphics laid out the same as or similar to your current apparatus. This includes specialty designs such as special Maltese crosses or graphics that duplicate the department logo or patch. If you are attempting to match paint colors, sometimes the delivery information on a previous rig will contain paint type and color, or you might have to match paint chips after the conference and notify your salesperson of your choice.
Schedule enough time to accomplish your goals without rushing. Typically, three days including transportation is enough. I like to arrive midday on the first day to take a tour of the facility and look at apparatus that are in production or finished. Devote the entire second day to your preconstruction meeting. Sometimes, the salesperson will need to seek answers from other factory personnel as to whether a request can be fulfilled. Also, many groups that I have been with take quite a bit of time in the graphics department, making sure that the finished apparatus meets their expectations. Use the morning of the third day to tie up the loose ends and make final decisions before leaving for home.
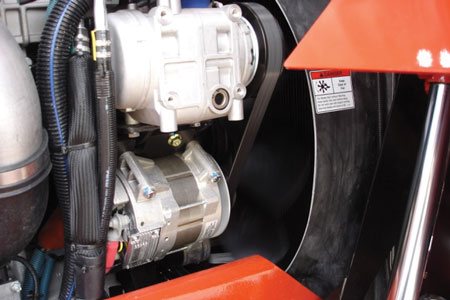 |
| (7) Verify that the correct components, like this alternator, were installed. |
At the meeting, have one person in charge of the committee and one person take extensive notes on changes and clarifications. It is important that you use YOUR spec in the review process. This is even more important if the specifications are from a different manufacturer or a more generic version than the committee authored. If the manufacturer’s representative wants to do the preconstruction from his documents, insist that you do your spec first, then go back and go through his. The reason for this is your spec might contain very specific requirements that could be overlooked in the manufacturer’s shop order or build sheets. Remember, this is the time to get the requirements worked out, not after the truck is built!
Have some clean drawings of the proposed apparatus at the meeting that you can mark up to indicate the placement of components such as shelves and roll-outs. Use either a pencil or an erasable pen, as you are likely to move things around as the meeting progresses. It is wise to specify pump panel approval drawings in your specifications. At the meeting, you can easily move controls around on paper that will be impossible to move once the truck is completed. Also, this is a good time to determine what colors and legends you want on your various controls. If you do not specify, they will likely be labeled “Discharge #1,” “Discharge #2,” and so on.
After the meeting, the salesperson will typically have a list of changes and clarifications that were discussed. It is extremely important to compare them to the notes that your “scribe” took during the meeting. This document constitutes a change to the contract, so make sure it is correct and complete before authorizing the changes.
Changes vs. Clarifications
It is important to know the difference between changes and clarifications. A change will have a positive or negative financial effect on the price of the apparatus. For instance, if you initially specified discharge valves with standard push-pull controls and then you elect to change them to electrically operated valves, there will be an upcharge for the more expensive controllers. On the other hand, if you specified all discharges to have pressure/flow meters and then changed to standard pressure gauges, you would receive a credit for the difference in price.
Other things that might be taken as credits are items or quantities of items that have been deleted. For instance, if you have 10 compartment shelves and five roll-out trays specified and after laying out the compartments you only use six shelves and three trays, you have a credit for four shelves and two trays. Often, purchasers will include extra options and equipment and use them as a buffer for changes that might increase the price of the apparatus. Be sure to keep good accounting of your pluses and minuses!
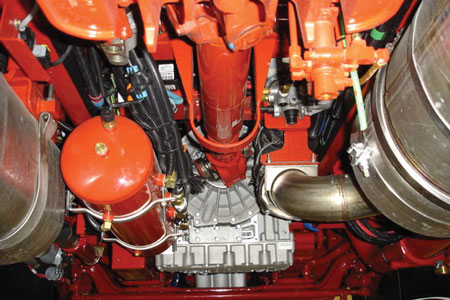 |
| (8) Inspect the driveline, exhaust system, axles, brakes, and hoses and wiring under the rig. Look for possible fluid leaks. |
A way to avoid this “horse trading” is to include a contingency fund in the spec. This is a specific amount that is included in the price of the apparatus that can be drawn on for change orders that originate at the preconstruction conference. Any funds not used will be deducted from the final price of the apparatus.
As the purchaser, you need to be aware that all the changes you make will have a financial impact. Be sure you understand the cost and know how you are going to pay before authorizing such changes.
Items listed as clarifications are simply preconstruction notes that clarify a requirement in the specification but don’t have an impact on the price. For instance, if a certain number of folding steps, handrails, or lights are specified, locating them on the apparatus is considered a clarification.
Chassis or In-Progress Inspection
As I stated earlier, a chassis inspection could be especially critical if you specified a commercial chassis or a custom fire chassis that is not built by the apparatus manufacturer. These “purchased” chassis are ordered by the final apparatus manufacturer, so you want to ensure nothing was lost in the translation from your spec to the builder’s order. Most times, corrections can be made before further work is done.
Begin with the chassis portion of your specifications. It should contain a description of all the features and options that make up the chassis. Check the vehicle against the list to be sure that it is complete. This is also a good time to check the chassis wiring and hoses that will be covered when the body is installed.
 |
| (9) Weather permitting, move the apparatus outside to test lights and audible warning devices. Also, check the paint and finish outside. |
If you use the final inspection checklist as described below, you can check off each chassis item as you locate it. This will save you time when performing the final inspection.
This might be a good time to check out the body and pump house if they are in production. Although they probably won’t be finished, you will be able to take some measurements and get an idea of the general layout.
An in-progress or chassis inspection should be a quick in-and-out procedure. You will need additional time when you schedule the final inspection.
Final Inspection
The final apparatus inspection/testing is probably the most important of the three types of factory trips. The public and your department members are counting on your skills, expertise, and judgment to ensure that the new apparatus is complete and up to the requirements of the specifications.
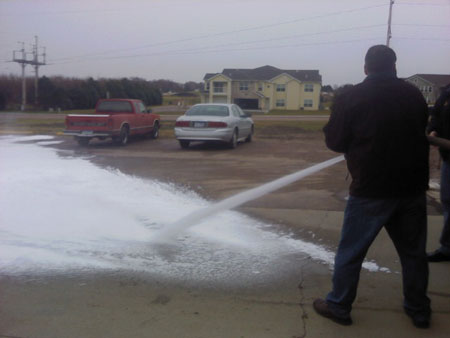 |
| (10) Test auxiliary systems such as this compressed-air foam system. |
Again, organization and preparation are the keys to success. There are several preparations to make before embarking on the trip. After my first inspection trip (described in the beginning of this article), I decided there had to be a more organized way to perform an inspection on the apparatus. A technique that I developed then and still use today is to prepare an inspection checklist by dividing the apparatus into physical locations. If you try to inspect the vehicle in the order of the specifications, you’ll quickly become exhausted running from one end of the truck to the other as each paragraph is described.
Some of the location headings that I use are as follows:
- Front
- Cab/Crew Cab Interior
- Left Side
- Pump Panel
- Rear
- Right Side
- Top
- Under
- Engine/Pump Compartment
Depending on the type of apparatus, other areas might pertain, such as the following:
- Turntable
- Aerial Ladder
- Platform
Prior to the trip, in the comfort of your home/office, go through the spec and place each item where it is on the truck. Include a brief description and the page of the spec where the requirement is located. (This will help if you need to refresh your memory or completely check the specified item.)
Some items will be described in several locations. For example, the NFPA required reflective stripe might be described in one paragraph in the specifications but will be located on the front, left side, and right side of the apparatus.
 |
| (11) Run the line-voltage generator and test all lights, outlets, and cord reels. |
Other paragraphs, such as the air horns and sirens, will have features located in more than one area. The sirens/horns will be at the front, but the activation switches and so on will be in the cab.
Using this technique, you can begin at the front of the rig and check the extended front bumper, front suction, hose well, air horns, siren, trash line discharge, headlights, warning lights, turn signals, and so on. All of these items are described in various parts of the specifications, but doing a checklist will allow you to stand in one place and check that the described items are all being provided. You can then move to the cab/crew cab and continue with your inspection.
When doing the checklist, I add a few pages for operational items that need to be checked such as the following:
- Department of Transportation Lights
- Warning Lights
- Audible Warning Devices
- Heating, Ventilation, and Air-Conditioning (HVAC)
- Driving Controls
- Interior Lights
- “Do Not Move Apparatus” Warning System
- Seat Belt Warnings
- Generator or Aerial Controls
The inspection team should perform these tests at the same time outdoors. Other departments inspecting their apparatus really frown on air horn and Q-Siren tests inside the inspection bay!
I also provide pages for operational tests. The road tests described in NFPA 1901, an abbreviated pump test, and generator and aerial operation tests are all included. I also use the NFPA 1901 Weight Analysis Calculation Worksheet shown in Annex B.
 |
| (12) Your specifications should include a mini pump test. |
Leave several blank pages at the rear of the book to list deficiencies found.
Also in preparation, gather documents and tools to be used during the inspection. Some manufacturers provide basic tools in the inspection area, but I never leave it to chance. Items to bring (in addition to several copies of the checklist) include the following:
- Copies of the original specifications and any change orders.
- Approval drawings of the apparatus and pump panel.
- A copy of NFPA 1901.
- Tape measures – a long one for apparatus length measurements and a shorter one for compartments and so on.
- A flashlight.
- An inspection mirror.
- A voltmeter for checking AC and DC power supplies.
- A temperature probe or gun to measure the HVAC system.
- A sound meter to check the cab sound level. (You can download this application on a smartphone.)
- A stopwatch for timing road acceleration, drafting operations, and aerial operations. (This application is also available on a smartphone.)
- A grease pencil, painter’s tape, or brightly colored marker dots to highlight paint imperfections.
When scheduling a final inspection, allow ample time to thoroughly inspect and test the apparatus. This is especially important if you are inspecting multiple units. Be sure to inform your salesperson in advance that you want to witness a mini pump test so he can schedule time at the test pit. (This requirement needs to be in your specifications.)
When you arrive for the final inspection, hopefully the apparatus will be clean, shiny, and waiting for your inspection. As strange as it may seem, I have gone for a final inspection and the apparatus was not close to ready. I immediately refused to perform any “partial inspection” and insisted on returning when the apparatus was complete. The manufacturer could have saved money, time, and embarrassment if it would have postponed the trip until the unit was ready.
I generally split the inspecting party into two groups. Each team has a copy of the specs and an inspection check sheet. I usually start by taking all the basic measurements together. This saves time, and each team can note the measurements on their sheet. Then one group starts at the front and the other starts at the rear, and each group does an independent inspection. In this manner, different sets of eyes can check everything twice, which results in a more thorough inspection.
 |
| (13) Perform aerial operations and timing tests. |
Most manufacturers are well versed in the provisions of NFPA 1901, but sometimes every employee is not. Before the inspection, become familiar with Annex B, which has a Fire Apparatus Delivery Form that will help you understand the requirements of the standard.
Another helpful form that I briefly mentioned is the Weight Analysis Calculation Worksheet in Annex B. This worksheet is self-explanatory. Starting with the apparatus scale weights with all tanks full (that should be provided by the manufacturer) and using information about the apparatus such as axle ratings, personnel seating positions, hose loads, and loose equipment requirements, you can estimate the available axle capacity or possibly a dangerous overweight condition.
Although you might think that this can’t happen, I have had more than one apparatus that was calculated to be overweight. One unit was specified as having an aluminum body, with a stainless-steel body listed as an option. The fire company decided to take that option, but the manufacturer failed to upgrade the rear axle to compensate for the heavier body, and the rear axle was overloaded. Remember, it is easier to get this corrected at the factory before it is delivered than after it is home and in service!
 |
| (14) Operate the aerial from both the turntable and the platform if so equipped. Check all lights and mounted controls. |
During the inspection, pay attention to the routing of hoses and wiring, especially under the rig. Sometimes you may observe a location where abrasion might cause premature wear. Tilt the cab and verify that the components specified were installed. Look for any signs of seepage or leaks. This is unusual, but I have found them in the past.
Exercise caution when climbing on top of or under the rig! Inspect all areas, but do it safely.
After you have completed inspecting all inside items, move the apparatus outside and continue the inspection. Check all lights, audible warning devices, and systems together. Depending on the location and time of year, it is preferable to inspect the paint and finish outside in the natural light.
Take the unit for a road test following the guidelines in NFPA 1901. The basic requirements are as follows:
- Accelerate from 0 to 35 miles per hour (mph) within 25 seconds.
- Attain a speed of 50 mph on a flat surface.
- Maintain a speed of at least 20 mph on a six percent grade.
- Make sure the auxiliary braking system functions as designed.
- Make sure the air brakes bring the apparatus to a complete stop from a speed of 20 mph in a distance not exceeding 35 feet.
Other tests to perform and areas to check are the maximum speed, panic-stop, antilock brake system, and unusual sounds or vibrations in the cab. This would also be a good time to take a sound meter reading in the cab. At 45 mph, the sound at any seating position should not exceed 90 decibels.
Depending on the manufacturer, the salesperson or a factory representative might have to drive the rig. Remember, in most states, the firefighter’s exemption for a commercial driver’s license does not include test driving a new fire truck!
 |
| (15) Carefully check the fit and finish of all compartment doors. |
Perform an operational test of all systems on the apparatus. This includes a generator test and the demonstration of a foam system if specified.
As stated earlier, I always specify that the manufacturer’s representative perform a mini pump test. During this test, I observe the following:
- The number of seconds to take draft.
- Pump at maximum capacity at 150 pounds per square inch (psi).
- Pump overload test, pumping capacity at 165 psi.
- Pump at 70 percent of capacity at 200 psi.
- Pump at 50 percent of capacity at 250 psi.
At each stage of the test, I have the pressure governor set and do a shutdown to ensure that the pressure increase does not exceed 30 psi. During the testing, I record the engine temperature, oil pressure, and charging voltage and look for any leaks.
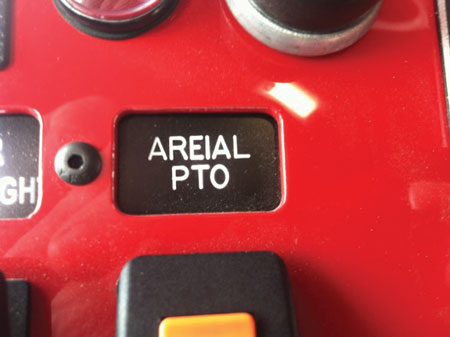
When checking aerial apparatus, I typically test the operation of the stabilization system before moving to the aerial tests. This includes the operation of any automatic leveling system.
The aerial operational timing test consists of raising the aerial to the maximum elevation and extension and rotating it 90 degrees within 120 seconds if the ladder has a rated vertical height of 110 feet or less and 180 seconds for ladders more than 110 feet.
Other tests include the operation of the rotational limiting system for “short jack” situations and the override system for main control failure. Also, check the 12-volt system for bedding the aerial and raising the stabilizers if the PTO system fails.
Operate the aerial from both the turntable and the platform if specified. Remember to wear a safety belt in the platform! Verify all lights, intercom, and controls as operational.
 |
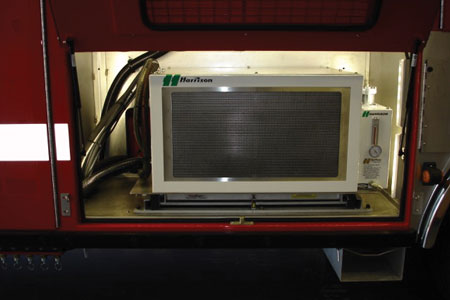
| (16) Verify all compartment and hosebed measurements. |
If the apparatus has a line-voltage generator, run the generator and take voltage readings at outlets and cord reels. If you specified a transfer switch, check the outlets that are fed by the shore line and the generator to ensure that they are operational in both modes.
Carefully check the fit and operation of all cab and compartment doors. Some inspection teams perform a “water test” and have found leaks in compartments and cab doors!
Verify all measurements contained in your specifications such as compartments, hosebeds, and steps; perform any other tests that you think are necessary.
Finally, inspect the inventory of loose equipment included with the apparatus. This will most likely involve opening packing boxes, but it is essential to verify this inventory. Make sure any operational/parts or instruction manuals are included with the truck.
While conducting the inspection, don’t stop to discuss your findings with the factory representative or salesperson. This will only distract you! When both teams have completed their inspections, get together and compile one list of items that need attention.
Deficiencies
There are no perfect apparatus deliveries; however, some are more perfect than others. It is safe to say that I have never completed a final inspection without a list of deficiencies – corrections, omissions, or problems with the finished unit. On a project as large and as complicated as a piece of fire apparatus, there are bound to be some issues that need to be corrected stemming either from a misunderstanding of your requirements or something that just didn’t turn out the way you wanted it.
Deficiencies generally fall into one of three categories: minor, unacceptable, and acceptable.
Minor deficiencies are small items that must be changed, adjusted, modified, or improved. They include paint or finish imperfections, adjustments to components that might not operate smoothly, leaks, incorrect graphics or lettering, and minor omissions. Typically, these problems are easy to correct. You might also request other minor changes that could make the apparatus more suitable.
 |
| (17) Perform any additional tests in your specifications. This test checks the holding capacity of the wheel chocks on an incline. |
Unacceptable deficiencies are major discrepancies that absolutely must be corrected before you accept the apparatus. Items such as excessive height, length, or weight; an error in a major component such as a pump or generator; or any other condition that renders the apparatus unacceptable would be cause for rejection.
Acceptable deficiencies are a variation from the specifications because of an error, omission, or misunderstanding. If the error doesn’t affect the safety of the apparatus, seriously impede your normal operations, or compromise the bid process, a negotiated settlement might be the most logical solution, resulting in a better finished product. I was once involved in the inspection of an apparatus that would have been overweight on the rear axle with the specified water tank. After discussing the various solutions, we decided on slightly reducing the capacity of the water tank. The price of some of the costly change orders that had been incorporated into the apparatus was adjusted as compensation.
A word of advice: Try to work with the manufacturer to adjust deficiencies for the best outcome for all involved.
After the Inspection/Delivery
After the inspection, prepare and forward to the salesperson and manufacturer’s representative a complete report of the findings, test results, and corrections to be made. When the apparatus is delivered to your location, you can use the information contained in your report to ensure all the corrections were made.
The final factory inspection is not the same as acceptance unless you intend to pay for the apparatus and accept it at the manufacturer’s facility. Many situations can arise between the manufacturer’s plant and your fire station – an accident, malfunction, loss of equipment, or breakdown, to name a few. I always advise purchasers to avoid the drama of a road trip home! Conduct a thorough factory inspection, let the manufacturer deliver the truck to your fire station, and then do a reinspection and perform the acceptance tests as defined in your specifications.
 |
| (18) Be sure all controls operate properly. Also, check legends and spelling! |
Factory inspection trips increase the cost of fire apparatus, but that is a relatively small price to pay when considering the community’s large capital investment and the long life expectancy of the vehicle. A good preconstruction conference followed by thorough testing and a complete final inspection are the best insurance that you receive everything your community is paying for and a fully functional piece of apparatus.
This is a big responsibility. Take it seriously, be professional, and do it right!
WILLIAM C. PETERS retired after 28 years with the Jersey City (NJ) Fire Department, having served the past 17 years as battalion chief/supervisor of apparatus. He has served as a voting member of the NFPA 1901 apparatus committee for several years and is the author of the Fire Apparatus Purchasing Handbook, the apparatus chapters in The Fire Chief’s Handbook, and numerous apparatus-related articles. He is a member of the Fire Engineering and Fire Apparatus & Emergency Equipment editorial advisory boards and of the FDIC executive advisory board. He is the recipient of the FDIC International 2015 Tom Brennan Lifetime Achievement Award.
FACTORY INSPECTION TRIPS
Apparatus Inspection and Maintenance: Everyone’s Responsibility
Apparatus Purchasing: a Series of Choices, Compromises, and Trade-Offs
Fire Engineering Archives

