TRAINING NOTEBOOK ❘ By Greg Sellers
It’s late in the evening. The alarm comes in for a structure fire in the older part of town, buildings with which you are familiar. Tight streets, power lines all over the place, balloon-frame houses, and many structures in less-than-ideal conditions. The police radio reports received while you are responding indicate you are going to work—fire showing with people trapped.
Aerial Operations and Power Lines
The Do’s and Don’ts of Positioning Aerial Apparatus on the Fireground
Aerial Ladders: How Strong Is Your Ladder Game?
You and your officer decide to go past the street and around the block to the address. This will get the truck to the front of the building behind the first-due engine and will place your turntable at a corner for best access. Yes, you see the wires and leave room for your outriggers. The operations are well underway, but the fire is in many void spaces. The chief tells you to get the aerial up and take out the front attic window for ventilation. Your concern is the many wires. The chief says, “I got you; get the aerial up.” Surprisingly, you get the aerial up in position with little difficulty and take out the attic window. You leave the aerial in place.
You hear the radio chatter from an engine company, “We can’t get out by the interior stairs. We are blocked; we’re coming out the aerial.” The next thing you see is a firefighter at the attic window with black, turbulent, preflashover smoke pushing behind him. You stay at the pedestal as your officer goes up to assist as the firefighter climbs out the window; the engine company officer follows. All three members descend the aerial to safety. The attic is clear of firefighters. Shortly thereafter, the attic flashes and becomes involved in fire.
This is a true story that had a positive outcome because of proper apparatus positioning, aerial operator skills and determination, and early recognition of a probable rapid fire event. This article focuses on the aerial operator—the basic skill level needed to perform the job successfully and factors the operator should consider.
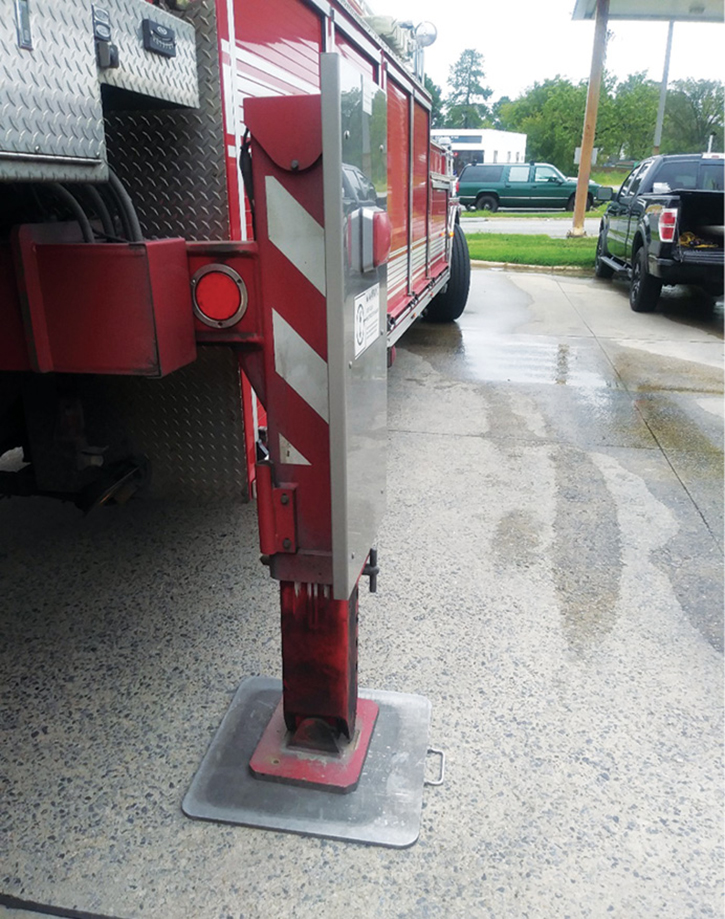
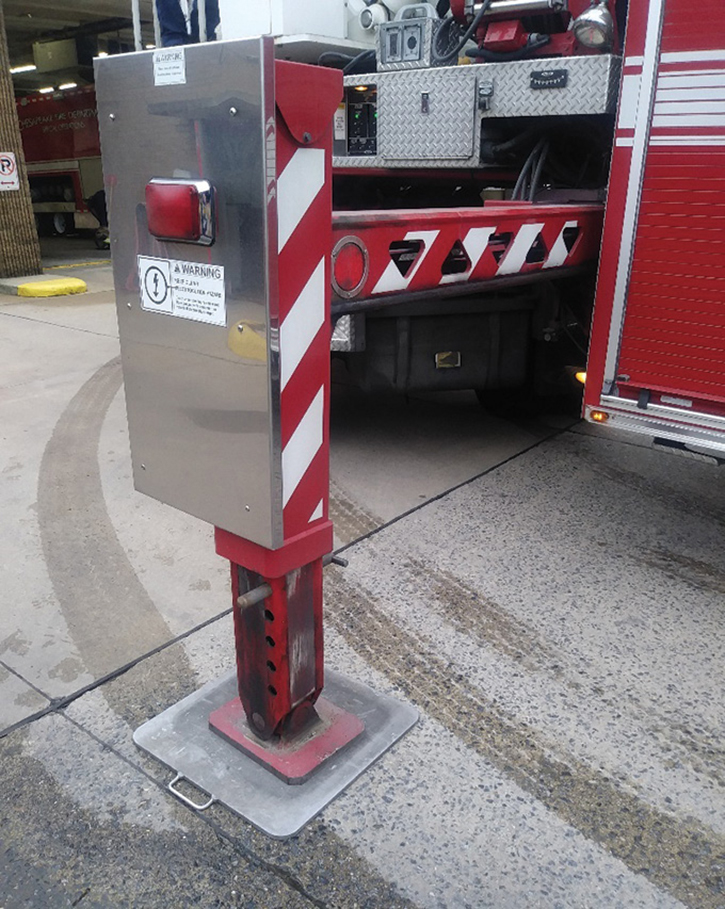
(1) A short-jack outrigger, which is excellent for use in tight spaces or in between objects. Remember, the operating side of the outrigger must be fully extended. (Photos by author.)
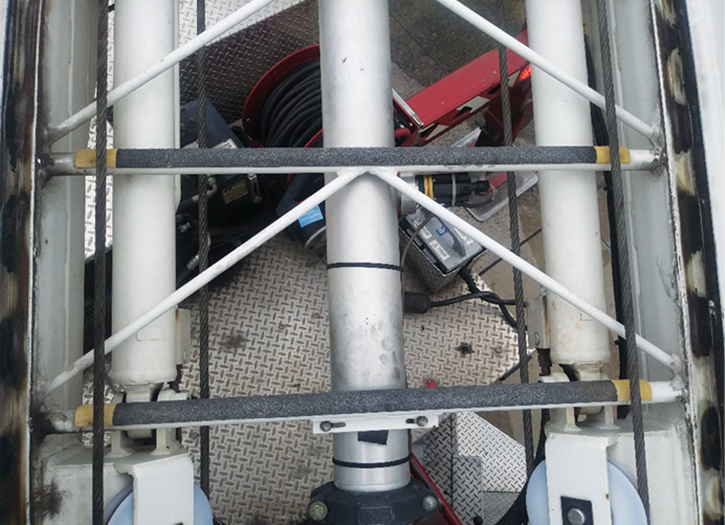
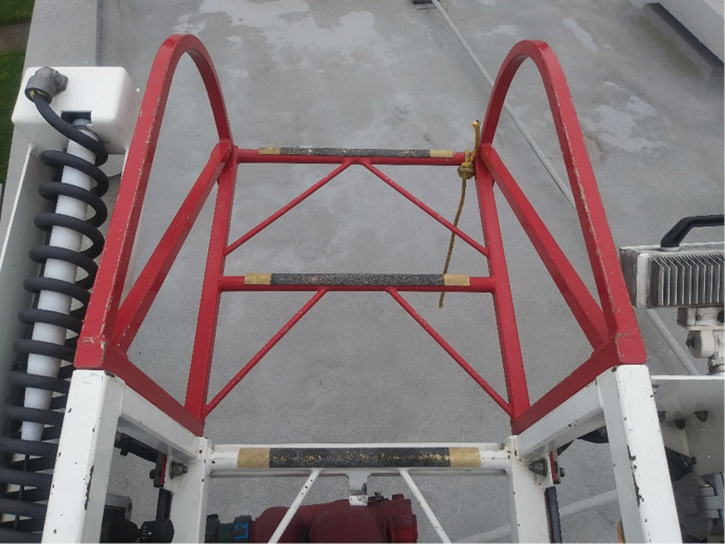
(2) K-bracing adds strength to the aerial; it is not seen on older aerials.
Apparatus Specifications
Aerial operators must know the apparatus they are operating—from aerial construction to aerial load limits to outrigger construction and span to emergency operations. They should be familiar also with apparatus length, height, and weight; short-jacking requirements; and torque box. A torque box resists lateral twisting forces on an extended aerial. Obviously, being a skilled and confident driver is a must.
As we all know, rear-mount apparatus are excellent for operating off the rear of the truck, not so much off the front because the length of the vehicle reduces reach. Mid-mounts work well off the side; tower ladders can get low to the ground to act as a ground monitor or even go below grade for a possible water rescue.
Many aerials and tower ladders have built-in safety sensors, which are governed by a computer or electronic-limiting switches that may prevent movement in a certain area. Aerial operators need to know what those areas are.
Older aerial devices may not have any of the short-jack safety features that today’s aerials have. Since these older models have no outrigger sensors, they will let you operate the aerial in any position and at any height.
“K-bracing” has been one of the biggest improvements in aerial design. It prevents lateral stresses on the aerial, which adds strength that helps prevent a catastrophic collapse.
Today’s aerials are steel or aluminum and are known as “nonsupported” aerials. This means that the aerial is designed so that it does not rest on any object. Resting an aerial on an object, especially at an angle, changes the forces applied and may result in a collapse.
Aerials today are of truss construction, meaning that the top of the beams or handrails are in tension and the base beams are in compression. Resting a nonsupported aerial on an object will reverse these forces, possibly leading to an aerial failure. It is recommended that an aerial be placed with about six to eight inches of clearance over the roof or to whatever platform you’re going to ascend. Always follow your apparatus manufacturer’s recommendations when operating the aerial device.
Being familiar with the parts of an aerial is important. Knowing what the extension cylinder is aids in extending and retracting the fly sections. The lift cylinders lift and lower the aerial; the trunnion is the connection point of the lift cylinders and the aerial device. The aerial has beams, rungs, pulleys, and cables much like a ground ladder. The rotating gear is at the turntable; this is how the aerial rotates 360°. Interlocks hold hydraulic pressure to keep the aerial and outriggers in place.
An overload sensor is installed in the aerial as a safety feature. It senses overload of the aerial from weight based on how the aerial is positioned. Some aerials have the last two or three feet set up as a removable section. If the tip is damaged in any way, this section can be replaced simply by unbolting the old section and bolting on a new one.
If using the aerial as an overhead anchor point, always attach to the aerial itself, not the removable section.
When it comes to emergency power unit operations or operating the aerial or outriggers during failure, always follow the manufacturer’s recommended guidelines. Each manufacturer and each aerial device are different. It is a good idea to have a copy of the operator’s manual onboard the apparatus.
(3) Aerials today are typically “nonsupported,” meaning that the tip does not rest on the objective.
(4) An H-type outrigger is common and usually extends four to five feet from the side of the apparatus.
Outriggers
Today’s aerial trucks generally have three types of outrigger setups: H-style, A-frame style, and straight down. There are pros and cons to all three types. You need to spec them based on the area you serve. If your area has very narrow streets with much on-the-street parking, maybe an A-frame outrigger would be best for your apparatus. These outriggers come down and out from underneath the rig. They are good for tight spaces such as streets with constant parking. They cannot be short-jacked but, with the down-and-out design, they generally do not need to be.
If the area you serve has fairly good room on the streets and limited parking, the H-type might be a good choice. It can be short-jacked but, depending on the apparatus type (tiller vs. straight truck), it may extend four to five feet from the side of the apparatus.
Straight-down outriggers, seen on some types of tower ladders, may be a little more difficult to short-jack when setting up.
When setting outriggers, the aerial operator must make sure the outrigger will not land on a manhole cover or any other street cover that may cause the outrigger to lose its stability or to collapse. Curbs are another obstacle: Crib up the curb so the outrigger plate and outrigger sit flat on the cribbing and curb. Be sure the apparatus is equipped with several pieces of cribbing, typically 4 × 4s or 2 × 4s. If cars are a challenge, make sure you can get the outrigger fully extended on the operating side. This is a must.
Aerials manufactured after the early 1990s have a built-in safety feature that will not allow the aerial to come past the side of the apparatus on the short-jack side. On older aerials, this feature is not built in, so an operator must know the capabilities of the device.
Placing the outriggers between cars or other obstacles is perfectly acceptable. Try to get the nonoperating side outrigger extended as much as possible. Be sure to pin the outrigger (if equipped) after placement. This is a safety feature that will catch the outrigger in case of catastrophic collapse, preventing a complete outrigger collapse. Some apparatus require the pin to be inserted before the boom can be lifted. A good tip for spotting outriggers for a rear-mount or mid-mount apparatus is to make your point of reference a spot on the side of the outrigger cover (some have warning lights) that you can see.
At night, use the outrigger spotlights as a reference; prepoint them toward the ground where your outrigger will land. On tiller-drawn apparatus, use your tillerman, who can see the turntable, the wires, and any other overhead obstructions.
The outrigger level gauge is set up with three colors: green, yellow, and red. Green indicates you can operate the aerial at 100 percent capacity; yellow, 50 percent capacity; and red, the aerial is inoperable based on the level of the turntable. Stay in the green and within 5 percent of incline, which is the industry standard for aerials.
Aerial Positioning
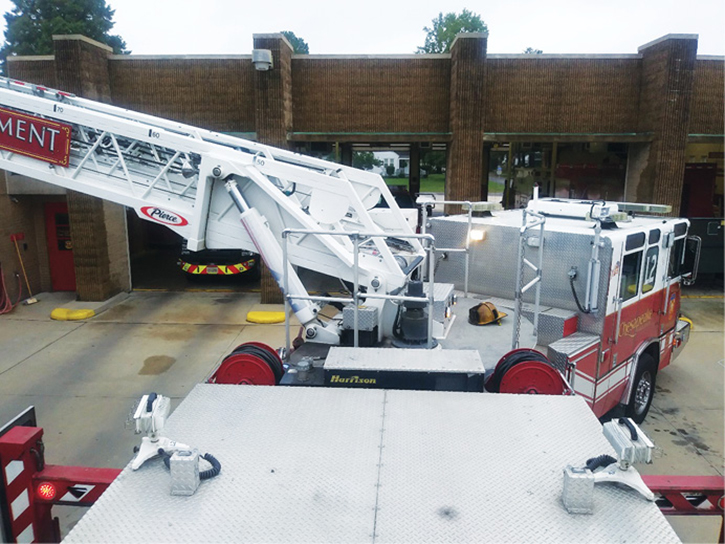
Aerial positioning is somewhat up to the operator’s experience level, skills, and determination. The shape and size of the building and the obstacles encountered (wires, trees, street conditions) will always affect aerial positioning. A good aerial operator will get the aerial up and in position one way or another. Remember, when you pull into the scene, it isn’t so much truck positioning—it’s turntable positioning. You have to pick what is going to work best for the situation—going off the rear or the side of the rig or just driving straight in.
(5) Improve your scrub area by turning the cab away from the structure.
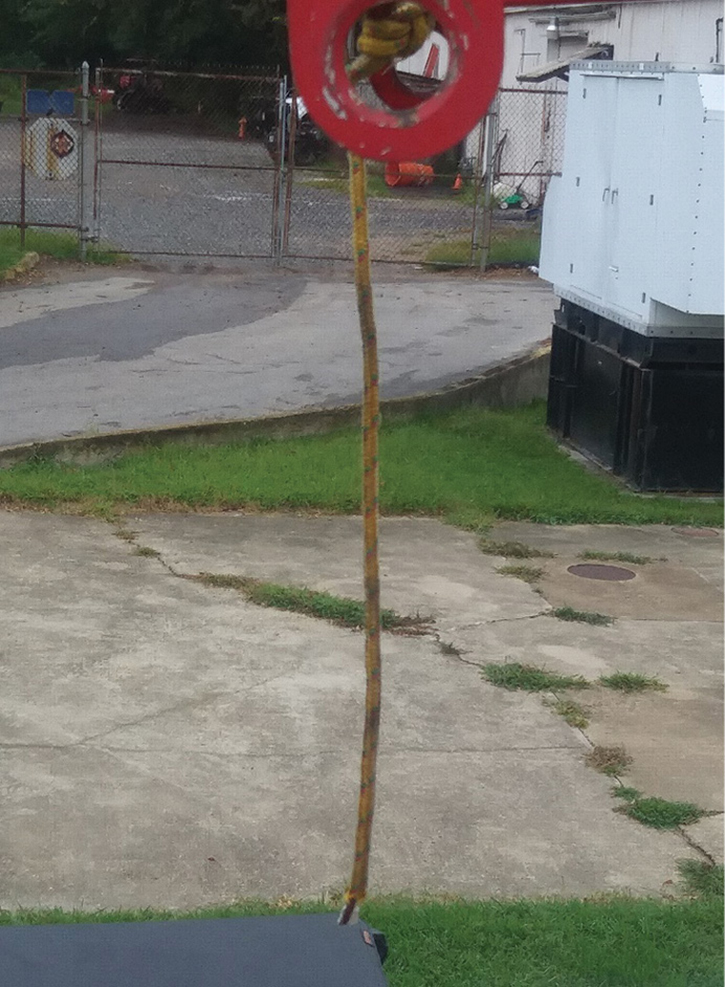
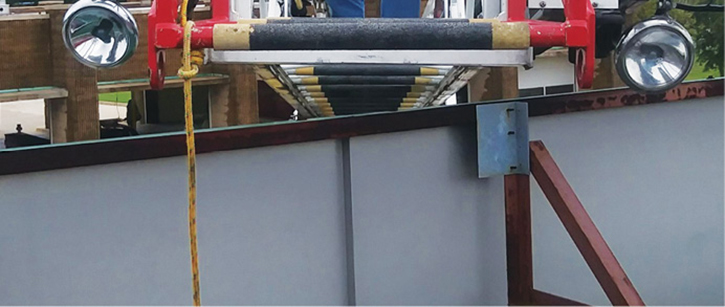
(6) Use a rope (reflective/light colored) to use as a depth gauge when spotting rooflines.
Each fire will determine what you will do, but you must understand what needs to be done. When you operate off the side, you have to improve your scrub area—the overall reach of the aerial based on the position of the apparatus. Place the cab away from the fire building if possible. This will open up your scrub area and will allow the aerial to reach farther toward the cab area of the scene. If the need is to operate off the rear, backing into the scene may be best. Some departments “beach” their aerials—that is, take it off the road, mainly on the grass. If you do this, you must make sure the ground can support the weight and that you keep the aerial within 30° degrees of the front or rear. Coming off the side, although it has been done, places a huge cantilever load on the outrigger and may cause the apparatus to collapse.
If you are dealing with power lines, it is acceptable to go above the lines. If needed, bring the turntable underneath the lines so the aerial can be raised and rotated underneath the lines. Be sure to keep the recommended distance from the lines, which is 10 feet.
Tip Positioning
Aerial tip positioning is not complicated. Again, use some imagination and ingenuity if needed. When placing the aerial at the roof, be sure it is nonsupported (the aerial does not touch the roof). Place it about six to eight inches above the roofline and about five rungs over the roof. A good trick to help with depth perception is to tie a brightly colored 3- to 8-millimeter Prusik cord on the pedestal side of the last rung of the aerial. Once the rope makes contact with the roofline and moves, you know you’re at the roof and need to go only a few rungs farther.
There are several methods for placing the aerial at a window. What works for me is to line up the top of the handrails with the bottom of the window frame and then extend the aerial toward the window. Since the aerial is a bit lower than the widow, it makes transition in and out of the window easier.
At night, using the tip lights to help judge your distance is a good trick. As the lights get tighter on the building, you know that you’re getting closer. When they are at an almost perfect image, you should be right at your target.
When approaching a victim at a window, you may need to reassure and calm the victim. You can use the aerial intercom system (hands free at the aerial tip) to do this. Raise the aerial to above the window; then bring it down and rotate it toward the victim. Victims have been known to jump on the aerial, shock loading it and causing a potential aerial failure.
(7) When placing the aerial at the roof, make sure it doesn’t touch the roof.
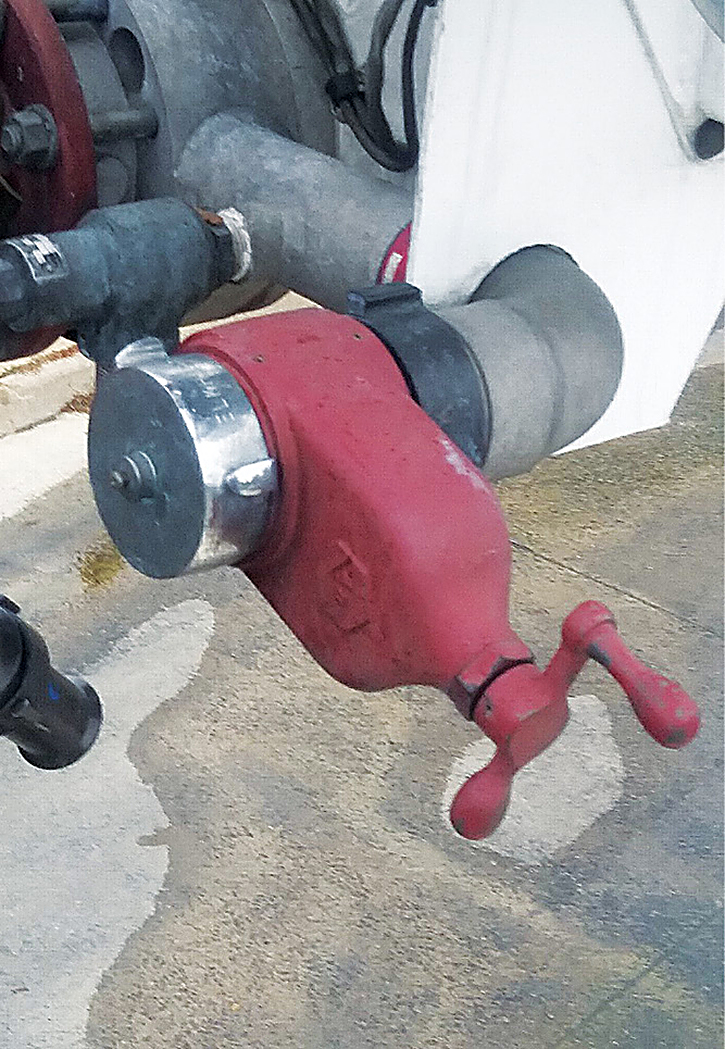
(8) A separate 2½-inch discharge used for elevated standpipes. Make sure you shut off water flow to the ladder pipe before using it.
Some departments ventilate with the aerial; be sure to check wiht the apparatus manufacturer before using this tactic to see if the manufacturer recommends it. You may still have to ascend the aerial to finish the vent to get a complete removal of the glass, shades, curtains, and sash. Be sure nothing is raining down on you from the aerial vent before you ascend the ladder.
There are times when you may have to place the aerial next to the roofline so the members can step over the aerial onto the roof or fire escape. Work out in training how this is going to play out.
Master Stream Operations
When access is not needed, the other most common task is master stream operations. Most aerials are designed with a prepiped waterway, which means that the waterway and the nozzle are already attached and can be placed in position using minimal personnel. Most aerial master streams have a pinnable waterway. This design allows the nozzle to be kept at the tip of the aerial (for master stream operations) or set back one fly section so the nozzle is out of the way of the aerial tip (access or rescue mode). Some aerials also have a 2½-inch discharge next to the nozzle for standpipe operations. It is extremely important that the nozzle be “pinned” prior to charging the master stream. Improperly pinned nozzles have been known to disassemble themselves from the aerial and injure and kill firefighters. This occurred in Pennsylvania in April 2008 when a deputy chief died in the line of duty.
Aerials that are not prepiped must be set up; this takes several firefighters using at least 150 feet of three-inch hose and a removable nozzle. The operation begins moving the aerial out of the cradle and off to the side of the apparatus, clamping the nozzle to the tip of the aerial, running the hose down the aerial, and stretching it down the aerial off to the nonoperating side of the truck. As the aerial goes up, the hose is deployed; the hose is then secured with hose straps, typically one per section.
There’s a lot to being a competent aerial operator besides driving. Understanding the aerial’s capabilities, practicing its use in different scenarios, being creative, and always having the mindset of “I’m going to get the aerial up” all make a great aerial operator. Depending on your department’s standard operating procedures, you may have other tasks to complete such as ground ladder placement, utility control, ventilation, and lighting. Regardless of the skill and capabilities of an aerial operator, ground ladders are fast, lightweight, and easy to raise, so don’t forget about them. Challenge yourself and your crew to practice with the aerial. It may save you or your customer’s life someday.
GREG SELLERS is 28-year veteran of the fire service. He is a career firefighter in the Chesapeake (VA) Fire Department and a volunteer firefighter in the Smithfield (VA) Volunteer Fire Department. He began his fire service career in the Tonawanda (NY) Fire Department. He is an instructor in engine and ladder company operations.

