Today, having an ice rescue/recovery team is no longer exotic. No fewer than 15 to 20 years ago, such teams were few and far between.
In today’s world, thousands of career and volunteer firefighters as well as many emergency medical services (EMS) and law enforcement departments have some sort of surface ice rescue equipment and have sought training from any of the dozens of organizations that provide ice rescue training. It almost goes without saying that training needs to be specific to the equipment your department has and should include hands-on training with more effective equipment when appropriate. Refresher training should begin no later than the middle of November, since it could take a couple of weeks to refresh all members of an ice surface rescue team. Training needs to be as realistic as possible, with thin, unsupportive ice; open water areas; and “weak” mock victims with heavy, sinking legs who will be considered “submerged” if rescuers do not quickly make them sufficiently positively buoyant.
RELATED FIREFIGHTER TRAINING
Throw Back to Basics: Ice Rescue
Ice Rescue: the Leapfrogging Solution
FALL PREPLANNING FOR SAFE ICE RESCUE OPERATIONS, PART 1 | PART 2 | PART 3
Often, just learning how to properly and quickly don any of the different surface ice rescue suits available can be a learning experience in itself. Suits are an important part of rescuer proper personal protective equipment (PPPE) because they protect wearers from environmental elements and often provide the necessary positive buoyancy.
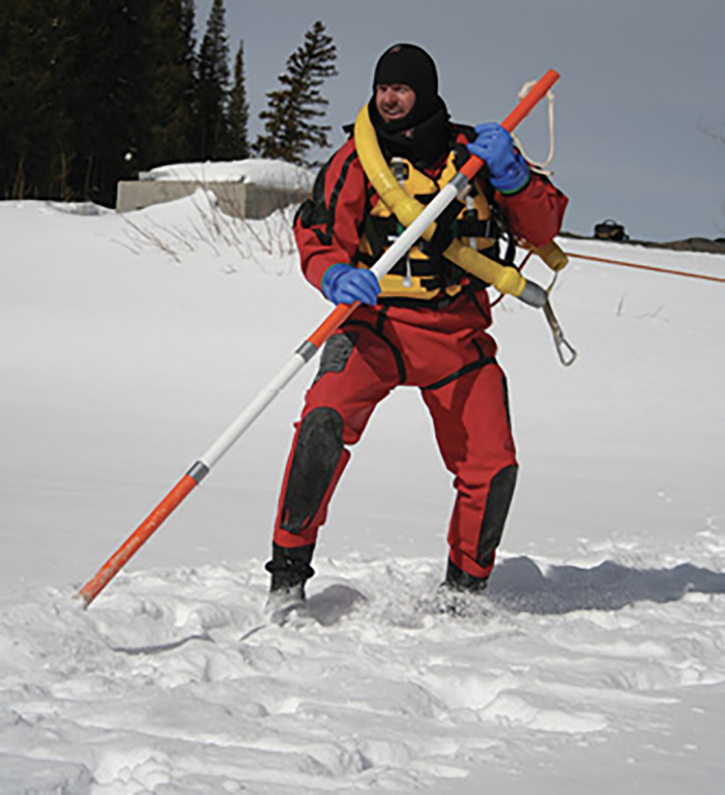
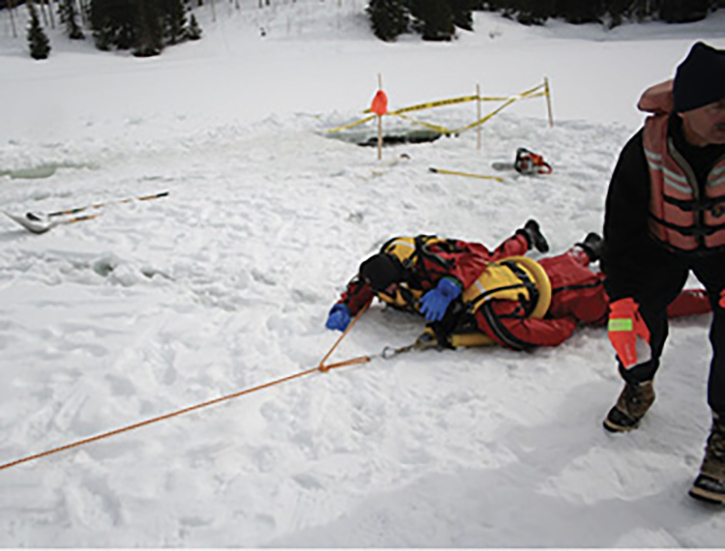
(1) A swiftwater dry suit is shown here with a flotation sling and an ice rescue pole. (Photo courtesy of Chris White.)
Swiftwater vs. Ice Rescue Suits
Some teams purchase swiftwater rescue suits that provide advantages over single-function ice rescue suits (photo 1):
- These suits have a dry suit neck seal to keep wearers dry even when submerged below the neck level, which means these suits can be used for swiftwater and other surface rescue operations in addition to ice rescue.
- Rescuers can pick the type of undergarments they prefer, which means these suits can be used year-round by adjusting the level of undergarment insulation.
- Multiuse results in cost savings if the department has more than one type of aquatic rescue team such as swiftwater, flood rescue, rescue swimmer, and surface ice rescue.
- These suits come in individual sizes, which means every rescuer can have a properly fitting suit. They also can be customized if the off-the-rack sizes won’t work for particular wearers.
- Swiftwater dry suits allow for significantly more mobility with less drag.
- The boot and ankle configuration on swiftwater suits is usually better designed than that on surface ice rescue suits in regard to the use of fins, which can be useful tools even in surface ice rescue operations when the ice is very thin.
- A danger of having only ice rescue suits is that they will be used in non-ice operations where they do not belong.
When choosing between swiftwater and ice rescue suits, consider these disadvantages:
- Swiftwater suits require the addition of personal flotation devices (PFDs), which make the front of the suits less streamlined when rescuers extract themselves out of the water and back onto the ice. An alternative to wearing a PFD over the suit is to wear a separate flotation undergarment designed to meet flotation and insulation standards. That configuration is used in surface ice rescue suits that have shell exteriors as opposed to ice rescue suits made from neoprene.
- Most swiftwater suits do not come with attached dry gloves and hoods; they can be added by a qualified dry suit repair technician. These modifications can significantly increase purchasing costs.
- Depending on the glove, hood, boot, and PFD system used, it can take as much as two minutes longer to dress in swiftwater suits than traditional ice rescue suits.
- Because they come in individual sizes and with neck seals that need to be cut for the wearer, fewer rescuers can share the same suit.
Some of you may be thinking that unlike swiftwater suits, ice rescue suits come with harnesses and that that should be considered an advantage for ice rescue suits. I have not found harnesses on any ice rescue suit to be as effective as an independent water rescue harness. I teach students to remove the harnesses attached to ice rescue suits and use them to anchor tether lines to stationary objects. I use the same harnesses on ice rescue suits and diver dry suits.
Suit size is an important issue. Almost all ice rescue suits are designed to accommodate wearers who are well over 6 feet tall and 250 pounds. Moving around in an ice suit that is too large, whether on the ice or in the water, can be extremely difficult for smaller, lighter rescuers who have an ideal body frame to work on thin ice. When the boots are too large, the wearer’s legs typically float to the surface, making it challenging to control one’s body in the water.
Whether your team has chosen the surface ice rescue suit or the multipurpose swiftwater/flood rescue suit, with the addition of a swiftwater PFD, a critical requirement for ice rescue PPPE is adequate personal flotation—self-protecting buoyancy!
Some teams were taught to wear PFDs over ice rescue suits. This is not necessary if the ice rescue suits provide sufficient personal flotation and it makes the wearer too positively buoyant to effectively move around and work with victims in the water. The bulkiness of the PFD makes it more difficult to get out of ice holes and move on the ice.
Victims
Our victims, who include would-be rescuers who lack PPPE, have punctured through the ice and are immersed in approximately 32°F water (28°F saltwater), causing what I call “the thermal hammer” that can last for about five minutes. The physical shock of that entry changes their heart rates and blood pressure, breathing, and possibly hearing; it can also cause muscle weakness, cramps, and intense pain.
Peripheral vasoconstriction from water pressure (0.5 psi/foot) and cold cause blood to shunt to the core, with resulting significant rises in blood pressure as well as immersion diuresis (urine production). Breathing turns into uncontrolled hyperventilation with rates as high as 60 to 70 breaths per minute and volumes of 60 to 70 liters/minute, with resulting crashing carbon dioxide levels, light-headedness, the inability to think, and sometimes panic. The drop in carbon dioxide levels and peripheral vasoconstriction can cause tetany, muscle cramps, and muscle spasms.< sup>1
Often, victims remove their gloves while attempting to pull themselves out, making matters worse. The frigid cold can create what feels like incredible bone pain. Victims can lose the ability to use their fingers or have any type of a grip within seconds. Attempting to climb out can send a pain through the wrists, forearms, and elbows that makes you feel as if someone has just forced a hot steel rod through your bones.
Victims might just barely be able to hang onto the ice shelf; breathing might be all they can do. Like the rescuers, victims need buoyancy to stay alive: Immediate, independent positive-victim-buoyancy (IIVPB) is critical.
No matter what type of rescue equipment your company has, the victim needs IIVPB that sets the scene so that even if victims become unconscious they can no longer sink and go to the bottom. As long as they stay at the surface, we have a chance of keeping them alive. Once they submerge, they start the process of dying.
As we all know, rescues do not always happen the way we plan. Smooth and flawless are not typical words used postrescue. Often, our victims are at a point where they can just barely continue to hold on and their faces do not look forward to another submerging event.
Just think of how tired and fatigued the average rescuer is at the time he reaches a victim whether victims are 50 or 500 feet from shore. Once we have incorporated the leapfrog technique, in which we replace would-be rescuers en route to the victim without losing ground, we have improved the rescue ability and reduced the severe fatigue of the would-be rescuer. However, until the victim has physically been removed from the water, there is a constant chance he can go to the bottom if IIVPB has not been successfully established.
Additionally, as is discussed in greater detail below, without IIVPB, rescuers are put at greater risk because they have to manage negatively buoyant victims from the time they make physical contact with the victims to the time the victims are fully on shore.
All victims require IIVPB! Let’s take a look at what that means and how to establish it.
Establishing IIVPB
IIVPB ensures that except in extreme moving water ice conditions, our victim has little or no chance of going to the bottom, even if reimmersed into the water. IIVPB means your victim is capable of floating at the surface independently from the rescuer. The device providing the IIVPB must be snug enough for the victim to breathe but not loose enough to slide through. Once IIVPB is established, it allows rescuers time to catch their breath, mentally relax, and plan the next move—the extraction process from the ice trap.
Immediate
From the moment the rescuer makes physical contact with the victim, IIVPB should be smoothly, gently, and fully established in less than 10 seconds. When properly trained, most rescuers can successfully complete this task in less than seven.
It is crucial to keep the victim on the surface during these crucial 10 seconds for several reasons.
- The more quickly you make the first victim buoyant, the less the risk that the victim will submerge and the more quickly a rescuer can get to other victims during multivictim operations.
- Victims might “give in” a bit once rescuers make physical contact because they feel that they are saved, so they might lose some of the adrenaline keeping them at the surface and holding onto the ice shelf.
- If rescuers reach victims prior to the victims’ losing their strength, victims can grab onto rescuers if they don’t feel fully supported at the surface.
- The ice shelf keeping the victim on the surface could break. Therefore, if ice rescue transport devices, such as sleds, are not available, approach from the victim’s side to maintain eye contact, maintain verbal and visual communication, and decrease the chance of breaking the ice in front of the victim onto which the victim is holding. Rear approaches are not recommended.
Independent
The buoyancy should keep the victim on the surface without any further interaction or support from rescuers. Victims need to be independently buoyant from their rescuers so that rescuers can attend to additional victims sharing the same ice hole or in other locations; decrease the chance that the victim will grab onto or climb on top of a rescuer or another victim; and decrease the chance of breaking ice by spreading apart the location and, therefore, the weight of rescuers and victims. Victims should not be able to slide out of IIVPD devices even when they lose consciousness so that rescuers won’t be task loaded by trying to keep an unresponsive person from sinking.

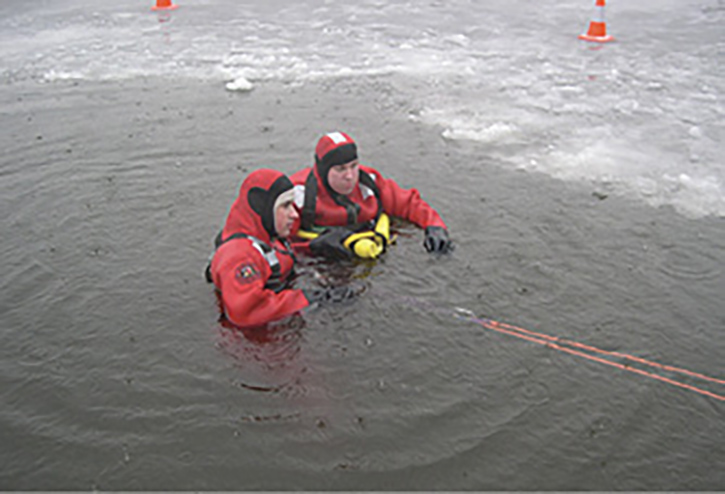
(2) IIVPB needs to support a realistically weak, negatively buoyant victim even when the ice gives way. Test your IIVPB gear in warm water with mock victims who are not wearing any buoyancy and who are too weak to support themselves.
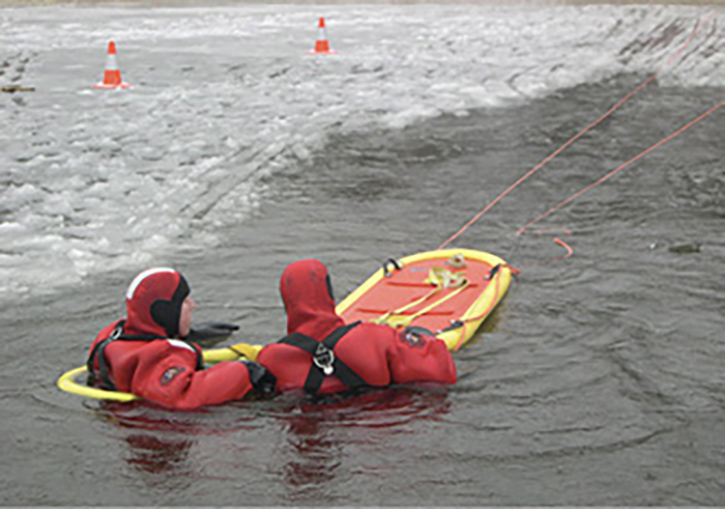
(3) Once IIVPB has been established, the next step is to transport the victim safely and gently back to shore. (Photos 2-3 by Andrea Zaferes.)
The rescuer getting behind the victim is a dangerous technique. Still today, some teams are taught an outdated and less than safe or effective technique in which a rescuer gets behind the victim; wraps the rescuer’s tether line around the victim; and secures it with a large, heavy, metal carabiner. The rescuer and victim are now hooked together, and the victim has no other buoyancy than the rescuer’s suit. There are numerous problems with this technique, which does not provide any independent buoyancy to the victim.
First, rescuers should never secure themselves to victims unless there is no alternative. If there is no alternative, which is not true in the case of surface ice rescue, then a quick-release mechanism should be built into the system so that rescuers can rapidly disconnect from victims as needed. Without independent positive buoyancy, any disconnect or letting go of the victim has a high risk for victim submergence and possible drowning.
Next, ice rescue and swiftwater suits with PFDs are designed to hold up only the single wearer. They are not designed to hold up a rescuer and a negatively buoyant victim. Additionally, the heavy metal carabiner increases the victim’s negative buoyancy.
The position of the rescuer to the now attached victim severely restricts the rescuer’s ability to move to more effective and safe positions and locations. It is more challenging to get a realistically negatively buoyant victim safely out of a realistically thin ice hole when the rescuer is “tied” to the victim with the rescuer’s tether line.
Safety concerns and points for failure. Approaching and grabbing a victim from behind presents a number of safety concerns and points for failure. It is not unlikely that realistically negatively buoyant victims who are being grabbed from behind by rescuers wearing awkward ice rescue suits will be accidentally pulled away from the slippery ice shelf onto which they are struggling to hold.
Imagine being in a life-and-death experience. Now imagine being grabbed and “manhandled” from behind by someone wearing a cumbersome suit and thick gloves. Even if the person grabbing you is attempting to communicate verbally, close your eyes and think about how that would make you feel, and visualize your physical response. What are the chances stress will increase and you will try to turn around to face the rescuer?
A rear approach almost always puts the rescuer in the ice hole with the victim. This means now the rescuer also has to get out of the hole and puts the rescuer in a less-than-optimal position to assist the victim back onto the ice.
A rear approach means the victim cannot be asked to gently raise his legs and kick his feet to get in the horizontal position that is necessary to get out of the hole. Reaching down and raising the victim’s legs, as is taught with this rear approach technique, does not work well with realistic victims who have their legs down or even up under the ice.
The technique of wrapping the tether line around the victim and securing it with the carabiner has too high of a failure rate. The “raise the victims’ legs and push them onto the ice” part of this procedure means rescuers are risking the victims’ faces becoming submerged without being in a physical position to do anything about that.
There are additional problems involving the rigging and what happens when shore takes tension and tries to assist pulling the tether line to get both the victim and rescuer out of the hole and back onto more supportive ice.
The reason this technique is being taught by so many instructors is that it is not performed realistically. There is no expectation that a negatively buoyant victim may not be able to follow simple commands. This technique is not designed for realistic thin, unsupportive ice. Nor does it consider weak or unresponsive victims. Real victims do not wear ice rescue suits, as do the mock victims used in training. Real victims might not be able to assist or pick their airways out of the water. Dogs, kids, and even adults do not fall through ice on which instructors and students safely walk. Any time you learn a new technique, ask yourself, What can go wrong in realistic conditions with realistic victims?
Positive
For victims, positive means sufficient positive buoyancy such that their heads, particularly their faces/airways, are guaranteed to be maintained above the water when they are extracted from ice holes and during transport to shore. If victims lose consciousness, their airways should be able to rest on the buoyancy device to keep their airways above the water.
Positive for rescuers means the guarantee that they are buoyant enough to move comfortably at the surface and have enough positive buoyancy to support their heads and necks, plus an additional 12 pounds.
Victim buoyancy devices (slings). If we shouldn’t use rescuer suits for victim buoyancy, what should we use? There are several types of commercially manufactured, buoyant flotation sling devices available for the ice rescue toolbox. The key is to purchase units with sufficient positive buoyancy that are simple to use while wearing awkward gloves and that do not in any way require the rescuer to use a downward force on the victim while securing it to the victim. The sling should not be too thick to prevent the rescuer from manipulating it with one hand, even if the rescuer has small hands. It should not be too stiff so that a small victim could slip out of it.
In almost every class, I hear students say, “I could build one of these out of a pool noodle” when we start working with flotation slings. It is not recommended to build your own tool if the functioning of that tool plays a significant role in keeping someone alive. If the tool fails, then who is responsible and liable? Even more importantly, if the tool fails because it was not properly built and tested, someone can be injured or even killed.
All too often, we see poor skill levels in the application of donning slings on victims. The main error is that when victims are realistically negatively buoyant and weak, their faces, and sometimes their entire upper bodies, end up being submerged while slings are being applied.
Things can change in split seconds during an ice rescue; hence, as we look at how we properly use the sling, we need to look at several training issues.
Because real victims are not wearing flotation suits or PFDs, victims are much more fragile and difficult to work with in the real world than they are in standard training scenarios. Therefore, you may want to do some training in a pool or a warm water environment where the mock victims wear nothing more than standard clothing. However, rescuers should be encapsulated in their standard ice rescue PPPE so they have to work with the thick gloves and the challenges presented by the suits.
Real victims may not be capable of helping themselves or rescuers. So, in this warm water training, use mock victims that are comfortable sinking below the surface or having their airways submerged for periods of time so that rescuers can learn how to keep the airways of realistic victims dry.
Preventing the victim from submerging. The key here is that during the process of establishing IIVPB, the victims are most likely holding onto the edge of the ice to maintain support and keep themselves at the surface. Hence, from the moment of contact, the rescuer must ensure that the victim will not submerge. The technique used to apply the sling to victims must involve upward movements so that downward forces are never applied on the victims.
Keeping victims’ faces out of the water is imperative. Aspirating, or inhaling water, can cause a cascading series of problems. The skill of applying the sling to an ice victim requires redundant training under a critical eye. Creating an artificial hole and ice can be done in several ways such as with a partially inflated firehose wrapped in a circle.
Key components of maneuver. Let’s look at five key components to making this life-saving maneuver work smoothly every time.
1. As you approach the victims, continue the strong, confident, positive communication. Tell the victims to stay where they are holding onto the ice and to not let go. Just prior to physical contact, rescuers must do everything in their power to not break ice between them and the victim.
Note: Understand that victims are visually focused on you. If you are going to use the less-than-recommended technique of coming around from behind them, you may need to repeatedly tell them to hold onto the ice and to continue to look forward. The idea of approaching from the rear may sound great; but, realistically, the moment the victims know you are there, they will attempt to change position to make visual contact.
2. As you grab the victim’s wrist, pull the victim slightly toward you against the ice shelf if it still exists and keep hisr head above water.
Note: Telling victims to kick is not enough: Their legs are more often than not heavy and hanging below them. With shoes or boots, kicking can be an exhausting event with little or no benefit. They need to be told to bring their legs up and then kick gently. Kicking with their legs pointing to the bottom can begin a downward or sinking motion.
3. From the beginning of contact, the motion must be forward (toward the rescuer) and gently upward. In applying the flotation, the victim must never feel a downward force. Physical contact must be maintained throughout the rescue process, until the victims can remain at the surface with the aid of the flotation by themselves.
Note: Advise victims of what you are doing and why. Some may be capable of assisting in this process. They can help to put their arms through the unit and in a proper position. They cannot, and should not, be trusted to make a snug enough fit so that they can still breathe but not slide out of the buoyant sling.
4. For the most part, the average team plans on a single victim; in reality, this may not be a fact. Triaging which victim to make contact with first is more often than not the job of the contact rescuer. In such cases, verbal communication and explanation of what you are doing become imperative. The following steps are from the TeamLGS Ice Rescue Procedures.
- Tender, put the sling over your power (dominant) arm.
- Grab the victim’s wrist with your power hand (tech-victim arm: right-right or left-left) while telling the victim what you are going to do.
- Grab the lower ball of the sling with your weak hand.
- Pull the sling’s “carabiner” forward and upward with the weak hand while reaching under the sling with the strong hand to pull the self-fastening strap down, across, and then around the sling to lock the victim’s chest tightly in the sling.
- Use your weak hand to gently slide the sling, “balls down,” horizontally under the victim’s arm. Stop when your hand reaches the victim’s armpit.
- If the victim cannot assist by putting the other arm through the sling, use your strong hand to follow the victim’s body to the victim’s other wrist and pull that arm up through the sling.
- Gently flip the top of the sling over the victim’s head. Then, properly hold the “carabiner” in your weak hand.
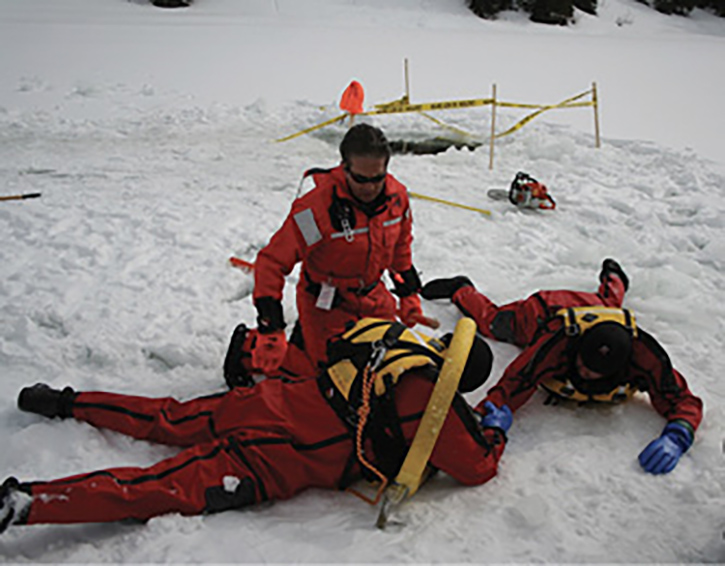
(4) Applying the sling to the victim.
(5) Connecting victim and rescuer. (Photos 4-5 courtesy of Chris White.)
Note: Average ice rescue victims are not a physical threat. These victims often are not even capable of closing their hands to make a physical grip. They want to be saved!
In training sessions, we sometimes find that the would-be victim in fully encapsulated PPE and adequate flotation may elect to harass the would-be rescuer; hence, we begin the program by stating that a frozen cold, nearly incapacitated ice rescue victim is not typically a direct a major threat to our personal safety. This statement does not reject the concept that an ice rescue victim could be a threat to the would-be rescuer; however, this is not the norm.
5. Once the would-be rescuer has established independent positive buoyancy, the rescue can slow down a little. The rescuer can now take a few seconds to think about each of the next steps: ensuring the rescuer’s safety, catching his breath, and applying the most effective and safest extraction process possible—preferably as per training!
No matter how realistic the training, we can never prepare totally for the anxiety of the real contact rescue when a life hangs in the balance.
Reference
1. Parasa, M, Saheb, SM, Vemuri, NN. Cramps and tingling: A diagnostic conundrum. Anesth Essays Res. 2014 May-Aug; 8(2): 247–249.
WALT HENDRICK has taught thousands of police, fire, and military divers and water rescuers worldwide how to recover submerged bodies and evidence for more than 55 years. He created the first Rescue Diver certification and a number of public safety diver and surface water rescue programs. Through his company TeamLGS, he trains U.S. Coast Guard ice rescue instructor trainers. He is the co-author of Surface Ice Rescue (Fire Engineering Books). He has been a pro bono speaker at more than 150 SAR and dive conferences and has been published 150 times. He, with Andrea Zaferes, initiated Aquatic Death and Homicidal Drowning Investigation training programs and procedures in the mid-1990s and continues consulting on cases nationwide. He invented numerous procedures used in ice and water rescue. In 1998, he started RIPTIDE, a nonprofit organization dedicated to preventing drowning among public safety personnel, the recovery of drowning victims, and assistance with homicidal drowning and aquatic abuse investigations and research. He has been the recipient of numerous awards and honors, among them the first Divers Alert Network-Rolex Diver of the Year, Beneath the Sea Diver of the Year for safety and education, and the NAUI Diver Hall of Fame.

