By Dave Donohue
The ability to understand and apply the concepts of chemical and physical properties is critical to ensuring responder safety and selecting appropriate strategies and tactics at hazardous materials incidents. These basic concepts provide the basis for selecting protective equipment, determining the potential area of harm, and determining actions that you can take for offensive and defensive mitigation of the incident. The introduction of a practical demonstration lab at the operations and technician level allows responders to see and apply chemical and physical properties in action and examine their impact on decision making. This article will provide training officers and hazardous materials instructors a series of demonstration models that can improve knowledge retention and expand understanding at minimal cost.
When conducting these experiments, consider safety at all times. This includes wearing appropriate personal protective equipment, ensuring adequate ventilation, having emergency response equipment available, making sure that trainees are kept at a safe distance, and limiting the size and scope of demonstrations.
Demonstration 1: Vapor Pressure
Materials needed: > Two four-inch diameter aluminum pans
> Water
> Acetone based nail polish remover
> Pipette (1cc)
> Paper towel
Using the pipette, draw up one (1) cc of water and place in the first aluminum pan. Repeat the action using water and place the water in the second pan. While discussing the property of vapor pressure, allow the materials to vaporize. At the conclusion of the discussion, turn the pans over and allow their contents to pour on to the paper towel. The water should roll out while the nail polish remover should be evaporated.
Discussion Points
The ability of the hazards of a material to spread from the point of origin is related to the vapor pressure of the material. In other words, vapor pressure is the force a material exerts against air to move to a vapor state; i.e., how quickly a material evaporates. At sea level, air exerts a force of 760 millimeters of Mercury (mm/Hg), or one atmosphere of pressure (ATM). Any material with a vapor pressure greater than 760 mm/Hg or 1 ATM will be in a gaseous state at sea level and normal temperatures. Materials with a vapor pressure of less than 10 mm/Hg give off so few vapors that they are essentially not evaporating. Materials with vapor pressures of between 10 and 759 mm/Hg are actively entering the vapor state, with those with higher vapor pressures becoming gases quicker than those with low vapor pressures.
For example, water has a vapor pressure of around 25 mm/Hg, while acetone-based nail polish remover has a vapor pressure around 180 mm/Hg.
Understanding this concept is critical to understanding how the threat of hazards spread from point of origin and impacts oxygen concentration, flammable range, and toxicity as the material diffuses from an area of high concentration to areas of lower concentration.
Demonstration 2: Expansion Ratio
Materials needed: > One-inch piece of dry ice
> Empty 16-ounce empty water bottle
> Balloon
> Tongs or gloves
> Oxygen meter, optional
Using the tongs or gloves to avoid skin contact, place the piece of dry ice in the water bottle. You can add a small amount (2–4 cc) of water to speed the demonstration time. After placing the dry ice in the bottle, cover the neck of the bottle with the balloon. As you discuss expansion ratio, the dry ice will be vaporizing, and the balloon will expand to absorb the carbon dioxide gas. If you have an oxygen meter with probe available, you can test the air in the bottle and the balloon before and after the experiment to demonstrate the displacement of air by the carbon dioxide gas.
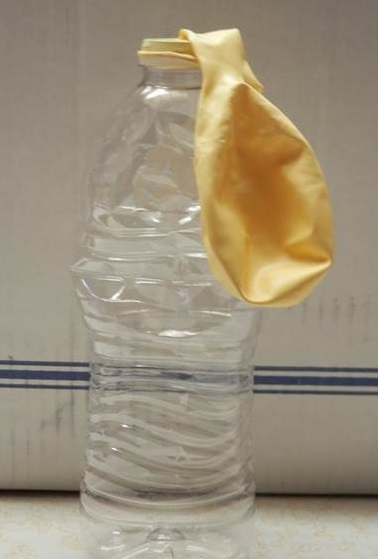
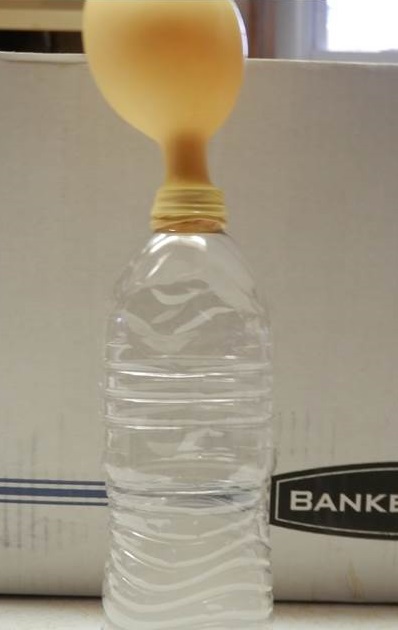
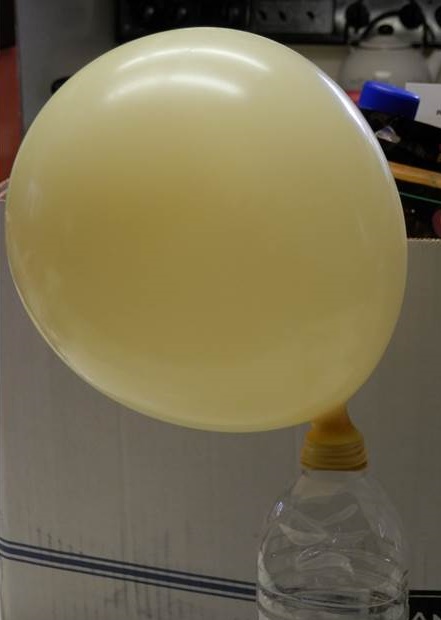
(1, left) Balloon in place over an empty bottle. Add less than one ounce of dry ice. As it moves to the vapor state, it will expand dramatically and fill up the balloon. (Photos by author.) (2, center) Fifteen seconds after dry ice is added. Note the discoloration in the bottle. The vapor is frozen water vapor from the air, not carbon dioxide vapors. (3, right) Three minutes after dry ice is added.
Discussion Points
Materials are often compressed or cooled to minimize the space needed to store the material. For example, breathing air cylinders use compression to store more air within the container. Liquefied petroleum gas (LPG) is compressed to such a degree that it is turned from a gas into a liquid in the cylinder, and carbon dioxide is cooled and becomes a solid. Expansion ratios vary from material to material, but the key concept is that solids, liquids, and gases may expand to inhabit a much larger area than their original container. For example, LPG has an expansion of ratio of 270. This means that one cubic foot of LPG liquid will fill an area 270 times larger with propane and will bring an area more than 4,500 cubic feet into the explosive range.
Demonstration 3: Oxygen Concentration and Vapor Density
Materials needed: > Approximately three ounces of dry ice
> Four-inch aluminum pie pan
> 4 to 6 votive or tea candles
> Lighter
> Gloves or tongs
> Two- to three-inch high cup
> Water (optional)
> Oxygen meter (optional)
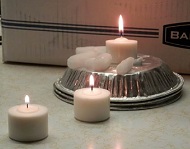
Place the cup upside down on the demonstration table and place a candle on top. Next to the cup, place the aluminum pan upside down and place a candle on the pan. In close proximity to the pan, place the remaining candles. Use the lighter to light the candles.
Using tongs or gloves, place the dry ice on the aluminum pie plan near the candles. You may add a little water to speed up the reaction. The vapors you will see are not carbon dioxide but water vapor. The candles that are below the level of the dry ice should diminish and possibly go out as the oxygen concentration goes down. If you have an oxygen meter, you will be able to demonstrate the fluctuations in oxygen far beyond the visible water vapor. The candle on the cup should be unaffected by the carbon dioxide.
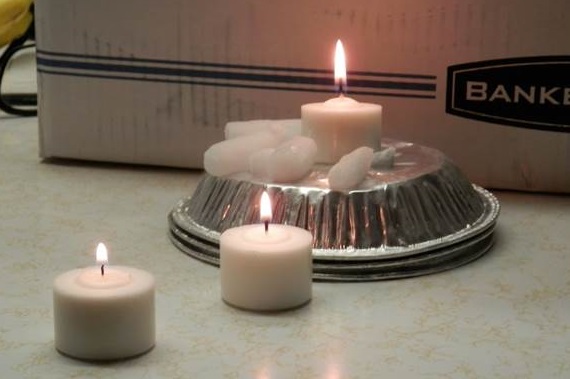
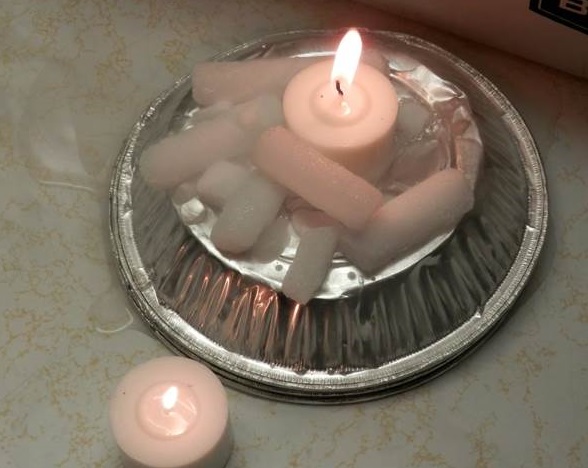
(4, 5) Carbon dioxide vapors are heavier than air. As they move to the vapor state, they will spread out and displace oxygen, causing the candles to go out.
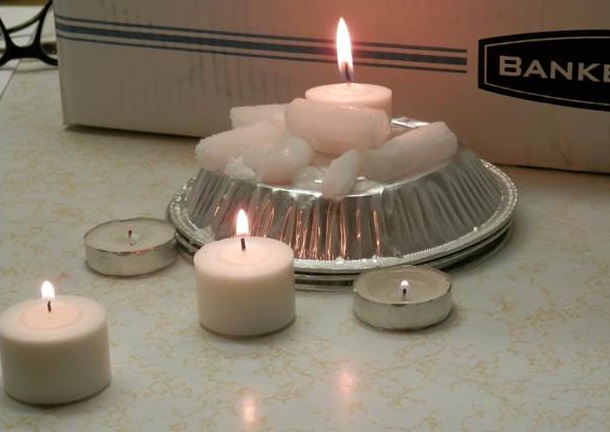
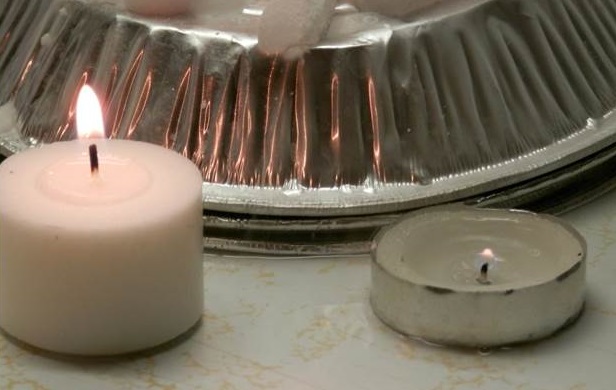
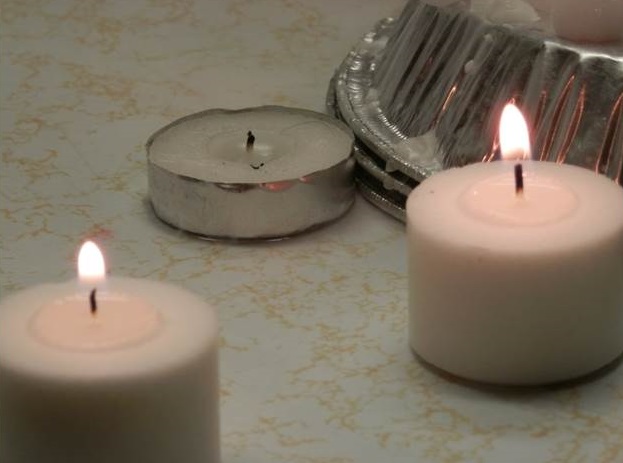
(6-8) Note how the lowest candles are flickering and going out.
Discussion Points
Most gases and the vapors from all liquids are heavier than air and have a vapor density—or relative gas density—of greater than one. As a result, they tend to sink and move to low points. Unfortunately, we are land animals and are attached to the low points. So, we are in the area where most gases and vapors will accumulate. The hazards the vapors possess such as toxicity, flammability, or air displacement will impact us.
If your department uses meters that measure oxygen concentration, discuss the impact of a change in oxygen concentration. Generally, a change in oxygen concentration of .1 percent indicates that .5 percent [or 5,000 parts per million (ppm)] of the air has been changed. From a street responder perspective, air is roughly one part oxygen and four parts nitrogen. Oxygen meters measure only the oxygen portion of air. However, as air is a mixture, the concentration of oxygen in the air cannot be changed without changing an equal amount of the nitrogen in the air. So, changing .1 percent of the oxygen in the air means that .4 percent of the nitrogen has been changed (unless nitrogen is being added to the air). Note that one percent is equal to 10,000 ppm.
Demonstration 4: Flammable Range
Materials needed: > Flash chamber
> Lighter (long)
> Acetone-based nail polish remover
> Pipette
> Safety glasses
> Gloves
> Combustible gas indicator
In increments of 10–15 drops, place nail polish remover in the flash chamber. Afterward, place the lid on the chamber in an unsecure fashion. Safety Note: The lid must be able to move freely, releasing energy, on ignition.
While wearing safety goggles and gloves, introduce a flame to the atmosphere through the pilot hole. It is likely that there will not be ignition the first time this is demonstrated. If ignition does not occur, repeat the presentation while continuing the discussion on flammable range. The intent of this demonstration is to move into the bottom end of the flammable range, thereby limiting the amount of material ignited and the size of the demonstration. If a combustible gas indicator is available, take readings before and after each attempt at ignition.
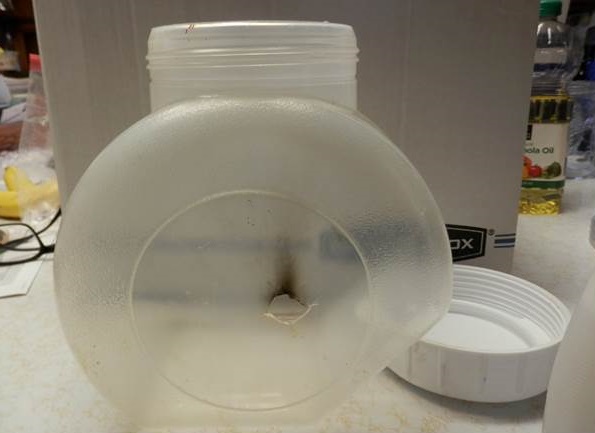
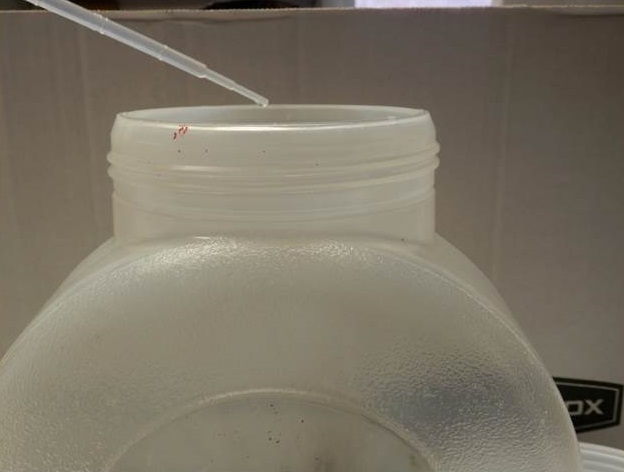
(9, 10) Less than 10 cc of acetone will be added to this container and the lid placed on (upside down).

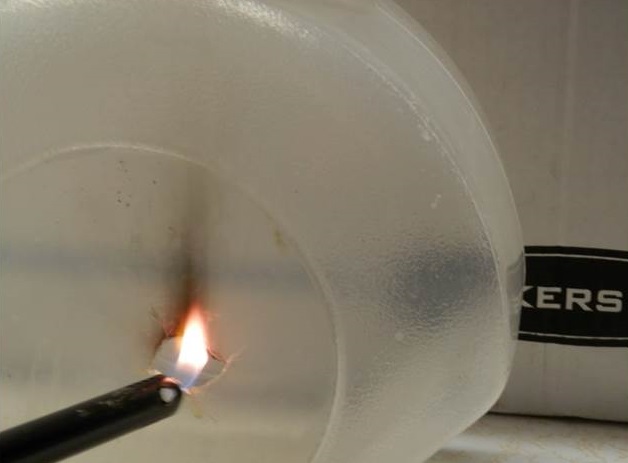
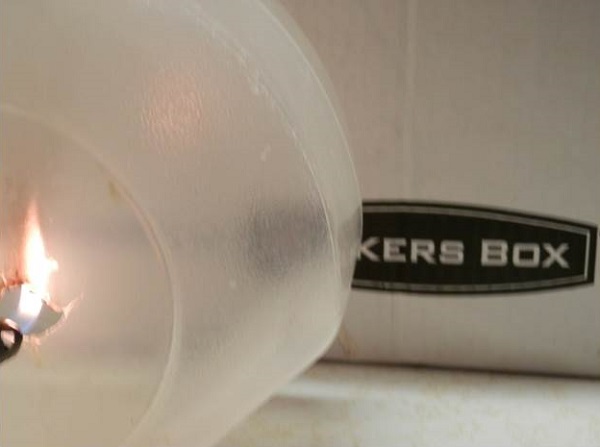
(11-13) As a flash is introduced, the vapors will readily ignite, blowing the lid off. Note the near clear flame inside the chamber above the ignition source.
Discussion Points
You will likely not achieve the flammable range following the first round. If this occurs, discuss with the class the concept of flammable range and the areas above and below the range. Trainees should also review the flammable range of several materials, including acetone, to recognize that flammable ranges are specific to the material. When the demonstration is successful, as demonstrated by a flash, there will likely be material remaining within the flash chamber.
Query the trainees as to why material remains as the vapors fell back below the flammable range. For further discussion, ask the students if, given a scenario with a flammable range reading that is above the flammable range, what hazards exist and why. If you are using a combustible gas indicator, discuss the limitations of the meter and how the meter readings related to the demonstration and ignition. Review vapor density and how vapors from liquids tend to sink.
Demonstration 5: Specific Gravity
Materials needed: > Mason Jar
> Liquid automatic dishwasher detergent
> Isopropyl alcohol
> Food coloring (optional)
> Vegetable oil
> Water
Fill a mason jar approximately 1/3 of the way up with water. After adding several drops of food coloring to the bottle, gently pour isopropyl alcohol into the jar until the jar is approximately half full. The materials will readily mix because of the polarity of the alcohol. Next, gently pour the dishwashing liquid into the jar until the liquid level if approximately two-thirds full. The dishwashing liquid should sink, as it has a specific gravity of less than 1 (>1). Finally, gently add the vegetable oil to the jar. As vegetable oil has a specific gravity <1, the liquid will float.
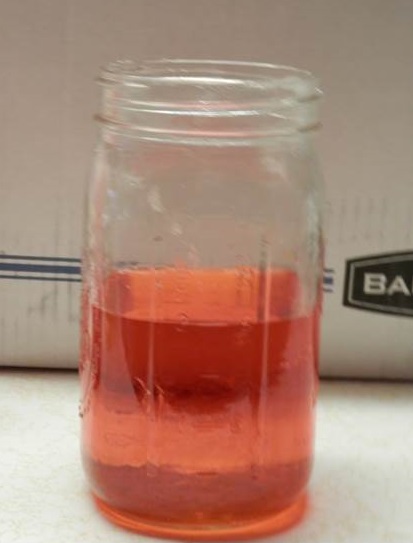
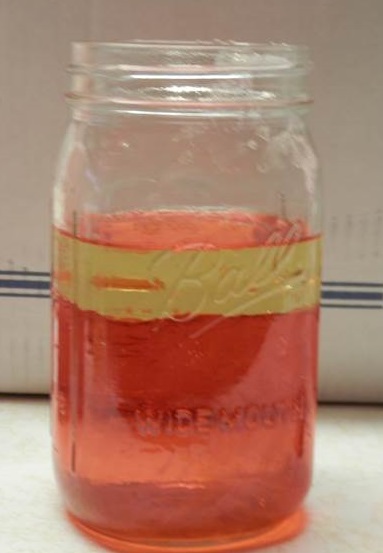
(14, left) Water mixed with dyed rubbing alcohol. Rubbing (isopropyl) alcohol is polar (has a positive and negative end) like water, so it is miscible with water. (15, right) Vegetable oil is added to the mix. Vegetable oil is non-polar and lighter than water, so it floats above the water column.
Discussion Points
Some liquids, like water, have a positive and negative end. As a result, they will readily mix. From a responder standpoint, alcohol-based fuels are polar. Consequently, they mix with water. If foam is used during firefighting operations involving polar solvents, water will be drawn out of the foam, making foam operations less effective. When responding to a polar solvent that has spilled in the water, separating the material from the water will be difficult, if not impossible. It will also be impossible to construct dams which trap product and allow water to continue downstream.
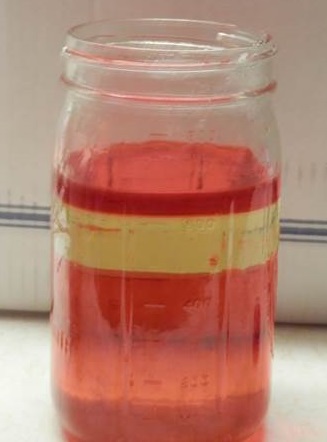
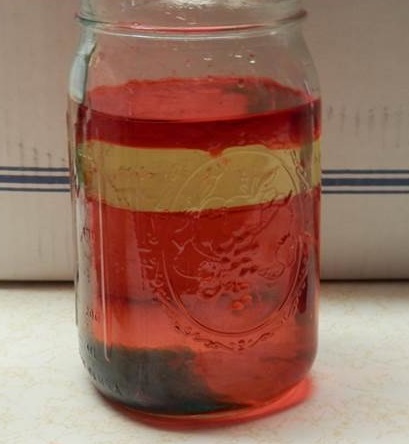
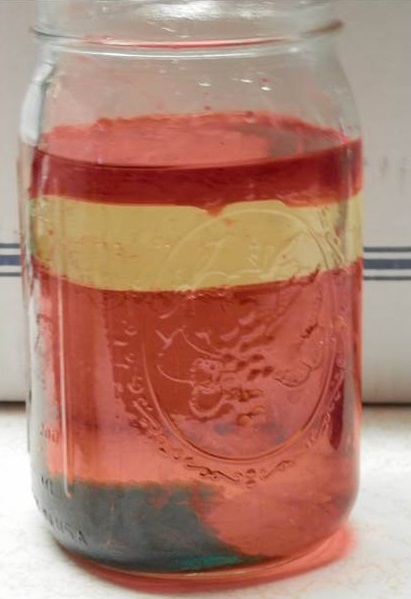
(16, left) Rubbing alcohol floats on a layer of vegetable oil. Polar and non-polar solvents do not mix. (17, center) Isopropyl alcohol floating on the vegetable oil and dish washing soap added to the mix. Dish washing soap is heavier than water, so it will sink in the water if added slowly. (18, right) Closer view of the dish soap sinking in water.
Liquids that are not polar will sink or rise based on their molecular weight when compared to water. Those with a molecular weight less than water will rise, and those materials heavier than water will sink. Specific gravity is calculated by dividing the density of a material by the density of water (1gm/ml). If the result is less than 1, the material will float.
Demonstration 6: BLEVE/Container Failure
Materials needed: > Two paper cups
> Tea/votive candle
> Lighter
> Water
> Gloves
> Stopwatch
> Two balloons
After lighting the candle, begin the stopwatch and hold the empty cup approximately two inches over the flame. When the cup begins to smolder, remove the cup from the flame. Stop the time when the cup is removed from the flame. Add water to a similar cup and repeat the experiment. (It is possible to boil water in the paper cup.)
Fill one balloon with air and another with water. Repeat the experiment above. Note: Invest in good quality balloons and practice this before demonstrating to ensure that the balloon with water in it will not fail.
Discussion Points
Heat contact with a container will weaken the container and can cause a container to fail violently. Liquids within a container have the ability to absorb some of the heat delaying damage to the container. As long as the container is able to release the heat energy through a relief valve, failure of the container may be delayed. Examples would include boiling water. Discuss the impact placing a lid has on boiling liquids and how the lid reacts when the liquid is boiling.
Demonstration 7: Oxidizing Reactions
Materials needed: > HTH (powder preferred)
> DOT #3 Brake fluid
> Four-inch aluminum pan
> Plastic table spoon
> Medicine cup, such as one used for cold medicine
> Thermal imaging camera (TIC) (optional)
Safety Note: Conduct this experiment in an area with adequate ventilation such as a ventilated hood system or outdoors; it will release harmful vapors.
In a safe, well-ventilated area, place one to two tablespoons of HTH in the aluminum pan. Add one cup-full of DOT #3 brake fluid. Next, step to a safe location. The reaction will take place within several minutes and will be indicated by discoloration of the HTH and liquid, followed by boiling liquid, charring of the HTH, and the release of harmful vapors.
Discussion Points
The HTH is releasing chlorine in the presence of the brake fluid. This results in the oxidation of the brake fluid and releasing of heat and vapors. Oxidizers speed reactions and can make normally stable materials unstable. If using a TIC, the heat reaction can be seen as the materials interact and will be present before other indicators are present.
Demonstration 8: TIC Use
Materials needed: > Three empty water bottles covered with paper or painted
> Cool water
> Two 10-inch aluminum pans
> Vegetable oil
> Pipette
> Baking Soda
> Vinegar
> pH paper (optional)
> Plastic tablespoon
Begin by placing different levels of water in each water bottle, and then cap the bottles and set them aside. Next, place water in the aluminum pan. Add six to 10 drops of vegetable oil in the pan. Using the TIC, identify the location of the drops of oil.
Next, identify the liquid levels of the water in the bottles. Finally, using the tablespoon, add an equal amount of baking soda and vinegar together in an aluminum pan. Using the TIC, watch the reaction and the temperature change. If available, use pH paper to identify the pH of the vinegar, wetted baking soda, and the mixture in the pan.
Discussion Points
The TIC identifies temperature variations. Materials in containers will absorb heat to which the container is exposed. This will result in a temperature variation between the liquid and gas areas within a container holding liquids. Using a TIC can provide an estimation of the approximate volume of a container.
Spills in water will likely be at different temperature than the water and may be visible to TICs even when they cannot be easily seen by the naked eye.
Final Thoughts
Using chemical demonstrations to enhance the learning environment is not without hazard, and safety considerations should always be foremost in the learning environment. The demonstrations listed are designed to provide small demonstrations of the specific chemical and physical properties and are designed to enhance retention of response concepts. When considering including demonstration experiments, the desired outcome and safety must balance and justify the demonstration.
Following are some resources you should review when considering, and prior to, conducting practical demonstration:
- National Science Teachers Association (www.nsta.org).
- National Fire Protection Association (NFPA) Lab Safety Tip Sheet.
- U.S. Chemical Safety and Hazard Investigation Board “Key Lessons for Preventing Incidents from Flammable Chemicals in Education Demonstrations” (www.csb.gov/assets/1/19/Lab_Safety_Bulletin_2014-10-30.pdf).
- NFPA 45, Fire Protection for Laboratories Using Chemicals.
- NFPA journal “Unsafe Science” (www.nfpa.org/newsandpublications/nfpa-journal/2015/september-october-2015/features/unsafe-science).
- American Chemical Society (www.acs.org).
Special thanks to Boca Raton (FL) Fire Rescue Services Chief Tom Wood for introducing me to the idea of chemical and physical properties demonstrations. Although the demonstrations tended to be robust, they provided me insight to the concepts and started me on the path to find additional demonstrations that I could use at the operations level.
Dave Donohue is a member of the Washington County (MD) and Cumberland County (PA) Hazardous Materials Teams. He has more than 35 years of emergency services experience and has been involved in hazardous materials emergency response at the federal and local level since 1982. He also serves as a captain of the Halfway (MD) Fire Department. He can be reached at dkdonohue@aol.com.

