BY CHAD GREATHOUSE
During Kentucky’s 50-year flood of 2010, among many rescues, we received a call for a minivan stalled on a flooded road with two passengers inside. The fast-moving, knee-deep water was flowing across and perpendicular to the road. On the upstream side of the road was a split-rail fence; on the downstream side, a seven-foot slope that led downhill to a wire grid horse fence. This situation left little room for error and made placing downstream backup difficult because of the fence. Two of us waded on the upstream side of the road along the downstream side of the split-rail fence. When upstream of the van, we tied a throw bag rope to a sturdy fencepost and one of us walked downstream to the van, using the rope for support. After putting personal flotation devices (PFDs) on both occupants, we walked them out one at a time, the child first and then the father. No one was swept into the fence strainer (which allows water to flow through, not solid objects). However, there was a significant potential for this scenario.
Looking back on the rescue, I considered how we could improve our response and how we would rescue someone from a fence strainer, which is so common in central Kentucky’s horse country and cattle farms. Most training regarding strainers focuses on rescuer survival-how to avoid getting caught in a strainer and how to swim or climb up and over it if you cannot avoid it. This is essential training, but it overlooks rescuing a victim from a strainer. This is compounded by our experience of performing more recoveries than rescues from strainers. What happens if a victim or a rescuer is swept away into a strainer during a rescue attempt?
At our annual recertification classes, I like to teach one or two new skills that build on the basic skills of a technician class. Sometimes, I offer a scenario addressing a specific problem such as foot entrapment or strainer rescue. This year, we covered the basics plus two strainer rescue scenarios.
V-Lower Rescue
Our first scenario started like any other strainer drill. We rigged a rounded 6 × 6 landscape timber in the current with ropes so that it could be cut free on either side if needed. After the standard up-and-over strainer survival drill, we placed a live victim (a trained rescuer) on the strainer.
To rescue the victim, technicians set up a V-lower rescue. This is basically a two-point boat on a tether but with a rescuer in a PFD with a releasable tether substituted for the boat. Two 70-foot throw bags with a 3⁄8-inch polypropylene line were connected to each other to make a 140-foot line and connected to the releasable tether on the back of the rescuer’s PFD. The other end of this line was crossed to river right. Two more 70-foot throw bags were connected to each other and to the same rescuer’s PFD on river left. Two rescuers on each bank held each line, and the “go” rescuer was lowered into the current above the victim. This forms the V of the V-lower and puts the rescuer in a survival swimming position on his back.
Taking care to keep the angle between the ropes small by using longer ropes (definitely less than 45°), we lowered this rescuer to the victim. Keeping the angle small is critical when using handheld ropes for tethers (especially polypropylene throw bag ropes, which have significantly less strength than nylon rescue ropes). Increasing the angle greatly increases the forces on the ropes and the rescuers holding them. We used two 70-foot throw bag lengths (140 feet) on each side of a river that was about 70 feet wide at this point. Using this formula-a rope twice the river’s width on each side of the rescuer-keeps the angle to about 30° at full extension. Once the go rescuer had reached and gotten hold of the victim, we hauled them upstream hand over hand. Once the rescuer and the victim were well clear of the strainer, we gave slack on river right, allowing the current to swing them to river left.
The V-lower method is quick and easy; it requires only trained rescuers, personal protective equipment (PPE), and throw bags. We used five rescuers to perform the V-lower, one upstream spotter, and two downstream backup rescuers (all under the watchful eyes of trained instructors). Eight rescuers, four throw bags, and PPE are a minimal investment for a swiftwater rescue. This method can be very useful for teams without a boat and for incidents in which we just cannot wait for the boat.
However, it is risky to put a rescuer in the water upstream of the hazard. In the case of a riverwide strainer, it can reduce your margin of error to zero. If the water speed is much more than three knots (300 feet per minute) or the victim is very large, the ropes will be hard to hold, and the forces involved may overstress the polypropylene. Remember: reach, throw, row, go (ReThRoG), and consider lower-risk options first.
One alternative is to use ½-inch nylon rescue ropes, which are stronger and easier to grip, instead of throw bags. But nylon ropes do not float. Also, take care not to allow the ropes to get snagged underwater.
You can use ultra-high molecular weight polyethylene (UHMwPE) throw ropes, which float and are a little more than twice as strong as polypropylene. Unfortunately, this drives up the cost of throw bags significantly.
Fence Strainer Prop Scenario
Our last scenario was a little more complicated to set up. We built a fence strainer prop that could be suspended in the current as a highline. This strainer was built around a 15- to 20-foot-long section of chain link fence, which we used because the small holes reduce the entrapment hazard. A firefighter who had fenced his yard donated it. This fencing type also allows the prop to be woven back together easily (out of the water and not under tension) after it has been cut. Each end of the fence was wrapped around a scrap 2 × 4 that ran from the top to the bottom of the fence. We fastened the fence to the end board with fencing staples. We ran a section of retired half-inch rescue rope through the top of the fence, wrapped it around the 2 × 4 one time on each end (in the opposite direction of the fence wrap to prevent unraveling), and repeated the process on the bottom of the fence panel. This design (photo 1) reinforced the fence so it would not be pulled apart, even when the wires were cut with the fence under tension. The ends of each rope were knotted to form a connection point. The top and bottom ropes were extended with more ropes on each end. The ends of the top rope were tied back high on each river bank. The ends of the bottom rope were tied back at water level on each side to allow the fence/highline to sag into the water. We adjusted the tension on each rope and brought the fence into an upright position in the current similar to that of a normal fence in flood conditions.
 |
| (1) Photo by author. Click to view video |
For safety reasons, no one was allowed in the water on the upstream side of the strainer. We also had rescuers in place ready to cut the bottom support ropes for the strainer, which was not as wide as the river. I stood by in a kayak near the strainer. Because of the risk level, we practiced this scenario in easy swiftwater, where the river was about twice as wide as and deeper than in the first scenario. Once the strainer was in place, we floated our homemade water rescue manikin into position on the strainer.
We discussed several rescue options for this scenario. There are several ways to approach from the downstream side: reaching, throwing a throw bag, wading (possibly with a tether), by boat, and by highline. Except for a medical evacuation, helicopter rescue is not an option for us and presents significant hazards for water rescue in general. We used our inflatable rescue boat with a 40-horsepower outboard based on the depth of the water and the speed of deployment and to allow us to practice boat handling.
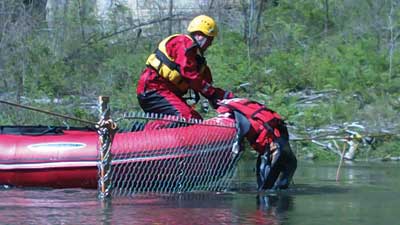
When we reach the victim, there are more rescue options. Often, it is easiest to pull the individual up and over the strainer (photo 2). If this is not feasible, another option is to pull the victim off to the side of the strainer. Cutting the fence (or the strainer) from the downstream side takes more time but provides another angle of approach.
 |
| (2) Photo by Nick “Lucky” Baldwin. |
A good size-up will indicate what tools you need before you enter the water. Keep all cutting tools well sharpened, maintained, and ready; worn or poorly adjusted tools may not cut fencing materials at all. Bolt cutters with blades that meet work well and start every time. Side cutters will work, but with a lot of effort.
When cutting, consider working to one side of the victim to avoid cutting him. Start at the top of the fence/strainer and work down. If you cut upward from the bottom, the water may push the victim into the hole created and underwater. Make the hole large enough so that you can pull the victim through on the first try. In our training, we pulled the victim over the fence several times. We cut the fence only on the last repetition.
These rescues were accomplished with an upstream spotter, downstream backup (two throw baggers), a boat, a boat operator, and a spotter/rescuer in the boat-five rescuers. A wading variation could be accomplished with as few as three rescuers. However, more personnel should be available for safety in training operations. The depth and speed of the water can limit the use of the wading option.
We built the fence prop using retired rescue ropes, scrap lumber from my garage, chain link fence donated by a firefighter, and fencing staples from home. We bought nothing new. We will add floats to the top of the fence to ease setup and takedown the next time we use the prop.
By observing the hazards in our response area, with a little ingenuity we developed realistic training without breaking the bank. Although it was a higher-risk training evolution, we addressed the hazards and proceeded with the drill. It is safer to learn dangerous skills in a controlled environment than to practice them for the first time on a rescue scene where conditions are unforgiving.
Author’s note: Swiftwater rescue is an inherently dangerous activity. Seek competent, hands-on instruction before attempting it. Well-trained rescuers implementing good decisions for the situation at hand will help increase safety.
Creating a Rescue Manikin
Last year, I wanted to use our rescue manikin for foot entrapment rescue training. Because it was too dangerous to use a person in a foot entrapment scenario, I needed a training manikin. According to its instructions, our new, expensive rescue manikin could not be submerged in water since it may void the warranty. Although water rescue manikins were available on the market, they were not in the budget.
David Alemanni, founder of Swiftwater and Flood Education-Europe, told me how he built his own rescue manikin using PVC pipes, ropes, and an old wetsuit. Using his idea and scrap materials I had on hand, I built my own rescue manikin.
The skeleton consisted of approximately 2 × 4 dimensional lumber. I drilled holes in the ends of each “bone” large enough to pass a ½-inch rope through the board on each side of the joint and knotted the rope ends.
Each leg was made of two boards (one upper and one lower). I used one horizontal board for the hips, one for the spine and, one for the shoulders. This made a skeleton that could bend at the joints like a person.
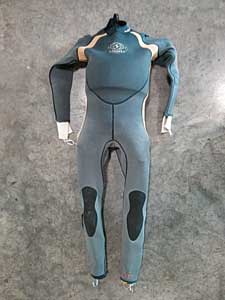
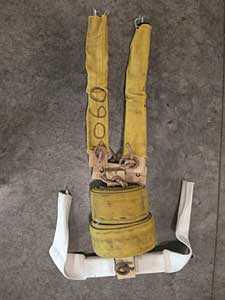
Sections of the outer jacket of retired three-inch fire hose covered the legs. This provided stability by preventing the knees from bending sideways and offered some pinch protection. I fastened an open hook to the end of each leg to facilitate the foot entrapment drill (the foot hooks were taped over for the fence strainer drill). I fastened one end of a section of the three-inch hose to the spine with screws, and I wrapped the hose around the spine until the torso was an appropriate diameter and fastened the end with more screws. Two sets of wraps were used to fill out the torso. A section of hose was attached to each shoulder to create arms. The manikin was put in a wet suit, and we added a PFD (photos 3, 4).
 |
 |
| (3-4) Photos by author. |
We now had a headless water rescue manikin constructed of scrap lumber from my garage, short sections of retired fire hose, a few screws, two hooks, and an old wet suit. The total cost was less than $30. Although it was not full weight, it felt like a person and caught the force of the water like a real person.
CHAD GREATHOUSE is a firefighter and technical rescue instructor with the Jessamine County (KY) Fire District (JCFD). JCFD is the technical rescue hub for the Bluegrass Emergency Response Team, a multihazard regional response team that incorporates 11 counties in central Kentucky. Greathouse also works at Blue Grass Airport in Lexington as a public safety officer (police officer, ARFF firefighter, emergency medical technician).
Fire Engineering Archives

