By Greg Fisher
For decades, the fire service has sanctioned behavior that has endangered the lives of many when it comes to live fire training in acquired structures. I have been involved in live fire training since the late 1970s and, unfortunately, have been party to some of those behaviors, but I have learned from the mistakes. National Fire Protection Association (NFPA) 1403, Standard on Live Fire Training Evolutions, did not exist at the time; and, fortunately, none of those evolutions resulted in the injury or death of a firefighter. We read in fire service publications of firefighters being injured or killed while participating in live fire training in buildings that were never designed for burning. Often, these drills lack preparation in being compliant with NFPA standards and are taught by instructors with the “paper” but little experience. Far too early in the evolutions, someone in charge calls it a good day once the helmet gets dirty while everyone else does the hard work protecting the exposures, picking up hose, and cleaning up the mess.
On the other hand, we see departments with the training, experience, and resources to perform live burns in an acquired structure, but they choose not to because of the potential push back from “bean counters” and politicians, the required administrative work, the potential liability, and the planning and preparation—or they just bought a DVD that shows how to fight fire.
“The purpose of … NFPA 1403, Live Fire Training Evolutions … is to provide a process for conducting live fire training evolutions to ensure they are conducted in safe facilities and that the exposure to health and safety hazards for the fire fighters receiving the training is minimized.” (NFPA 1403, Chapter 1)
Regardless of the circumstances, unless the authority having jurisdiction (AHJ) forbids open burning, the time and resources to execute live burn training pay off in immeasurable ways. Situations we have read about where an injury occurred because of a damaged hoseline, a live victim was used for a rescue scenario, a building deflagrated because of the use of a noncompliant fuel, and a room flashed because “gasoline paneling” was left on the walls would all be distant memories.
“Live fire training is intended to provide the safest and best experience possible under both realistic and controlled circumstances.” (NFPA 1403, Chapter 1)
This part of the article deals with the “ducks in a row” component of planning a live burn: What do we need to do to facilitate a training prop with limited use but maximum value? Starting with the procurement of property, some communities have found that their urban renewal or new green space projects can save demolition and solid waste disposal costs by involving the fire department. In the rural areas, demolition by fire of the old family house could gain additional acreage for planting, thus more income and less land tax. Even though this is a “win-win” for the farmer and the fire department, various environmental, historical, permitting, or financial issues keep property owners from approaching their fire protection districts to dispose of these buildings or vice versa. (Some states prohibit live burns of any kind, and that is unfortunate.)
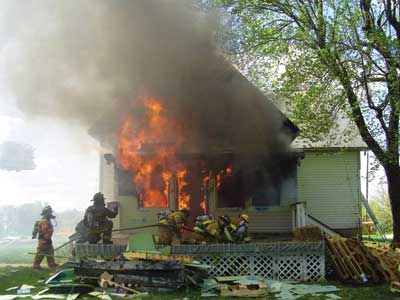 |
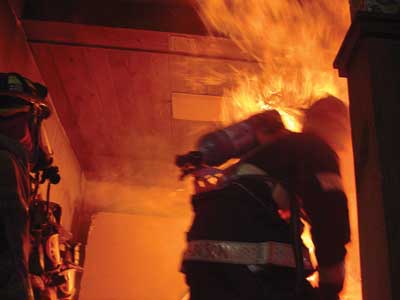
| Photos by Bryant Krizik. |
The Groundwork
Paperwork. The house is yours to burn. The contractor has the housing development ready to go, but the old place has to be burned down by the end of the month. The paperwork required varies with the AHJ; whether the feds, state, county, parish, city, or village, it has to get done. Looking into it well ahead of time will make the turnaround more rapid when a property becomes available. For example, you will need a permit from the state environmental protection agency. The permit often is approved if the property passes an inspection for asbestos or lead paint. They should not be present; if they once were present, the situation should have been remediated.
Some jurisdictions require environmentally certified contractors; others will allow the owner-occupants to remove the materials. In many cases, if the property is owned by the municipality or other governmental body, the costs for inspection, removal, and disposal can climb dramatically. The better the relationships built by the fire service with the rural population and the municipal internal customers, contractors, and builders, the greater the cooperation and investment you’re likely to receive for these buildings and training opportunities.
In some cases, historical preservation groups or agencies must sign off on the permitting processes. The purpose may be to seek funding for restoring the property or simply to be able to photograph or archive examples of historically significant architecture or architectural features. Occasionally, this may allow preservation groups to remove window and door trim, judge’s panels, wainscotings, light fixtures, and built-in cabinets. Be sure to coordinate efforts with these groups, since more often than not, removing those items in balloon-frame homes renders the areas noncompliant for burns because of openings into void spaces. If you are given the house under these conditions, work with the big box lumber stores or vendors to procure damaged lumber, drywall, and material to cover up the openings to allow for a safe and compliant training session.
Obtaining or verifying the environmental paperwork will keep the department out of harm’s way as well. Even though departments are typically not the building owners, they often share the liability for cleanup if the lead paint, asbestos, vinyl siding, and roofing materials have not been properly disposed of. Each AHJ is different, but asbestos removal is universal because of federal regulations.
Depending on the jurisdiction and ownership of the property, when the property owner does the legwork, the workload for the fire service personnel planning the exercise is often lightened. This may not be possible in all AHJs; however, where it is, the property owner bears the permitting and inspection fees. This has been a deal killer for some, since it involves a cost borne by the owner who wants to get this done as cheaply as possible. In many instances, the property owner has been able to “write off” these costs as well as a nominal value for the property as a donation to the local fire department.
Before the fire department ignites the first fire, other documentation is required. A legal description of the property is often a part of the permitting process and could be a part of a document that verifies ownership. Verification through local or county governmental bodies is recommended; this prevents the organization from getting in the middle of estate or family ownership battles. Departments have inadvertently burned down the object of a family feud or even the wrong building because ownership was not verified. It is embarrassing for sure, and it could also be costly to the department.
After obtaining written permission from the owner or designee, the department should obtain documents releasing the fire department of liability, canceling fire insurance, and perhaps a rider for liability during the training period. In addition, if the owner is seeking tax considerations, there should also be a thank-you letter to the owner on the department’s letterhead for donating the property to the department for training purposes. Word the letter so that the value is established by the owner. Examples of some of these documents can be found in sections of NFPA 1403, but it should be standard practice for the department’s attorney, the owner’s insurance carrier, and the chief to review these documents.
Transportation, Traffic. Contact the agencies with whom you normally interact. Regardless of the property’s location, consult with the law enforcement and emergency dispatch agencies to determine if there are any issues related to traffic control or smoke hazards that will affect interstate or busy highway traffic. Arrange for officers to direct traffic where needed or to secure the scene so that traffic is limited to those involved in the training. Consult these agencies also regarding the scheduling dates: Avoid holiday traffic or sporting event weekends, for example, and determine the best traffic patterns for rural water shuttles if they are required.
Public works, fire police, road commissions, and departments of transportation may need a “heads-up” as well to assist in traffic control or place barricades. Working with the transportation folks may reveal that the water supply plan is slated for roads not constructed to handle large volumes of heavy fire apparatus. They may also be able to assist with vehicle staging and parking plans.
Water. Contact water departments, owners of static water supplies, and departments whose tankers or tenders will be needed. (Water supply is addressed later in the article. It is mentioned here so that it is not a last-minute request.)
Other Mutual Aid. Contact other mutual aid-companies early as well. Although they may not be supplying the secondary source of water, smaller departments often need time to prepare their newer staff members to meet the prerequisite competencies for participating in a live burn.
Emergency Medical Services (EMS). Plan a detailed EMS component. We must be proactive in rehabilitating and treating firefighters who may become injured in a well-controlled environment.
In previous editions of the NFPA standard, basic life support services were required to be on site. This left room for interpretation and a potentially dangerous situation, when the department’s only two emergency medical technicians-basic (EMT-Bs) were on the attack and backup crews. It also did not specify the need for immediate transport capability. NFPA 1584, Standard on the Rehabilitation Process for Members During Emergency Operations and Training Exercises, 2015 edition; NFPA 1500, Standard on Fire Department Occupational Safety and Health Program; and continual research on the effects of heat stress have cited the need for a more definitive EMS process at live burns.
Safe live fire training is inherently risky even in the most controlled environment. In a relatively recent live-subject, heat-stress research of firefighters of all ages, 100 percent of the firefighters studied from all over the state were found to be dehydrated prior to starting the research. Caffeinated or alcoholic beverages, foods high in sodium, and other factors contribute to the potential dangerous outcome associated with fighting fire.
If the host department does not include EMS or EMS transport as a part of its mission, it must arrange for an on-site ambulance. Plan ahead with these providers so they can develop a rapport for being included in future responses and allow for potential continuing education units for EMS if training objectives are built into the training day. EMS gets to experience the effects of interior firefighting on members before the real thing kicks in. They prepare for and operate the rehabilitation group and are able to do some real-world monitoring of the effects of the conditions as they affect the firefighting staff.
Notifications. Once the date for the live burn has been established, notify neighbors directly adjacent to the property; nearby airports and heliports; convalescent centers and healthcare facilities; and railroads of the date and time of the burn. Take every precaution to minimize the possibility of hazardous results for the community.
Although this segment on preparing for a live burn concludes here, it is by no way all-inclusive. Some agencies, organizations, and personnel were not referenced. Take inventory of your own AHJ, find out who needs to know and be a part of the event, and determine whom you would like to participate.
Preparing the Staff
A crucial component of the live-burn evolution—the staff—must be fully prepared before members can take part in a live fire evolution. Acquired structures aren’t as readily available as they once were. In the early 1980s, prior to NFPA 1403 and the need for permits from the EPA, burning 20 to 25 houses a year with the state fire academy was not uncommon. Taking advantage of the time the volunteer or paid-on call firefighter committed to the day, it was customary to do some mask familiarization and place students in the “fire behavior demo” simply to get the new student some exposure. The “exposure” is now a legal consideration for the instructors. Tort immunity for the fire service is being whittled away in most states. The student should have more than a 15-minute introduction to donning and doffing a self-contained breathing apparatus (SCBA) before being allowed in a live fire environment, even if it is only a fire behavior lesson with multiple exits from the burn room.
With the volunteer setting and so many competing demands on their time, it’s difficult to cover all these subjects before an acquired structure presents itself. Avoid the temptation to allow the untrained recruit to be involved in that live burn. Even in a compliant burn setup, there’s just too much that can turn bad rapidly. NFPA 1403, Section 4.3, calls for the students to meet the job performance requirements of NFPA 1001, Standard for Fire Fighter Professional Qualifications, as they relate to the following subject areas: safety, fire behavior, portable extinguishers, personal protective equipment (PPE), ladders, fire hose, appliances and streams, overhaul, water supply, ventilation, forcible entry, and building construction. Take the time to enhance the skills they will use most. To some, the priorities may differ, but hose, ladders, and breathing apparatus skills typically make or break most fire situations whether on calls or in training. Even in small departments with precious few hours spent in training, the required subject areas can be covered in the three to six months it may take to get all the paperwork and other live burn arrangements covered.
Instructor in Charge. The two most recent NFPA 1403 standards define “Instructor in Charge” and “Instructor” identically, yet there is a difference.
NFPA 1403, 2007 edition, Section 3.3.13 and 2012 edition, Section 3.3.5:
“Instructor–An individual qualified as an instructor and designated by the authority having jurisdiction to deliver fire fighter training, who has the training and experience to supervise students during live fire training evolutions.”
NFPA 1403, 2007 edition, Section 3.3.13 and 2012 edition, Section 3.3.6:
“Instructor in Charge–An individual qualified as an instructor and designated by the authority having jurisdiction to be in charge of the live fire training evolution.”
However, in the 2007 edition, Annex E considers NFPA 1041, Standard on Fire Service Instructor Professional Qualifications, as a reference only, “not a part of the requirements.”
On the other hand, the 2012 edition states: “The instructor in charge SHALL have received training to meet the minimum job performance requirements for Fire Instructor I in NFPA 1041.”
Too often, we rate “certified” as more important than “qualified.” We’ve all worked with the individual who looks good on paper. Remember, now the instructor shall have received training to meet the requirements. It doesn’t require the merit badge so to speak. There are folks in the department who took the classes, learned the trade, but never got around to taking the test. Sometimes, they are more qualified than those who have the position. Those with the title should draw on those with the background and on-the-job training to help direct the live fire evolutions. Many of the experienced members may have already made the mistakes and, hopefully, learned from them. Their experience and institutional knowledge are invaluable.
The “certified vs. qualified” debate is of concern also for local and mutual-aid company responders. The standard requires that the students provide written documentation for the aforementioned job performance requirements if they did not receive their minimum prerequisite training from the AHJ providing the live burn training. Not being an attorney, I cannot speak to the efficacy of a student providing a document stating he has received the requisite training. Even when the student provides the document or the auditors find the requisite documentation, we will never be able to verify that the job performance requirements were not “pencil whipped.”
Certainly, we ensure the members of our own departments attending the live fire training have the requisite skills to participate in training we are hosting. One way to attempt due diligence for the mutual-aid companies whose training we are unsure of is to provide a number of sessions prior to burn day if the property owner grants access. You can offer a few evening or weekend training sessions at the property reviewing the essential job skills. Or, the drills could be dedicated to practicing the SCBA, hose handling, ladder, forcible entry, and search and rescue skills, for example. The student’s ability to roll a single 50-foot section of three-inch fire hose in a “double donut with shoulder loops” or demonstrating the operation of a 30-pound dry chemical, cartridge-operated fire extinguisher can probably take a back seat to climbing a ladder with hand tools to enter a window or ventilate the roof after refreshing the skills needed to throw a ladder for rescue vs. placing one for roof access. Make these the requirements for participation in the interior training.
Another lead-by-example behavior on live burns is the proper use of protective equipment. For training institutions with tightly controlled Class A burn buildings and who continue to use long coats and three-quarter boots or fire resistant pants and leather boots because of repeated heat stress concerns, that debate is set aside for the acquired structure evolutions, and NFPA compliant turnout clothing is used. Although my career started in three-quarter boots, long coats, and no hoods, riding tailboard on open cab engines, the incidence of fires for most has diminished since the 1970s, and “on-the-job training” has been reduced to false alarms and EMS. The list of PPE requirements and associated standards is the same for training as it is for responding. Training more often in live fire conditions with appropriate staffing and rehabilitation efforts is the key to safe response instead of using body parts such as ears and the back of an ungloved hand as temperature gauges.
Fuel Load
The fuel load is a big part of the standard. Even if we use straw and pallets, common combustibles with easily predictable fire behavior, the smoke is not “clean.” Instructors are often seen entering without masks in place to set and ignite the fire. Equally disturbing is their coming out after extinguishment with smoky conditions prevailing without masks on. The younger staff members may be impressed, but we all know doing this is bad practice.
When live burn training goes wrong, it is often for the same reasons that actual alarms become newsworthy—the lack of command and control. If the instructor in charge allows other instructors to freelance by adding to the fuel load that originally was agreed on, changing the objective of the drill after entering the building, or allowing an untrained individual to shadow during an evolution, students get the message that this is acceptable. Standard incident command training aside, NFPA 1403 requires the instructor in charge to ensure correct levels of safety, maintain a manageable span of control, provide rehabilitation and communication, and conduct personal accountability reports (PARs). When our instructional staff maintains the incident command system discipline, recognizes and corrects the training anomalies, keeps the machismo or egos in check, and maintains the discipline explained in each drill preplan and pre-drill briefing, the drills typically go extremely well.
NFPA 1403, Section 4.12, “Fuel Materials,” states: “Fuels that are utilized in live fire training evolutions shall only be wood products.” And the express prohibition of pressure-treated wood, rubber, plastic, polyurethane, foam, upholstered furniture—basically ALL the materials we used to leave in place or throw on the burn pile when we were too hot and tired to go out and get additional pallets or straw. Using chemically treated or pesticide-treated straw or hay is also forbidden in the standard. If you’re not sure of the burn characteristics of material found in or around the property, do not use them for fuel.
Although NFPA 1403, Section 4.12.3.1, states flammable or combustible liquids as defined in NFPA 30, Flammable and Combustible Liquids Code, shall not be used in live fire training evolutions, it does allow combustible liquid with a flash point under 100˚F for engineered fire training props. Rational thought might say when the training is over and the objective now is to burn the property down, this liquid might be an acceptable accelerant. Don’t use it! Why run the risk of inadvertent use of the liquid fuel during training? Instead, order enough dry straw to get the remaining wooden fuel load going at the end of the day. Know the difference among hay, straw, and silage. While providing a class at a well-known western safety symposium, I found the baled material provided was extremely dry but was cut in such small pieces that it would not stay in place in the burn sets long enough to ignite the pallets.
NFPA 1403, Section 4.12.5, addresses ignition and the acceptable methods for igniting the proper fuel load. The methods include “propane lighters, butane lighters, fusees (safety flares), kitchen type matches, and similar devices … if … removed immediately after ignition of the training fire.” My choice is five-minute-rated safety flares; they can be used one time and can be extinguished by grinding them out on the floor or ground.
The following is one of the most intriguing sections in NFPA 1403, Chapter 4: “Fuel materials shall be used only in the amounts necessary to create the desired fire size ….” We hear the students keep calling for “bigger and hotter.” The instructors keep flashing back to the good old days before “rules” and the stories the old guys tell of being lucky enough to come out without injury to themselves or their students.
Be careful. What we consider a fire of desirable size may be far more than the student considers a desirable size. The student’s sudden discomfort may turn to hoseline abandonment and a scramble to extinguish and account for retreating troops.
Another unacceptable tradition from the “how much fuel” debate is that many of us have purposefully “seasoned” our department-supplied PPE to give the appearance of a grizzled veteran by remaining in the room too long or standing up adding fuel to the pile. The disfiguration of the reflective trim on the coats, the deformed flip-down shields, and the completely melted and inoperable flashlight banded to the helmet SCREAM of experience as we exit the fire behavior lesson that went just a little too long—right? Seriously? Demonstrate that experience with safe behavior and proper care of your gear.
The key lies in NFPA 1403, Section 4.12.7: “The fuel load shall be limited to avoid conditions that could cause an uncontrolled flashover or backdraft.” Nothing says a flashover demonstration is prohibited. It needs to be set up in such a manner that students are observing from an exterior vantage point.
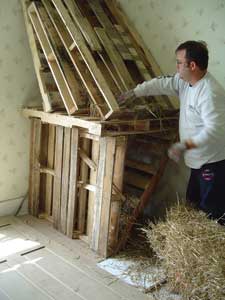
Since dry, untreated straw, hay, and pallets constitute the accepted fuel in an acquired structure, the key to realistic fires is in the method in which the fuel is configured. Too often, the fuel is stacked in the center of the room with the fuel load entirely within three feet of the floor. You must consider certain factors regardless of where the fire set is placed. Creating a platform in the corner of a room with the majority of fuel stacked above the three-foot level will produce a rolling fire throughout the room. Having the fuel set higher also minimizes the damage to the room. When the pallets are simply stacked or arranged on the floor in the middle, it takes a longer preburn phase to generate conditions of a flameover or rollover. This extended period from ignition to rollover tends to preheat other areas of the room such as the linoleum (if left in place), window, and door trim and often compromises the ceiling and intact windows. The premature failure of the ceiling or heat-driven window ventilation changes the fire dynamics and, often, the desired fire effect for training.
Pallets and straw set higher in the room allow the fuel to ignite more rapidly after the straw flashes and produce a volume of fire similar to a typical room-and-contents fire, without the uncontrollable contents. If set properly, the fuel left after extinguishment can often be used again after a short period of drying and the addition of more dry straw (photo 3).
When locating the fuel set, consider the following: the anticipated path of travel in the room and out; the proximity to windows, doors, and other preengineered openings; and the integrity of the wall and ceiling surfaces. Avoid placing a fire set next to the openings with decorative trim that essentially hide a rough opening where fire can travel. If the room configuration makes that fire set location unavoidable, when writing the objectives for a drill in that room, account for the necessary overhaul, the use of a thermal imaging camera, and extinguishment when the spaces are breached.
Exterior Preparations
Firefighters have died because buildings were inappropriately prepared. The National Institute for Occupational Safety and Health and Federal Emergency Management Agency reports remind us that two firefighters perished in a flashover because fuel was in the exit path and wall coverings were left intact. Three died as a result of a partial building collapse when improper fuel was ignited after vapors spread into voids in a balloon-frame, two-story home.
I was once trapped in a room above the training fire. Fast-moving heated gases caused the door to slam shut. The doorknob came off as I attempted egress. I escaped by kicking out the bottom panels of an old “Christian” door. For me, this clearly identified and reinforced the need to ensure secondary exit from upper floors as well as to “assess the selected fire room environment for factors that can affect the growth, development, and spread of fire.” (NFPA 1403, Section 4.12.8)
Some trainers consider NFPA 1403 standard requirements for preparation too daunting to undertake. Since, as noted previously, bread-and-butter fires are few and far between in many areas of the country, acquired structure live burn training has become very important. Dividing the process tasks into manageable categories makes them more easily handled.
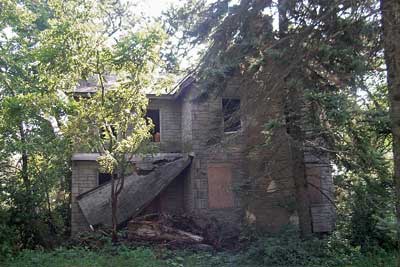
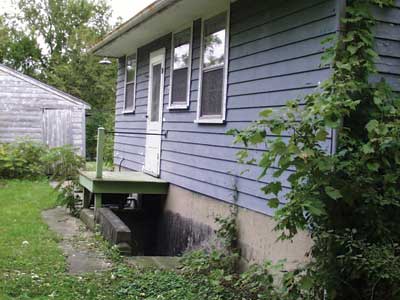
Structure Condition. Begin with the condition of the structure. Consider factors such as structural instability, the presence of asbestos or other environmentally questionable materials, exposures that are too close, or the potential of a political or social hotbed of controversy for the department when evaluating an offer to use a property for training. Consider specifically the suitability of the house for live fire training. It must be able to support the load of firefighters, hoselines, fuel loads (which must be compliant), and accumulated water (photo 4).
All forms of utilities must be disconnected or removed. The property owner should cover the related costs. Verify this before the day of training. In some cases, power back-fed from on-site generators or illegally hooked up to other properties was discovered after training began.
Electrical power may be underground or overhead. If the line is overhead, cut it at the pole well away from the building. If overhead power lines are too close, it may be possible to work with the utility company to reroute the power and shut off the line. You would then be able to protect it as any other exposure. If the service is underground, it may still have to be rendered safe somewhere away from the property. Regardless of the location of the feed, deal with it well in advance of the training day.
Shut off or remove incoming gas or propane. Even if the rural setting has a propane tank at a safe distance, ask that it be removed if it is not supplying other “on farm” requirements. Shutting the meter down for either fuel source won’t work: As the house burns down, it may damage or destroy the meter and cause an uncontrolled flame once the house is “in the ground.” Fuel and fuel tanks are another matter, as they can be found inside and out. Removal is necessary unless the tank can be emptied and rendered safe so that the potential of a boiling-liquid, expanding-vapor explosion (BLEVE) is eliminated. Remove all trace of oil in a basement if any was spilled in the process.
Remove or repair unsafe exterior building hazards such as dilapidated porches, roofs, carports, or structural components that may hinder entry and exit for drills or emergency egress. Identify, secure, or cordon off below-grade windows or stairwells, sumps or cisterns, well houses, air raid shelters, swimming pools, or other areas that present fall or other hazards for firefighters (photo 5).
Depending on the jurisdiction, environmental protection statutes may require the removal of exterior vinyl, steel or aluminum siding, and soffit and fascia. You may have to remove asbestos, fiberglass, or asphalt shingles as well. If you must do this, have a contingency in place to cover the entire roof with tarps or rolled plastic to maintain the integrity of the ceilings if inclement weather should occur between preparation days and the training.
Check the structural integrity of chimneys. Some departments have felt comfortable pushing loose bricks, if present, into the flue; others have maintained clear drop zones and pushed them off the roof. Ensure that the debris does not become an additional hazard, and check to see where the chimney goes. In many old rural midwest and northwest homes, some chimneys terminate on a platform secured to a stud wall and are plastered over five to six feet off the floor. The chimneys were used for pot belly or Franklin stoves. The chimney platforms may no longer support the chimney once fire training has damaged the building.
Check attic spaces for chimneys that are no longer in service. When installing modern heating, ventilation, and air-conditioning (HVAC) systems, often chimneys were taken off at the roof line and roofed over. This may cause extension in the attic, a concern when attic extension is not a planned objective of the training. It may also pose a load or weight problem, depending on its condition, as areas of the building may become weakened during the burns.
Other exterior hazards needing attention include the landscaping, the landscape, and nature itself. Trees, bushes, and shrubs outside windows, doors, and porch roofs may pose a hazard or an impediment to rapid escape from a room or an area designated as a secondary means of egress. The items must be removed adequately so that holes with roots, rock, and debris do not create slip, trip, and fall hazards for responders. Cover or fill in with dirt or gravel, or barricade those areas so no one can enter them.
Additionally, the structure may have become a shelter for various types of wildlife. Some of the “lessons” I have learned include the need to develop a fire stream class on how far to “lead” a squirrel or a raccoon with its tail on fire with a 1¾-inch smooth bore nozzle in rapidly exiting a void in a porch roof. The animal ended up out of reach in a hay loft in a wooden barn that was not considered an exposure because of the wind direction and its distance from the acquired structure. Also, it was not one of the buildings the owner wanted to have demolished by fire or any other means. OOPS! Overgrowth around the barn contained poison ivy, which eventually was watered down to keep it from burning. Obviously, direct contact with the ivy during the preparation phase could have caused injury. Inhalation of the smoke from the burning poisonous plant could have produced tragic results.
One exterior workday for an FDIC class found us preparing on a very cold day. On the second day of preparation, the weather warmed up significantly, and an occasional yellow jacket or bee was noticed flying in and out of the soffit. After slowly and carefully removing the exterior siding, we found the bee hive in the wall. It covered an area spanning six full stud spaces and was seven feet tall at its highest.
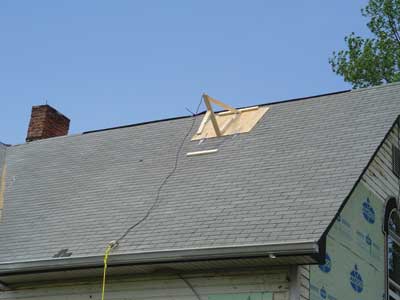
A practice that has become habit for some is to create a resettable roof ventilation cap over holes cut in the roof. You can open a vent hole from the ground with rope, wire, or cable and lower the rope to reset when the smoke has lifted. The NFPA 1403 standard calls for a provision to be in place that would make it possible to vertically ventilate all roof spaces in the training environment to rapidly improve interior conditions should the need arise. The ventilation method may be as simple as a single adequately sized hole cut in the middle of a 2,000-square-foot ranch with a 4/12 pitch, or it could be multiple holes over each finished room in a walk-up attic not originally designed for multiple rooms (photo 6).
When working with acquired structures, it is important to understand the concept of nonintervention, the same strategic option used in fire and hazmat responses: “Buildings that cannot be made safe as required … shall not be used for interior live fire training evolutions.” Unless the objectives for training are the skills needed to perform a surround-and-drown scenario, you must walk away from some buildings offered for training. As one who has fallen through a floor and was stopped by my armpits from dropping into the room filled with fire below, I believe staying away from questionable structures is a great strategy.
Inside Work
“All hazardous environmental conditions shall be removed before live fire training evolutions are conducted in the structure.” (NFPA 1403, 5.2.5)
Starting from the ground up, you must address numerous items.
Basement or crawl space. If a basement or crawl space is accessible from the proposed training area, inspect and remove any hazards. This could include fuel tanks. Render safe water heaters or other vessels, such as pressure tanks, that could BLEVE. Remove paints, solvents, or other consumer packaged hazardous materials.
Since these properties are often left unattended for extended time periods, often without electricity, basements can fill with water. If the area has more than one way out, you might use it for training after you remove the water, cover sump holes, and drywall exposed floor joists. If the exposed floor joists are in the basement ceiling and you decide not to cover the ceiling with drywall, do not permit burning even if there is a secondary way out. Placing a burn barrel in the basement can be a bad practice. With the underside of the first floor exposed, there is the possibility of extension of fire through radiators, the HVAC vent, a clothing chute, a dumbwaiter, or a plumbing chase. Igniting the floor system is another. These conditions make it difficult to have a safe training session. Conversely, cover the floor surface above to prevent downward extension when building a fire set in a room with a floor vent or opening. The same openings would pose a hazard to those crawling over them in smoky conditions.
Often, unusable areas of basements and crawl spaces become collection spots for items that cannot be used in the live fire training. Typically, the items are personal effects the owners or occupants have determined to be of no value to them. If these areas are used for disposing of noncompliant materials, ensure that they are inaccessible during a training evolution. Keep in mind that you must have access to the basement during live fire evolutions to check for fire extension. You must ensure that all fire is extinguished before you start the next drill.
Floors. Cover any holes in the floor regardless of their size to mitigate fire travel from below or brands dropping from above. Since firefighters with associated PPE, hoselines, tools, and rescue dummies weigh a great deal, the floor should be sound. In abandoned houses, you may find broken windows, missing doors, and leaking roofs, which will compromise the support for floors and ceilings in a relatively short time, especially if the homes have engineered lumber for subfloors, roof decks, or stair treads. During energy-challenged days in the past, brick or concrete may have been set down to support aftermarket wood or pellet stoves on floors not designed for the additional weight. If the floor is spongy—even over a shallow crawl space—make sure it’s supported, and remove excessive weight.
Moving to the first floor, debate is possible regarding flooring material. Some trainers have trained with the carpet intact. They wet it down prior to ignition. Other trainers insist on removing the carpet, nails, and tack strips to minimize the potential of adding to the fuel load. Since the NFPA standard specifies, “The fuels that are utilized in live fire training evolutions shall only be wood products” (NFPA 1403, Section 4.12.1 “Fuel Materials”) and the carpet, even after being wet down, can rapidly become part of the fuel package, the most prudent option is to remove it. Consider removing linoleum tile as well; repeated exposure to fire can cause it to vaporize rapidly and end up as part of the fuel load.
Wall Covering. Previous remodeling projects, or even original construction, may find the wall covering, cheap highly combustible paneling, nailed directly to the wall studs. This condition is common in trailers, mobile homes, and some cheaply built or older manufactured homes. If removing the paneling because of its rapid flame spread rating would expose the open studs, cover the area with drywall, or render the room inaccessible on training day. Cover any areas where openings in the floor, ceiling, or wall exist. Patch over openings for outlets, switches, light fixtures, transoms, wall vents, and the like. When handled properly, the asbestos inspection necessitates breaching wall and ceiling and floor surfaces. If you can establish contact with the inspector beforehand, ask that samples be taken close to existing holes such as switches, outlets, or fixtures. This may reduce the time needed for patching.
In one instance, after preparing a house for two days of expected live burn training, the instructor in charge made a final visit to determine if any last-minute items needed attention to ensure a safe, efficient, and effective drill. Opening the front door, he found that salvagers had entered what was otherwise a house in “move in” condition and removed every piece of copper wire by punching a hole in the wall above the light switch or outlet, grabbing the wire above the box, cutting the wire, and pulling it like a lengthy rope saw, opening up every wall and ceiling in the house. The ceilings and walls had to be covered throughout the entire property before we could use it for training. The lesson learned was helpful from a security and an operational standpoint. In the future, we cut plywood to the exact window dimensions and screwed it to the window and door frames from the exterior. Since the property was used multiple days, all but the top two screws were removed during evolutions. The property was resecured at the end of the day to discourage salvage operators from entering.
Windows. Leaving the windows in place allows for the retention of smoke and heat and provides excellent ventilation and forcible entry training. To avoid being cut by glass or damaging PPE, some schools remove the window to the rough opening, patch the voids, and cover the outside with an easily accessed window cover. Other instructors leave the glass in, ventilate in the traditional fashion, and then seal off the room, eliminating the space for future evolutions. Experience has shown that you can use the same room multiple times, even after the windows have been broken, if you incorporate a judicious overhaul objective into the training evolution.
If you are planning to use the room more than once, you must have an alternative means of retaining the smoke. Attaching oriented strand board (OSB), drywall, metal sheeting, or plywood to the outside with two or three points of attachment at the top of the window will keep the heat and smoke in and allow quick removal by pushing from the inside or pulling from the outside. If the initial window ventilation opened up the space to the rough opening, cover or patch the void spaces around the windowsill, frame, and top before burning in the room again.
Combustible interior finishes. NFPA 1403, Appendix A …. Factors affecting “how NFPA 1403 is applied to a specific structure ….”
Section A.4.4.2 (10) states: Type of interior finish materials on the ceiling, walls, and floors. If combustible, they need to be accounted for in the fuel load evaluation, or they need to be removed. Combustible materials on the ceiling, wall or floor surfaces can lead to rapid transition to flashover.”
In older homes slated for demolition by fire departments, conservation groups and rehab contractors often remove oak and walnut staircases, baseboards, decorative window and door trim, crown molding, built-in shelving units or cabinets, light fixtures, stained glass or ornamental windows, doors, and fireplace mantles. In such cases, the training department has some work to do before live burn training can take place in the building.
Often the buildings possessing these architectural treasures are true masonry exterior walls with the floor joist cut on an angle at the joist pockets in the walls or they are of balloon construction with an opening from the basement to the attic when the baseboard or floor trim is removed. The salvagers can damage large sections of wall, floor, and ceiling. If allowing preservation and conservation folks to recover these things is a part of your AHJ’s permitting requirements, forcible entry tools like small halligans, officer tools, and a modified hydrant wrench may be less damaging than the tools the salvage folks use. Work with them to minimize the damage so your patching project will take less time.
If the house you’ve obtained has far less history in terms of décor, you may find low-density “gasoline” paneling, barn siding, paraffin wax-coated or vinyl wallpaper, car siding, or knotty pine tongue-and-groove with multiple coats of varnish or other materials. Mirrors, glass tile, carpet, artificial turf, burlap, simulated brick, felt, velvet, velour, and even polyethylene plastic sheeting have been found in structures set aside for fire training. As NFPA 1403 specifically addresses low-density combustible fiberboard, instructors will often debate the term “highly combustible interior finishes.” I remember many burns where the flaming 100-year-old waxed wallpaper would light off and fall down around us during the fire behavior lesson. This was before the common use of hoods in our PPE. The sudden volume of flame was just an accepted risk or object lesson for a trainee, and instructors were able to read the anxiety in the students’ eyes. Although effective “back in the day” in gauging whether a new student would activate the “fight or flight” reflex, it is (and admittedly was) an unacceptable adult education methodology.
If you’ve never seen the surface of a simulated brick wall covering flash off while advancing a line down a hallway, it might not “register” when preparing the 1970s family room of a house for burn training. If there is any doubt the wall surface could prematurely flash or add to the fuel load, remove it, cover it with drywall, or secure the room so it is not involved in the training exercise. My state’s history tells the story of concerns over such things in the tragedies at the Our Lady of the Angels school in Chicago, which occurred on December 1, 1958, and claimed the lives of 92 children and three nuns (http://bit.ly/1K4uY05) and St. Anthony’s Hospital, Effingham, Illinois, which occurred on April 4, 1949, and claimed the lives of 74 people (http://bit.ly/1wxRzZu).
Glass and plastic tiles and mirrors that appear to be ceramic are also of concern. Obviously, plastic tile will add to a less predictable fire load and flame spread as the increase in British thermal units generated in the same space will be dramatic. Although not considered a part of the fuel load, mirrored and glass walls pose an additional hazard. If thermal imaging technology is deployed, the reflective nature can interfere with the interior crew’s reading the conditions inside the structure. As these surfaces heat, crack, and break, they become a hazard to all parts of the body and the condition of the turnout gear and the SCBA. If you don’t remove these items prior to the burn evolution, they will break and come down at the most disadvantageous time.
Ceilings. They pose some risks when the plaster or gypsum board is badly cracked or sagging. Patch holes left after the removal of light fixtures, decorative beams, or crown molding. Cover above and below the opening vents passing through the ceiling that were used in the past to allow heating the floor above so that fire does not travel upward or firefighters fall through.
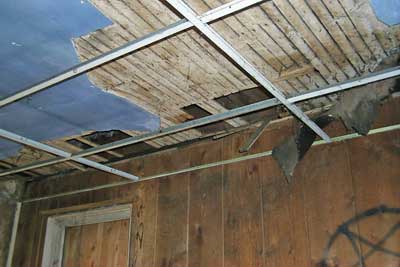
False ceilings, suspended or drop ceilings, or “tile” ceilings, popular for various reasons in the 1970s and 1980s, can present dangers when fire training. False ceilings framed out and covered with drywall provide a dead air space where fire, smoke, and heat can become trapped. If the plaster and lath above it is breached or damaged, it will add to the fuel load and allow fire to travel in essentially two dead air spaces. If the subsequent overhaul through two layers of ceiling, at two separate heights, is not part of the planned objectives for a drill in that room, the training for that day will be overhaul work (photo 7).
Suspended ceilings with wire attachments to ceiling rafters or second-level floor joists pose a similar problem. Often, attaching the hangers to the original plaster ceiling caused damage that allowed fire to travel. The likelihood of canned or fluorescent light fixtures are part of the newer ceiling, meaning that above are additional breaches made to accommodate the wiring process. Depending on their locations in the property, insulation as well as metal or flexible “helix” style HVAC conduit may have been added. If left in place, their potential failure in a live fire exercise may injure responders or cause them to become trapped.
The ceiling panels are an additional concern from the perspectives of their combustible nature and weight. Fire rated panels are unusual in single-family dwellings. Even if the suspended ceiling was completely fire rated, it is not safe to keep the drop ceiling intact. Some panels in the field were found to be manufactured of fairly rigid insulation coated with a vinyl or plastic decorative surface. When ignited early in the incipient phase, the material behaved as if the surface were coated with napalm. You must discover this before the training. The surface will ignite and drip like gasoline or flaming candle wax.
The additional work of pulling down the panels, framework, wires, and fixtures are warranted to make conditions during the fire training safer. There have been many reports of firefighters getting caught in the wiring, fixtures, and helix style HVAC conduit when ceilings came down during the fires
Another commonly found ceiling configuration includes 12- × 12-inch fiberboard tiles on 1- × 2-inch furring strips. Conducting burns where this type of ceiling was left in place produced mixed results. If the grid was in good condition with all squares in place, it tended to slowly decompose with some flame near the edges. Once a tile was lost, fire equal to the depth and length of the squares and furring strips traveled slowly in the dead air space. When tiles were used to cover existing drywall or plaster, the results were usually easily controlled. If it was a standalone ceiling, fire often rapidly extended to the attic or floor space. Eliminate the potential hazard by removing the fiberboard tile ceiling and recovering it with drywall.
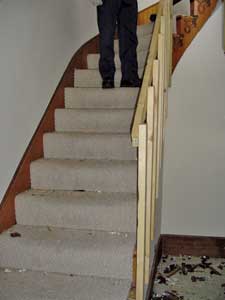
Stairways. When preparing the structure, pay attention to stairways to all levels, whether interior or exterior and whether covered by a hinged floor board on a “mud porch”; a treated lumber exterior deck supported by questionable 4- × 4-inch beams; or a formal staircase with decorative trim, balusters, and railings. These structures were acceptable for day-to-day living in a one- or two-family dwelling. Blatantly obvious is the need to replace stair treads or railings when a reclamation contractor has removed the fancy walnut staircase. If they are still present in the building, ensure that the existing stairs, balusters, and railings will handle the repeated movements of firefighters and their equipment up and down the stairways (photo 8).
Outside staircases to cellars and basements pose a risk. Constantly exposed to weather and not often used, the doors, treads, and risers may be rotted and railings may be missing. If a window is to be used as a secondary exit over the “lean to” access door, ensure that the door can support the sudden live load of a responder escaping through the window.
As you descend to the cellar in the preparation phase, look for insect hives, raccoon nests, and nontraditional tread and riser heights and widths. During the training phase, make sure the door is closed so that no one falls in; however, if checking the basement for extension, secure it open. Someone may have to monitor the opening at ground level to direct people away if the training evolution is ongoing
Many times, the acquired structures are in rural areas where building codes are either nonexistent or not enforced. Staircases or decks added on to structures usually were constructed with cost savings in mind; the needed structural support for emergency response staff may be marginal. Completely remove the additions if the integrity of the construction is suspect. Secure the doors or windows normally used to access the area to avoid a fall. Training sessions have necessitated rebuilding stairs of some kind to minimize the trip and fall hazards. If the footwork is done early and the property owner allows access early, search and rescue and hose and ladder training can take place in nonfire conditions. Identify the areas that need reinforcing for the live fire exercises at that time.
Site Work
Preparation creates debris. The disposal method will vary with each jurisdiction and the materials. Wood-based products such as furniture and paneling that have been removed and broken up and reduced in size, as well as cabinetry can be figured into the fuel load. Household chemicals, pesticides, paint, solvents, and the like may require special disposal or possibly can be thrown in the garbage can. Asbestos tile, shingles, exterior siding, and other friable products may also need special attention, licensed personnel, and nontraditional removal and disposal. The local AHJ may or may not allow carpet, vinyl siding, synthetic-based furniture, wall and window treatments, and other debris to be consumed as fuel in the “burn down” process. However, NFPA 1403 does not permit it during the training process. You must do the research and ensure compliance for the sake of the department and the taxpayer.
If the debris can’t be used for fuel, what do you do with it during training? “Any debris creating or contributing to unsafe conditions shall be removed.” (NFPA 1403, 5.2.6, “Hazards”) Too often, a great number of personal effects are left behind. Rooms deemed to be unsafe for training could be used to stage the material, provided it does not add to the fuel load, does not cause excessive weight over a training area, and can be rendered inaccessible during the evolutions. Basements and attics have been known to be receptacles for the waste also. This has been problematic when, early in the training session, fire drops to the cellar or breaches a ceiling and ignites the contents in the basement or attic space.
Shingles, siding, soffit, and fascia can create debris on the exterior that can create slip, trip, puncture, cut, and fall hazards. If the owner chooses to recycle material, move it from the site or store it well away from the training area and water supply. Leftover brick, stone, or block from the unstable chimney may be allowed in the foundation, crawl space, or cellar in some jurisdictions to be left when the foundation is filled in. Other AHJs require total removal to approved landfills with other materials left over from the burn.
Depending on the location and condition of trees and landscaping, you may have to remove some portions to allow a safe egress from windows, doors, porches, or landings; they must not present an obstacle to the training crews. You can cut the foliage and move it well away from the building for disposal later, or you can place it in or around “out” buildings slated for demolition by fire. Keep in mind that while this is common practice in some places, some jurisdictions limit, prohibit, or require additional permits for burning what amounts to yard waste. Some landowners with the appropriate equipment have moved the material away for the training session and then pushed it in or around the house for consumption when the house is completely consumed by fire. Sometimes the landowner asks that a tree or an exposure be saved. You can accomplish this by directly applying water or Class A foam. Foam or not, verify and adhere to any AHJ/EPA runoff requirements.
If the tractor or backhoe is on site during the burn-down and you can do so safely, have a qualified operator punch in areas of the roof, side walls, or attic areas, which often allows for a cleaner burn. Maintain exposure protection lines and scene control. The weather or circumstances will dictate whether this is an option. We’ve all experienced a great deal of smoke affecting property downwind in training and in real life.
Occasionally, the precut ventilation holes do not produce a clean burn. Widening the opening with heavy equipment or opening up the lower areas so there is more combustion air on the windward side often will get the desired and natural result of a more rapid, clean burn. Note: The instructor in charge and safety officer have the final word. If this method of opening up the building or pushing in the walls with heavy equipment cannot be done in a safe manner, don’t allow it to happen.
The potential for more embers downwind must be accounted for and addressed by companies assisting in the training. Just because the interior training may have concluded doesn’t mean the session is over. Reinforce with departments and mutual-aid companies that they must assist in breaking down and returning to service after the scene is left safe.
Training Day: Not Quite
Although some factions in the fire service today would have us train in theater smoke, with computer simulators, and with videos, NFPA 1403 states in Section 1.2.2: “Live fire training is intended to provide the safest and best experience possible under both realistic and controlled circumstances.”
Fighting fire is inherently dangerous. As mentioned earlier, for training personnel to act safely when doing dangerous tasks requires fundamental knowledge of the skill sets noted in NFPA 1403, Section 4.3.1 (1) – (11) and Appendix A – A 4.3.1. referencing NFPA 1001 (1) 5.2.3 to (16) 5.5.4, which includes most topics noted in 4.3.1 as well as radio use, search and rescue, structural firefighting, scene illumination, and tool and fire hose care and maintenance.
Once you’ve handled the training issues prior to live burns, you need to have a plan for the evolutions for the burn day. The days of lighting off an acquired structure and making a 911 call to see how folks respond are over. Documented close calls and line-of-duty deaths have occurred when responders en route did not know they were traveling to a training call. A suburban department destroyed multiple sets of PPE and injured a firefighter because the responders thought they were going after real victims—risking a life to save a life.
Preburn planning and briefings are vital parts of the day’s training. The briefings must spell out the objectives of each evolution—describing all the features of the area to be burned, discussing all facets of the evolution, and verifying instructor and company assignments. All students must walk through the entire structure to be familiar with the layout and potential secondary exits. A large map or footprint of the building is a tremendous help in presenting the documented objectives for each drill by pointing out the path of hose travel, areas to be searched, location of the fire, and so on. This can be done freehand on white boards, drawn on a leftover piece of drywall from the building prep, or by having the site map and building footprint (required in some AHJ’s permit applications) enlarged.
Note: As I traveled for the state fire academy for more than three decades assisting with or directing live burns, I observed far too many wasted opportunities. The desire to run realistic fire evolutions with responding engine, truck, and squad companies performing initial attacks, primary searches, and immediate destructive ventilation or overhaul operations often resulted in no more than three or four students actually seeing live fire from the inside. The rest, sometimes as many as an additional 50 or 60 students, “humped” hose, moved ladders, or patiently watched from the outside seeing only smoke and the “high fives” the instructors gave the three students who actually got to apply water to a fire throughout the day.
Even worse, unrealistic or overstaffing of hose crews or search and rescue teams caused overcrowding in tight stairways or the overloading of the upper floors of structurally questionable buildings. Five- or six-staffed hose or search crews are well beyond the staffing levels of most departments I know. Discussion on acceptable staffing levels is a topic for another time. If the majority of the departments involved in the training exercise are able to staff only two people on a hoseline during the normal business week, train to that.
Remember, too, the fire is just a prop. It takes cognitive and psychomotor skills to know how to get the hose to the fire, recognize what’s going on, and provide the safest outcome for a very dangerous situation. Enhance the hose-handling skills, search and rescue techniques, and ladder proficiency to the drill ground before live burn day without fire in the mix. Capitalize on the fact that you can produce realistic live fire conditions and expose as many to that area of the drill as you can on the day of the burn when you have the luxury of an acquired structure.
Understanding the dynamics of fire and planning for the eventuality are musts as you put your objectives together. Taking into account the weather, the layout of the building, and the relative skill level of your students is part of the mix. Three to five simple objectives for each evolution allow rapid but safe turnaround between drills and will ensure that you will get as much value out of the structure as possible.
Understanding your staff of instructors is just as important. Though well-meaning and knowledgeable, their desire to provide students with value-added training at times will cause instructors to add just a little more to the drill than was planned. More often than not, they’re making a great point, but, nevertheless, it is freelancing and has no place in live fire training. Having a matrix or rotation established with clearly defined roles for the instructor to accomplish the documented objectives and the preentry briefing provides a vehicle to “nip in the bud” any drive to have instructors set their own objectives. As trainers, command, and company officers, we understand that “stuff happens” and the planned objectives to that point are the roadmap for the evolutions. When the ceiling comes down prematurely or an undiscovered camp stove propane cylinder or water pressure tank hidden in a wall violently decomposes, it’s time to take a detour, and the planned objectives are now moot. If, to that point, the instructors were executing the planned objectives, getting back on track or organizing a tactical withdrawal and accountability report, things will go much more smoothly.
Include an emergency or evacuation plan in the preentry briefing, and establish and demonstrate an audible evacuation signal. My recommendation is to include sirens with the air horns. The following experience led me to demonstrate the need for the sirens:
I was working in a small community. We decided that three long blasts of the air horns on the engine used for the primary attack lines would be the evacuation signal. Actively working our way to a well-involved fire in a walk-up attic in a large Victorian home, we left the structure without question when we heard three long blasts of the air horn with a longer than anticipated delay before we heard the blasts again. Thinking that the situation was serious, we continued to exit. Although it was not a part of the standard at the time, being a fairly progressive group of instructors, we reported to the “predetermined location for a roll call” since the evacuation had been signaled. When we appeared at the spot (as fire continued unabated in the attic), we were asked what we were doing. We asked why the evacuation signal was sounded and if everyone had gotten out safely. At that moment, the Illinois Central Gulf freight approaching the third railroad crossing in town initiated its federally required three blasts of the air horn. The remainder of that training day was spent chasing a single fire instead of providing multiple evolutions for a well-trained and motivated department.
It goes without saying that adequate water is needed for live burn training. Although NFPA 1142, Standard on Water Supplies for Suburban and Rural Firefighting, is the benchmark, common sense will get you most of the way there. Section 4.11.1 states: “The instructor in charge and safety officer will determine the rate and duration of water flow necessary for each individual live fire training evolution… to extinguish the training fire … backup lines…and protect exposures.”
Once you’ve figured the required fire flow for the aforementioned items, an additional 50 percent of that supply needs to be on hand for “unforeseen” circumstances.
Common sense and the standards dictate the need for backup hoselines in addition to the backup volume for the water supply to protect life and property. Whether because of the geographical layout of the site or the inability to see the “big picture,” having attack, backup, and ignition hoselines originating off the same engine has been commonplace. If the engine supplying both lines suddenly stops running, lives are in danger. Make sure the backup line is pumped from a separate source or engine to minimize the potential for the loss of fire attack water. If the secondary water supply is a quarter of a mile down the farmer’s lane because of vehicle access obstacles—well, you have to do what you have to do.
Anticipation of weather conditions may be a part of the water supply preparation. Consider prevailing winds, lay of the land for runoff, and leaking portable water tanks to keep pump operators out of the smoke and prevent “sticking” the engine or tenders/tankers up to their frames in soft ground. Makeshift hose bridges may be needed to channel water away from traffic routes designated for the water shuttle, replacement apparatus, or ambulances.
The instructor in charge must be concerned about the capabilities of his fellow instructors and the training background of the students. Determine beforehand if the pump operator knows what “net engine pressure” is and what the friction loss is in the hose laid out for the drill. Hydraulics classes should be a minimum if the department doesn’t have the luxury of having a pump operator certified by the appropriate training agency or according to the NFPA standard.
You must account for site control and security. Consider minimizing nonessential vehicles and their parking, providing adequate staging areas for essential traffic and parking for EMS or rehab resources, and appropriate ingress and egress from the site. When law enforcement and the press have been a part of the planning, designated areas for their vehicles should be a part of the plan.
These same areas we consider for parking and traffic also produce our biggest headaches for safety and site control. Keep from harm’s way visitors to the site such as press, law enforcement, relatives of the property owner, interested neighbors, and those who spotted the “header” miles away. Trained local fire police auxiliary members, fire or law enforcement Explorer or Cadet groups, or off-duty deputies may be great resources for this task.
If certain visitors are allowed near the burn building, they should be provided with, or required to wear, PPE appropriate to their involvement, and they should be escorted at all times.
Prior to the first drill, the instructor in charge and the safety officer should document a list of objectives for the day’s training. Number each drill in the preferred order, and develop a few more than you think there will be time for. As the objectives and drill order are being compiled, consider the potential weather, number of floors, building condition, and relative experience of the trainees.
Under present NFPA 1403 requirements, if the condition of the ceiling is degraded by the water running through the floor above, you may have to repair or reinforce a ceiling. By alternating the drills in such a way, you can work the first-floor room initially and then proceed to the room directly above.
Another option is to work in a room until there’s nothing left. Having trained in properties more than a hundred years old where a true craftsman installed the horse hair plaster, burning in a room three or four times before the space was compromised was not uncommon. Yet, in houses less than 10 years old, ceilings failed before the fire ever reached the door. Some AHJs will reassess a room, provide some minor repair, and come back to the room to drill again. Other jurisdictions will burn in a room once, completely “gut” the room, and then secure it so no additional training can be directed to that space. Both policies can be justified under the 2012 edition of NFPA 1403. A smaller class size would facilitate the intent of one policy while a larger number of students could safely be trained under the other. As you create the objectives for each drill, keep these things in mind and be prepared to shuffle the order of the drills as the day progresses to facilitate room repair or securing areas to keep crews out of the heat and smoke.
You can easily establish three to five measurable objectives using a bullet-point list, such as the following:
- The attack crew will advance a line to the second floor and suppress the fire in room marked #4.
- The backup line will stage at the bottom of the stairs and await an order to advance.
- The search crew will provide a primary search on the fire floor and overhaul if requested.
- The vent crew will await orders and open up the window from a ground ladder.
- The vent crew will provide a primary search on the first floor.
The Training Begins
Accountability. A manageable span of control is important, and you may choose to begin the day with assigning crews to instructors or officers. Documenting their positions in a preconceived matrix of drills, rotating students and staff in methods to minimize heat stress and exposure to the elements is expected. A prepackaged, purchased personal accountability system is one method; however, when students travel from areas outside the mutual-aid boundaries, differing “store bought” systems may not be compatible. Numbered cattle tags from rural supply houses on shower curtain rings are an affordable option and are almost firefighterproof. Items are easily and inexpensively replaced when damaged or lost and can be made on scene with a permanent marker. Some may provide live fire training in venues drawing students from multiple cities, states, or countries. The legal intent of the standard can be met by using a legal pad and a pen to list the crews’ names and columns for checking them “in” or “out.”
Student skill levels. After instructors have been assigned, crews ascertain the skill level of the students by having them demonstrate SCBA skill even if they handed the lead instructor a copy of their state certification. If last-minute preparations require ladder or tool work, direct them to the task, and observe their abilities. Have them move charged hoselines to prepare for a drill. If they have difficulty on the outside without full gear and SCBA, take that into account as you lead them into the fire. Better yet, require any students who sign up for “burn day” to participate in the preburn training held days or weeks before.
Student walk-around and walk-through. Prior to briefing for the evolutions, each student must complete a walk-through of the acquired structure. This helps them achieve familiarity with the building should an evacuation become necessary. Operating doors and windows, ascending and descending stairways, and noting escape routes to lower roof sections are a few considerations. An exterior walk-around enables them to identify hazards such as slip, trip, and fall hazards and cisterns or wells; the location of the rehabilitation section, air fill station, and EMS; and the rally points for an evacuation not already written into a drill or an evolution. These should be identified and included before training begins.
Student briefing. Every live fire training session should begin with a briefing. The students should be told how to deal with a Mayday, to stay low in the smoke and heat, to account for a partner, and where to stand by if an emergency evacuation is sounded. You can do this with the total group of students or include it in each drill’s brief.
The instructor in charge and safety officer should brief the students on all aspects of the evolution. If a footprint of the house is available, draw out or point to the areas of the attack and where the backup and ignition lines will be deployed. They should give clear direction from the documented objectives prepared ahead of time, map out the route of the search crews, and point out any ventilation assignments or other objectives covered in the drill. The briefing should include also projected emergency egress locations or safe havens for crews to find relief in an uncontrolled fire.
The briefing commonly includes the rescue objectives of the live burn. The location of the rescue mannequin does not have to be divulged. If the evolution includes a rescue scenario, a human may not be used for that purpose, whether properly equipped or not. The standard states that the rescue mannequin shall not be dressed in firefighting personal protective clothing.
Sign off on the drill. The instructor in charge and the safety officer are required to sign off on the drill. According to NFPA 1403, 4.9 “Communications”: “A method of fire ground communications shall be established” among all functional crews “to enable coordination and external requests for assistance.” Work out radio issues such as the number of portable radios, proper usage, and appropriate frequencies as a part of the plan, not the day you burn.
The safety officer has the authority to intervene and control any aspect of the operation, regardless of rank, to prevent unsafe acts or eliminate unsafe conditions. Safety should be this individual’s only responsibility on site. A common practice for the safety officer might be a walk-around and a walk-through before each evolution.
The instructor in charge has the following responsibilities:
- To communicate with all crews, water supply, rehab, and EMS, indicating their readiness to begin before requesting the safety officer’s approval to ignite.
- Be responsible for the overall fireground activities including rest and rehab, medical treatment, food and fluid replenishment, and relief from the weather. This may include additional instructional staff to provide relief from the cold, heat, or precipitation.
- Assign an instructor “to each functional crew, each of which shall not exceed five students; to each backup line; and one additional instructor for each additional functional assignment.” Instructors shall be rotated through duty assignments.
The Concluding Paperwork
NFPA 1403, Chapter 9, calls for certain records and reports to be retained, including an accounting of the activities conducted; a list of the instructors and their assignments; a list of all participants; documentation of unusual occurrences, any injuries sustained and their treatment (to the extent HIPAA allows); any changes or deterioration of the structure; and documentation of the condition of the premises and adjacent area at the conclusion of the training exercise. The permits, letters of permission, inspections, and other documents discussed at the beginning of this article must also be a part of the file.
At the conclusion of training, the property should be turned back to the owner with a formal document stating the expectations of both parties. Printing e-mails, text messages, and other correspondence related to the training can also be helpful in planning the next event or providing an accurate record of logistics for future reference. This documented history will also show due diligence if something goes wrong. Fire departments have been held accountable for asbestos cleanup from the rubble weeks after the fact because the word of the property owner was presumed true. In another case, the liability fell on the licensed inspector for inadequate sampling during the inspection process.
Conduct post-training critique sessions and document the students’ performances related to the objectives “and reinforce with the students the training that was covered.” (NFPA 1403, Chapter 9) Depending on the size of the group and the ability to rotate instructors, it may be possible to critique each exercise after each drill. Do not confuse this with critiquing the training experience.
Students should be able to record their attendance at a live burn training session in their personal and department training records. Some AHJs provide a generic attendance certificate. Others may provide NFPA 1001, 1002, and 1021 specific job performance requirement objective-driven documentation. This documentation is important in the growth of the firefighter, apparatus operator, company officer, and commander regardless of whether the certification in the disciplines is required, recommended, or absent a given department’s overall training program.
The number of acquired structures for live burn training decreases each year, as does the number of jurisdictions willing to make the effort in resources and staff. Don’t pass up the opportunity; the experience cannot be replicated in engineered training buildings. Take the time, do the paperwork, prepare the responders, and execute the best live fire training possible by becoming familiar with NFPA 1403, Standard on Live Fire Training Evolutions.
Additional Links
NFPA 1403 Live-Fire Evolutions at Fire Service Training Centers
Planning a Training Fire Compliant with NFPA 1403 in an Acquired Structure
Maximizing Training Evolutions in an Acquired Structure
GREG FISHER has coordinated the “National Fire Protection Association (NFPA) 1403 Compliant Live Burn Training in Acquired Structures” class at FDIC since 2003 and has directed numerous similar classes in Illinois, Iowa, Indiana, Idaho, Oregon, and California. He began his fire service career in 1976 at the Savoy (IL) Fire Department and joined the Champaign (IL) Fire Department in 1979, retiring as captain in 2005. He is a field instructor at the Illinois Fire Service Institute. Previously, he was rescue program director and coordinator for the National Fire and Emergency Services Explorer Conference. He is a fire brigade leader for Eli Lilly/Elanco Laboratories in Clinton, Indiana, and chief of the Pesotum (IL) Fire Protection District. He remains active in Fire Service Exploring with the Champaign County Fire Chief’s Association/M.A.B.A.S. Division 28’s Explorer Post 31. He has a bachelor’s degree in fire science management from Southern Illinois University.
Greg Fisher is lead instructor for “Compliant Live Burn Training in Acquired Structures,” which will be on Monday, April 20, and Tuesday, April 21, 8:00 a.m.–5:00 p.m., at FDIC International in Indianapolis.
Fire Engineering Archives


