Steering Column Extrication: Alternatives
RESCUE
When the traditional method isn’t good enough anymore, try one of these. The last of three parts.

(All photos by Ronald E. Moore)
After spending all of the last article on two steering column extrication methods that work across the front of the vehicle, we now move to other areas of the car.
The third basic method uses a four-foot-long block of wood placed over the windshield opening, parallel to and above the steering column, as the base for the rescue tool that will move the column.
This method has some advantages and some disadvantages over the two previous methods which depend on the front of the automobile. This method requires that the vehicle not be resting on its roof and that the roofline of the vehicle be somewhat intact.
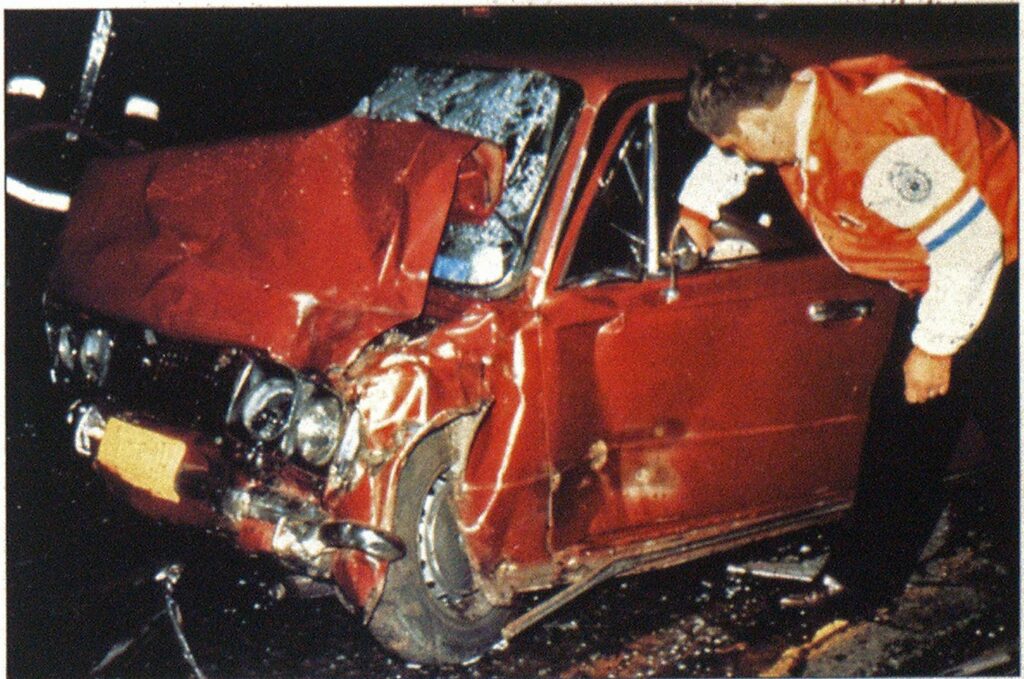
But the big advantage of this method is that it works without relying on the front end of the vehicle. It works even if the vehicle is a flat-nosed truck, school bus, city bus, commercial coach, van, or minivan. And considering the tremendous damage that automobiles undergo in violent head-on collisions (Photo 1), a vehicle that was long-nosed before the accident may now be flat-nosed, too.
Additional advantages are that this method can be accomplished with very simple tools, in its simplest form it can be done completely by one rescuer, and it’s fast.
As with both previously discussed methods, certain preliminary work must be done. The rescue evolution size-up should be accomplished, the steering wheel moved or removed, and all patient safety considerations undertaken.
After that, there’s little set-up work needed. The basic elements of the set-up are positioning the four-foot blocks of wood, looping the column with chain, and placing and operating the lifting tool.


The “working” four-foot block of wood, the primary block, is placed across the windshield opening of the vehicle directly above and parallel to the steering column. (See Photo 2.) The bottom end of the block rests above the firewall to make use of the firewall’s structural strength. The upper end of the block rests on the edge of the roofline, above the sun visor area. If this area is damaged or likely to be weak, another fourfooter, a support block, could be placed along the roofline edge first. The working four-footer would then be placed over this support block, forming a “T” above the column. (See Photo 3.)
A rescue chain at least eight feet long is then draped over the working block; looped down one side of the steering column, underneath, and up the other side; then hooked onto itself to form a slightly slack loop. There’s no need to cradle wrap the steering column as in previous methods; this evolution works best with just the simple loop.
It’s vitally important, though, that the loop of chain be kept as low on the column as possible. Locate it below the knuckle joint and right at the dashboard instrument panel.
To complete the task, a lifting tool is placed on top of the working four-footer and under the top of the chain loop. Once the chain loop is adjusted to accommodate the lifting tool’s length and snugged relatively tight, the set-up is complete.
With all personnel ready and all necessary safety measures (including the longboard protector described in February’s article) in place, the lifting tool is operated. The rescue equipment lifts the loop of chain, and the chain very quickly lifts the steering column.
If, for some reason, the bottom end of the working four-footer begins to crush into the vehicle, there are two options. The simplest is to let the block crush the metal, anticipating that after several inches, the block will settle onto the strong structure of the firewall. Second, another four-footer could be placed under the bottom end of the working block, parallel to the firewall, so that the three wood blocks now form an “H.” This extra base block spreads out the load and will minimize any crushing.
The right tools
Rescue equipment that can accomplish this assignment includes hand tools such as the mechanical jack, hydraulic tools such as a hydraulic jack with a temporary V head attachment, and the handoperated, hydraulic ram with a V head. Power rescue-tool rams, spreader units, and air-powered lifting tools can also perform this column-lifting function. Any tool that will lift can, in some way or other, be used for this set-up.
The power rescue system spreaders can be used with the standard automotive tips under the chain loop. Systems with accessory grab-hook and shackle options can also be set up in the crane-type lifting mode described in February. For ease of operation, and to prevent any pinching damage to the base end of the spreader, the spreader should be placed into position from the top or roof side of the working four-footer, with the tip end pointing down toward the front of the vehicle. This puts the rescue tool operator, all hydraulic hoses, and the bulk of the spreader unit up and out of the way during the actual lifting procedure.
If air bags or air cushions are to be used for this task, enough fourfoot blocks must be brought into the working position to totally support the underside of the bottom air bag or cushion. There should be parallel loops of chain around the column and air bag to minimize the shifting of the bag. Finally, there should be a limit set on the inflation height of the bag or cushion. With the air-powered tool maintained at the 70 to 80 percent maximum inflation height, the rescue chains or straps will trench into the rubber bag surface.
While moving the column with this method, the driver’s-side front roof post—the A post—could buckle or fail. If so, there’s a solution. Similar to a stud in the wall of a house, another four-foot block can be propped vertically in the driver’s-door area to support the underside of the roofline. Put the top of this four-footer at the threeway junction of the windshield roofline, the driver’s-side roofline, and the front A post so the block braces the roof area and takes the reaction of the column-lifting job. In training, this set-up, with the “stud” block, the roofline block, and the working block, has been used for a successful column lift when the A post has been completely removed.
All things being equal, there’s no other method that can move a column as quickly, safely, and simply as the lift across the windshield using a four-footer. Given one rescuer and about 30 seconds of time, the column will be history.
No front end and no roof
Despite the advantages of working across the windshield, there are several situations in which neither it nor the two across-the-front approaches can be used.
For example, if the accident vehicle has been involved in a headon or nearly head-on collision, the front structural area of the vehicle ahead of the firewall may be so severely distorted that there’s no possibility of using horizontal pulling tools there. If the same accident vehicle is a convertible or if rescue personnel have removed the roof, there may be no possibility of using rescue equipment across the windshield, either. Lifting across the windshield may also be impossible if the vehicle has rolled onto its roof.
Under these conditions, the fourth method of column movement-pushing from the side or inside—can become the rescuers’ method of choice.
The steering column doesn’t have to move straight forward to free a trapped person. The goal is to increase the distance between the steering column and the trapped person. If the column moves off at an angle at the same time it moves forward, the required clearance will more than likely still be gained. With this in mind, the crew pushes the column with equipment that’s positioned inside the passenger compartment or along one side of the vehicle.
This has the important advantage of virtually eliminating the seesaw effect that horizontal pulling tools have on split steering columns in late-model cars. Thus, even though working the column from the inside or the side is a good method for vehicles with severely damaged front ends and roofs, it can be used any time vehicle and patient conditions permit.
As with the previous methods, size-up is called for when it appears that the injured person is trapped by the steering wheel and column. Cutting and bending or complete removal of the steering wheel is again necessary, and all patient safety procedures need to be conducted.
To prevent unwanted reaction to the movement of the column, selected relief cuts must be made in the structural areas of the vehicle. This is called “disconnecting” the vehicle.
Rescue personnel should first anticipate the action and the reaction forces that will occur during the rescue work. For example, the floorboard may be pulled up and the A posts in toward the driver. As the floor buckles, the roof may also be drawn down onto the occupant. Rescue personnel working the equipment and medical personnel attending to the trapped driver will have to be alert for any such movement.
Then, when a reaction is anticipated or observed, strategic cuts with saws, chisels, or power cutter units into the structure of the vehicle may disconnect the structure of the car, allowing the column to move without the other unwanted reaction movement. Ideal locations for these relief cuts are the rocker panel or A post near the bottom of the front-door hinge, the A post near the junction with the top of the dashboard, and the sheet metal of the floor.


The choice of tools for the inside push and their placement will be strongly influenced by the position of the trapped occupants and the configuration of the vehicle. A lifting or pushing tool is necessary. This can be a hand tool such as a mechanical jack, a hydraulic tool such as the standard hydraulic jack or the hand-operated, hydraulic ram with a V head, or a power rescue system spreader. (Air bags won’t work with this method because they require too much room to expand when in operation.)
The determination must be made as to where best to place the base or bottom end of the equipment. One factor is the proper position of the tool against a lower point on the steering column. Generally a push right on or at the brace or bracket that secures the column to the dashboard is best. This places the push of the equipment below any tilt-column knuckle joints that may be present. Also, centering the force low on the upper shaft of a split steering column reduces or eliminates the seesaw effect. If relief cuts have been made, it also enables rescue personnel to simultaneously move a major portion of the dashboard near the column, including lower sections of the front A posts and any hanging brake, clutch, and accelerator pedals. (See Photo 4.)
A second, unavoidable factor in tool placement is the position of the victim, especially the person’s legs and feet.
Ideally, if the injured patient isn’t in the way, rescue personnel can get directly under the column for a direct forward lift or push. This puts the lower end of the tool on the floorboards, a very weak area that won’t support the reaction of the push on the column. Blocking must be placed between the floorboards and the base end of the pushing tool to minimize collapse or punching through of the floor. (See Photo 5.)
If there’s no room inside the vehicle for the blocking, the wood can be placed underneath the vehicle, directly under the base end of the pushing tool. The floor will crush onto the wood blocking, which will absorb the force.
As with other column-moving methods, there will be variations that depend on the tool chosen.
A mechanical jack can be quite effective. The jack is brought into the passenger compartment, and the lifting toe of the jack is placed directly under the column, as low as possible. The jack itself is arranged so as to leave its handle facing on the passenger side of the vehicle. In this way, there’s operating room for the jack handle. The crew operates the jack from the passenger side.
It should be noted, though, that as the column moves, there’s a chance the toe of the jack will slip up the column and into the driver’s lap. Due caution should be exercised.
A slight modification uses an additional item, a short length of rescue chain. For conditions where the jack toe can’t be placed under the column for a direct push or lift, a loop of chain is formed low around the column. The toe of the jack extends above the column, near the typical location for the gear selector indicator, and the loop of chain is lifted over it. As the jack operates, the toe lifts the loop, and the loop pulls the column up. Blocking is definitely required at the floorboards or under the vehicle for this technique.
Another inside variation uses a power rescue system spreader or ram. With the spreader, the bottom tip of one arm is positioned to work from the driver-side rocker panel at the junction of the A post or at a strong point on the passenger-side floorboard. The tip of the upper arm is placed at the proper low point on the column. As the arms open, the column is lifted up and toward the opposite-side front A post. The ram is similarly positioned to work from the rocker panel to the column.
Two problems are common with this technique. As the column moves, the tool contacting the column has a tendency to fall suddenly toward the driver’s lap. Also, the positioning of the driver may make this technique too risky; the person’s legs and feet may be extremely close to the column, leaving no safe working room.


If the victim is close to the column and rescue personnel still want to use a pushing or lifting tool, a sideways push coming from the passenger-side rocker panel near the junction with the front A post may be the solution. Shorter pushing or lifting tools, unable to reach the column from the passenger-side rocker panel, may be positioned to work off of the transmission tunnel or hump at the floorboards. With front-wheeldrive autos, where there is no transmission hump, there may be an adequate push point or anchor point at the front edge of a seat adjustment track. If the need arises and the front seats are bucketstyle, it may be possible to remove the entire passenger seat. With the seat gone, rescue personnel have a better chance of properly positioning the pushing tool as they work from the passenger side.
The rocker panel push
If the tool is to work along the rocker panel rather than the transmission hump or seat track, a suitable anchor point is needed.
Existing anchor points on most autos include the seat belt retractor mechanism and anchor bolt as well as the bottom edge of the B post (the second post from the front). But if the seat belt retractor is on or in the front door (as it is with some late-model cars) and the B post will not suit, you can make your own base of support. With a cutting tool such as a power cutter, chisel, or reciprocating saw, remove a pieshaped piece of the rocker panel. Then place the pushing tool into this pie cut. When it’s operated, the reaction of the column compresses the cut rocker panel, giving it some strength. This is usually enough to accomplish the column movement.
Another method of producing a suitable anchor point is endorsed by only some major manufacturers of power rescue tools. This technique uses the power rescue spreader or cutter itself as an anchor point wherever desired.
In the case of the spreader, the unit is converted to a “squeezer” by closing the arms onto the rocker panel at the intended anchor location. In the case of the power cuter, the tool is operated until it has partially cut through the rocker panel; it’s left there as the stationary push point. Then the columnpushing tool is anchored against the cutter or spreader. (See Photo 6, below left.)
Again, it must be emphasized that not all manufacturers endorse this application of their power rescue tools—the tools may be damaged when used this way. However, rescue personnel should be aware of this special technique if ever confronted with a life-ordeath situation.
Any tool used on the driver’s side for pushing or lifting the column presents an obstruction when it comes time to extricate the oncetrapped occupants. Therefore, after the equipment performs the push, steps must be taken to secure the column in the raised position. Once that’s accomplished, the rescue equipment can be removed, making way for patient extrication work to follow.
One way is to move the column past its point of no return. In other words, push or lift the column beyond what’s necessary. When the pushing tool is relaxed, the column relaxes, too, but not enough to become a hindrance once again.
Or vou can use a chain to secure the column to a solid point along the front or outside structure of the vehicle. If the roof is still intact and roof removal isn’t anticipated, a four-foot wood block could be placed over the windshield opening and above the column. The safety chain loops the column and the wood block; as the rescue equipment is released, the chain loads onto the four-footer, and the column remains raised.
If you can’t move it
The problem of keeping the column raised doesn’t exist with the fifth steering wheel extrication method—column removal. Column removal can be very successful if done correctly, and by no means should it be the last method considered at a rescue incident. But if used, it has to be done right, or it will do more harm than good.
The size-up is conducted as before, and all safety procedures are followed for emergency service personnel and the trapped persons.
The initial objective is to reduce the amount of material that must be cut through. This is done by locating the cut low on the column, where there’s typically less material surrounding the shaft, and by exposing the column housing and shaft assembly as low as possible within the passenger compartment, preferably at the dashboard brace or bracket area. To accomplish the latter, portions of the dashboard and instrument panel may have to be removed. This can be done by manually pulling or breaking away the plastic components, along with some light-duty cutting or sawing of the other dashboard materials.
Once the column shaft has been exposed, it may be possible to remove portions of the shroud that surrounds the shaft. By removing or bending away this light-gauge metal, you’ll leave less material to cut through. The column shaft underneath is generally a ¾-inch-diameter component made of coldrolled steel. Cutting through it can be done by sawing or shearing. Each action requires different precautions and has different results.
To saw, you can use a hand hacksaw or an airor electricpowered reciprocating saw. (See Photo 7 on page 53.)


The blades should be continually lubricated to cool them and to aid in removal of cut particles from within the cut. The easiest way is to apply a lightweight machine oil from a squeeze bottle or oil can during the cutting. If you don’t have oil, use a trickle of water or a discharge of compressed air from a partially opened air cylinder or air compressor line. (The sawing work can be done without lubrication, but the blade may wear out prematurely and the operator will experience greater difficulty in working the tool.)
Start the cut on the underside of the column. Have a second rescuer hold onto the top of the steering wheel ring or column to steady it. This person should apply a slight upward force to ease any binding of the saw in the cut as the column begins to bend. Also, when the shaft is cut about halfway through, the column can be bent upward. This moves the steering wheel and column away from the trapped occupant, eliminating the need to cut all the way through the shaft.
Shearing with the cutter unit of a power rescue system is another option, but it entails some serious safety concerns. The manufacturer of the rescue tool you use may not recommend it.
Shearing is the compression or squeezing together of a part of an object so that a failure occurs at the shear point. It differs in one important respect from sawing through with serrated teeth, which imparts only enough energy to warm the saw blade and the object on both sides of the cut: Shearing imparts energy to the power tool as well as the object being cut. If the energy build-up is too great, the tool or portions of it may fail. Shearing an object that has a free or unsupported end—such as the steering column—may result in a sudden release of energy that launches the free end at the instant of shearing. For that reason, it’s wise to shear only halfway through the column and then bend the column the rest of the way.
Shearing-type rescue tools should be used only if all the following conditions are met:
- The manufacturer approves of the use of the tool for cutting columns.
- Rescue personnel are trained in operating the tool in this evolution.
- There’s enough space to properly position and operate the cutter unit.
- Trapped occupants aren’t in direct contact with any portion of the steering column, the steering wheel ring, or any of the supporting spokes.
- Trapped occupants can be well protected with covers and wooden boards.
- The free end of the steering column can be restrained or “captured” if it snaps.
- Any risk associated with this evolution can be justified by the anticipated end result.
The danger of injury from shearing with a power rescue cutter may be unjustified. And the task may be next to impossible in field situations, anyhow. The positioning of the injured patient or the size of the cutting tool may prevent maneuvering it into the proper position for the cut. Even if the tool can be properly placed on the column shaft, the operation of the cutter may move the tool into a position that would compromise the safety of the patient.
Think twice about cutting columns in two with power cutters, then think again!
With five basic methods of disentangling persons trapped by steering columns, open-minded rescue crews have an opportunity to pick the one that’s most appropriate to the situation. Ideally, rescuers should be aware of all five basic methods. For each method, there should be a primary and a back-up tool that can accomplish the assignment.
It’s only through this type of redundancy and depth within the rescue tool inventory and the minds of the rescue personnel that safe, efficient steering wheel extrications can be accomplished under real-world conditions.

