Steering Column Extrication: Across the Front
Although the construction of newer cars makes this customary method more difficult, placing rescue tools on the hood can still work. The second in a series of three articles.
Features
RESCUE
Working across the front hood area during auto extrication is considered the grandfather of all column movement. It’s unfortunate that many rescue teams are locked into this as their only method.
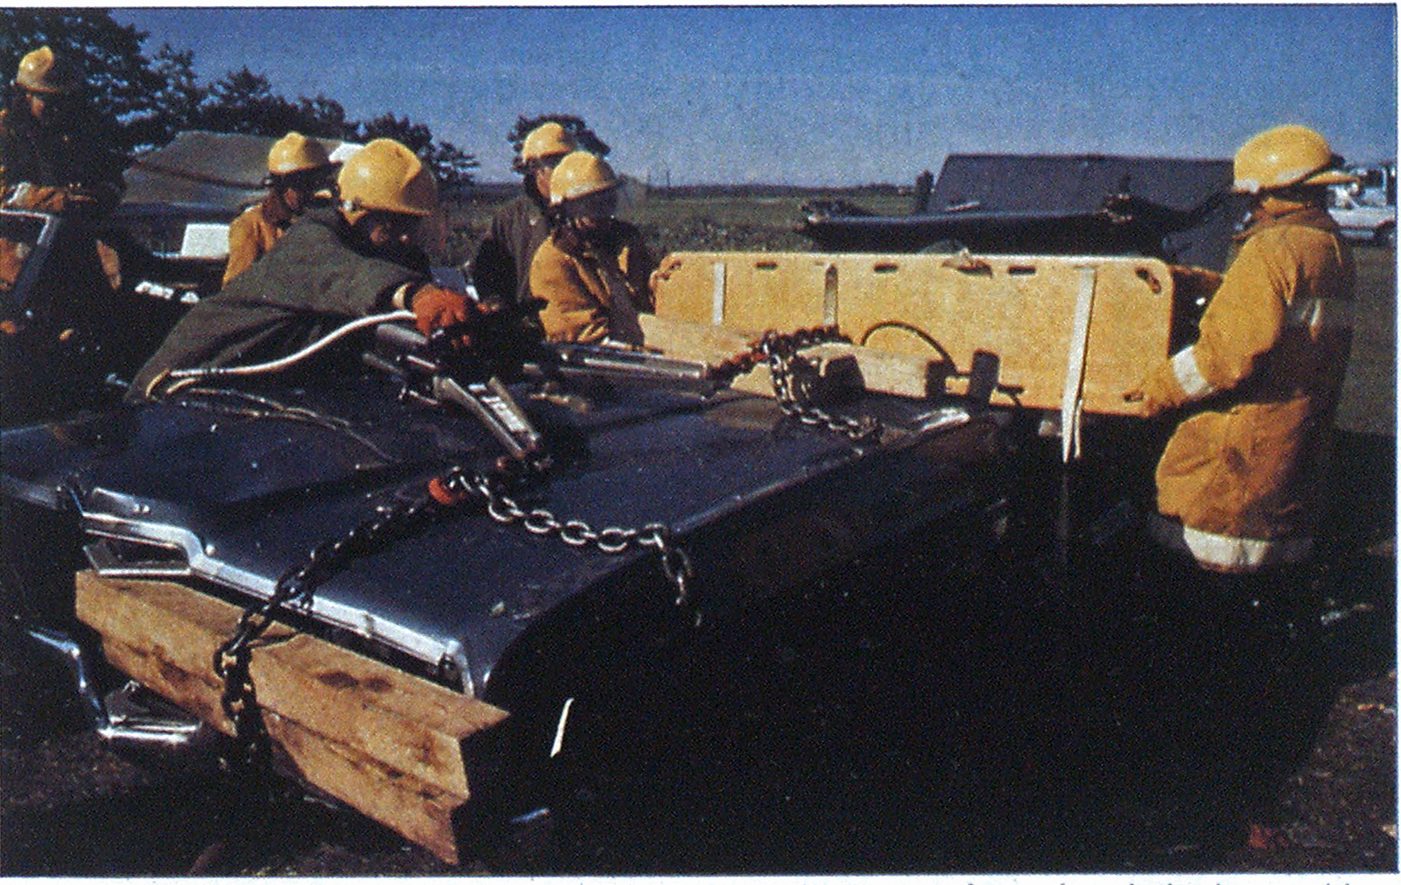
Working across the front involves either pulling the column forward or lifting a length of chain or strap placed across the front. (See Photo 1, opposite.)
But the frameless “new technology” vehicles that have plastic bodies, lightweight metal, and crushable front ends are now more common than ever before. Often the hood and fender area crumbles so severely upon impact that there’s no longer a solid surface on which rescuers can anchor their pulling equipment. (See Photo 2, opposite.)
It’s for this reason, plus the seesaw action of the rack-and-pinion “split” steering column common on front-wheel-drive vehicles (described in the first article in this series, “Steering Column Extrication: The Preparation,” in the January issue) that this method must not be relied upon as the primary one. The good old reliable “lay the tool across the front end” method is neither good nor reliable any longer.
If equipment is to be used across the front of the damaged auto, the area must be surveyed for optimal equipment position, status of the shock-absorbing bumper, and general strength. The bumper must be reported safe and the front of the vehicle capable of supporting the pull placed upon it.
A secure anchor point for the chain or strap must be found under the front of the vehicle. This may be the axle, torsion bar, or tie rod. This anchor point serves as the basis of the column-pulling setup; if the anchor point is secure, the set-up is off to a safe start.
Next, what’s left of the front grille area should be strengthened. It generally isn’t effective to place blocking material on top of the damaged hood or under the rescue equipment. Although it may look good, this doesn’t really strengthen the front end, and it may interfere with the movement of the column. It’s better to place blocking over the grille and bumper and on top of the firewall, near the dashboard.
Two effective methods exist for doing this “beefing up.” One uses “four-footers,” four-foot-long, four-inch-by-four-inch hardwood blocks. Rescuers place two or three of these parallel to the front bumper and resting either on the bumper or just above or below it.
A second and newer technique involves a flexible ladder cribbing assembly. (See Photo 3 on page 50.) A rescuer holds the rope handle and drapes the cribbing blocks over the front area of the vehicle, then attaches the handle to a point near the windshield—such as the wiper arm, hood lip, err louvered vent area—using a bungie-type stretch strap. The ladder cribbing is thus secured in position, making rescue personnel available to perform other required
Once the front has been blocked and secured, the chain or strapping is brought over the blocks and across the front of the auto. The anchor chain or strap can be secured in position with another bungie-type stretch strap. This second strap holds both the blocking and the anchor chain or strap in place.


(Photos by Ronald E. Moore)
CORRECTION: Because of an editing error, the beginning part of this series, in last month’s issue, contained two references to four-wheel drive. The technology Mr. Moore is describing as an extrication challenge is front-wheel drive.
Wood blocking should also be added to the dashboard and the top of the firewall. This provides lift for the chain or strap that will move the column, to make more effective use of the rescue equipment’s pulling power.
A more progressive approach is the sliding box crib, a moving and self-adjusting system. The sliding crib is best constructed of three four-foot-long, four-inch-by fourinch blocks. (See Photo 4 on page 50.)
Two of the three blocks act as “rails” of the crib. These are placed 12 inches apart in line with the column pull, parallel to the side of the vehicle. The remaining block becomes the “slider.” It’s laid across the two rails at a 90-degree angle to them. Starting out at the end of the rail blocks near the column, the slider slides toward the front of the auto during the column movement. (See Photo 5 on page 50.) By doing so, it converts the energy of pressure into motion to keep the hood from being crushed.
At the same time that this preparation work is going on near the front of the vehicle, other personnel can work on securing the chain around the steering column and wheel assembly.


The goal of this wrapping is to allow for the column to be moved as safely and effectively as possible. This means keeping the column from breaking and from seesawing within the auto, which would only make conditions worse for the injured occupant.
The item used to wrap the column is determined by the equipment that will be doing the pull. With power rescue tool systems, the rescuers may be compelled to use the chain or strap that the manufacturer provides. Substitute chain or strap can be used only if it meets or exceeds the specifications of the original equipment. Many rescue teams that use ½-inch alloy chain with their rescue systems have purchased additional 10or 12-foot lengths of equivalent quality from local suppliers.
If equipment other than power rescue tool systems is used, then smaller, more easily maneuvered chain or strap is secured to the column. For a typical automobile, column pulling across the hood can be accomplished with about 4,000 pounds of power. This means the strap or chain should meet and exceed this load requirement by a suitable safety margin.
If you choose strapping rather than chain, you’ll have to take safety precautions. The strapping, being a nylon material, is more vulnerable to injury than the chain.
Sharp glass or metal can cut the strap, particularly when the strap is drawn tight during a pull. Contaminating fluids from the car— such as oil, battery acid, gasoline, and diesel fuel—also can cause permanent damage to the strap. All potential sources of contamination as well as sharp metal and glass should be removed, taped over, or draped with a safety tarp cover. By this point in the rescue, the windshield should be completely removed.
Another problem: Strapping has a tendency to stretch under stress. Especially in hot weather, it can stretch so far that the rescue equipment actually runs out of travel before the column has been moved enough to complete the job.
All vehicle rescue evolutions that can be carried out with the lengths of nylon strap and ratchet provided with some rescue equipment can be done just as efficiently with appropriate rescue chain. The chain isn’t susceptible to physical damage and doesn’t noticeably stretch under load conditions.
Wrapping
Having chosen between a strap and a chain, you’re ready to put it in place around the column.
In a column wrap, the precision of the work is critical. The rescuers wrapping the column should think of themselves as being in the victim’s place to understand that there’s no room for error.
One way to increase safety is to secure the pull as low as possible. A pull low on the column will minimize stress on connecting joints in the column assembly, such as the tilt-column knuckle joint, and reduce the potential seesaw action of a split column. Access to a low pulling point is improved if rescuers remove the plastic top portion of the dash and instrument panel.

(Photos by Ronald E. Moore)
With the relatively large and bulky chain required with some rescue systems, the only real option is to make one or two wraps with the slip hook end of the chain low around the column. Proper positioning of the hook is required. (See Photo 6 on opposite page.) Make sure that when the chain pulls, it pulls into the back side, the “heel,” of the slip hook. The load of the pull shouldn’t stress the open side, the “toe,” of the slip hook, because that would bend the hook open.
I ve had a lot of success with something I call the “cradle wrap.” (See Photo 7 below.) Its purpose is not only to safely secure the chain or strap to the column, but to support the vulnerable middle section of the column and use leverage to maximize the pulling equipment’s effort.
The cradle wrap works well with chain up to ⅜-inch in diameter and at least 10 feet long, or with a 20foot length of strapping up to 1 inch wide. The ½-inch and larger chains of some power rescue tool systems are too large and bulky for this particular wrap.
If you’re using a chain, begin by placing the center of the length over the top of the steering column, sliding it down as low as possible into the dashboard and instrument panel area. Then place one of the two ends under and around the column to complete one full wrap.

There are now two free ends, one hanging on each side of the column. Looking from the driver’s point of view, cross the end on the left under the column to the right side, and bring it under and then over the right-side steering wheel spoke. Similarly, cross the end on the right side of the column under and around the column, wrapping under and over the left-side steering-wheel horn button and spoke.
With the ends close to the column, pass each under the top portion of the steering wheel ring and out onto the dashboard. The chain ends are then available to be joined together to form a loop or may be used as two separate lines of chain.
The only difference in using nylon strapping is in the initial placement of the strap over the column. Instead of the center of the length, a point of the strap six to eight feet from the ratchet device is placed over the column.
The ratchet end of the strap and the other, longer strap section are passed under and around the column just as with the end of the chain. If positioned properly, the ratchet will be outside the car, on the front hood, just about at the top of the firewall, where it’s accessible to the rescue personnel.
The crossing of the chain or strap underneath the center section of the column—-the “cradling” of the column—gives support to the upper section and minimizes the seesaw action during pulls. If the column slips or fractures, as with the failure of a tilt joint, the cradle wrap continues to act as a restraint for the upper end of the column, forcing it away from the interior of the auto and jamming the fractured end into the dashboard. (See Photo 8, above right.)
At the same time, the chain or strap is secured low on the column, below any failure areas. And with the chain or strap placed over the free end of the steering column, the mechanical advantage of the pull is increased.
Before going any further, rescuers should give the person trapped behind the wheel one piece of protection beyond the usual. By now, following normal procedure, the trapped person should already have the companionship of at least one rescue person, preferably a medical person, and anyone inside the car should be covered with protective material. (See “Extrication Safety Checklist” on page 35 of the January issue.)


A blanket or tarp isn’t enough for the actual column pull, though. If there’s a failure of some steering column or vehicle component during the pull, a blanket or tarp probably won’t deflect the flying object and prevent injury. More likely, the blanket would be penetrated and those under the cover injured.
An additional measure of patient safety involves the use of a ¾inch-thick, 18-by-72-inch medical longboard. This equipment is usually thought of strictly as a medical tool for bringing the immobilized patient out of the vehicle, but it’s also a valuable safety tool.
Two rescuers, one at each end of the longboard, can hold it lengthwise and on edge across the inside of the vehicle, placing it between the people and the steering column. (See Photo 1 on page 49.) If any broken glass, plastic, or metal flies off unexpectedly during the pull, the board acts as a deflector.
If there’s not enough room for the longboard inside the car, use a medical shortboard instead. Positioned as a chest protector, the shortboard protects the person directly behind the column.
Now the rescue equipment that will be used to pull the column can be placed in position. If power rescue tools are to be used, the tool itself, the power plant, the hoses, and the operator should be positioned on the passenger side of the vehicle, if possible. This clears the driver’s front fender of obstructions for the crew members hooking up the equipment and places the tool operator in a safer position. The operator is at arm’s length, plus the length of the tool, away from the “line of fire.”

If a manual, ratcheted pulling tool is to be used, the body of the tool is placed near the front end of the auto, and the working end— the pulley and slip hook—is secured near the column. This allows for the safest use of the tool and maximizes the tool’s pulling power.
With blocking and chain secure at the anchor point and at the column, the inside personnel protected, and safety observers ready, the pulling equipment is operated. As the pull takes place, the action and reaction are monitored. The action is stopped if the desired result is achieved, a problem is detected, or the tool runs out of travel. If successful, the tool may be left in place holding the column up.
If the equipment has to be reset and releasing pressure from the pulling tool would lower the column back onto the trapped person, a way of securing the column in the up position must be devised. A simple technique is to take a safety chain or strap and secure it around the column, attaching the other end to a stationary point somewhere on the vehicle. If the roof is intact, a four-foot hardwood block can be placed vertically across the windshield area, above the column. A chain or strap is then looped over the block and around and under the bottom of the column. Once it’s drawn tight, this loop holds the column up as the primary rescue equipment is released.
Many of the same procedures apply to the second basic column movement method for working across the front of the automobile, referred to as “lifting a length.” One or more lengths of chain or strap are anchored at the front of the vehicle, run across the front hood area, and secured to the column as before. The difference with this method is that the rescue equipment, instead of being used to pull horizontally, is used on top of the firewall area of the vehicle to lift vertically.
To prepare for the lift, either a set of four-foot hardwood blocks or the ladder crib blocking is placed properly at the front area of the vehicle. One block’s also needed at the dashboard and firewall area, parallel to the windshield, as a stable base for the lifting tool. The chain is placed from the front anchor point to the movable column so as to be relatively tight on the lifting tool. With all appropriate safety measures taken, the length of chain is lifted at a point directly over the top of the firewall. Using air bags or the spreader unit of a power rescue system, this method can move a column very quickly, compared to the more labor-intensive set-up of pulling horizontally across the hood.

For purposes of illustration, assume for the moment that we’re using a spreader. The spreader is positioned with its lower arm on the wood base plate. The upper arm tip is located under the chain. As the arms of the spreader are slowly opened, the upper tip lifts the chain.
There’s a possibility that, as the spreader arms open more than 12 inches, the chain will slip off the tip of the upper arm or the spreader unit itself will torque to the side and slip out of position.
Spreader units that have the chain-grab hook-and-shackJe accessory can be used in a way that will prevent such slipping. This technique requires the spreader to work much like a crane as it lifts the length of a chain.

In setting up for this evolution, the spreader unit arms are opened about 14 inches. A single chain-grab hook-and-shackle unit is then placed on the upper arm only; unlike the conventional use of this shackle assembly, the unit is positioned to hang down from the underside of the upper arm. The spreader is then held in position on the base plate. The chain length running from the column is attached to the dangling grab hook at the appropriate point.
Again, the chain is lifted as the arms of the spreader are opened vertically.
With this basic arrangement, there’s a whole range of tools that can accomplish the task of lifting a length of chain.
Consider hand tools such as a 7,000-pound-capacity mechanical jack (see Photo 9 on page 52) as well as standard hydraulic tools such as the hydraulic jack and the hand-operated, hydraulic ram, or even air-powered lifting tools such as air bags or air cushions.
If a standard hydraulic jack is used, the chain won’t stay on the top serrated head of the unit. To solve this problem, it may be possible to place a V head from a hand-operated, hydraulic spreader loosely over the serrated head of the jack. The chain is run over the V head as the jack operates and is lifted. This in turn compresses the V head onto the hydraulic jack.
Working on air
If air-powered lifting tools are used, they’re most effective when positioned as directly over the top of the firewall as possible. This makes column movement more efficient and uses the strength of the firewall for some added, essential stability.
The largest-capacity bags or cushions should be deployed. It takes only a few tons of power to lift the steering column; the largecapacity air bags will be used not for their strength but for their lifting height.
One air bag can be laid on top of another, for a maximum of two. (See Photo 10 on page 52.) Then the bottom bag is inflated partially, followed by partial inflation of the top bag. The operator alternates this inflation to accomplish the lifting.
But the bags shouldn’t be fully inflated. A maximum of 70 to 80 percent of the peak inflation height of each bag should be the rule. The logic behind this is twofold.
Underinflating the bottom bag maximizes the gripping surface that the two bags share. (If each bag were fully inflated, it would be like trying to balance one basketball on top of another.)
In addition, underinflating the upper bag serves to trench the chain or strap into that bag’s surface. The trench, a long depression, allows the strap or chain to nestle into the bag, again maximizing the gripping power of the bag and minimizing the chance of the chain or strap rolling off during the lift.
For the greatest safety, there must be two separate strap or chain paths over the bags. Parallel lines further lessen the possibility of the bags shifting during inflation and slipping out accidentally. Recall that as the cradle wrap was completed, there were two paths of chain or strap coming out from the column area toward the front of the vehicle. These separate lines can simply be extended over the bags to make the parallel lines.
As the lift takes place, action should be stopped when the desired results are obtained, the air bags are each inflated to about 80 percent of their peak height, the stacked air bags shift off center and become potentially unstable, or some problem with the action or reaction of the column develops.
Lifting and pulling the steering column by working across the front of the vehicle are just two of the steering wheel extrication possibilities. The final article will describe the other three—working across the windshield, pushing from inside, and removing the steering column altogether.

