AN ON-SCENE DECONTAMINATION SYSTEM

OPERATIONAL ZONES
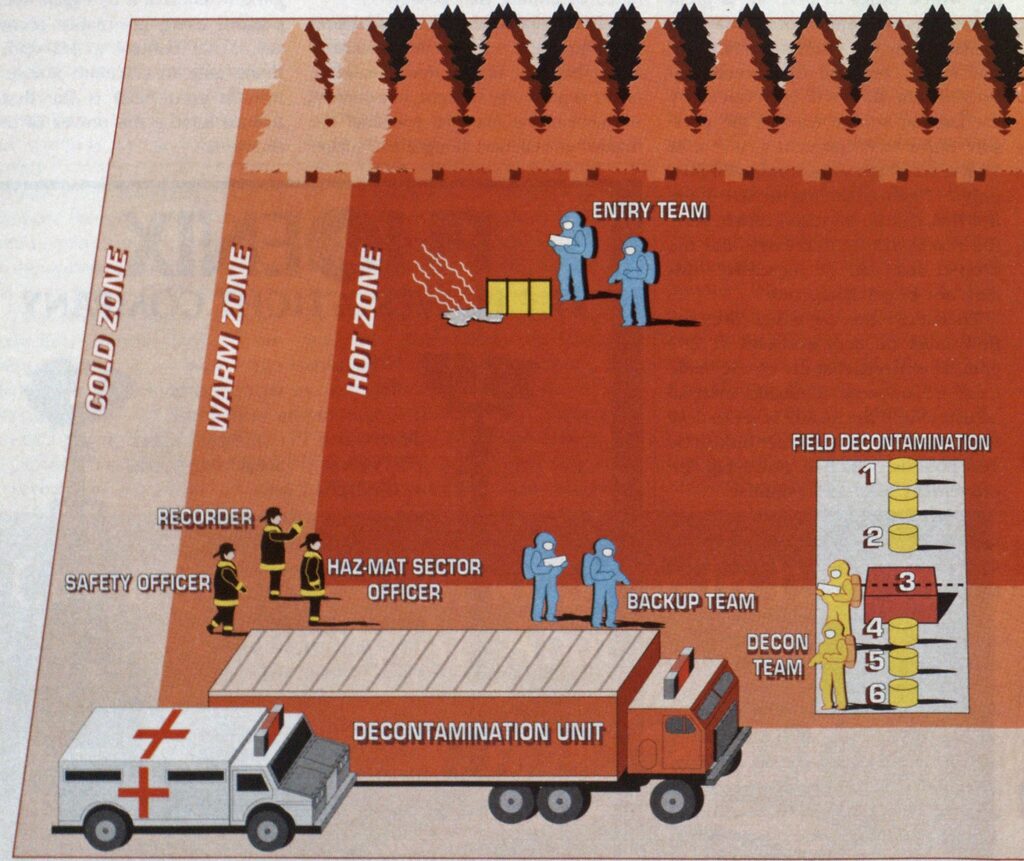
After the hot zone is established initially by personnel at the first responder awareness level, it may be expanded several times by more experienced haz-mat personnel and/or the incident commander as the operation and movement of personnel dictate. Many individuals perceive the “hot,” warm,” and “cold” zones as lines dictating the appropriate levels of personnel protection. In fact, protection levels depend on what you’re doing and where you’re doing it. The hot zone should be large enough so that its perimeter poses no danger to personnel without personal protection. Effective mitigation and decontamination for many incidents require personnel with Level A protection. Level B protection, and turnout gear. Note that field decontamination begins in the hot zone and ends in the warm zone; a decon system entirely in the hot zone would have much the same effect as throwing a doormat in the middle of a muddy yard and expecting to get back into the house with clean shoes.
AREAS OF REFUGE
An area of refuge is where personnel without life-threatening injuries are grouped within the hot zone until incident command determines how best to handle their exposure (treatment of severe or life-threatening injuries takes priority over decontamination). This location should be far enough away from the source of contamination so as to minimize additional exposure to the product. Several areas of refuge may be required, depending on the number of contaminated individuals, exposure levels, and the extent of injuries, if any. The belief that the hot zone is dangerous for personnel or victims without maximum-level protection is only partly true; while the immediate area around the release might be dangerous to life and health, if the zone is set up properly there should be one or more safe areas where exposed personnel can stay until decon can be established and performed.

SITE SELECTION
Consider the weather (primarily temperature, relative humidity—wet and dry bulb—and wind direction and speed), topography, and geography. Temperature will determine if all of the decon (field and personal) can be accomplished outdoors. It and humidity will be factors in determining the operational time the entry team and the decon personnel work in chemical protective clothing. Many departments are switching to portable weather stations to determine conditions at the exact location. Placement of the field decontamination system also hinges on the contour of the land and roadway and street construction, as well as on the setting. You wouldn’t want to place it in a low-lying area where product can drift or accumulate, exposing decon personnel and reexposing entry teams; by the same token you must consider worst-case senario and not place a decon site where failure of the shower system would permit runoff to exposures, lakes, ponds, streams, sewers, manholes, and so forth.
Most haz-mat teams throughout the country train their members in mitigation and control and in the use of specialized equipment and devote at least some training hours to the selection of protective clothing. But some teams have put decontamination on the back burner, even though it is a very important stage in haz-mat response. The success of the operation depends to a great extent on decon, yet it is probably the most misunderstood and misused facet of haz-mat response.
There are two types or phases of on-scene decon. portable field decontamination showers for tools, equipment, chemical protective clothing, and firefighter protective equipment (in other words, anything other than personnel); and personal decon showers. The following discussion assumes that safe and effective incident actions—identification and confirmation of the product; evacuation, if necessary; establishment of the hot zone and expansion, if necessary; selection of chemical protective clothing; personnel entry; establishment of areas of refuge; requests for interagency response; and so forth —have been accomplished. Remember that although there are certain basic principies that characterize every effective decon system, the system should be flexible enough to meet any challenge you may face.
FIELD DECON
First you must decide if it’s possible to decontaminate tools, equipment, and clothing. If the product has contacted only the surface of the material and has not permeated or been absorbed by the material, decon is possible. However, if permeation has occurred, you may have no choice but to overpack everything for disposal. Next determine how to accomplish equipment and chemical protective clothing decon:
- Dilution with water. Water is usually readily available, but several factors should be considered: Does the runoff have to be recovered, and are enough salvage drums available? Is the weather warm enough so that freezing of the runoff won’t occur? Is it too
- cold to subject personnel to outside decon? Have we adjusted the water pressure to about 10-20 psi to avoiddriving the contaminant farther into the protective clothing or worse, into the skin?
- Solution. Neutralizing solutions (see box below) by themselves or in conjunction with water may be used for certain chemical contaminants such as corrosives. The idea is to bring the contaminant’s pH level to neutral, thereby reducing or eliminating its risk to the person affected. Some solutions, while neutralizing the hazardous material, may cause damage to the skin or layers of protective clothing. They also may be expensive and difficult to obtain in large quantities. Consult manufacturers, chemists, and industrial hygienists on what solutions and strengths to use.
- Chemical breakdown. Certain chemicals may be used to cause a reaction that breaks down the contaminant into a less harmful substance. This also will require technical advice and may be expensive and difficult to obtain in the desired quantities. Many biological hazards, for example, are rendered less harmful by the use of a chlorinated solution (such as bleach).
- Disposal. This may be the safest as well as the most economical method. It may be cheaper to buy new than to decon and reuse. Many departments now are putting less expensive oversuits over their expensive Level A chemical protective suits; the heaviest amounts of contamination are thus on the oversuit, which is then disposed of. This provides them with a greater chance of salvaging the Level A suit. Although the oversuit may have shielded the Level A suit from contamination altogether, the Level A suit cannot be placed back into service until it is cleaned, leak-tested, and checked for defects. Any faults should be corrected and retested; any suit failing this test should be disposed of.
- Combination of dry and wet. This action may be required for waterreactive materials that are not hazardous when dry but are hazardous when wet. For example, it would be wise to remove as much powdered corrosive from the protective clothing as possible with a dry decon before performing the wet decon.
DECON SOLUTIONS
SOLUTION A
5% SODIUM CARBONATE – 5% TRISODIUM PHOSPHATE (TSP): Add 2 lbs.
TSP and 2 lbs. sodium carbonate to 5 gallons of water. Used for inorganic acids, metal processing wastes, PPBs, PCBs, solvents, organic compounds, etiologic materials.
SOLUTION B
10% CALCIUM HYPOCHLORITE: Add 4 lbs. HTH or pool chlorine to 5 gallons of water. Used for heavy metals, pesticides, dioxin, PCB, chlorinated phenols, cyanides, ammonia, nonacetic inorganic wastes, etiologic materials.
SOLUTION C
5% TRISODIUM PHOSPHATE: Add 2 lbs. TSP to 5 gallons of water. Used for organic compounds (trichloroethylene, chloroform, toluene), PCBs, PPBs, oily/greasy unspecified wastes.
SOLUTION D
HYDROCHLORIC ACID – DILUTE SOLUTION: Add one-half pint HCI to 5 gallons of water. (Always add acid to water, not water to acid.) Used for inorganic bases, alkali, and caustic wastes.
SOLUTION E
CONCENTRATED DETERGENT SOLUTION: Add 1 cup powdered or liquid
detergent to 5 gallons of water. Used for radioactive materials.
PORTABLE FIELD DECONTAMINATION SHOWER.
Many departments either buy or make their own decon systems. There are both inexpensive and costly systems. When choosing a system, consider the following:
- Showers should be inexpensive in case they can’t be decontaminated and must be disposed of.
- A shower should be able to contain product runoff until such time as the runoff is deemed safe or can be transferred to recovery drums.
- Showers should be equipped with elevated platforms for members to stand on during the decontamination—they should not be standing on the product that was just removed from their bodies.
- Showers should be equipped with splash protection.
- The entire system should be compact. It should be small enough to put into recovery drums at the site in the event that disposal is required.
- The system should be complete yet simple to set up in a minimal amount of time by inexperienced personnel. Personnel should only have to be told where to position the shower. This will help free haz-mat technicians and specialists to perform sizeup and plan and prepare the operation.
A cost-effective yet efficient shower that meets the above criteria is easy to construct. Other than the steel frame for the base of the containment area, all the necessary field decon shower components may fit in a 55-gallon recovery drum. This is desirable because first, you don’t have to hunt for anything—it’s all inside the drum — and second, it makes disposal a simple matter should it be necessary. Several showers packed in recovery drums can be placed in strategic locations in the community and brought to the scene by units other than the haz-mat team. Information on how to assemble the field decontamination shower is on the underside of the recovery drum cover.
The shower components are packed into three crates that in turn are placed in the recovery drum in order of use, making setup that much easier. The first part of the field decon shower that’s set up is a diked area. This area provides a secondary containment should the shower containment fail. The secondary containment is kept in place with three lengths of charged hose (the size of the hose will determine the capacity of the secondary dike) connected to a three-way gate. A tarp is placed over the hose and the ends folded underneath. This helps keep the tarp in place. The decon stations are clearly marked on the tarp shown. This self-instructional tarp makes it easy for personnel unfamiliar with setting up the system to do so correctly without difficulty; it also helps if personnel forget what to do at a particular stage of the field decon process—all they have to do is look down at their feet for instructions.
Once the secondary dike is in place, the primary shower area is constructed. The frame is assembled to form the primary’ dike area, and the containment tarp is lashed to the steel frame with tie wraps, wire, or other means. Splash protection is then assembled; in this particular shower an attachment was created to add piping to the frame that in turn supports a splash tarp. Then a raised platform is positioned in the shower area. Remember that the platform must be strong and stable enough to prevent failure. In this setup plastic crates topped with dry deck serve as the platform. The field decontamination shower is now complete. Setup time should be less than five minutes for personnel who have no prior training.


FIELD DECON PROCEDURES
STEP 1-TOOL AND EQUIPMENT DEPOSIT (UNASSISTED): This being the first procedure makes sense since tools and equipment are most likely to have had direct contact with the contaminant. It will be someone else’s job (private contractor, waste handler, etc.) to decontaminate or dispose of this equipment as necessary. This is an unassisted station of decon, it is not necessary at this point for decon personnel to have any contact with the entry team. Decon personnel should try to avoid any contact with the entry team members until they are past the shower area to limit decon personnel exposure. Decon personnel should assist the entry team members before they reach the shower only when it is necessary to do so. (Although personal protection for decon personnel varies depending on the nature of the incident, in general, however the entry team is protected they should suit up one level lower.


STEP 2 — OVERS ITT, OUTER GLOVE, AND OUTER BOOT DEPOSIT (UNASSISTED): These are the items of protective clothing most likely to have the heaviest concentrations of contaminant picked up from walking and handling anything with product on it Entry team members should assist each other in removing these articles. The outer boots should be removed first, followed by outer gloves and oversuit, if worn; taking the outer gloves off first would provide less protection for the hands when removing the booties.
STEP 3—DECON SHOWER, WASH AND RINSE (A AND B OPTIONS): The decon team will start to work in the decon shower wash-and-rinse area. It is at this location that the different solutions may be used. The application may vary (soft-bristle/ long-handle brushes, sprayers, etc.). The decon team must do a thorough job here, paying particular attention to creases, seams, splash protection areas, and dump valve areas. A and B options are for the placement of additional shower areas, if necessary. During the shower process, attention must be paid to the level of product in the shower; it should not be allowed to rise to the level of the elevated platform. Before that point the runoff should be contained in recovery drums until a determination can be made as to how it should be treated or disposed of. At the shower the decon process crosses over from the hot zone to the warm zone.
STEP 4 —PROTECTIVE CLOTHING DEPOSIT: Fully encapsulating chemical protective clothing is removed at this stage (though sometimes Step 4 is preceded by Step 5 in cases where Level B or turnout gear was the only level of clothing protection used and SCBAs have to be removed before clothing deposit). The decon team is now able to make contact with the entry team. The suits should be removed with care, and even though the suit was washed and rinsed, contact with it should be kept to a minimum. A record of who wore the suit should be made. The suits may require further decontamination by a private company.

STEP 5—SCBA DEPOSIT: If the apparatus is to be placed in a recovery drum, all pressurized air should be purged from the system. The recovery drums are not designed to withstand the air pressure of an SCBA should a leak develop. The top of the drum could blow’ off and severely injure personnel if the recovery drum were overpressurized.
STEP 6—INNER GLOVE DEPOSIT: After removing the inner glove, it’s probably best to place it in a plastic bag and add it to a recover} drum of material that’s ready for disposal.
PERSONAL DECON PROCEDURES
Personal decon sy stems vary from department to department. They may be housed in trailers, step vans, or tractor trailers driven to the scene or may be of the portable variety. Nevertheless, there are several stages in the personal decon process that should be addressed. Keep in mind that effective personal decon includes affording personnel as much privacy and comfort as possible. A well-heated environment on a cold day and comfortable water temperatures will go a long way in making sure that personnel take the time to receive adequate decontamination.
STEP 7—PERSONAL CLOTHING DEPOSIT: Once inner glove deposit has been made, the entry team member is ready to step into the cold zone and begin personal decontamination. Personal clothing deposit should be performed in an area that affords some privacy and protects personnel from the elements. The clothing is removed, bagged, and placed into a recovery drum. A decontamination property tag containing all pertinent information about the property should be included in the bag. A receipt section of the tag should be removed and given to the person whose property was confiscated.
STEP 8—DRY DECON AND VACUUM AREA: Any visible debris should be vacuumed from the body. All emergency medical service personnel should be protected by Level C clothing.
STEP 9-WET DECON AND SHOWER AREA: Here personnel wash and rinse thoroughly with soap and water. Water temperature should be comfortable. At this stage rashes, skin discoloration, and burning, stinging, or tingling may be noticed. Medical personnel should ascertain whether they are related to the incident. After the shower, personnel dry off here before proceeding to the redress area.


STEP 10 —REDRESS AREA: Personnel are given coveralls and slippers before proceeding to medical monitoring. Again, the personal decon system should have a means of climate control.
STEP 11—MEDICAL MONITORING: A thorough check by a physician is required. Medical information, including medical history and vital signs, is logged into a permanent record of exposures. Specific problems indicated by signs or symptoms are monitored and treated as necessary. Further treatment at a medical facility may be necessary.
Before concluding the operation, overpack all bagged articles in recovery drums. The runoff water from the field and personal decon showers should be filtered and analyzed before any disposal is even considered. Proper labeling of all overpack drums completes the operation.
Decontamination doesn’t have to be a complicated problem. We make it that way by not training our personnel properly, by trying to cut corners on costs, and by trying to save time. Doing it right the first time instills confidence in the personnel who are being treated and avoids the hassle of having to perform decon a second or third time. It also avoids possible civil as well as criminal prosecution for improper handling of the incident. Proper decontamination is not just the right thing to do — it’s the law!


