
By Phil Jose
When you choose to become a hands-on training instructor, you immediately step into the role of subject matter expert for the skills you are teaching. Firefighters are drawn to the field of hands-on instruction through a combination of a dedication to excellence in the craft of firefighting and to serve others. It takes effort and training to produce firefighters who are knowledgeable and innovative in performing these lifesaving tasks. Becoming an instructor increases your ability to serve your students and develop their skills. Better trained firefighters produce a more effective outcome for their communities. By assuming the role of hands-on instructor, you have become a mentor to other firefighters. To improve as an instructor, you must invest some time in learning the craft of teaching alongside the craft of firefighting.

(1) As the instructor, you are the subject matter expert. Learn the details with a thorough review of the source material cited in the lesson plan. (Photo courtesy of Fire Engineering Books and Videos.)
RELATED
Regional Multicompany Hands-On Training
The Troop Leade’s Checklist: Adapting Military Methods to Hands-on Training
Teaching demands that you take a professional approach to developing the skills needed to help students learn in the hands-on environment. To be an effective instructor, you will need to understand concepts such as the lesson plan, effective coaching, effective demonstration, organizing student practice, time management, positive feedback, and the logistical challenges of the training environment. Mastering the challenges inherent in the hands-on training environment is critical to your success as a fire service instructor. Your students are depending on you. Let’s examine some of the skills that will improve your ability as a hands-on instructor.
Lesson 1: Hands-on Lesson Plan
A necessary component for effective instruction in the hands-on environment is a good working knowledge of the lesson plan and any supportive material. Thoroughly read and review the lesson plan material. If there is a set of reference materials in the lesson plan, review the references. Read the articles. Watch the videos. Ensure that you have a thorough understanding of the lesson plan and the background information. Even if you have some experience teaching in the classroom environment, recognize that the hands-on environment requires a different skill set.
For example, the hands-on environment does not lend itself to the use of a projector or the multiple pages of a written lesson plan. Hands-on training generally involves a smaller group of students than classroom training.
A classroom instructor can easily consult the lesson plan while teaching. Classroom instructors also can use PowerPoint® slides to help spark their instructional memory. These tools are not readily available for hands-on instructors. It’s a given that you will need to study the lesson plan before your first day.
A great tool for hands-on instructors is to create a one-page outline of the hands-on training session using only major bullet points or reminders. Increase the font size of the outline to make it easily readable at a quick glance, print a copy, and laminate it for use in the field.
Figure 1 shows a laminated lesson plan that makes an easy quick reference for the instructor. It is from a hands-on air management training session during which the students enter a limited-visibility prop space. This five-minute briefing prior to the hands-on drill involves knowledge and skills. The knowledge component describes the scenario and the operational environment for the students. Three skills are outlined in the lesson plan: reading the pressure gauge, communicating air volume within the team, and deciding to turn around so they exit the hazard area before the low-air warning alarm activates.

The lesson plan provides the hands-on instructor the opportunity to demonstrate and have the students practice individual and team skills prior to entering the prop. Improving their performance in the hands-on prop improves skill acquisition. Learning is fun, and helping them learn quickly increases the the likelihood students will retain their skill after the class is over. Instructors also build credibility and trust with the students by demonstrating the ability to improve the students’ skillset and performance. Having a quick reference laminated version of the lesson plan allows the hands-on instructor to more effectively teach the skills outlined in the plan. This is especially true the first couple of times you are teaching new hands-on content. As you gain experience, you will rely on the notes less and less. For every class, review the content prior to the training day to ensure you do not drift in your delivery.
Lesson 2: Demonstrate One-Do One
Learning in the hands-on environment involves building skills sequentially until they are mastered enough to layer on the next skill. Individual skills build on each other to complete a single effective task on the fireground. The instructor understands that each skill is valuable and that learning the baseline skills will improve overall performance of the larger task. The instructor should demonstrate a single skill, have the students practice that skill, and then demonstrate the next skill. Build the individual skills into a pattern from beginning to end so that the entire task can be completed effectively.
In Figure 1, note the three distinct skills outlined in this hands-on lesson plan. The first skill is to access and read the pressure gauge. This skill may seem intrinsically easy since firefighters check their air gauge every day when checking their self-contained breathing apparatus (SCBA). Experience demonstrates that this skill requires practice before entering the prop. It would be a mistake to presume that the regular practice of checking the SCBA when it is on the apparatus is adequate to perform the same skill in a different environment. The firefighter as a student in the hands-on environment will be checking the gauge in the hands-on prop or “hazard area” while wearing the SCBA and operating in near-blackout conditions. This is significantly different from checking the SCBA on the well-lit apparatus floor.
The lesson plan describes the objective to “access and read the pressure gauge” followed by a step-by-step approach that includes a gloved hand, the backlight button for the gauge, and proscribing eight to 10 repetitions for each student. The entire process of describing and demonstrating this skill and then having the students practice takes 30 to 45 seconds. The students build the muscle memory to perform one skill efficiently before moving on. Teaching skills one at a time using a “demonstrate one-do one” approach is a useful practice for the hands-on instructor.
Lesson 3: Develop Your Demonstration
Demonstrating a skill so that others may learn is different from doing the same skill with the focus of completing it safely and effectively. Think through, and then practice, talking and demonstrating your way through the required skills. It is helpful if you have access to instructional videos or mentors who already teach the skill you are attempting to master. Taking and watching video of your demonstration is another great way to improve your delivery.
Consider the process of demonstrating the use of a halligan and flathead ax for forcible entry. Demonstrating will require talking students through the hand placement on the tools, tool positioning relative to the doorknob and deadbolt, the direction the hook should face and why, inward vs. outward opening doors, and more specifics. Where you point and what you say develop through the practice of talking and moving your way through a demonstration from start to finish.
Make sure the students can hear you. When speaking, project to the student farthest from you, and occasionally make eye contact with each student. When performing a demonstration in front of a forcible entry door, it’s predictable that you will need to turn your head away from your work so that your students can hear you talk. Failing to do so may result in some students not hearing your instructions. When you are working, don’t talk. When you are talking, don’t work. Explain what you are going to do, tell them where to look, and explain what they are watching for.
In our example, presume you are about to demonstrate using a baseball swing to drive the pick of the halligan into the doorjamb to lever the door open. You would describe your actions while looking toward the students and telling them what to watch. Then, you would direct your attention to the action of swinging the halligan. Once the halligan is buried into the doorjamb, you would return your attention to the students, explaining how to lever the tool to open the door. Repeat this pattern, step by step, throughout the demonstration.
Lesson 4: Sets and Reps
For the hands-on student, the most important part of the class is practicing the newly acquired skills. Control the allocated training time effectively to ensure that each student gets the maximum number of sets and reps possible. With each opportunity to practice, provide coaching to increase student performance. Some students will need only minimal coaching, whereas other groups will need significantly more. Learn the flow of practice time for each skill you are teaching and constantly assess methods to increase opportunities for student repetition and coaching.
For example, say you are teaching a group of five students how to properly deploy the final 100 feet of 1¾-inch hose to the front door of a house. You demonstrate how to put the hose on their shoulder, how to deploy the hose to the door, and how to reassemble the 100-foot section on the ground for another repetition. Once the demonstrations are over, the students will have 10 minutes to practice this skill. If it takes approximately 30 seconds to lay the hose to the door followed by picking up and reassembling the hose, which takes about 90 seconds for each student, the total time for a single repetition would be two minutes, giving enough time for each student to complete five repetitions.
Practice Sessions
Let’s consider two options for running the 10-minute practice session.
Method 1: The instructor has all of his five students stretch their hose at the same time and then pick up and reset. The instructor attempts to watch two students to provide each with some coaching or encouragement based on their performance. As the group resets, the instructor will have some time to coach two of the students, and each student will get five repetitions. The instructor, if watching and coaching two students for each repetition, will be able to directly watch and interact only twice with each student. This practice divides the instructor’s attention between two students deploying the hose simultaneously. Divided attention on the part of the instructor is likely to decrease the instructor’s ability to see details of performance and to decrease the effectiveness of coaching provided to the students.
Method 2: Using the same five-person group and the same practice session time, a better idea would be to have students individually deploy their hose in a sequential fashion. Student 1 would deploy with the instructor’s full attention—coaching as the student deploys and making a positive statement when he finishes, providing excellent one-on-one attention to Student 1 during the 30-second deployment effort.
As soon as Student 1 is done deploying the hose and begins to reset, the instructor signals Student 2 to begin. The instructor moves through the students sequentially, allowing Student 1 to be reset and be ready for another repetition when Student 5 completes the first. The instructor continues to move through the group, providing the same five repetitions for each student in the 10-minute practice session. This method provides a much better opportunity for each student to learn because of the individual nature of the instructor’s attention and coaching.
Lesson 5: Instructor Positioning
Once the demonstration is complete and the practice session starts, have a plan that includes where you will position yourself to see what the students are doing. Your positioning should enable you to watch the student work while focusing on the learning points outlined in the lesson plan. Also, be close enough to intervene—physically, say, by placing your hand on the student’s shoulder, or by voice so the student can hear you. For example, if you need to have a student stop for a safety reason, you want to be in a position where the student will be able to hear your voice when you say “stop.”
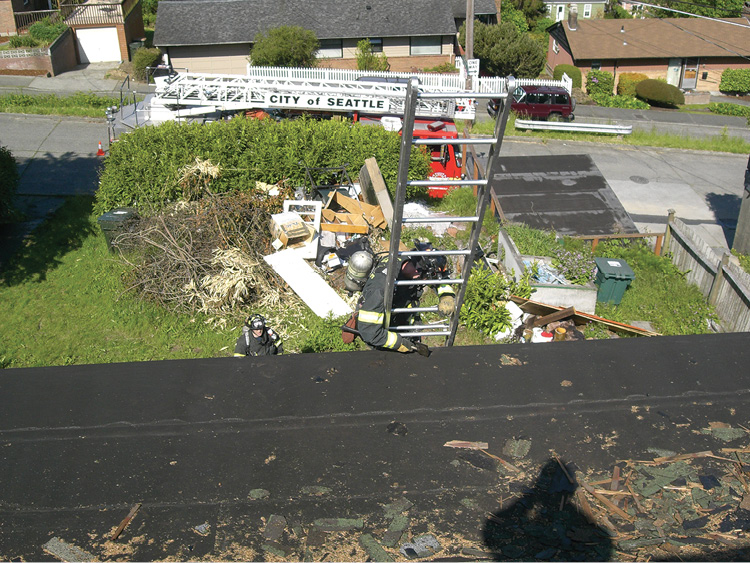
(2) The students are arriving at the transition from the ladder to the roof of an acquired structure training site. The instructor should be in position on the roof before the students arrive. (Photo courtesy of Seattle’s Bravest Charity.)
Consider the following examples.
For the above forcible entry training session: The instructor should be able to see the student’s hand placement on the tools and the tool placement on the door. Since this training will involve striking the halligan with the flathead ax, you wouldn’t want a student’s hand on the striking surface! Be close enough to tell the student to move his hand or for you to reach out, point to the tool at the right spot, and say, “Put your hand here.”
For the hose deployment session: You would likely walk alongside the student or have him walk toward you as you watch his hand placement on the hose and nozzle as he deploys the hose. Focus on the student’s adherence to the methods outlined in the lesson plan and your demonstration. Once the student is finished, you might take a knee next to him, make eye contact, and provide coaching and positive feedback.
For a vertical ventilation operation: Think about the positioning requirements of instructing a vertical ventilation operation on a pitched roof prop. Presume the students are completing the entire evolution from the placement of the ground ladders to cutting the hole in the roof. Your positioning should enable you to watch them during their ground operations and then while operating on the roof (photo 2). Your access to the roof might be to use the ladder the students place, or you could put a second ladder to the roof as part of your setup prior to the class. Your transition from the ground to the roof should put you in a position to watch the students as they approach the designated vertical ventilation cutting area.
Photo 2 is of vertical ventilation training at an acquired structure. Using it as an example, you can consider the following questions about the students: Do they transition off the ladder safely? Do they sound the roof as they move? Are the members of the team coordinating their movements effectively according to the lesson plan and demonstration? Your positioning needs to ensure that you can assess each of these learning objectives and provide coaching when appropriate. Plan in advance where you will be during each step of the process and how you will transition to ensure that you and the students are safe and successful.
These are only a few examples of the positioning considerations for a hands-on instructor. Make positioning part of your pretraining planning process. Think through your positioning during each skill; focus on being in the right place to see students perform the skills, to be able to speak effectively to the students to provide coaching, and to ensure that the entire process is consistent with the safety and learning criteria of the lesson plan. Be close enough for effective teaching yet out of the way for student learning.
Lesson 6: The Students’ Skills
For most hands-on training courses, there will be some prerequisite skills. These are skills that the students should, repeat SHOULD, bring with them when they attend your class. For a forcible entry class, using the halligan and flathead ax would likely be listed as a prerequisite skill as something like this: “The ability to swing a halligan and a flathead ax so that the target can be hit repeatedly.” Why is this important to an instructor of a hands-on class? You cannot presume that everyone arrives with the prerequisite skills.
When thinking about how your class will proceed, it’s a sound practice to allow time for an initial review of the prerequisite skills. Also, skills degrade over time when not exercised regularly. Have the students practice basic striking skills and watch closely for the safety points and personal protective equipment (PPE) required any time striking is underway.
There are several advantages to conducting a short prerequisite skill review to improve the class and the opportunity for your students to learn. The practice session helps set the tone relative to required PPE. You can evaluate the relative skills of your students. The students will have the opportunity to practice a skill that they may not have used in a while. They also have the chance to warm up physically and mentally to the learning challenges before them. By practicing the prerequisite skill, students can focus on building from the prerequisite skill into a learning and operating pattern that includes the new skills you are teaching. Building skills from what they know already also increases the “stickiness” of the new skills in their motor pattern.
Lesson 7: The Positive Approach
Since your goal is to teach others, it is imperative that you have a positive approach to learning and maintain that positive attitude across the training day. In your demonstrations and individual coaching, focus on the right way of doing the skills. Instructors sometimes fall into the trap of demonstrating how things should not be done. For the students, this type of demonstration can create confusion when they are trying to put the demonstrated skills into practice. Imagine you are a student who watches the instructor demonstrate one right way and three wrong ways to perform a skill. What would you remember, and what would you do? The instructor just created confusion where, likely, none existed before. As a hands-on instructor, focus on repetition of the right way to perform a skill. It is better to demonstrate the right way three times than to perform the skill once the right way and two times the wrong way. Do it right every time so the students can follow your example.
The positive approach extends to your coaching interaction with the students as well. Humans learn best in a positive and supportive environment. Your students will make mistakes. Your job is to correct those mistakes in a positive way to ensure they don’t make the same mistake twice. Keeping your language positive will help.
Picture yourself working alongside a student handling the halligan bar as part of a forcible entry team. When the student puts his hands in the wrong position on the tool, tell him, “Put your hands here,” as a positive statement while you point to the right spot for his hands. This is better than the negative, “Don’t put your hand here.” When the student moves his hands to the right spot, support him, saying something like, “Good job; that’s right where your hands go.” Maintaining a positive approach improves learning and makes the class more fun.
Lesson 8: Time Management
You must manage the clock. The clock moves quickly when you are teaching a hands-on class. Novice instructors often mismanage the clock relative to the lesson plan. Your demonstrations should take a known quantity of time. Each demonstrated skill should also have a defined amount of time for each student to practice.
For our forcible entry class, this means students working in pairs, switching places, and getting a few attempts in each position. Presume 10 students, working in five pairs, each with three skills to practice. Consider the impact of spending one extra minute on each of the three skill sessions. If each pair should have four minutes to practice each skill, the total practice time is 5 pairs of students × 3 skills × 4 minutes/pair = 60 minutes of training. If you allow each group one extra minute for each skill, that would be 5 pairs × 3 skills × 5 minutes = 75 minutes. You will be 15 minutes over or, if no extra time is available, some students will not get to practice some skills.
Approximate how much time each pair of students will have to practice the skills. You must develop the skill to manage the time, the students, and their practice for all the course objectives. Novice instructors will likely have to consult their watch to stay on time. As expertise develops, you will learn to manage the demonstrations, the time, and the students based on pace and flow. A sound practice is to move through all three skills a little ahead of schedule. If you get through the three skills with 10 minutes to spare, you can provide the students with additional sets and reps for skills they had difficulty mastering. Giving them extra practice and finishing on time are the win-win marks of a teacher pursuing craftsmanship.
Lesson 9: The Environment
The hands-on environment produces challenges you would unlikely experience teaching a classroom session. Apparatus moving in the vicinity, power tools, planes, trains, and automobiles are all distractions that may be present when teaching a hands-on class. When there is ambient noise, you have two basic options: wait or talk over the noise. The better option, when possible, is to wait for the noise to pass. An apparatus driving by or a plane overhead, for example, has a relatively short window of impact on your teaching. If the teaching site has a noise maker that is ongoing, like saws operating, you may need to talk over the noise throughout the day, which is not ideal. A sound practice is to spend a moment surveying the training ground and the training plan for other classes before the training day begins.
Lesson 10: Have Fun!
You have learned the lesson plan; have developed your demonstration; and know your positioning, timing, and flow. You are ready to bring a positive approach to teaching your first day. Your dedication to your craft and the opportunity to help others learn are appreciated. The last thing to remember is to have fun!
Teaching hands-on training is an educational and a rewarding experience. By dedicating yourself to learning the craft of teaching, reviewing your performance regularly, and making steady improvement, you will prove to yourself and others that you are an excellent instructor. Enjoy the journey; it’s worth the effort.
Phil Jose retired from the Seattle (WA) Fire Department as the deputy chief of training; previously, he was a shift commander. Jose is a 35-year fire service veteran. He is a co-author of Air Management for the Fire Service (Fire Engineering, 2008) and a recipient of the FDIC International Tom Brennan Training Achievement Award. He teaches nationally on the art of reading smoke, tactical decision making, air management, and instructor development.

