Scenario: It is the beginning of your day tour. You have assigned tools and riding positions. As you and your crew check the apparatus, dispatch comes over the station alert radio: “Ladder 1, respond to assist Medic 1 with a person down, possible forcible entry needed.” While en route, you confirm the tool assignments with your crew and discuss a variety of possible forcible entry concerns and solutions.
 |
| (1) A typical hinge installation for six screw hinges: 1⁄2-inch screws, three per leaf, secure the hinge to the door and the frame. Heavy exterior doors use three hinges with eight screws, four per leaf. (Photos by author.) |
You arrive on scene to a residential dwelling and notice that the front door is open. You enter the residence to find distraught family members in the living room and the emergency medical services (EMS) crew in the hallway pushing on the bathroom door, which they can only open about eight inches. The medic tells you that the patient is unconscious on the floor directly behind the door and states that they need to get to him quickly.
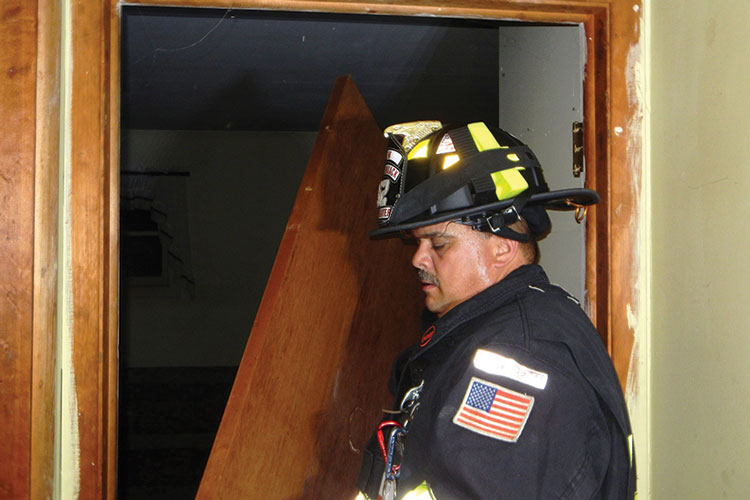
Sizing up the situation, you note that you have an inward-swinging wood door that is blocked from opening. It is not locked, but it will not swing open enough to allow entry. Even if you could push the door enough to allow access to the bathroom, patient care and removal will be difficult because of the path of the door opening into the room. The medic crew backs away from the door, giving you room to work.
Forcible Entry Training
In our initial training, we learn that forcible entry is the process of gaining entry through doors that are locked or blocked and through areas where openings are nonexistent. We learn the tools, techniques, and practices that are the foundation of fire service forcible entry.
 |
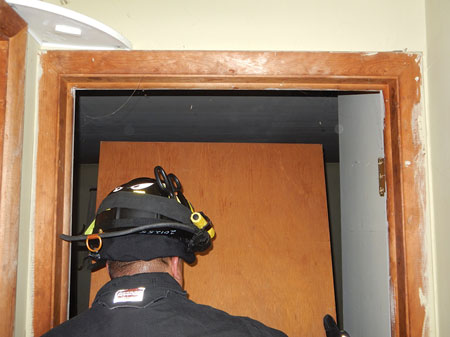
| (2) The door is not locked but hits an obstruction, not opening enough to allow personnel to enter the room. |
Continuing education takes us into the field, where we apply our knowledge and skills in real-world scenarios. The construction and security industries continually improve security devices to deliver a better product. The fire service industry responds with new tools, techniques, and practices. The prevalence of forcible entry training through written materials, online content, and live presenters helps the fire service to stay current.
Forcible Entry Experience
Most of our fireground experience in forcible entry takes place in residential occupancies and involves the use of the irons, which consists of a flathead ax or sledgehammer and a halligan tool. These tools allow us to gain access through locked entry doors from the exterior of one- and two-family dwellings and from the public hallway in multiple residential occupancies. Forcing locked doors is the most common application of our forcible entry skills and serves as the basis for our experiences. There are many opportunities to apply this skill in the field and that allow us to refine the necessary skills and build an experience base that will serve us well in future incidents.
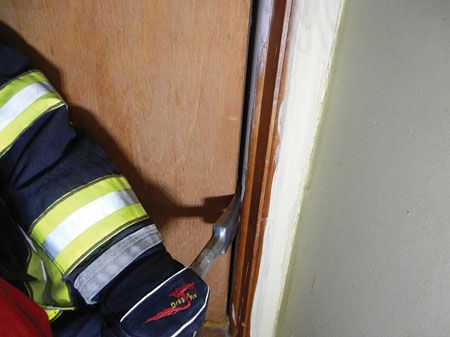 |
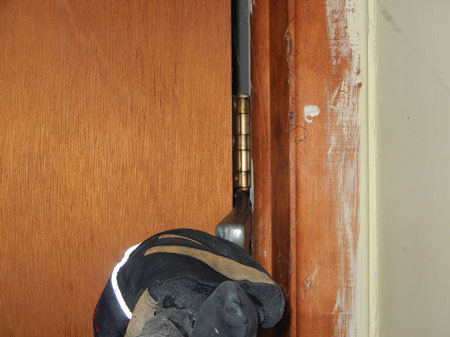
| (3) The halligan fork is inserted above the bottom hinge into the space created on the hinge side as far as the space allows. |
Typically, interior residential doors do not present the same challenges as exterior doors. Interior doors are intended to provide separation and privacy. Exterior doors are intended to secure the occupancy from unauthorized entry.
In the opening scenario, the company is faced with gaining entry through a door that is blocked. The door opens partially and then contacts an obstruction; more than likely, it is the patient contacting the door, prohibiting access. For many firefighters, this scenario may not be a common occurrence. So, rather than drawing on our recent fireground experiences, we may need to look back to our initial basic training.
Door Removal Technique
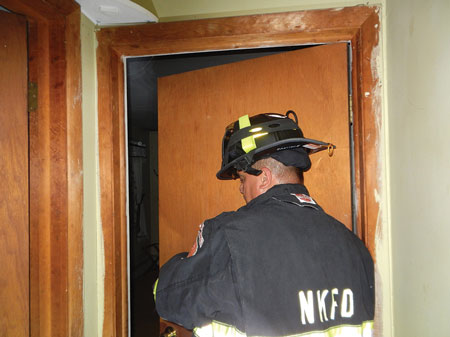
In the above scenario, one solution we can use is complete door removal. By removing the door, we provide the largest possible opening, facilitating access to and patient removal from the room. For door removal, we attack the hinge side of the door – the connection points of the door to the frame.
A typical hinge attachment consists of six ½-inch wood screws; three each through each hinge leaf into the door edge and into the frame (photo 1). Generally, there are two hinges totaling 12 screws fastening the door to the frame. As an assembly, the set of hinges securely connects the door to the frame, which enables the door to function as designed. Together, all of the screws provide adequate lateral resistance to support the weight of the door. The solution is to attack each hinge individually, applying force to pull, or strip the screws out of the door or the frame.
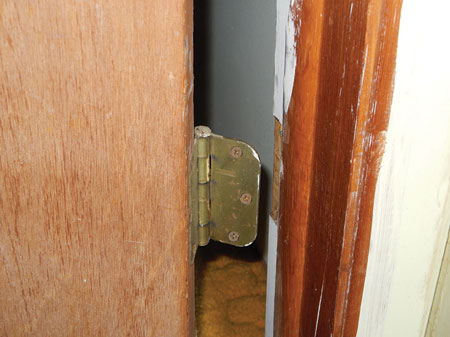 |
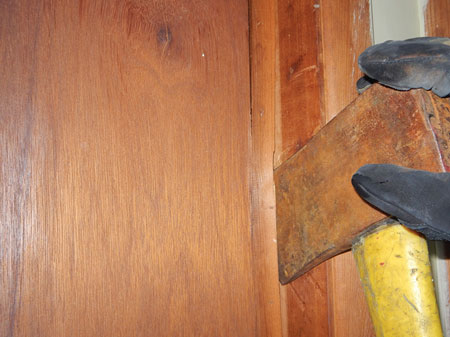
| (4) Screws stripped from the frame, freeing the door from the jamb. |
Pushing on the door creates a space between the frame and the hinge edge of the door, exposing the hinges (photo 2). Place the fork end of the halligan into the space just above the bottom hinge and pull the door toward you (photo 3). The fork prevents the hinge edge from returning to the normal closed position. The force applied through the door easily strips the screws from either the door or the frame (photo 4). If the hinge is not released, push the door open again and insert the fork farther into the opening and pry toward the door, moving it away from the jamb and into the room.
Repeat the process above, placing the fork below the top hinge (photo 5). Maintain the door in a perpendicular position so that the force is applied to effectively strip out the screws. Maintain stability of the door until it is totally separated from the frame. As the door is separated from the frame, push it in, tipping the top of the door into the room. Lower the hinge side toward the floor while pulling the bottom of the door outward (photo 6). Removing the door bottom first from the area (photo 7) allows access for the required work.
 |
| (5) The fork is inserted below the top hinge, and the door is again pulled toward the closed position, stripping the top hinge. The door is now free from the jamb. |
If the space needed to insert the fork of the halligan is insufficient, you have a few other options. Insert the adz of the halligan and pull down on the forked end to dislodge the screws, or insert a door chock into the space and close the door on it to remove the screws. Another option is to remove the doorstop from the frame’s jamb, which is fastened with finishing nails and is easy to remove.
Go back to your basic initial training; use a flathead ax or the halligan adz to remove the jamb. Keeping your tool edges sharp and clean from debris allows you to perform this technique more efficiently (photo 8). When you remove the doorstop, you can insert the fork. You can also perform the process using the ax blade in place of the halligan fork.
 |
| (6) The door is tipped in at its top, lowering the hinge side toward the floor. |
Another option is to place a hydraulic forcible entry tool between the door and the frame. Pump its handle slowly so the screws pull out of the door slowly. Operating the tool too quickly could result in the sudden failure of the connection, resulting in loss of door control. If you create enough space by pushing the door open, you can use a screwdriver or cordless drill to remove the screws, reducing damage to the door and frame.
This operation should include a size-up to determine the presence of other usable entry points. Have another member size up the exterior for a window; although bathroom windows are usually smaller than windows in other rooms, they offer another access point to the room. Check adjacent areas to determine if there are other doorways into the room. It may be possible to locate an alternative entry point that meets your needs.
Technique to Force a Blocked Door
- Open the door as far as it will move. Create sufficient space to insert a tool between the door and the jamb on the hinge side.
- Place the halligan fork into the space between the hinge edge of the door and the frame just above the bottom hinge.
- Pull the door closed. The door essentially acts as a lever with the fork acting as the fulcrum. Through the mechanical advantage of the lever, sufficient force is applied to the screws, easily stripping them from the wood frame.
- Repeat at the top hinge, placing the fork just below the hinge. Working from the bottom to the top supports the top of the door until the top hinge is forced.
- Tip the top of door into room, lift up on the hinge side, and carry the door in a vertical position into the living room.
This technique provides a rapid removal of the door, providing access to a working area in the room. Although the medical emergency scenario is something I have encountered several times in my career, I have also used it in fire situations, where removing the door from the frame improves the ability to maneuver into the fire occupancy or enables using the door for other functions such as placement over a burned-out hole through the floor.
Typical interior door installation uses two hinges for lightweight hollow core doors; heavier doors require three hinges. If there are three hinges, follow the same procedure, moving from bottom to top. This maintains door stability until you completely separate the door from the frame.
Response Scenario Continued
You direct your crew to remove the door from the frame by attacking the hinge side. One firefighter pushes the door until it meets the obstruction. A second firefighter inserts the halligan fork in the space created at the hinge side, placing it on top of the bottom hinge. As the door is pulled closed, the screws begin to strip out. The door is again pushed open. The tool is inserted farther; the door is pulled closed again and the screws strip completely, releasing the bottom hinge.
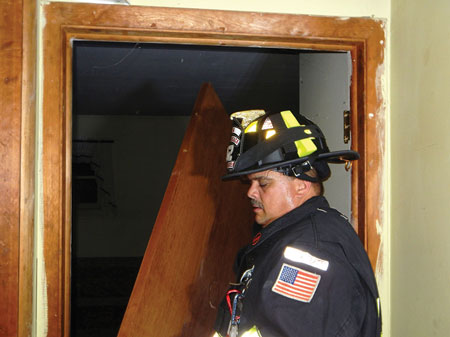 |
| (7) Grasping the door knob, carry the door from the area, allowing unobstructed entry into the room. |
The first firefighter supports the door and pushes it to the obstruction. The second firefighter places the fork under the top hinge. The door is pulled closed, and the screws strip partially, freeing the hinge. The halligan is pushed toward the door, completely freeing the hinge. The first firefighter tips the top of the door into the room, grasps the doorknob and lowers the hinge side to the floor, and carries the door into the living room.
EMS personnel can now enter the room to begin initial assessment and care. The patient is removed into the larger space of the living room, where the medics administer life-saving care.
 |
| (8) You can remove the stop strip to allow access into a space created from minimal opening of the door. |
Effective forcible entry is based on the training and experience of the forcible entry team in relation to the difficulty of entry. As firefighters gain more fireground experience, it becomes easier to determine not only the typical method for a particular scenario but also the variety of options that you can use to overcome difficulties you encounter.
Prior to performing forcible entry, evaluate your need to enter based on occupant and firefighter safety, the speed of entry required, and the acceptable level of damage. Then, consider the following three questions:
- Does this technique meet the needs of the situation to allow you to enter as needed?
- Is your operating position safe, and will it remain safe throughout the execution of the technique?
- How will complete door removal affect the safety of firefighters and occupants after the door has been removed and can no longer be closed?
In our recruit training, we learn forcible entry tools, techniques, and door construction. In our on-the-job training and continuing education, we learn to use a greater variety of techniques and tools in the situations we encounter in the field.
For every problem we encounter, there is a solution. The solution to the current problem may require us to look past the typical scenario of how we usually do it. We go back to our basic training and evaluate tools, techniques, and construction; draw on our experience; and, ultimately, come up with a solution.
RICHARD E. ANDERSEN is a 42-year fire service veteran who served as a captain/municipal training officer (ret.) for the Arlington Fire District in Poughkeepsie, New York, and chief of department for the New Hackensack Fire District in Wappingers Falls, New York. Andersen has a bachelor’s degree in fire service management from Empire State College and is a nationally certified fire service instructor II. He serves as a member of his community’s Firewise committee in Myrtle Beach, South Carolina.
Construction Concerns: Door Reinforcements
One Tough Door
FORCING DOORS
Fire Engineering Archives

