
By Samuel Hittle
Most of the forcible Entry applications we employ are centered on simple machine physics. Our comprehension of the concepts directly affects tactical outcomes. When used as levers or wedges, hand tools like the irons have zero force potential by themselves. Success is determined by the companies holding the tools. The more solid understanding of basic principles we have, the greater force we can apply in an appropriate manner. In contrast, when operating powered machines like the circular saw, its capabilities are already predetermined at the factory. Our knowledge cannot manipulate additional force from the tool. Only saw familiarity and functional discipline will allow us to realize its ideal performance potential or employ it in an ineffective manner.
The discussion that follows is intended to focus on forcible entry applications. It does not encompass all circular saw operations. The term “cutting” is used synonymously with what actually is occurring during saw operations, which is grinding to remove mass.
Buy the Saw You Need
Getting maximum potential from a circular saw starts with purchasing. Since not all saws and blades are created equal, you need to determine how the tool will be used. Even if it will be worked in multiple facets, as many are, it is still important to distinguish the primary function. Knowing the principal purpose will help you conclude which blade is ideal. Since saws and blades work in concert, the blade should influence your decision of which saw to purchase. Too often, departments purchase saws only to realize they poorly accommodate the aggressive blades their members like to use.
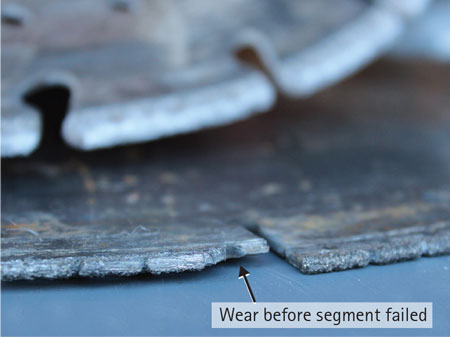 |
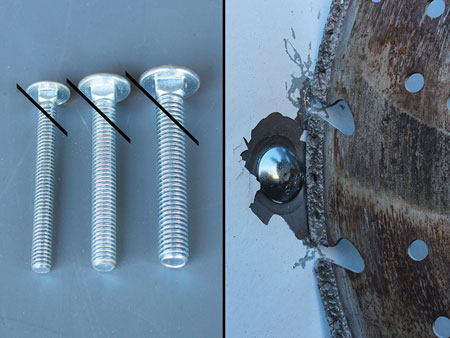
| (1) The appearance of smooth metal where diamonds should be suggests the blade has been subjected to heat or torqueing, signifying future failure of that segment. (Photos by Isaiah Hittle.) |
When buying a saw, consider price, weight, balance, guard design and mobility, handle configuration, depth capacity, cubic centimeters, and revolutions per minute (rpm). Blade considerations include style (i.e., abrasive, bullet, diamond, carbide tip), manufacturer’s recommended rpm, cost, thickness, kerf relief, whether the segments are manufactured as part of the core or welded on, and diamond characteristics (type, grit size, how they are bonded). The diamond’s grit size is important since this detail affects how the material will be scratched away. For the fire service, for forcible entry applications attacking metal, medium diamonds are typically best. If the diamonds are too fine, removal of the mass will be slow, especially when cutting hardened metals.
No pun intended, but this only scratches the surface regarding the multitude of details to consider. At the very least, bear in mind that cheap blades predictably produce cheap results, general-purpose blades are generally not extraordinary at anything, and the greatest blade without a saw to power it will underperform.
Break In the Saw Properly
Wichita (KS) Fire saw expert J.D. Heitmann recently developed a detailed document on how to properly break in our new saws. When done right, it takes about two hours. A proper “break in” falls under the adage: “Take time to make time.” Failure to invest time up front can cause engine damage, resulting in permanent reduced efficiency on the fireground later.
Morning Check Ensures Combat Readiness
One way to ensure we will get the most from our saws is to give them the attention they should receive in the morning. Since we are not constrained by time or operating under pressure, we can examine them in detail. Reflecting on the following will ensure your saws are in an optimal combat-ready condition, which will pay dividends if they are needed during the tour.
Is the gas old? This is often overlooked since fuel additives allow us to maintain a mixture for a prolonged time. Through morning checks, drilling, and fireground use, the tank on the saw becomes exhausted, while the mix is fresh. Our gas can, on the other hand, does not. Inadvertently, we end up pouring aged gas into our saw thinking it is fresh. Heitmann told me that bad gas is the number-one reason our saws are taken out of service. Some solutions to avoid this problem are the following: mix a gallon at a time, mark the gas can with the date the fuel is mixed, and change it every six weeks to ensure optimal performance. An alternative is to use premixed gas cans. This works well for smaller departments that don’t use their saws frequently to ensure fresh, properly mixed fuel when needed.
What is the condition of the blade? If using an aluminum oxide abrasive style blade, inspect the physical condition for fractures and fragments on the perimeter. Other considerations are whether the blade is rated for the saw’s rpm – that is, constructed for metal use – and if it has been stored in a remote compartment from the gas containers. Some of these things may seem trivial, but they have led to problems on the fireground. Fractures, fragments, and operating a blade with lower rpm than the saw’s output have caused catastrophic failures. When placed under a load, the blade will separate, turning shattered pieces into dangerous projectiles.
If stored in the same compartment with gas, the bonding component will suffer degradation. This increases the likelihood of separation and intensifies the rate at which the radius diminishes. Some will say this is an old ideology, but ask yourself this, “If you had a sticky substance on your driveway, would gas be beneficial in breaking down the substance for easier removal?” Now ask yourself, “What holds the particles of an abrasive blade together?”
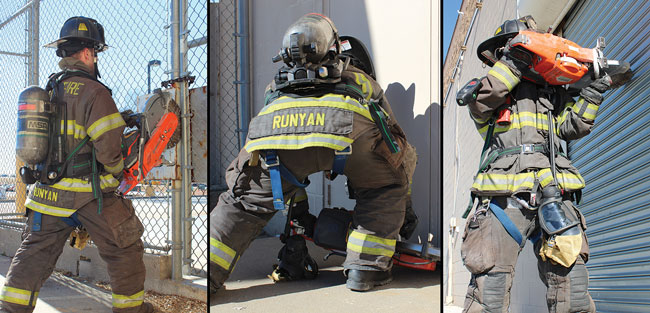 |
| (2) How you balance the saw’s weight on your body and position it in your hands affects the efficiency of your cuts. |
Because abrasive blades have a uniform appearance, it is not uncommon to inadvertently fix a masonry blade to the saw. This blade will significantly reduce efficiency. Because labels tend to detach over time, write with a paint pen the use for the blade near the edge to enable quick identification. It is also beneficial to signify that the blade is new. Consumed lettering indicates the blade has been used and should be removed from frontline use and be kept for training purposes only. Responding with a new blade on the saw helps to ensure that internal degradation and fracturing are not present; they can be difficult to see with the naked eye.
When inspecting a diamond blade, look for ductile fractures, warping, proper direction, missing diamonds, glazing, clean metal, and that the rpm rating matches the rpm of the saw. You can always operate a blade with a higher rpm than the saw, but not the other way round. If operating a saw with an outboard configuration, make sure the blade has been reoriented to reflect the change.
Ensure that all the diamonds are present, they are sharp, and the disc is clean. Worn diamond patterns are signs of potential failure (photo 1). According to Occupational Safety and Health Administration data, 40 percent of individuals who were struck by broken diamond segments were killed. The other 60 percent were injured seriously enough to require hospitalization. Glazing on the diamonds and buildup of debris on the disc will result in reduced efficiency. Glazing reduces the diamonds’ effectiveness to scratch at the material.
When conducting the morning inspection, run the blade over a paving stone or an asphalt chunk to clean the diamond heads. Granted, these blades are considered self-sharpening, but why not ensure they are in optimal condition from the start? Cleaning the disc surface will eliminate unnecessary friction that could potentially slow down operations. To inhibit the attraction of discarded materials during use, spray with high-heat nonstick cooking spray.
When the visual examination is complete, you are ready to run the saw. You can cause unintentional damage here. A proper startup consists of letting the saw idle for 30 to 60 seconds to warm up, slowly throttling it up for 15 to 30 seconds (most saws have a revolution limiter to protect them when running without a load), and then allowing it to idle down for another 30 to 60 seconds. Abruptly shutting it off without allowing it to idle will cause expansion issues and the unburned carbons to adhere to the engine’s combustion chamber. While the saw is at full rpm, listen for sputtering and observe the rotation of the blade. A mismatched or heat-damaged blade or one with an inappropriate arbor will result in wobbling to violent shaking.
During the cool-down stage, again listen to the motor. Does it have a nice hum, or is it struggling to maintain running? If the blade is turning on its own accord, the tension belt may need adjustment.
Holding Considerations
Having good body/saw mechanics translates into efficient and prolonged operations. Finding a comfortable manner to manage the saw reduces potential for torqueing and side friction, lessens fatigue, improves visibility, assists in applying pressure, and augments stability. The objective is to orient the saw in a way that uses the body to capture most of the weight. What this looks like varies among individual builds, skill sets, saw features, and the task.
Following are some considerations when developing your individual style.
Probably the most overlooked components in holding the saw in a comfortable position are manipulating the guard and hand placement. The guard is designed to move to facilitate operations. Take advantage of this: Instead of reconfiguring yourself to the way the saw was stored, you should arrange the saw to meet your needs. As far as hand placement is concerned, you can literally grasp the saw anywhere that is conducive to making the cut. You do not have to hold it by the handle.
When making high cuts, rest the saw body on your shoulders. To balance the front, many firefighters prefer to grab the cutting arm while posting their elbow into the body for strength. Adjusting the guard so you can push the saw instead of pulling it improves visibility of the cut and increases the potential for applied pressure.
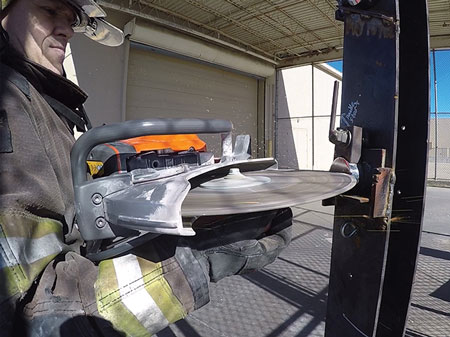 |
| (3) If the rpm are too high, the saw will move around before setting. This can be challenging when making an intricate cut. |
Holding the tool using arm strength inevitably will lead to subtle shifting as fatigue sets in, placing torque on the blade. The amplified friction from this torque forces the saw to work harder. If the engine cannot compensate, which is commonly the case, the cut is slowed or comes to a stop, trapping the saw in the material. With an abrasive, torque will likely contribute to the destruction and separation of the blade.
How to position for a midlevel cut will depend on the required angle. If making a vertical cut, try resting the handle in the hip flexor region while positioning the foot toward the cut area. For a horizontal cut, arrange the saw so both arms act as corbels posting into the body. This technique requires a variance in your standard grip on the handle. Instead of using your index finger to throttle, rely on the pinky. This is another example that shows there are no rules, only habits, regarding how to hold the saw.
When working a low cut, it is not uncommon to see individuals try to get low with the saw. This usually entails the firefighter’s cutting from both knees. Instead, consider a modified fighter stance: Rest the saw on the ground or foot while applying pressure with the lower leg. Operating in this position will expedite a retreat should a hostile fire event or collapse occur (photo 2).
An advanced hold is needed if the saw is used upside down to remove the potential of the cutting arm interfering with the blade depth. This technique requires training prior to the alarm to ensure it is done safely.
Getting a Bite
Depending on the circumstances, starting the cut can be problematic. The location of the cut, its size, the weight of the saw, blade type (diamonds tend to have a harder time initially), rotational inertia from the spinning blade, and the composition of the material being removed all contribute to the degree of difficulty. It is especially complicated to get a bite when you need to make an intricate cut on hardened metal.
As a rule of thumb, the shinier the metal, the harder the metal. The harder the metal, the more likely the saw is going to dance when it makes contact. If the blade is rotating too slowly, there is not enough force to grind. When moving too fast, it has trouble remaining stationary.
To combat this, we usually tend to fiddle with the throttle trying to find the right rpm. Instead of guessing, let the saw and the material dictate the ideal rpm. Rev the saw to full throttle, let off the trigger, and immediately place the blade on the desired area. If the rpm are too high, the material will naturally slow the blade to an acceptable rate at which it will start to seat itself. The moment you detect visual abrasion, get back on the throttle and open it up (photo 3).
Know Your Blade
As already mentioned, when using a circular saw, you are grinding material away. As when using sandpaper, effectiveness is proportional to pressure. The appropriate amount is contingent on the blade type. Too much pressure on an abrasive blade causes it to diminish in size more rapidly and increases potential for separation. A diamond blade, on the other hand, requires a more aggressive pressure to be productive.
 |
| (4) Applying tension and resting the guard on the material to be cut while cutting from the top will help stabilize the operation. |
How do you know if pressure is too much or too little? As in any other operation, you should be listening. If the motor starts to sound lethargic, you are pushing too hard. When this happens, maintain full throttle and back the saw out of the cut until it regains full momentum. Monitoring sparks is another method for determining if you are applying adequate pressure.
Reading Sparks
Reading sparks isn’t much different from reading smoke. You are looking at the particle size, volume, and color. Large sparks indicate large chipping is taking place. Volume signifies consistency in the depth of the scratches. Large sparks and volume indicate how the cut is progressing. If spark production is minimal, the sawyer needs to apply more pressure. Keep in mind that diamond blades inherently generate fewer sparks than abrasive blades.
Changes in spark illumination suggest that a transferring between varying metals is taking place. Granted, all sparks are bright, but shinier metals produce shinier sparks than dull metals.
Consider how this applies to the removal of carriage bolts. A door skin is typically constructed of a softer dull sheen metal, and the carriage bolts are a shiny stainless grade. As the blade transitions from the door skin into the carriage bolt, the sparks change subtly in color until the bolt is severed.
There will be another minor change in color as the saw passes through the bolt into the backside of the door. Observing these subtle changes in color along with the pitch of the saw will help augment judgment regarding depth and progress. This is especially useful during night operations.
Stabilize the Saw
The best way to stabilize the saw is to use solid holding techniques in conjunction with guard manipulation and burying of the blade. Failure to establish some form of contact between the saw body and the material being removed causes the blade to increase movement, riding up and down in the cut. This leads to firefighter fatigue from the struggle to maintain control of the saw and creates an unsafe condition that can lead to kickback, predisposing the blade to damage. This often results in failure to achieve maximum depth of the cut.
Adjusting the guard so it rests on the material being cut will eliminate a significant amount of the instability experienced with these saws. Try to have the bottom of the guard initiate contact. The motion of the blade will pull the saw into the cut and help to maintain control. When making extended cuts, augment stability by fully inserting the blade.
An additional advantage of acquiring full depth is that you can use the arbor as a guide to ensure that you have achieved adequate overlap in the cut sequence and have realized maximum cut depth. This is especially beneficial if running a 12-inch saw or turning abrasive blades that diminish during the operation. Operating in this manner will cause fragments to enter the shroud and increase debris buildup in the guard. For this reason, after a cut, point the saw downward to dump any residual material that may have entered. After the alarm, clean out the buildup of debris to ensure the saw will operate at optimal efficiency later.
Cut with Surface Area in Mind
When you increase the surface area on the radius of the blade, the saw’s power is distributed over a larger range, lessening the potential grinding force. The increased surface area on the blade also lends itself to heating. Over time, if there is not adequate cooling, the blades will suffer thermal degradation, triggering separation or warping. Warping leads to wobbling, which inhibits efficiency and increases fatigue in the firefighter attempting to control the saw.
 |
| (5) Regardless of the bolt size, cutting at a 45° angle will eliminate the square portion behind the head. |
Think of it like using a reciprocating saw: If given the choice between cutting the 3½-inch part or the 1½-inch portion of a 2 × 4, you would pick the smaller surface area because it makes for a quicker operation. This analogy also demonstrates the value of stabilizing a saw by positioning the guard against the item being separated. We are all familiar with the results if we don’t do this – a sloppy cut and a bent blade.
Padlock and Chain Considerations
You achieve efficiency in cutting padlocks and chains by attacking the weakest component and introducing tension. Although the lock presents itself as the primary barrier, it is really a single piece of a system. The objective is to eradicate the least substantial and softest element of that system. When you encounter a lock and chain, the objective typically is to defeat the chain unless it is made of high-strength alloy links like boron. (Note: Boron links usually have a gold-like finish, are stamped “boron,” and have a flat instead of round face feature.) In a hasp and lock system, the hasp is normally the quickest cut. It is stationary and rarely manufactured with the same hardened metal found on the shackle of a quality lock. This is especially true of the newer hockey puck locks and hasps.
In many cases, applying tension is essential to steady a lock or chain so that adequate pressure can be applied; otherwise, the material will be predisposed to move around, making it difficult and time consuming to make the cut. You can achieve the suitable tension in several ways, including using tethered locking pliers, a halligan, or a roof hook. Replacing the locking pliers’ screw with an eyebolt will enable you to attach a chain or rope and use it as a tether. A halligan or a roof hook is less reliable, but it can still be beneficial when the pike or head is placed in a link or lock shackle from below. If inserted from the top, it more likely will lose its grip.
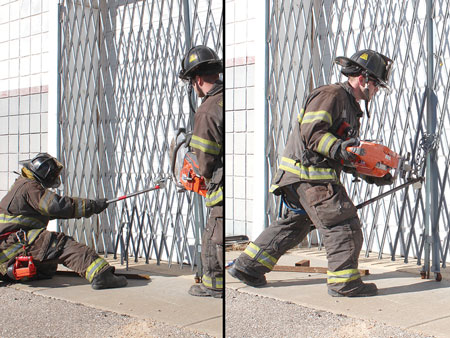
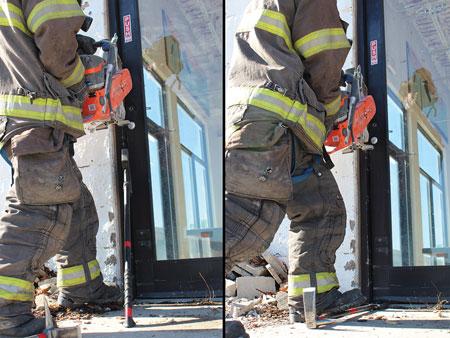
Regardless of which technique you use, have the individual providing the tension assume a turtled position to the left of the work area. This position protects from the rotational inertia or gyro effect, which naturally carries the saw to the right when it comes off the cut. When using a 16-inch saw or an outboard configuration, this effect is exacerbated (photo 4).
Working Off a Ladder
When working off a ladder, avoid frontal attacks. This approach turns into a battle for balance. You must counteract the same force used to administer pressure with the saw to avoid being pushed off the ladder. More often than not, the sawyer opts for less applied pressure, resulting in inefficient grinding. Instead, adjust the guard so an attack can be initiated from a position above or below. Working from above will incorporate the weight of the saw. This is ideal when using an aluminum oxide abrasive. When operating a diamond blade, it is advantageous to attack from below. Since diamonds require more pressure, a lower position allows you to use your legs while improving ladder balance through compression. Just make sure the ladder is secure. For additional stability, review Mike Ciampo’s modified leg locks (http://emberly.fireengineering.com/articles/2015/04/firefighter-training-videos-ladder.html).
Additional Considerations
Always wear eye protection when cutting; sparks and metal fragments have caused serious injuries to firefighters.
When connecting a sequence of cuts, make sure there is adequate overlap by advancing the arbor approximately one inch past the intersecting lines. This is the only guarantee that the maximum diameter of the blade has passed through the same point on the back side.
Saws don’t turn. If you are dissatisfied with the alignment of the cut, remove the saw while it is at full throttle and start over. Trying to correct the cut by turning the saw causes torque on the blade and makes the engine work harder. It also increases the potential for blade failure.
Look for leverage potential and connection points on high-density window and door coverings. Attacking the attachments to the building will usually involve fewer cuts. After detaching a side, you can use the assembly to leverage itself away from the opening. This approach will reduce effort and save time, especially when the cuts are difficult to make.
Cut window bars from the top down. This will take care of the most difficult cut first while reducing the potential for the blade to become caught in a compression force caused by the assembly sagging and pinching the blade.
Attack carriage bolts at a 45° angle. This is ideal to eliminate the bolt head and the square formation behind it, allowing the remaining part to pull through when the door is forced. This approach applies to all carriage bolts regardless of diameter size. Cutting at an angle less than 45° leaves the problem area (i.e., square portion) intact. Making a cut at an angle greater than 45° extends operational time, increases the sawyer’s fatigue, consumes additional gas, and diminishes the blade’s radius if turning a composite blade. Additionally, consider giving the carriage bolt a solid whack with a hand tool prior to starting the cut. This will create a depression that will help receive the contour of the blade and offer some daylight behind the bolt head for quicker operations (photo 5).
 |
| (6) Gapping the reveal when cutting storefront doors reduces surface tension on the disc, improving saw efficiency. |
Be mindful of angles. When facing thicker materials, a slight bevel toward the center of the material being extracted will enable the removal. If the bevel is cut toward the outside of the system, it will have the opposite effect.
Generate separation between the door slab and the jamb when cutting locks. This provides visibility for the sawyer and reduces friction on the disc surface area, maximizing saw performance. In a team of two, have one firefighter insert the adz in the middle of the door and jamb approximately two feet above the throw and pry down. The same outcome can be accomplished by a single firefighter’s driving an aluminum wedge or ax blade between the door and the jamb.
Another option is to place the halligan forks, bevel down, under the door on the latch side and step on them. This technique enlarges the reveal by recapturing sagging that occurs when hinges are worn out (photo 6).
If your apparatus has access to multiple saws, configure one to an outboard position. This arrangement is beneficial when you are confronted with floor bolts, vertical basement window bars built into the structure, and some hinge-removal applications; it eliminates constraints associated with the cutting arm or handle when attacking carriage bolts with a diminished blade. As mentioned earlier, when doing this, it is important that directional blades are remounted to turn in the appropriate direction.
Finally, know the boundaries of your saw’s fuel system. Take, for example, the saws we use in Wichita. When low on fuel, they will stall out during high cuts when the saw is resting on the shoulder because of how the fuel system extracts the gas from the tank. It’s not a big deal, but it is something we need to be aware of when determining our cut sequence.
The information and tactics presented here are only a fraction of those available. With new products and forcible entry challenges emerging daily, we must always remain students. Continually seek to improve this extraordinary profession, your company, and yourself.
SAMUEL HITTLE is a lieutenant with Wichita (KS) Fire. He has an associate degree in fire science. He is an FDIC and Traditions Training instructor; an FDIC lecturer; a contributing author to Fire Engineering, Urban Firefighter, and Fire Rescue; a member of the FDIC Executive Advisory Board; and a panel member on the Interior Attack Technical Panel for UL.
Samuel Hittle will present “Forcible Entry Wins Are in the Details” at FDIC International in Indianapolis on Thursday, April 27, 2017, 10:30 a.m.-12:15 p.m.
Rotary Saw vs. Chain Saw, Part 1
Rotary Saw vs. Chain Saw, Part 2
The 12 Saw Positions Drill
Fire Engineering Archives

